Any washing machine, regardless of brand, has a filter that protects the drain pump from foreign objects. During operation, it becomes clogged, which leads to poor water drainage. The problem is solved by removing debris from the filter element. You can do the work yourself, but to do this you need to know where it is and how to clean the filter in an automatic washing machine (WMA)?
How to detect the problem
Although regular cleaning should be done, many washing machine owners forget about it. In this situation, a blockage occurs that will prevent the machine from continuing to operate.
Modern washing machines, such as Indesit or Atlant, are equipped with a built-in diagnostic system that can determine the cause of the failure:
- If the pump is clogged, it may indicate that the problem is in the drain system. This problem is visually manifested in the fact that water stops flowing from the tank.
- It is possible that drainage occurs, but very slowly and unevenly. In this case, the water will not flow out completely. As a result, the diagnostic system stops the car. In this case, you can hear the noise that is made during operation. Sometimes knocking sounds are heard if foreign objects get there.
When the diagnostic system indicates improper operation of the drain system, the instructions indicate the need for cleaning. To do this, you need to disconnect it from the washing machine.
When the condition of the filters requires checking
Of course, it is best to make it a rule to open and check the condition of these parts once a quarter. And if you need to clean them, do not neglect the situation and do not cause the entire system to break down.
But if you do notice one of the situations described below, you need to remove and check the filter as soon as possible:
- a corresponding error appeared on the electronic display;
- The machine stopped washing;
- the equipment refuses to rinse the laundry;
- Spin does not start;
- The water drains more slowly than usual, or has stopped altogether.
If one of these situations occurs, wait until your washing machine completes the program and make sure that both filters are in satisfactory condition.
Possible problems
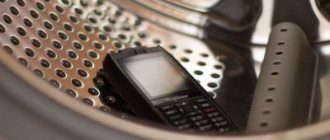
If there is a need to deal with the drain snail, you must first disconnect it. After the owner of the washing machine tries to do this, the following may happen:
- When you try to unscrew the drain filter, it remains completely motionless.
- It starts to spin, but after it has gone through a quarter of a turn, the rotation stops and it is impossible to move it any further.
- Sometimes it unscrews completely, but despite this it is impossible to pull it out.
The instructions do not provide instructions if one of the listed situations occurs.
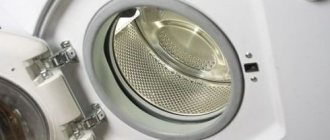
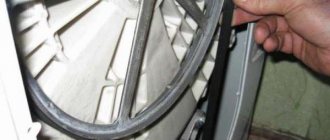
The filter is hidden by a narrow panel with snaps
If the filter is hidden by a decorative panel that is attached to the lower front part of the washing machine, then it must be removed. This panel can be attached in different ways:
- on locking hooks that need to be installed horizontally using a screwdriver (old Bosch);
- on latches, which are separated first at the top, then at the bottom, being careful not to damage them (Ariston, Indesit);
- on a screw and latches, the panel is removed by sliding it sideways (new Bosch).
Solution
If you have difficulty extracting it, there are methods that can help in this situation.
Using Tools
It is possible that if enough force is applied, the hole can be opened. For this purpose, you can, for example, use pliers.
Knock
There is a chance that debris that is clogged in this part may move and allow it to open. To do this, you need to unplug the machine and remove the water from it.
After this, you need to tilt the washer back 45 degrees. This must be done in such a way that the hole is located on the side that is on top. You need to tap it with your hand. In this situation, there is a chance that small objects will move down and no longer prevent the lid from opening.
Dismantling
In this case, you will have to first disconnect the drain pump to solve the problem. This option is much more complex than the others. However, it is also more effective. It makes sense to use this in situations where another method could not solve the problem.
It is recommended to resort to this method in cases where the owner of the washing machine knows what he is doing. If there are concerns that something will go wrong, then it is better to invite a specialist from the service to carry out repairs.
There are several ways to disconnect the pump. But first you need to gain access. For top-loading machines, this can be easily done by opening the left or right wall, depending on the brand of the washer.
If a horizontal bookmark is used, one of the following methods is used.
Access through the bottom
In some washing machine models, the bottom of the machine is not closed or can easily be opened. To work, you need to unplug the machine and drain the water from it. Then it is either laid on its side or positioned at an angle of 45 degrees. In the latter case, it is recommended to rest the device against a wall. The pump can be easily detected because it is connected to the drain.
In some brands, the bottom is open, but access to the part is blocked by a steel bar. This design, for example, is provided in Bosch brand washing machines.
If the Aquastop system is provided, which protects the device from leaks, then it will not be possible to gain access to the drain pump in this way. This is due to the fact that there is a system sensor at the bottom of the washer.
Through the back wall
The designs of some brands of washing machines provide for the location of the drain pump next to the rear wall. In this case, you can unscrew the 4 screws that support it and remove it.
Through the front wall
Sometimes it is not possible to use other methods. In this case, the problem can be solved by disconnecting the front wall.
In order to gain access, you must perform the following steps:
- The top panel needs to be removed.
- It may be necessary to remove the clamp used to secure the door.
- In some cases, it may be necessary to remove the bin that is intended for detergents.
- It is necessary to remove the control panel by unscrewing the screws that hold it in place.
- The fastening screws securing the hatch locking device are unscrewed.
After the above steps have been completed, it becomes possible to remove the front facade. It is usually secured with 3-4 screws. Two of them are usually located at the bottom. They can be covered with a lower panel-bar, which will first need to be removed. The remaining screws can be located in different ways depending on the brand of washing machine.
Once this is done, you can directly work on the drain pump.
Structure and purpose
After a certain period of operation, the cartridge in the filter must be replaced
When purchasing water purification filters, detailed instructions for use and design are included with the equipment. Do not neglect this data. Each cartridge has a certain service life, after which it stops performing its functions and pathogenic microflora actively develops in it.
If household members use large volumes of water, the filter should be replaced more often than prescribed. If the volumes are small, you can wait. You should also monitor the speed at which water passes through the filter element. If the fluid clears slowly, the filter is clogged and needs to be replaced.
Integrated water treatment scheme
To understand which way to unscrew the main water filter or how to remove the flask without a key, you need to familiarize yourself with the structure of the cartridges. There are several types of treatment systems that require replacement of components at the end of their service life:
Filter circuit for water purification
The cleaning system consists of the following parts:
The cartridge has a cylindrical shape and is made of polyethylene, cardboard, polypropylene and activated carbon. The main goal is the mechanical removal of contaminants, salts and metals, and solid third-party particles from tap water. The inner part is hollow, where the filtered liquid is concentrated. The upper and lower parts are equipped with rubberized rings.
When replacing a cartridge, technicians often encounter the fact that the water filter does not unscrew. During operation, the flask and lid stick to each other. In such situations, a special key solves the problem.
Cleaning
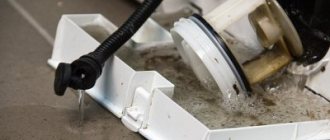
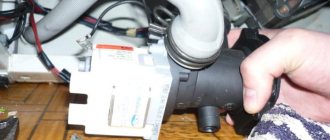
To unscrew and clean the pump, you must first gain access to it. This procedure can be applied to almost any brand of washing machine, for example, Kandy or Ariston. You will need to do the following:
- The power supply wires must be disconnected from the pump.
- You need to place a rag or bowl under the part. This is due to the fact that water may leak during disassembly.
- The pipe attached between the drain tank and the pump must be disconnected from the latter by removing the fastening clamp.
- At this stage of disassembly, you can try to clean the inside of the cochlea from foreign objects. There is a chance that in this way you can remove objects and debris that are blocking. If this can be done, then now it will be enough to unscrew it. If not, you need to continue disassembling the pump further.
- Now you need to remove the clamp that secures the connection of the drain hose to the pump. Now the latter needs to be removed from the snail.
- Now it is possible to disconnect the pump unit from the washing machine body. The mounting screws that need to be removed can be installed on the side wall next to the cover or on the bottom of the structure.
- After disconnecting the pump structure, it is necessary to disconnect the volute from the pump. Sometimes it is attached using a latch and other times it can be done using screws. In order to disconnect, you need to unscrew the screws or rotate the part so that the latch comes out of the grooves.
After disassembly, cleaning must be done. After this, you can easily unscrew its lid.
If it has been cleaned, you need to install it back. To do this, all of the above operations are performed in reverse order. After this, you will need to replace the wall of the machine or the bottom if they were disconnected.
Step-by-step instruction
Before removing the filter for cleaning, you need to prepare a container to drain the remaining water and a dry rag. It should be placed under the niche where the drainage unit is located so that water does not get under the unit.
To clean the washing machine filter, you must:
- dismantle the part;
- remove debris and dirt from the filter;
- clean the device shaft;
- rinse the filter element under running warm water and clean with a brush;
- check the condition of the sealing gasket and remove scale from the threaded connection of the removable part and the shaft.
Installing a filter for a washing machine is carried out in the reverse order. Cleaning the filler mesh is carried out when the time it takes to fill the tank increases. This can be determined by the pressure of water flowing into the detergent tray. The mesh is cleaned without dismantling using a toothbrush.
If the described methods do not help
The methods described here work in most cases. However, there are situations when nothing can be done. In this case, if it does not unscrew, you can try using several more methods:
- You can try to clean the glass and its threads from rust without removing this part. To do this, you need to fill the tank with water and dissolve one or two tablespoons of citric acid in it. Then you need to start a short washing cycle at a temperature of 40-60 degrees. As a result, a composition will pass through the filter, which will clean this part from rust.
- If the lid does not open due to lime deposits on the threads, then cleaning the filter will not help. In this case, the filter glass, which was previously disconnected, must be placed in a container with a solution of citric acid in water. This composition will dissolve the lime and make it possible to unscrew the lid.
- If all else fails, you can buy a similar lid and break the old one. It is made of plastic and can be easily broken off without damaging the filter cup. After this, you need to insert a new cover in its place. If the thread was damaged during this operation, then the part will leak after this. In this case, you will have to change the filter.
- If you don’t want to bother with breaking out the cover, you can buy a new filter and install it in place of the old unit.
General algorithm: which way to unscrew and how to put it back together
The first sign of a clogged filter is a decrease in pressure in the pipeline (water is drawn slowly, there is not enough pressure when the shower is turned on).
Let's consider the procedure to take if such a situation arises:
Mesh
To wash or replace the mesh, you need to unscrew the sealed plug in the form of a nut.
Let us consider in order the entire process for mesh systems:
Trunk
They acquired their name due to their location on main pipelines. The flasks into which the filter elements are inserted are made of plastic or stainless steel.
To get to the cartridge you need to:
Cartridge cleaning systems under the sink
In city apartments, owners often prefer to install a filtration system under the kitchen sink. This is convenient due to the saving of free space, as well as its close location to the purified water valve.
This system is usually equipped with several stages of purification, in some cases including reverse osmosis purification. It requires periodic replacement of cartridges according to the manufacturer's recommendations.
Let's look at the order of filter maintenance:
Signs of blockages
You can identify the presence of a blockage in the drain filter by the following signs:
- The machine does not turn on and gives an error. The error code can be anything, but it is important to make sure that the device is correctly connected to the water supply and electrical network, and that the drain hose is located at the correct angle;
- the time for draining water increases due to its prolonged removal from the drum or at the end of the cycle the laundry remains wet, and a small amount of liquid is present inside the tank;
- The “Spin” or “Rinse” functions do not work.
Seeing signs on your device?
Not really
What to do if the filter leaks after cleaning
After inserting the filter into place, you need to make sure that the drain system is working properly. To do this, start the rinse program and check the operation of the washing unit. Water should not spread on the floor. If a puddle appears, the rubber seal of the filter element may have been damaged during cleaning. Sometimes water does not start leaking immediately, but after 1-2 washes.
In some cases, the cause of the leak is the misalignment of the catcher. When installing, the filter must be positioned strictly perpendicularly. If the thread does not give in, it is better not to persist, the plastic breaks easily. You can try unscrewing the element again and tighten it again.
In a situation where the gasket is damaged, it must be replaced with a new one. If the problem is not solved, the problem is most likely due to damaged threads. In this situation, the filter element will need to be replaced (sometimes along with the snail). Those who could not find the part on sale can contact the service center.
Expert advice
To summarize, I would like to give expert recommendations:
- Take care of the quality of liquid in the house - this greatly affects all household appliances and plumbing fixtures.
- After washing soiled items or pillows with feathers, be sure to clean the trap.
- Instead of expensive products, you can use baking soda and vinegar with the same effectiveness.
We told you how to clean the inlet filter in a washing machine, and now we suggest watching a video on the topic:
Step-by-step actions of a do-it-yourself master
There are times when inspection is needed when the drum is stopped.
Remove the power plug from the indoor network. Close the water inlet valve to the machine.
Washing machines are often built into something in the kitchen or bathroom. Pull out the housing and use the passport to determine where the protective panel of both purifiers is located.
Use a sharp tool to pry up the cover or panel; they are removed or moved, revealing an overview of both filters;
Place a small flat container for residual moisture or a rag under the place where you unscrew the valve. Drained from the drum, it is found in some quantity in the pipe system.
Remove the filters one by one. At the inlet, simply unscrew the hose, having previously shut off the water supply to it.
Remove the filter and clean it. There is always a plug on the drain. Twist it to the left. Pull out the housing.
Clean the filter element by hand, and rinse its body from rust with a large stream of water in the sink of a bathroom or kitchen sink.
Pay attention to the external condition of the water pump, clean it of rust, and its blades of any deposits. It is possible that dense threads are wound onto the impeller during washing; over time, they will slow down the rotation, causing the pump to malfunction.
Return all products to their original places. Screw it carefully clockwise, feeling the correct thread under your fingers.
But don’t squeeze it, don’t create a distortion, otherwise your prevention will not be beneficial. Check the quality of work by running the unit in rinsing mode. Make sure there is no moisture leakage.