Share on social media networks:
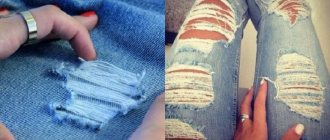
All women repeatedly face such a problem as arrows and holes in nylon tights. This unpleasant moment happens so often that sometimes you just don’t know how to deal with it. Moreover, this simply necessary wardrobe item forces us more and more often to buy a new, better product, and this is good for our pockets. This is probably why many fashionistas find it quite difficult to say goodbye to another pair of once-loved, accidentally torn tights. Is it possible to extend their life by transforming them into a new creation? Of course! These tights can make original and chic DIY stockings, leggings, knee socks, gloves, a gag and many other interesting little things. Now we will tell you, you don’t know how to make stockings from tights with your own hands.
Do-it-yourself nylon dolls - instructions for beginners, photo ideas
Craftswomen have found excellent uses for nylon tights. They make cute toys. Nylon dolls have become very popular these days. Since the material is affordable, and the flesh color is perfect for the base of the toy.
It is easier to give a baby doll made from such fabric the shape of a head and make facial expressions. This is how you get funny dolls that will delight any child.
Recommendations and advice from experts
You need to know some tricks on how to sew tights for a doll so that the product turns out beautiful and comfortable. Here are some of them:
- If the fabric does not stretch well, you need to leave allowances of 0.5 cm. Otherwise, the tights will be too tight.
- The bottom of the tights should be sewn diagonally to avoid wrinkles.
- Dressy tights can be sewn from mesh or tulle.
- It is better to sew fishnet tights at the back. The result is an even seam that only decorates the product.
- The elastic should not be too tight. Barbie has fairly wide hips; it will be difficult for a child to dress the doll.
- If the fabric stretches well, then you don’t need to insert an elastic band. The tights will hold up well.
How to make knee socks from nylon tights?
Nowadays, many fashionistas prefer golf socks. They not only look beautiful with a skirt or dress, but also visually lengthen your legs.
You can buy them at any store. But you wanted to have them right now, but there is no opportunity. In this case, they can be made from old nylon tights.
For future golfers, it is better to take thick and black tights. They can be worn over dark tights, and they will not differ in shade. Plus, they will also keep you warm in winter.
To make knee socks from tights:
- Trim the bottom of the tights. Just cut above the knees. Otherwise, they will not reach the right place.
- Next, fold the edge of the product and sew. Just make the stitches even and invisible from the outside. To solve the problem of golf falling off, sew elastic bands on the inside.
Knee socks made from nylon stockings
Preparation
To sew nylon tights for a doll, the material must first be prepared. There are 3 methods, they differ in time and final result:
- Freezing. The wet material is placed in a plastic bag, tightly closed and left in the freezer for 12-24 hours. Then defrost at room temperature and dry.
- Cook in bleach. For 0.5 water you will need 100 ml. whiteness. Cook for up to 15 minutes, then immerse in water with conditioner for 10 minutes, then wring out with a towel and dry. In this case, the tights will lighten significantly, acquire a yellowish tint, but at the same time they can easily be painted in the desired color.
- Cooking in activated carbon. For 0.5 water - 20 tablets. Cook for 10 minutes, then rinse off the coal and soak in water with conditioner to restore elasticity. Dry.
After this treatment, the material will become denser and more comfortable to work with, and fewer streaks and puffs will appear. This is especially true for dolls like Barbie. It is simply impossible to sew nylon tights for them without first preparing the material.
How to make basic elements
Nylon flowers for beginners - a tutorial on how to make basic elements with your own hands:
Petals
To make flower petals, you need to wrap a thin wire around a template of the appropriate size. Connect the wire tendrils and screw them together using pliers. Then remove the resulting “ring” from the base and bite off the excess part of the wire with wire cutters. To give the desired shape to the petal, pull out the resulting frame with your hands. Proceed in the same way with the remaining petals. The next stage is tensioning the nylon frames on the resulting frames. “Insert” the petals into the canvas, stretching it. Twist slightly at the base and wrap with nylon thread. Trim off excess fabric and wire.
Stems
Wrap the stems made of thick and rigid wire with green tape. When winding, you need to step back a little from the flower and start wrapping the stem from bottom to top in several layers, and then wind the tape in one layer down to the very end of the wire.
Manufacturing of basic elements
Centers, pistils, stamens and sepals
They are made in different ways depending on the flower, since they are all different from each other. A simple solution is to purchase ready-made parts. Independent production of miniature elements is a long, labor-intensive and painstaking process, and the resulting result will not always be natural and flawless.
Finished parts for flower centers
How to take measurements from a doll
Each doll has its own shape and size. In order for clothes to fit well and be worn for a long time, you need to make individual patterns for each doll. To do this, you need to take measurements.
If the doll is small or very slender, measurements should be taken with regular thread. The measured length of the thread is determined accurately with a ruler. A larger doll or baby doll can be measured with a measuring tape.
Having measured the dolls once, you can create a special table and use it every time when making doll things.
To create a pattern, the following data is entered into the table:
- Height is measured from the feet to the top of the head. If the doll stands on its toes, height should be measured from the toes.
- Length from feet to base of neck.
- Length from waist to feet vertically.
- The inseam length is measured from the foot to the base of the leg.
- Sleeve length is measured from the wrist to the shoulder through the elbow.
- Chest width is the distance between your arms in front.
- Back width is the distance between your arms on your back.
- The chest circumference is measured around the torso with the arms raised up.
- Waist circumference is measured at the narrowest part of the waist. For large dolls, the waist circumference often coincides with the chest circumference. For Barbie, these data will be different.
- Hip circumference is measured at the widest part of the torso.
- Head circumference is measured at the widest part.
- Leg circumference is measured at the widest part of the leg.
- Shoulder circumference around the doll's arm in the shoulder area.
- The girth of the hand is measured at its widest point. This data is important to take into account, since dolls sometimes have splayed fingers, which complicates the dressing process.
- The length of the elephant is the distance from the front waistline to the back waistline through the groin.
Not all of this information is needed for sewing tights, but other items of clothing can be made from leftover fabric. To help you figure out what can come out of the scraps, a complete table with measurements will help.
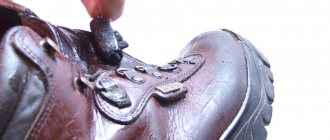
How to sew up tights unnoticed: crease, hole?
To sew up a crease or hole in tights without being noticed, you will need:
- Threads matching the color of the tights
- Needle
- Magnifying glass
The steps are as follows:
- Prepare a needle and thread.
- Pull the edges of the bottom end of the hole or arrow.
- Pull the thread through all the loops so that the arrow does not go in the other direction. For this purpose you will need glass.
- Treat the seam with clear varnish.
Even the neatest seam will be visible. Therefore, if a hole or arrow is in a visible place, then it is better to immediately throw away such tights or leave them for household needs.
Women's sexy stockings and tights
Our online store offers a large assortment of women's tights and stockings of different sizes, density, design and at an affordable price. High-quality, neatly fitting products from an Italian manufacturer will highlight the beauty of women's legs!
Assortment of stockings and tights INCANTO
The catalog presents classic models of tights and stockings in basic colors: black and nude. If you want to buy stockings, make sure that the size suits you, which can be checked in the size chart on the website. The elastic band should ideally match the volume of the hip.
In addition to the classics, we offer inexpensive fantasy products with patterns or made from erotic openwork material. Large and complex patterns are suitable for slender legs, on which they will not be deformed. For wide hips and calves, we recommend choosing a small, simple pattern that will retain its outline when the fabric is stretched.
How to choose a belt
First, decide what material you would choose your belt from: lace or satin.
Then find your size: the belt should sit firmly on your waist and not slide down your hips. Lingerie, like clothes, is sewn according to standard patterns for ideal figures, which are rarely found in life.
You need to select a belt with stockings only according to your size and do not wear them under tight clothes; also make sure that the edge of the stockings does not peek out from under your dress or skirt.
Stockings should also be your size and height - they should not hang or wrinkle. Before buying, look at how long the stockings are - on the packaging it is marked with the letters S, M, L. Do not confuse it with the size, it is indicated by the numbers 1-2, 3-4. Even a small 1-2 will turn out to be length L.
Let's get started
Now we will learn how to sew stockings from tights, and we will begin the process of alteration itself. It consists of several important steps:
- First, we need to turn the tights inside out. This will give the finished product a neat finish.
- Now we need to make a mark on the top of the tights that you chose yourself. We recommend cutting the tights at the very top, at the crotch level. So the stockings will definitely not be short.
- Next, we cut off the top of the tights so that we end up with two identical stockings. For this we need sharp scissors. We do the same manipulation with the second part of the tights.
How to use children's tights?
In winter, when the weather does not allow long walks, it’s time to make something with your own hands with your child. For example, you can make theater dolls, funny toys, and florists out of old children’s tights. Some needlewomen even weave multi-colored rugs. You can also cut rags from unnecessary children’s tights for wiping off dust.
MASTER CLASS ON MAKING FLORICA
Florik is a funny evergreen toy. It fits perfectly into the interior of a children's room. It is very easy to make, for this we will need:
- Children tights;
- scissors;
- threads with a needle;
- beads;
- sawdust;
- soil for indoor plants;
- lawn grass seeds;
- stand or plate.
Cut the stocking 20-25 cm long, fill 1/3 with sawdust. Mix the soil with the seeds and fill the remaining 2/3, sew up. Give the toy the shape of a hedgehog, sew beads for eyes and a nose on the toe part, and water thoroughly. After some time, the seeds will germinate and a green coat will appear on the florist.
MASTER CLASS ON MAKING A VERY LONG DAX
Long, like a sausage, cheerful and funny, children really like this dog. The more colorful tights you can find, the better.
So, in order to make a toy with your own hands, we will need:
- several old children's tights;
- threads with a needle;
- scissors;
- multi-colored rags, beads, buttons;
- padding polyester or nylon tights.
First, cut off the “legs” of the tights (“the feet” must also be separated). Turn the pieces inside out and then carefully sew them together. Sew up one end, stuff the whole body with old nylon tights or padding polyester. Sew up the other end, attach bead eyes and nose. Take 2 “feet” from the tights and sew them in place of the ears. From bright scraps, cut out a collar, four paws, a tail and glue (or sew) them to the “body”.
Sewing
First you need to sew the upper part - the waistband area. Then you can mark the seam by placing the doll on top of the workpiece, trace the outline of the leg and sew along the resulting line. However, this method is suitable for sewing “tenth” tights; the first time it is better to put the blank on the toy and already baste the seams on it, taking into account the anatomical features of the doll.
If the doll is Barbie, then the legs will be in the form of a cone, but if the toy has a pronounced foot, then additional seams may be needed. This is especially true for fairly dense materials. In this case, you need to sew tights to the ankle, then try them on again. Then there are 2 options:
- The first is a vertical seam to the floor, then a semicircular one, following the contour of the foot (from the little toe through the inside of the foot and to the outer edge of the heel).
In this case, there will be no seam on the foot, the toy will be more stable, and there will be no unnecessary folds on the instep of the foot. However, this method will not work if the shoes have only a small margin in width and length.
- The second way is to sew the side seam to the center of the foot, then sew the pant legs perpendicular to the side seam.
Since it is impossible to sew tights for a “big legged” doll without additional seams, the second method is ideal for them.
After all the seams have been made, you need to try them on without turning them inside out, if necessary, adjust them, then trim off the excess material and turn them inside out.
Doll made of nylon and plastic bottle
A plastic bottle is the basis for the doll, ensuring its stability.
- Nylon tights or flesh-colored stockings;
- flesh-colored or white threads;
- syndepon white; - sewing needle;
- plastic bottle;
- metal wire; - scissors, stationery knife;
- thick hair threads. Eyes. Fabric and decor for clothing.
- Cut off the bottom of the bottle using a utility knife. We wrap it with a layer of syndepon. Secure with tape or sew the edges. We put a stocking on the bottle so that the sock is on top.
- We form the front parts of the head, gradually adding the required amount of syndepon. A detailed description is in the section How to sew a head for a doll from nylon.
- When the base for the body and the head are ready, attach the eyes and sew on the hair.
- Let's make hands. We cut 12 pieces of wire 10 cm long. Take one piece and bend its edge into a ring. This will be a hand, and the ring is a kind of palm. Take five pieces of wire and fold them in half. These will be your fingers. We attach them to the ring, determining the height of the fingers so that it looks like a real hand.
- Wrap your hand and fingers with padding polyester. We form the thickness of the arm.
- We cover it with stocking fabric. We pull it between our fingers, stitching it with threads. The hand is ready. We do the second one in the same way. We sew the arms to the body. Thanks to the frame base, they can be bent.
- For a bottle doll, we sew a voluminous colorful skirt and a white folk-style shirt. If desired, the product can be decorated with decorative beads and rhinestones.
Tights to help the gardener
Cut nylon ropes are very durable and are often used by summer residents. They wrap young trees with this material to protect them from rodents, tie up tomatoes and cucumbers, and sew a “pipeline” to make picking apples easier. The stocking helps when harvesting potatoes: if you wrap the root crop when planting, during harvesting it will be enough to pull its edge out of the ground. A stocking is put on buckets with collected vegetables and fruits so that nothing spills during transportation. Next to the washbasin you can hang soap in a piece of nylon, then it will definitely not fall to the ground. Stockings are also used to decorate the garden, creating unusual flower arrangements from them: they are stretched over a frame and painted with acrylic in different tones.
Useful tips
- Start collecting tights early.
- If you have some free time, immediately make threads and wind them into balls. This way you will have enough material to work with. There will also be an opportunity for color experiments.
- You can diversify the color scheme if you first dye your nude tights with fabric dyes.
- Try not to tighten the fabric, this way you will maintain the lightness and airiness of the nylon in the product.
All of the above methods are perfect for fabric ribbons made from old socks, knitted T-shirts or T-shirts.
And if you alternate not only colors, but also different textures of ribbons prepared in advance, your rug can become a work of art in the hand-made style.
Creating a doll
We fill the nylon golf course with filler (sintepon). We tie the bottom and secure it. We tie the workpiece in the middle with a cord or thread and cut off the ends. We select the legs by sewing them in a circle and selecting them, pulling them together. We also tighten the nose in the front part of the doll.
We make the navel like this: we stretch a thread with a knot from the front part of the torso and secure it with a small seam and a knot on the doll’s back. In the same way we do the buttocks and ears. We embroider eyebrows, eyelashes, and a mouth (from red thread). We make stitches at the corners of the mouth, and sew beads for the eyes.
Knitting threads are needed to create hair. They are used to braid hair, decorate it with bows, put on a hat, or simply let down improvised hair. The doll is ready!
Making stockings from tights step by step
When all materials and tools have been collected, you can begin to work. Just a few steps and the stockings will be ready:
- Trim the bottom of the tights. If the stockings are planned to be long, then only the panty panties themselves are cut off. If the product is just above the knee, then the length is measured and two identical stockings are cut to the width of the elastic above the mark. To measure the length correctly, you should wear tights. However, you cannot cut yourself off.
- Scorch the edge. To prevent the nylon from releasing arrows, you need to burn it with fire. To do this, it is convenient to use a candle on a stand. You need to slightly stretch the cut edge with both hands and quickly move it to the side of the fire. The movement should be smooth, without jumps. Otherwise the line will turn out uneven. Do not bring the fabric too close to the fire, it may catch fire.
IMPORTANT! It is impossible to burn two edges at once, otherwise they will stick together.
In addition to open fire, you can use a hot cut. The essence of the method is that the nylon is cut with hot scissors. A hot blade will melt the fabric when cut and immediately bake it. In this case, the scissors must have plastic or rubber handles. Holding the handles, you need to heat the blades over the fire. Cut the nylon into only one layer. This means that you cannot cut tights by folding them in half. Just cut off each stocking in a circle.
- Sew on an elastic band. It will be most convenient to make a fold for the elastic and then insert it there. To do this, you need to bend the end to the width of the elastic and sew it up, bending the burnt edge inward. The seams must be done very carefully so as not to tear the nylon. They should not be very large, otherwise the stocking will bulge. When sewing with non-elastic threads, the product must be stretched so that the seam stretches along with the elastic. Then insert it and secure it.
Tools and materials
This alteration is feasible even for novice needlewomen. For it you will need a simple set of materials and tools:
- tights;
- thread and needle;
- rubber;
- scissors;
- lace, decorative ribbon and other decorations.
Fishnet tights are best . They are easy to trim and there will be no arrows.
Ordinary nylon stockings will also make stockings, but you will have to put in more effort. You can also remake warm knitted tights.
IMPORTANT! The needle for work must be thin. After all, nylon is a very delicate material. A break in one fiber will result in an arrow.
The thread is taken to match the color of the nylon or the color of the decor that will be used. It should be smooth, without knots, and strong enough. It will be even better if you take an elastic thread.
For the alteration, a wide elastic band is used so that it stays well on the leg and does not squeeze it. You can take an elastic band from the same tights, dividing it into two parts.
ATTENTION: The scissors must be sharp so that they can cut the nylon well, without chewing it or tearing it.
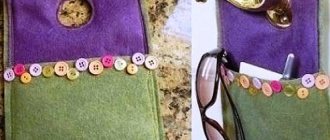
You can take a variety of decorations: lace to match the nylon or contrasting, wide satin ribbon or small bows from ribbons, rhinestones or multi-colored sequins, appliqués or strips of fur.
Do it yourself
The easiest way to become the owner of a classic “linen” accessory is, of course, to buy it. The cost of belts varies widely and, according to most women, is overpriced for such a small product.
When purchasing a belt, you need to pay attention to some nuances:
- - the material from which it is made - it is desirable that it be elastic and pleasant to the body. The most common ones are satin, lace, mesh and leather.
- - the number of garters - is selected based on the intended functions of use (in most cases, their number ranges from four to twelve) - the greater the number of garters, the more comfortable the belt will feel on the body when worn, but it will take more time to remove it;
- - width of the belt - the thinner the belt, the more discomfort it will cause a woman when wearing;
- — fittings material — metal and plastic clips are common, the difference between which lies in their reliability and durability.
There are no specific rules for wearing stockings. It can be worn both at the waist and on the hips, the main thing is that it fits tightly enough and follows the curves of the female body. In order for the belt to fit tightly to the body and not slip, you need to use elastic bands or rubber fabric along with the main fabric.
Important! To attach to the belt, you need special stockings (without silicone lines).
How to fasten a belt to stockings? It is necessary to place the round part of the garter clip under the inside of the stocking (2-3 cm from its edge), and put a rubber fastener on top of the stocking, forming a lock. Now you need to adjust the length of the garters - they should not be too tight (because a sudden movement can tear the stocking), but they should not hang either (the aesthetics and sexuality of the image are lost).
An alternative purchase option would be to make the belt yourself.
We’ll talk further about how to sew a garter belt:
- First you need to decide what material the accessory will be made from. This is important, since the fabric should not cause discomfort and cause unpleasant sensations on the body. For everyday wear, stockings made from stretch fabrics are preferred, for sensual special occasions - silk and lace. It is important that a large amount of fabric for sewing a belt is not required (approximately 30-40 cm of the standard width of a fabric roll).
- It is necessary to make a pattern for the future product. To speed up the process, the pattern can be found on the Internet. We must remember that the pattern is made strictly according to specific measurements (waist and hip circumference), therefore, when using a ready-made version of the pattern, do not forget to adjust it to your size!
- Cut the fabric based on the existing pattern, be sure to leave a few centimeters for allowances.
- Then the sewing begins. There are many master classes on this topic on the Internet; there are also detailed descriptions of the process with attached photos and video materials.
In this article we consider only the main points that are worth paying attention to:
- — for a more comfortable feeling, it is recommended to add a lining to the belt (it is made using the same patterns as the main product);
- — in order for the belt to fit more tightly to the body, it is advisable to sew an elastic band on the back side; this will add not only functionality to the product, but also a piquancy to its appearance.
- — an important component of a belt is the fittings used to sew it. Currently, there are many online stores offering a large selection of accessories for women's underwear.
By making a garter belt with your own hands, you can not only save a lot of money, but also create an absolutely unique and unique piece of clothing that is right for you. The main thing is not to limit your imagination.
Edge processing
To prevent the edge from fraying, it must be processed. Despite the fact that the fabric used is mostly synthetic, it is highly undesirable to melt the edges with fire. This is due to the fact that the product must stretch, and the melted edge loses this property. Therefore, it is better to use an overlocker, a zigzag stitch on a machine, or manually stitch it with an overlock stitch. If you use very thick knitwear (as on swimsuits), then such material does not need to be processed.
The presented master class will help you in your work.
New life for an old thing, or How a sweater turns into leg warmers
With our own hands we can literally sew this item of clothing in half an hour. What is needed for this? Old sweater, sewing machine, scissors, needle, pins, elastic band. Then follow the description.
- Cut off the sleeves of the sweater. Both parts must be the same size.
- Cut off the bottom edge of the sweater (cuff).
- Measure the circumference of the sleeve hem. Make cuts from the cuff exactly the same size. Sew their edges.
- Sew these pieces to the cut sleeves. The lower part of the gaiters is ready.
- Sew an elastic band on the wrong side of the top edge of the product. This is how easy and quick it is to make your own leg warmers from a sweater.
Video lesson:
Leg warmers consist of 1 x 1 elastic and a main pattern, the dimensions of which depend on the height of the shoe. Knitted leg warmers are meant to be worn under boots. Having measured the height of the boot at 16 cm, we accepted exactly this height of the main pattern.
We cast on 64 loops on two knitting needles, take out one of the knitting needles and evenly distribute all the loops onto 4 knitting needles (it turns out 16 loops on each). Knitting begins with seven rows of 1 x 1 rib. Next, the pattern begins, consisting of a set of eight rows, which are repeated several times. Towards the top, the number of loops decreases, and after the pattern, 10 centimeters of 1 x 1 elastic are knitted
How to make stockings from tights with your own hands?
Yadviga, I’m also trying to figure it out, I seem to understand the problem in general, but please add some details: 1) what height do you usually wear in winter (high boots or short boots) 2) for skirts, mainly what length do you need such pantaloons?
Off the top of my head I could immediately recommend leggings, but I’m afraid they won’t go well with everything.
The topic is necessary :), I have an idea, but have not yet implemented it, to sew pantaloons from thin black fleece; they will be closer in spirit to a sports style than to underwear. With a dark skirt, tights will not be visible, if anything.