Surely, you have more than once seen a painting hung on the wall in houses or apartments - the tradition of decorating the interior in this way can compete with the history of painting in general in terms of its longevity. However, sincere love for him and a pronounced desire to decorate your room in a non-trivial and attractive way come into serious confrontation with the reluctance to spoil the wall and make holes in it to fix selected examples of painting art. How to be? We propose to resolve the conflict between beauty and practicality quickly and elegantly and present the best ways to hang any picture on the wall without drilling the wall. We also advise you to familiarize yourself with an alternative option for painting in an apartment in the article: “Drawings on the walls in an apartment: painting techniques and interesting ideas - 50 photos and 3 videos.”
- Paper clip and glue;
- Double-sided tape;
- Wine cork and cloves;
- Ceiling plinth and fishing line;
- Polymer glue;
- Spider hook;
- Regular hook;
- Special Velcro;
- Liquid Nails;
- Conclusion.
Paper clip and glue
What is necessary:
- a paperclip matched to the wallpaper;
- any pencil;
- glue;
- knife.
Peculiarities:
- can only be used for walls with wallpaper;
- not recommended for heavy paintings.
Execution algorithm:
- decide on the location of the painting and mark the length of the selected paper clip on the wall with a pencil;
- carefully make one cut with a knife - and immediately make another, right in the middle of the first and perpendicular to it;
- move the peeling wallpaper apart a little to create a free space and fill it with glue;
- spread the paperclip so that it looks like a hook and insert it into the prepared place;
- roll up all the edges of the wallpaper and press firmly so that outwardly everything looks as if no one touched the wallpaper;
- let the glue dry for 24 hours - and after the specified period of time you can safely hang the picture on the wall.
The whole process is in the photo
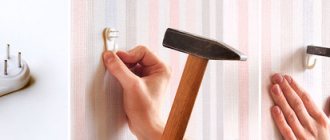
A very simple, but at the same time inventive way that helps you hang a picture on the wall in just a couple of minutes - and without drilling. It is important to choose a durable paper clip - avoid fragile plastic options. You can also use a regular button. Yes, the same one that you so loved as a child to put on the teacher’s chair during recess.How to hang a picture: mounting options
There are several ways and types of mounting paintings on the wall:
Nails
Metal fixtures come in different lengths and thicknesses. They are used for wooden surfaces. To hang a picture:
- Select the correct size nail. The lighter the picture, the smaller the diameter and length of the nail needed.
- Place the pointed edge against the wall.
- Hold the edge and hit the nail head several times with a hammer.
- Drive in the nail, leaving a small part of the stem and head above the surface.
- Hang the picture by first attaching a thin rope to it.
The painting holds perfectly on the fishing line. To do this, you need to attach two pushpins to the corners of the frame and tie the edges of the fishing line. Hang the resulting loop on a nail on a wooden wall.
Nails for attaching a picture to a wooden wall: Pixabay
Self-tapping screws
Such fasteners differ from nails by a special thread on the leg. It allows you to firmly attach anything to different types of materials. Here are the steps to complete the work:
- Mark the hole with a pencil.
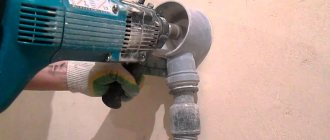
- Using a hammer drill, drill a hole of the required length.
- Insert the dowel, then screw in the self-tapping screw.
- If necessary, repeat steps 2 and 3 if the picture is heavy and several fasteners are needed.
Self-tapping screws are used for fastening to wood, plasterboard, metal and other surfaces.
Liquid nails and polymer glue
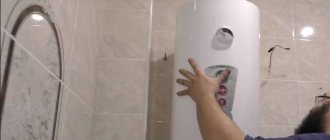
If you are looking for reliable fastening of pictures to the wall without nails in the usual sense, try an invention of the chemical industry - liquid nails. This fastener is a quick-drying type of glue that is used in construction. You need to use it like this:
- Squeeze out the glue using a special gun or manually and apply it pointwise to the back surface of the painting around the perimeter.
- Apply to the intended location, press down and hold in this position for about two minutes.
Polymer glue will replace liquid nails. The mounting principle is identical. The gel-like plastic substance contains polymers that help securely hold together products made of wood, plastic, plywood, glass, metal, brick, ceramics, and concrete.
Double-sided tape and other self-adhesive tapes
An excellent material that will come in handy when you need to quickly attach a light painting or photograph to the wall is double-sided tape. To attach a panel:
- Cut a few strips of tape.
- Glue them around the perimeter of the picture.
- Remove the protective film.
- Glue to the wall, pressing the picture to the surface.
Hanging pictures on the wall is easy. The main thing is to decide which type of fastener is suitable in a particular case.
Double-sided tape
What you need:
only tape
Features:
- Suitable only for light and small paintings;
- can be used for any SMOOTH non-textured surfaces;
- After dismantling the painting, most often the wallpaper comes off along with it, or the paint peels off.
Execution algorithm:
- It is best to choose double-sided tape on a fabric basis to use - this way you can be sure that you were able to hang the picture seriously and for a long time, because this type of tape has ideal strength and will withstand even a decent weight;
- stick a strip of tape onto the surface and secure the image;
- You can do it differently: stick 1-2 strips on the picture itself from the back, and then remove the protective sticker and lean it against the wall.
To eliminate the possibility of torn wallpaper during dismantling, it is best to keep the already peeled fragment strictly perpendicular to the wall surface.
Basic Rules.
Knowledge is power
There are several important rules that must be followed when stretching canvas. Knowing these rules will allow you to see and correct mistakes made when stringing - but, most importantly, it will keep you from making these mistakes. There are only three rules, and the first of them is:
Properly made subframe.
Speaking of the subframe.
It is a frame onto which, following the example of a drum membrane, the canvas is stretched. To make the subframe, a specially profiled wooden strip is used.
What should it be like:
- parallel sides must be equal;
- all four corners must be exactly 90 degrees;
- the width of the rail must correspond to the size of the product;
- the rail must necessarily have a bevel or side;
Let me explain with the width of the slats. As a rule, framing workshops use a strip with a height (thickness) of 15-18mm and a width of 25mm, 30mm, 40mm, 60mm. In some cases, a rail with a height of 35mm and a width of 40mm is used.
There are no specific rules and standards established by the Chamber of Weights and Measures regarding the correspondence between the width of the slats and the size of the subframe. But, based on common sense, we will not assemble A4 size from a 60 mm wide rail. And if we want to make a subframe measuring 600x800 mm, a 30 mm rail is clearly not suitable for us. Let's take it as a rule - the larger the size of the subframe, the wider the rail should be.
Article “How to make a canvas stretcher with your own hands.” View here
What is not always taken into account
Now attention. There is a very important aspect that is not always taken into account. This is the durability of the integrity of the image that will be applied to the primed canvas.
Of course this is not a secret, but the problem is that many do not give it due importance. It’s just that when stretching, sometimes mistakes are made that are not noticeable at first. But which over time will have fatal consequences for the future picture.
There are many articles and videos on the internet about how to stretch canvas onto a stretcher, but most of them focus on getting the canvas taut. However, this is not the only thing to consider. There are other points that will play an important role in the fate of the future film. They have to do with how the canvas will be placed and how it will be stretched.
Important Factors
When stretching, factors such as
- canvas size;
- its ability to stretch;
- whether it was previously tensioned;
- is it old or new;
- Is it primed or not;
And taking these factors into account, the master chooses the width of the slats, the design (with or without a crossbar), the tension force, the size of the staples, etc.
But regardless of these factors, the following must be observed:
- correct canvas placement;
- its uniform tension;
These are the other two mandatory rules.
Moreover, failure to comply with these rules during stretching will not immediately affect the condition of the canvas. The most obvious sign of an error is that cracking of the primer can only appear immediately if an emulsion or oil primer is used.
But acrylic primer is a more flexible material. And when using it, the canvases will not have problems right away, even if they were stretched incorrectly.
But over time, when the acrylic loses its flexibility, all the errors will become visible. Paintings painted on this canvas will crack due to uneven tension, and preserving them will be problematic. Therefore, proper placement of the canvas is necessary.
Proper Canvas Placement
Canvas is made by tightly weaving threads into a single-color simple weave.
The warp (vertical) threads are held firmly on the loom while the weft threads are crossed above and below each warp. The fibers here are thick, usually medium to heavy strands. One of the most important aspects is the placement of the canvas relative to the stretcher. This is a simple point, but failure to do so will certainly lead to problems in the future. And all you need to do is place the weft and warp of the fabric strictly parallel to the sides of the stretcher.
The warp is the threads running along the fabric. Weft - threads running across the fabric. Selvage is the non-fraying edge of the fabric. The width of the fabric is the distance from edge to edge.
Figure 1 is an example of incorrect tension. The weft and warp are not parallel to the sides. This will cause uneven tension and will cause problems later on.
In Figure 2, the wefts and warp are parallel to the sides. Here the tension will be uniform.
1. An example of incorrect tension.
2. Example of correct tension
Correct tension
It is very important not only to place the canvas correctly, but also to stretch it correctly. Even perfect placement will not help if the tension of the fabric in one place is greater than in another. Here you just need to follow one of the tension methods. An example is shown below. The main thing here is to act exactly according to the plan. Consistently.
Rice. 3
Many artists and framers pull their canvases very hard. They pull straight from the heart, sincerely believing that the canvas should be stretched like a drum and this is the main thing. Of course, the tension depends on the size of the fabric, but it should not be pulled so much as to deform or displace the fabric. In fact, it is not strength that is important, but correct technique. In general, like everywhere else.
Wine cork and clove
What is necessary:
- an ordinary wine cork;
- carnations;
- glue “Moment” (or equivalent);
- knife.
Peculiarities:
- only for light images;
- average degree of reliability.
Execution algorithm:
- take any cork from a wine bottle and cut it into circles with a thickness of at least 10 millimeters;
- glue the resulting fragments to the wall and insert a nail of suitable length into them (it should not go into the wall);
- the image is hung on nails, its weight is evenly distributed over all four corners.
Be careful: very heavy paintings require a different method of mounting on the wall.
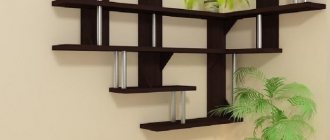
Grouping
If there is a large wall in the kitchen, and the paintings are small, it is better to place them in groups, around one canvas that you like the most. The group should include paintings similar in style or color scheme. For example, a series of batiks, united by one theme.
Important! In a group of three paintings, the middle canvas is the main one.
Canvases of the same size are most often hung in one row at an equal distance from each other. But they look more interesting when they weigh at different levels.
Often people perceive canvases as elements of classical painting that require a large amount of space on the wall. They should not be covered with furniture or other decorative items.
What other technique for hanging pictures can be used in the kitchen or any other room? A continuous trellis grouping, when the canvases cover the entire wall.
Important! To decide how to properly hang canvases on the wall, you should first create a composition on the floor and then transfer it to the interior. But it’s definitely not worth hanging a lot of canvases “by height” in the direction of increasing or decreasing. This is a sign of bad taste.
Ceiling plinth and fishing line
What is needed:
- molding (ceiling plinth);
- fishing line;
- hooks;
- glue.
Peculiarities:
- not recommended if there are pets in the house;
- the mobility of the fixed image is maintained;
- you can attach several paintings at once;
- allows you to quickly change boring images.
Execution algorithm:
- take any ceiling plinth and secure it with glue;
- attach a very strong and elastic fishing line to it;
- hang the picture by hooking the fishing line onto the hooks on it.
One of the simplest and at the same time interesting ways to hang a picture on the wall and do without drilling. True, it is worth placing them in such a way that they are out of reach of your pets - otherwise there will simply be no way to guarantee the safety of the paintings. Watch how the master talks about the practicality and simplicity of this method:
Backlight
Lighting of canvases is of great importance. But if in a museum they can be placed along one wall and lamps installed above each, then in an apartment it is better to use good natural lighting. Additional lighting can be useful when glare appears or you want to focus attention on the wall. For these purposes, it is better to use LED lamps that do not heat up and create a directional ceiling of light.
Important! The maximum permissible illumination for painting is 150 lux. You can use a 100W incandescent lamp or a 20W fluorescent lamp. They should be located at least 1 m from the canvas.
Polymer glue
What is needed:
any polymer glue.
Peculiarities:
- suitable for both heavy and light paintings;
- does not leave any marks on wallpaper, paint or any other finishing.
Execution algorithm:
- if you are dealing with heavy frames, then you should glue completely around the entire perimeter;
- if the image is light, then it is enough to just apply glue to the corners;
- It is best to organize a small press immediately after this and leave it to dry in this form for about a day.
In this option, the main thing is to choose an adhesive that does not leave greasy marks on the walls. Be sure to check this before purchasing, so as not to become an eyewitness to damaged wallpaper or paint.
Why are paintings needed in the house?
Properly selected clothing accessories create an incredibly attractive image. One detail changes the overall appearance and mood of the spectacle seen. The same thing happens with interior design. If every detail complements the overall picture, it becomes a pleasant place to be. A beautifully decorated interior will give the owner of the house comfort, and his guests will appreciate the good taste of the owner of the house.
Correctly selected paintings in the house create a certain atmosphere, comfort and coziness.
The paintings in the room stay with a person throughout his life. For a child, parents try to choose light wallpaper and hang pictures or photographs that are pleasing to the child’s eye. For a teenager, this is one way to loudly declare their musical or cinematic tastes - hang up a poster.
Properly selected paintings in a child’s room will complement and enliven the atmosphere. You can give the child the opportunity to choose paintings for his room.
For an adult, the opportunity to decorate the area with that very missing detail. One painting can set the overall mood for a room. If it is a picture of food placed in the kitchen, but it will promote better eating: it stimulates appetite.
“Appetizing” paintings will look great on the kitchen wall.
Spider hook
What is needed:
- spider hook;
- hammer.
Peculiarities:
- maximum weight up to 2 kg;
- ready solution.
Execution algorithm:
- take the purchased spider hook;
- hammer it into the wall.
Convincing examples of the practicality of using spider hooks from life.
Installation Tips
Do not overload the frame stand. One or two canvases can be hung on a wooden beam. The rest are better placed around.
- Before hanging pictures in the interior, you need to mark the distance between the canvases using a pencil and ruler or multi-colored stickers. During the installation process it will be easier to determine the location of the next panel.
- Arrange the pictures creatively. Six or seven canvases of different sizes will visually create the effect of increasing space. Experiment before hanging your canvases on the wall. But don't place them very high or low.
- Think through all the details in the interior. Small canvases will not look good in different rooms, so it is better to place them on one wall. Landscape photos give you more options than portrait paintings. Experiment with their placement in the interior until you find the best way.
- When designing where in the interior to hang a picture, consider the height of the furniture, shelving, the location of windows and the lighting of the room as a whole.
Regular hook
What is needed:
- hook;
- pliers;
- glue.
Peculiarities:
- maximum weight up to 1.5 kg;
- requires selection of a pattern for camouflage.
Execution algorithm:
- take a regular hook in your hands and, using pliers, bend it so that it can be applied to any flat surface;
- glue it to the wall with any glue;
- select a piece of wallpaper with a suitable pattern;
- glue in such a way that only the bent loop remains protruding;
- feel free to hang the picture.
This is what it looks like in the picture. As you can see, the simplest way to quickly hang a picture on any wall surface. The only negative is the weight limit of the frames used. And if you don’t have a suitable one, then you can always make a frame with your own hands.
Special Velcro
What is needed:
Velcro Command, KREPS.
Peculiarities:
- maximum weight up to 2 kg (more is possible if the number of strips increases);
- Suitable only for flat surfaces with wallpaper without texture;
- very fast and reliable installation;
- environmental Safety;
- leaves no traces.
Execution algorithm:
- degrease the surface and frame;
- form pairs of Velcro, the number depends on the weight;
- remove the protective paper and lean it against the wall in the right place, as well as in the right place on the back of the picture;
- connect the strips, hold for 30 seconds and release.
Today this solution is positioned as one of the most reliable on the market. However, there are often cases when, after six months or even less time, images unexpectedly fell. Apparently due to the peculiarities of the temperature in the room or high air humidity. However, this does not affect the popularity of such products in any way.
A detailed video showing how to hang a picture on the wall using this method, thereby avoiding the tedious drilling of the wall surface.
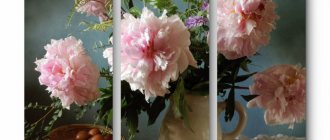
What is a modular painting
A distinctive feature of a modular painting is the fact that the canvas is assembled from several parts into a single image. Today, modular paintings , where each component part is of a different size, which gives the image a special appeal and creativity. In most cases, these paintings are made up of three or five parts, which are left without a frame so that the integrity of the canvas is not lost.
But in order for a modular painting to truly become a decoration of the room, when placing it it is necessary to take into account some of the subtleties and rules for installing such paintings.
Liquid Nails
What is needed:
liquid Nails.
Peculiarities:
- guarantee long-lasting and reliable fixation - 1 year according to the specification, the actual period is longer;
- can withstand quite serious weight;
- leave behind traces;
- may cause damage to the surface and frame during dismantling.
Execution algorithm:
- thoroughly clean the surface on which you plan to paste, as well as the image frame, of all unnecessary materials;
- degrease the wall surface and fixation points on the frame;
- Apply drops of glue around the perimeter of the back side of the picture in approximate increments of 5 to 7 centimeters;
- fix the image on the wall and, using any available means, organize a small press;
- in this position, let the liquid nails dry overnight or half a day.
Liquid nails perfectly help us cope in various everyday situations. They also discover their usefulness when it is necessary to hang a picture on the wall - just like that, without the process of drilling and subsequent contemplation of the holes in it. Of course, there are a lot of much simpler ways to do this - you could see this above - however, if reliability comes first for you, then, most likely, the last option we examined will be the best solution.
Features of non-standard paintings
In addition to the usual paintings, consisting of a frame with a painting stretched over it, there are also “non-standard” ones, that is, differing in the design itself. Two types of arrangement of such paintings can be distinguished.
No frame
It could be a pencil drawing, watercolor, engraving or even an unusual calendar. The weight of such paintings is usually small and they can be placed on the wall by securing them with ordinary push pins. Possibly with decorative heads.
Often there is an option when the frame is hidden, or rather its role is played by the internal frame, which gives the picture rigidity. In this case, the methods described above are suitable for mounting on the wall.
For lightweight products, these can be Velcro; for larger ones, they can be anchors and hinges that are attached to the frame with glue, small screws or nails.
Modular
It is a composite fabric. Each individual block has a part of a larger picture drawn on it. The task of how to attach a modular picture to a wall is complicated by the fact that its elements must be located in strict accordance with each other.
For this purpose it is convenient to use a common guide rail. It is attached to the wall or ceiling in the usual way using anchors or dowels. Then strong cords are attached to this bar, on which parts of the picture are in turn hung.
Such fastening for modular paintings is also convenient because the adjustment of the component blocks can be done extremely accurately, both vertically and horizontally.
If the guide strip violates the design of the room, parts of the modular picture can be hung using one of the methods described above, but this will require scrupulous markings, otherwise the disharmony of poorly joined blocks will negate all the work. Therefore, it is better to entrust the installation of a modular picture to professionals.