If earlier it was almost impossible to drill holes in hard materials, and using a hand drill even when processing wood caused a lot of difficulties and required considerable physical effort, then with modern power tools everything has become much simpler.
To make holes of different depths and diameters in concrete slabs, bricks, foam blocks and other solid materials, drills and hammer drills with various attachments are widely used.
But in the process of processing materials, a kind of dust or flour is constantly formed. Consists of large and small particles. All this is scattered in different directions.
Now imagine that you need to drill a lot of holes. There is a lot of cleaning to be done after this. Or you need to install a TV on the wall, and the room has a beautiful, fresh renovation. My wife literally cleaned everything yesterday. And there are many similar examples. Both at home and at industrial facilities.
And the task is one: to minimize the amount of dust and dirt that is formed during the process of drilling walls with a hammer drill or drill.
Hole in metal without drill
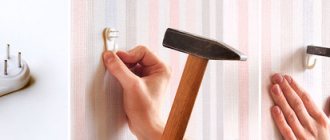
To drill through thin metal or plastic, you will need a screwdriver and a self-tapping screw with a cutting head. It comes in different lengths, it is better to take a short one.
- Mark the point on the surface where you will drill.
- Insert the screw into the screwdriver and carefully screw it all the way through
- At the same time, press down on it so that the tip cuts into the workpiece and pierces it.
The operation will only take a few minutes and the passage is ready. This self-tapping screw can cut several openings, then it needs to be replaced.
These tools are also suitable for drilling holes in wood. First you need to screw in a small screw, and then a larger one.
We drill a concrete ceiling without dust. How to drill a hole without dust
Many owners know how much cleaning there is due to dust and debris when drilling concrete or brick walls. How much do you have to move furniture, wash floors, wipe dust in a living space after drilling holes in the walls to install interior items such as shelves, lamps, paintings, etc.
One day my friend showed me an interesting way. For which I am very grateful to him. How to drill into a concrete wall without dust and debris? Maybe someone already knows this method or uses other devices, but I’ll tell you and show you anyway. So, everything in order.
Mark the space for the hole on the wall.
We make a small envelope-pocket device. To do this, take a sheet of A4 paper.
Fold a sheet of paper in the manner shown in the photos below.
Take masking tape.
We glue the tape so that we get an envelope in the form of an open pocket.
We glue the envelope on the wall as close as possible to the future hole.
We take a hammer drill with a drill of the required diameter. To better guarantee the cleanliness of the drilling, we take a household vacuum cleaner. After removing the brush attachment, apply the vacuum cleaner hose to the drilling site. Turn on the vacuum cleaner, preferably at full power. And drill a hole with a hammer drill.
You can call someone at home for help. But if there are no assistants, then in one hand you have a vacuum cleaner hose, and in the other hand a hammer drill. If the vacuum cleaner is powerful enough and the drilling diameter is small, then the envelope remains almost empty at the end of the job. Unfortunately noisy, but no dust or debris.
Concrete is the main building material from which most of all modern buildings are built. When renovating, a problem that often arises is how to drill into concrete? After all, reinforced concrete slabs are a material of increased strength, the processing of which requires knowledge and special tools. Below we will look in detail at how to quickly complete this procedure and what is needed for this.
Tool selection
You can drill concrete yourself using two tools: a hammer drill or an impact drill. For the first, processing of hard surfaces (concrete and stone) is a direct purpose. The hammer drill allows you to create large-diameter holes and is designed for fairly high loads. An impact drill, in turn, is designed for drilling holes up to 12 cm thick. It is indispensable when processing foam blocks, since a hammer drill is capable of completely crumbling a wall made of such material.
An impact drill can be safely used for processing concrete: it will allow you to make several holes without causing any damage. However, large-scale work requires specialized equipment. It is not recommended to use a conventional hammerless drill.
Cutting elements for concrete processing
To make holes in reinforced concrete blocks, it is necessary to use special drills, they are called pobedit drills. The tip of such a tool is coated with carbide coating. There is no point in saving on drills; a cheap tool will quickly fail at the most inopportune moment. You can drill concrete correctly only with special cutting elements designed for this purpose. Diamond-coated drills are also used. They are installed on special drilling rigs that create large holes with a diameter of 200 mm.
To arrange connectors for a switch or socket, crowns are used, which are a scaled-down model of diamond drills for drilling rigs. As a rule, their diameter is from 35 to 120 mm. Crowns allow you to drill holes up to 150 mm deep. When installing such an attachment on a hammer drill, you need to turn off the impact mode. Among the drill attachments there are similar bits. Their advantage is that they can be used to process several different materials. At the same time, drill bits are designed for devices with a power of at least 1000 W.
Application of crowns
It is often necessary to obtain a large hole in the wall for a socket. How to drill through a load-bearing wall here? Then they use crowns that have iron soldering around their circumference. Crowns come in different sizes, but the 68-centimeter ones, which are designed for sockets at this time, remain more necessary. When working with these parts, the hammer drill must turn off the impact mode.
There are such bits also for drills. However, they have a coating of a different nature - from a tungsten-cabrid alloy. It’s convenient to use them, because you can drill a hole in a concrete wall with a drill and immediately make a hole in the tile. Such crowns are used only with strong drills.
a story about concrete drill bits for drills
and how they drilled for about 30 years.
Subscribe to the channel How to make money.
Drills are the next device for drilling into a concrete wall. Their diameter is varied. Experienced craftsmen recommend making a selection based on the parameters of the diameter of the dowels.
How to make holes in a wall
Before drilling a wall for a pipe, it is worth understanding what standards must be observed during the work process, especially if you are going to drill a load-bearing wall.
When cutting a hole for communications, make sure that such structural elements of the building are not affected, such as:
- barrier and reinforcing bars in the thickness of the wall;
- ventilation ducts, if any, in the building;
- electrical wiring lines.
At the same time, when arranging holes for pipes in the wall, make their diameter slightly larger than the cross-section of the pipeline so that you can install a protective sleeve and, possibly, insulate it with mineral wool or other non-flammable material.
Drilling jig
Using such a device will not only reduce the amount of dust in the process, but will also help not to move while drilling and make a more accurate hole. It is necessary to make a plank from plywood or other suitable material and drill holes in the designated places. This plank is fixed to the wall using double-sided tape, glue or other fastening element. Another one is fixed to the bottom of the plank at an angle of 90 degrees, in the form of a kind of shelf. This way, the debris will settle on a horizontal bar to reduce the amount of waste on the floor and make cleaning easier afterwards.
How to drill without dust? 3 effective ways
Plastic cup nozzle
This method is probably the simplest. You will need a regular disposable cup or the cut off bottom of a plastic bottle. By threading a plastic container in the center onto a drill or auger, you will get a simple attachment that collects dust, concrete particles and other construction debris. However, there is one caveat - this method is practical only for drilling the ceiling; it is not effective when working with a vertical surface.
Paper envelope
But this method is applicable only when drilling walls. You don't need to make any special efforts to use it. Take a regular mailing envelope or roll it yourself from thick paper, and attach it to the wall with double-sided tape or a stapler. The “pocket” for construction dust should be located strictly under the place where the hole will be drilled, at a distance of 2-3 centimeters.
Using a vacuum cleaner
The tritium method is universal and is suitable for both drilling ceiling tiles and working with walls. If you have a professional hammer drill with a built-in mini-vacuum cleaner, then the trick is in the bag. If you don’t have such a miracle technique in your arsenal, then in this case you will need an assistant. While you drill the hole, your partner will hold the vacuum cleaner hose in close proximity to the drill. So, under the air draft, all the dust that comes out under the drill will be sucked into the vacuum cleaner. Perhaps this method can be called the cleanest and most effective.
Use any of the proposed methods and see from your own experience that even the dirtiest repair work can be clean and tidy.
Drilling without debris: DIY devices
Just 10 or 15 years ago, when drilling walls and ceilings, builders had to either breathe dust (which is very bad for the respiratory system) or dodge, coming up with new options for dust collectors. Such homemade products are still in use today - professionals no longer use them, but for ordinary people who need to hang a picture or shelf every six months, this is a real way to keep their apartment clean.
Envelope
You can buy it at the post office or glue it from a sheet of paper. The only requirement is the shape: the envelope should be like the good old days, with a flap on top, not on the side.
Next you need to modify the product:
- Reduce valve height (if necessary).
- From the inside, stick a strip of masking tape or electrical tape onto the valve so that it protrudes beyond the paper. This will then allow you to attach the envelope to the wall. You cannot use regular tape - it will stick tightly to the wallpaper, come off along with the paint, or leave a dirty sticky mark on the surface.
- The back of the envelope (it will be directed into the room) is bent slightly vertically so that the envelope is slightly open - garbage will fall into this gap.
We recommend: Methods of using self-adhesive film for updating furniture
The envelope will be usable until it breaks.
Analogues of drill bits
There is every reason to believe that the drill attachment mentioned above was made based on the dust collectors that our fathers and grandfathers used. To make such homemade products, everything that came to hand was suitable:
- plastic or paper glass;
- half a rubber ball;
- cut bottle or tin can;
- cake box lid.
The algorithm for their use did not change - a hole was made in the bottom along the diameter of the drill, an improvised dust collector was put on so that its open part was directed towards the wall or ceiling, and the necessary work was done. At the end, the garbage was carefully shaken out.
By the way, the ball and cake box are ideal for drilling ceilings.
Vacuum cleaner
- This method is a close relative of the vacuum dust collector, but instead of a special device that is mounted on the wall, you will need a spare pair of hands. In order not to stain the wallpaper and floor, you cannot do without an assistant - while one person operates the hammer drill, the second holds the vacuum cleaner hose (the brush is first removed from it) as close as possible to the place where the drill enters.
Do not forget that frequent use of this method may lead to the purchase of a new vacuum cleaner, since construction dust has a detrimental effect on the engine, and filters are not able to retain it.
These few methods, which allow you to avoid cleaning after drilling walls, are the most common, but the list of possible options is not limited to them. You yourself can come up with another option using what you happen to have lying around at home. Write your ideas in the comments!
Industrial methods of dust protection
Vacuum dust collector
This device comes in two types:
- Mounted on a wall or ceiling - under the influence of suction force, it reliably “sticks” to any surface, even textured, and stays there as long as the vacuum cleaner is turned on. It has a hole in the middle through which a drill or crown passes (by the way, the diameter of the hole can vary, but for household needs 6–7 cm is usually enough).
- Mounted on a drill or drill - initially placed as close as possible to the drill head, and as drilling moves towards the body. The disadvantage of such dust collectors is that debris can still spill onto the floor, albeit in small quantities. However, one cannot fail to mention their advantage - such devices can be used even if you have to drill into a wall in hard-to-reach places.
By itself, such a dust collector will be a useless toy. A prerequisite for its operation is the presence of a powerful vacuum cleaner connected to a special connection. You can drill once or twice using the same vacuum cleaner that is used to clean the apartment, but for regular use it’s worth getting a “Rocket”, “Whirlwind” or “Buran”. The fact is that fine dust seeps through the filter system and settles in the engine. Modern specimens cannot withstand long and burn out, but the old Soviet monsters are almost indestructible.
Self-adhesive bags
They have a number of advantages:
- They are relatively cheap, so they are ideal for those who use a hammer drill only occasionally.
- Doesn't take up space in your toolbox.
- Transparent, so they do not interfere with the view.
- Completely prevents dust from getting on the floor.
- There are options for both a regular drill and a hole saw.
- Despite the fact that they are considered disposable, after the first use they retain their adhesive properties and can be reused (you just need to empty out the debris that has accumulated inside).
The only disadvantage of such packages is that they are completely unsuitable for drilling ceilings and other horizontal surfaces.
Drill bit
It looks like a cone that fits onto a drill. At first it is straightened out to its full length (the wide end rests against the wall, and the narrow end rests against the body of the drill), but as the drill moves deeper into the wall, it folds like an accordion. When using a drill with a long shank, you have to press the bit against the wall with your hand, which can be inconvenient.
Required Tools
Concrete structures have increased strength and contain particles of crushed stone, which is why they cannot be destroyed with a conventional drill bit.
READ Disassembling Bosch Rotary Hammer Buttons
During the process, the drill encounters areas of increased hardness and the work stops.
Therefore, impact drills or hammer drills are used for drilling.
But in domestic conditions, for a small amount of work, purchasing expensive tools is not advisable; a hole in concrete can be drilled without a hammer drill. At home, you can get by with a simple dorel with special attachments:
- Steel punch - used when a regular drill gets stuck in particularly strong areas. It is a special rod with a pointed end of increased hardness. The punch is inserted into the hole being made and hit with a hammer, crushing the most dense areas. You can also use a long drill with a Pobedit tip as a punch.
- Pobedite drill – has a tip made of metal, which is particularly durable. These drills are optimal for working on concrete. The drill tip is made of an alloy of carbide - tungsten and cobalt.
- Diamond-coated drill bit is a highly effective attachment for drilling crushed stone and beta. Diamond drills are installed on a conventional drill or on an impact drill when working with vibration turned off. The cost of diamond drills is quite high, so purchasing them for occasional use is not advisable.
- Tungsten carbide-coated bits are used exclusively with high-power drills. In everyday life, crowns with a diameter of 120 mm are used; professionals use attachments with a larger diameter. For concrete, experts recommend using crowns with separately soldered teeth. If there is iron reinforcement in the thickness of the wall, it is not recommended to use crowns, as the teeth will break off.
- CS: GO bits – crystalline diamond particles are applied to their edges, allowing drilling in concrete structures.
IMPORTANT. To obtain holes with a diameter of more than 12 mm and a depth of more than 110 mm, it is not recommended to use a conventional drill
Without a hammer drill or impact tool, it is impossible to make a large hole in concrete or a through hole.
What do professionals use?
The range of dust collectors for rotary hammers and drills is quite extensive. These can be ready-made factory devices, or home-made devices.
In the case of professionals in the field of repair and construction, special solutions are provided for tools of this level. These are attachments installed on a drill or drill, allowing you to connect a hose from a vacuum cleaner to them. A kind of add-on that promotes fast and efficient garbage collection.
But professional dust collectors have certain disadvantages.
- Additional expenses. To acquire such an attachment, you will have to spend money. And not the smallest ones. This will be a profitable investment for those who drill regularly. But if you use a drill or hammer drill exclusively for household needs and literally pick up the tool 1-2 times a year, then such costs will be impractical.
- Need a partner's help. In order for a dust extractor to work effectively, it usually requires assistance from a partner. His job is to stand and hold the vacuum cleaner nearby.
Therefore, devices assembled from scrap materials have become popular in everyday life. You don't need to spend money on them. At the same time, they cope with their tasks perfectly. And you won’t have to look for an assistant.
how to drill without dust | Lifehacks
Dust-free drilling can be done using a vacuum cleaner. When drilling, you need to bring and hold the tube of the turned on vacuum cleaner next to the drill. The effect will depend on the power of the vacuum cleaner.
The more powerful the vacuum cleaner, the less you spray, but some of the debris will still spread. It will be uncomfortable for one person; you will have to hold the vacuum cleaner tube with one hand, the drill with the other, or ask someone to help.
When you turn on the vacuum cleaner, the nozzle sticks to the wall or ceiling; you don’t need to support it with your hand. You can drill quietly and comfortably alone without the help of others. This is the best way in which there will be no dust at all.
If you drill using the above methods, you need to have a fairly powerful one, preferably a construction vacuum cleaner. If you don’t drill much, you can get by with a simple home vacuum cleaner. But if the volume of work is large, then the vacuum cleaner will quickly begin to clog, and it will need to be constantly shaken out.
And if you constantly drill in this way, then an ordinary home vacuum cleaner can quickly become unusable, because fine dust will begin to get into the motor. You will definitely need a construction vacuum cleaner.
With the help of a vacuum attachment you can do without a vacuum cleaner. You need to take a small plastic bag and tie it to the nozzle tube with an elastic band. The nozzle will collect dust during drilling.
When drilling, you will need to press the bit against the wall and hold it with your hand, in which case you may need the help of a friend. Almost all the dust will fly into the bag, it will be less effective than with a vacuum cleaner, but the result is also good. But on the ceiling, this method will be poorly effective, because a lot of dust will fall through the hole for the drill.
If you don’t want to spend money on such an attachment or you can’t quickly buy it because stores are so far away, then you can make it yourself from scrap material. It's pretty simple.
For example, you can cut a plastic bottle evenly diagonally, tightly tape the neck of the bottle to the vacuum cleaner tube with electrical tape and make a hole for the drill. You can also make a collective farm using various improvised means, for example, using a small plastic box and pipes from plumbing fixtures.
How to drill without dust and without using a vacuum cleaner? If you don’t have a vacuum cleaner and you can’t make or buy different attachments, then you can limit yourself to simple paper. Of course, the effect will be much less than all of the above methods, but the amount of dust on the floor will be reduced. You can roll the paper into a bag and when drilling, hold it under the drill close to the wall.
You can also make an envelope out of paper and stick it with masking tape to the wall, under the place where you will drill. Most of the dust will end up in the envelope. Paper methods will only be effective on the wall; it will not work on the ceiling.
To be honest, when I can’t use a vacuum cleaner, I don’t use paper, because it brings little effect and general cleaning after that cannot be avoided. In this case, I simply cover everything with plastic wrap and then carefully remove the film.
But how can you drill a hole in the ceiling without dust and without using a vacuum cleaner? This can be done using a plastic cup. In this case, the drill must be long enough; you need to take the length of the glass, plus the length of the hole you are drilling. Make a hole in the middle of the bottom of the glass with a drill, press the glass to the ceiling and drill, holding the glass with one hand.
Some dust will still pass through the hole in the bottom of the glass, but it will be much less. They say that if you often drill in this way, the drill chuck can quickly become clogged with fine dust and become unusable.
This method is temporary. You need to drill very carefully in this way; if the drill jerks sharply, you can damage your hand. The hand should be protected with thick gloves. Honestly, I wouldn’t use this method, it’s a painfully dangerous experiment.
Disadvantages when using a vacuum cleaner
Some people use a vacuum cleaner. This is a good option to avoid dust when drilling with a hammer drill, but not always acceptable. This device may not be at hand. It requires two people to operate it. One drills a hole with a hammer drill, the other holds the suction tube of the vacuum cleaner next to the working part of the drill. All dust is sucked into the vacuum cleaner. But you can’t handle this situation alone. It is inconvenient for one person to monitor two operating devices at the same time, holding their parts in the right places.
Homemade dust control devices
Improvised devices sometimes cannot boast as complete dust removal as professional vacuum cleaner attachments. But they are much cheaper and often do not require assistance during use.
Drill attachment from a bottle or cup
If you need to drill a hole in the ceiling, the crumbled concrete will mostly fall down. To collect dust, a combination of a drill or auger and a bottle with a cut off bottom will help. An ordinary plastic cup will do, but it will need to be cut so that the part of the drill that will go into the wall protrudes above the walls. As a result, the “flour” falling down will fall into the cup and will be easy to remove.
Moistened sponge
You can make a nozzle from a sponge:
- the center is measured on it;
- draw a circle with a diameter of about 5 mm in the center;
- cut the foam rubber in a circle with a stationery knife and remove it to a hard substrate;
- a hole is made in the substrate into which a drill is inserted;
- Before starting work, moisten the sponge with water.
Like the previous device, this option is more effective if you need to drill the ceiling rather than the wall.
We recommend: We grout according to all the rules: how to apply grout to the tiles yourself so that it lasts for years
Paper envelope
An envelope made of thick paper is attached to the wall under the place where the hole will be drilled with double-sided tape. You can make it yourself by bending the sheet in half and staple it along the edge. The garbage will fall down, collecting in the envelope. Instead of an envelope, you can glue a paper cup.
The main disadvantage of this method is that light dust blown to the sides is not collected.
We use a vacuum cleaner
You can use the vacuum cleaner even without a special attachment.
- The easiest option is to draw in air with the narrowest slot-shaped nozzle. It creates a very powerful stream that draws in flour particles well. The disadvantage of this method is that you need an assistant.
- The second option is to build a nozzle from a plank with a drilled hole and a collection from a cut bottle attached to it. Then the drill is inserted through the holes in the bottle and the board, and the vacuum cleaner is connected to the neck.
We hope that the proposed methods will help you complete all work related to drilling as cleanly as possible, without unnecessary dust and labor costs.
Independent production and use of a dust collector
Using the most ordinary household sponge will help fight dust even more effectively. To do this you will need: a bath sponge (or dishwashing sponge) and a stationery knife (scissors with sharp edges will also work). Exactly in the center of the sponge you need to draw a circle with a diameter of approximately 5 mm. Using a utility knife or scissors, cut through the foam to a solid backing. We carefully remove the foam rubber, and make a small hole in the backing, of such a diameter that a drill can fit into it.
Before you put the sponge on the drill, you need to wet it with water. In this case, the dust will settle much better on the damp surface of the sponge and will not scatter around the room. Just remember, after contact with water, the sponge should be wrung out so that it is damp, not wet.
Of course, all these devices will not be as effective as a professional hammer drill with a dust-catching attachment. But it won't cost you anything.
- Author: Sergey Petrov
Rate this article: (0 votes, average: 0 out of 5)
We drill dust-free holes in the ceiling and walls.
Before this topic “Drilling (drilling) without dust,” I talked about how to cut without dust using a grinder. This process was described in the article Installing a dust-free groove. Well, now I was asked to tell you how to do this only when working with a drill or hammer drill. So, go ahead for new knowledge and solutions, because methods will be presented that will allow you to drill and drill in such a way that dust from under the drill does not fly around the room and, as a result, you do not have to spend a long time and tediously clean up! We will tell you how to make sure that when drilling the ceiling (with a drill, a crown), concrete or plaster chips do not fall on your face!! Go
.
All builders face a problem when drilling, drilling holes in the ceiling and walls. When a hammer drill or drill sprinkles small or even large fractions of drilling waste, simply dust particles, into your eyes, onto the floor and pieces of furniture, as well as your hands.
So, I propose to deal with this small nuisance using the old-fashioned method, by putting a regular plastic or cardboard cup on a drill, drill, or cardboard!!
Just insert a drill through the center of the cup
, the cup faces completely towards the drilling and at the moment of drilling, crumbling dust, particles of the concrete fraction, will fall into the plastic cup, which will greatly simplify further cleaning of the apartment and protect your eyes from dust. Although you should have glasses for this matter. Well, if anything, it won’t get into your mouth!! :))
This method of drilling, drilling without dust, is suitable for drills or drills no less than ten centimeters long, including the heel of the drill! Otherwise, the selected container will need to be shortened in length.
You can also drill a wall without dust.
, only in this case a vacuum cleaner or a bag glued to the wall in the place where you are going to make a hole will help us.
At the moment when you are drilling a wall, your partner or yourself will have to place a vacuum cleaner under the hole. The vacuum cleaner will suck up all the dust coming out from under the drill and will not allow it to scatter or crumble. So we figured out how to drill a hole in the ceiling and wall without dust using a drill and a hammer drill.
Then there are a few more instructions and, as always, interesting, in which I cut six short videos that show methods of drilling holes without dust, where dust is caught using special purchased devices and using homemade things.
Without resorting to the use of special drills with nozzles that draw in air, Americans do an excellent job.
When drilling a wall or ceiling, they do not use a plastic cup or a vacuum cleaner like we do, but a specially designed bag, into which all the fine particles fall during drilling.
This container is put on the drill and when the drill rotates, by analogy, production occurs along the grooves into the package. This is clearly visible in the photo below.
Drilling concrete with a hammer drill
What will you need to do to drill a hole in a concrete slab using a hammer drill? The procedure is easy:
- the drill switches to impact mode, then drilling begins; the tool must be held strictly at a right angle;
- after a few days, the drill is moistened with water, this will help avoid overheating;
- If you succeed in drilling a reinforced concrete wall, the drill must be pulled out without turning off the device itself;
- To clean the acquired hole from dust, a drill is inserted into it a couple of times.
Can't drill into the wall? Did the hammer drill hit something hard? This means you need to try and make a hole there.
My readers' experience
Tip 1
Half-mask respirators are complete rubbish. Spraying water does not clear the air of fine—the most dangerous and most volatile dust. If you have a partner and the opportunity, to reduce the FORMATION of dust, try spraying the grinder disk on the place where it fits into the groove being cut. Since pneumoconiosis is incurable, use RPE that is more effective than half masks (in order of increasing effectiveness): full-face masks with P3 filters (BUT so that the size matches your face), and they also have forced supply of clean or filtered air under the mask (so that unfiltered air did not leak through the gaps between the mask and the face - the main problem of RPE). The second option is more expensive, to put it mildly. The compromise is to work intermittently, tightening the headband fastening straps (to press the full face mask tightly against the face). In industry they use ventilation, but this is unlikely to suit you. Although drilling in the ceiling with a vacuum cleaner in one hand and a drill in the other is quite possible.
Tip 2
It was an experience. The apartment is residential. Renovation only in the kitchen. I moved the sockets, chiseled the walls (concrete) with just the same diamond disc as you have in the video, concrete with stones. Goal: to protect the apartment from dust; it is clear that in the kitchen itself there is a column of dust.
Option 1. Hang 2 sheets of dense polyethylene on the door with a large overlap of the wings vertically, with the ability to connect them with Velcro or a zipper. This option was prompted by the mobile chemical laboratory system. Polyethylene - so that dust rolls down. Dense - to walk on, so as not to tear. Velcro - to protect the passage and the gap in the middle. Apply tape around the perimeter of the door jamb. We didn’t get around to Velcro (there was no one to sew), and since the polyethylene is dense, the gaps still remained. I declined this option.
Option-2: The idea is the same, but instead of polyethylene I used 2 wet sheets, the tape around the perimeter of the door fell off by itself, and was replaced by nails and buttons. The overlap on the walls along the perimeter is 20-30 cm, in the middle of the passage it is also about 30 cm. Before dusty work, I removed it, wet it generously, and as it dried, sprayed it with a flower spray bottle. At the bottom, along the width of the door, I laid a wooden beam, pressed the sheets, provided tension, and thereby plugged the bottom gap. The main thing is that there is no draft in the apartment; all windows must be closed. At the end of the work (when the dust is thick and you are there), breathing all this goodness is harmful. I tried to spray the air to knock down dust, but the effect is weak + dirt appears. Additionally, he opened the window in the kitchen, put a fan opposite it to blow it out and went through the “wet barrier” into another room, waiting for the dust to settle. Result: dust seeped from the kitchen into the corridor and settled on the floor at a distance of about 3 meters (this was helped by the natural convection of air in the apartment), but beyond that there was no obvious dust. Daily cleaning of the corridor in the evening saved me from the displeased glance of my wife. Of course, and without fail, any renovation requires cleaning the entire apartment; dust appears always and everywhere. I hope someone will find my experience useful.
So, today we learned what construction dust is, where it comes from, and in what cases it occurs most often. How to protect your respiratory organs from it, how to work, protecting your furniture and other valuable accessories from it in the house.
At the same time, you need to remember that in addition to personal protective equipment during repairs, you can use safe technologies, such as odorless interior paint, this will also help preserve your health.
Why fight dust?
Dust is undesirable for many reasons:
- When dust enters the body, it causes health problems.
- Particles of cement or brick flour, getting into the gears of mechanisms, can damage them.
- When mixed with water, cement dust forms dirt that is difficult to wash off.
Therefore, it is customary to combat dust during repairs with all available means. To protect eyes, hair and skin, the construction worker wears special clothing, safety glasses, a hat and respiratory protective equipment (respirator or gauze bandage). Furniture and other things that cannot be removed from the room during repairs are covered with newspapers or polyethylene.
However, all these measures only reduce the damage. Devices that collect dust even as it forms can radically solve the problem.
Drill attachment from a bottle or cup
If you need to drill a hole in the ceiling, the crumbled concrete will mostly fall down. To collect dust, a combination of a drill or auger and a bottle with a cut off bottom will help. An ordinary plastic cup will do, but it will need to be cut so that the part of the drill that will go into the wall protrudes above the walls. As a result, the flour that falls down will fall into the cup and will be easy to remove.
We use a vacuum cleaner
You can use the vacuum cleaner even without a special attachment.
- The easiest option is to suck in air with the narrowest slot-shaped nozzle. It creates a very powerful stream that draws in flour particles well. The disadvantage of the method is that you need an assistant.
- The second option is to build a nozzle from a board with a drilled hole and a collection from a cut bottle attached to it. Then the drill is inserted through the holes in the bottle and the board, and the vacuum cleaner is connected to the neck.
We hope that the proposed methods will help you complete all work related to drilling as cleanly as possible, without unnecessary dust and labor costs.
Where does dust come from?
As a rule, hard materials are drilled with a hammer drill or impact drill. A drill, drill bit or other tool destroys the material and brings small particles to the surface. There is a special impeller inside the power tool. Rotating, it drives cold air towards the cartridge, cooling the engine and preventing the mechanism from clogging. However, the air flow disperses the dust to the sides, lifting it into the air.
Depending on the nature of the material, the dust will be more or less coarse. Homogeneity also differs: particles can have the same size or form several fractions.
The dust generated during drilling is hazardous to health. It can dust your eyes and get into your lungs when you breathe. To avoid such effects, it is necessary to wear a respirator, safety glasses and a hat when working.