Spider hook
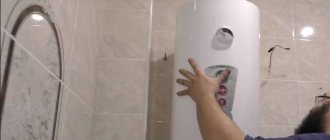
At a hardware store you can buy a special device called a “spider hook”: it has four pointed ends that are easily attached to the wall with a hammer and leave virtually no marks on it. This hook holds securely on any wall; you can hang a picture or frame weighing up to 2 kg on it.
This is interesting: Testing 3D interior planners - creating a room design yourself
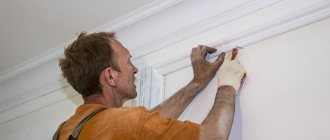
Marking methods
There are at least two ways to mark a wall for hanging modular paintings. The first is to trace the modules on the wall. Or rather, mark the corners of each fragment. We begin work with the central element of the composition. We apply the fragments to the wall one by one, tracing the corners. Don't forget about the distance between modules.
Modules often have different heights. To correctly position them relative to each other, select some moment that is present in at least two adjacent fragments. Make a mark on the wall (put a dot). On the modules that are in the middle of the composition, you need to put marks on the right and left. Align the next fragment according to the mark, move it to a specified distance, mark the upper corners.
Aligning a drawing by marks
When all the fragments are marked, we find the middle and install the selected fastener at the desired height. The “required height” is so that the top of the picture is at the mark made. It must be remembered that the stretched thread or installed bracket/loop is placed on a stretcher. In principle, a deviation of two, three, four or even five centimeters from the marks is not critical
It is important that the pattern on the fragments matches
Horizontal modules are rare
The second markup method is probably simpler. Take paper (newspapers, posters, leftover wallpaper, etc.), cut out copies of the elements of the modular picture. True to size. Place marks on the paper (as described above) so that you can correctly align the elements on the wall relative to each other. On paper, mark where the loops/staples are installed and where the fishing line is stretched.
We place paper blanks on the wall. You can secure it with pins (on the wallpaper) or buttons. In this option, you can evaluate whether you have chosen the right location and make adjustments. As you can see, the option is more practical. Next, in the place where the mark was made (there is a bracket or loop in the picture), we attach the hook. You can even do it through paper. Next, we tear off the paper and hang up the modular picture.
Needle
Another way to place light paintings is to stick a sewing needle into the wall. For example, you can carefully drive a tailor's pin with a head into the wallpaper at an angle. Another option: break off the eye of a sewing needle with pliers and simply hammer it into the wall with the sharp end. This way, the hole in the wall is small and unnoticeable, unlike nails or screws. At the same time, the needle itself, steel and durable, securely holds the frame.
Factors influencing the choice of fastening
Previously, the problem was solved simply. A hole was drilled in the wall, a wooden plug was inserted, a nail was driven in or a screw was screwed in. Dust fell on the floor, sometimes the plaster fell off, the damaged area was sealed with cement or alabaster mortar. Everything was troublesome and unaesthetic.
Today there are enough fasteners that allow you to hang pictures without drilling.
When choosing a mount, two factors are taken into account:
- weight, size of the item;
- finishing wall covering.
There is nothing to discuss about the mass of the subject. Everything is obvious. No sane person would think of hanging a picture in a heavy frame with double-sided tape.
The second factor is not decisive, but it must be taken into account. Different mounts hold differently.
Double-sided tape
This method is suitable for walls with thin paper wallpaper or plasterboard partitions. Just apply regular double-sided tape to the edges of the frame and attach it to the wall. True, the disadvantage of this method is that the tape can leave marks on the wall; To prevent this from happening, it is recommended to hold the tape at an angle of 90 degrees relative to the wall when removing the painting.
Useful tips
At first glance, each method of fastening without drilling seems simple. However, a minor defect or mistake will not allow you to achieve the desired result. To ensure that the painting hangs securely on the wall and is pleasing to the eye, it would be a good idea to listen to the following advice:
- Do not use expired glue or dried out tape;
- I wipe the adhesive surfaces from dust and degrease them with alcohol;
- The markings are applied according to the level, taking into account the dimensions of the frame of each picture;
- It is optimal to place the paintings above 1.5 m from the floor so that they hang at eye level;
- exposure to the sun is undesirable, since bright rays fade the colors of paintings, and the heat dries out the tape or glue, weakening the fasteners;
- a large composition of paintings looks beautiful with backlighting, and lanterns are installed on one or more sides so that the shadow is reflected on the wall.
Art lovers organize compositions in the office. In such cases, you first need to hang the main picture, and then distribute the remaining canvases with a slight indentation from it.
Velcro Command
The special technology of Command Velcro allows you to glue them to almost any surface and easily hang pictures weighing up to 2 kg on them. The advantage of this brand of Velcro is that it can be easily removed without damaging the walls. They are sold as a set of several strips: one strip is glued to the frame, the other to the wall. The more stripes, the heavier the painting can be.
Without nails or a hitch: 7 ways to hang a picture on the wall without drilling
Frames with family photos or beautiful paintings add aesthetics and creativity to the design. In this material we will tell you how to hang a picture securely and without damaging the walls.
Adhesives
One reliable way to attach a picture is with adhesive liquids. They are polymer glue and liquid nails. They fix even heavy images in wooden and iron frames on the wall. For light frames, a strip of glue along the edges on the reverse side is enough, but heavy frames must be carefully coated with glue along the entire length and width. Liquid nails are applied to small paintings in small dots around the perimeter; on large paintings, glue dots are applied over the entire area. The frame is pressed against the wall for several minutes so that it adheres tightly to the surface.
Before gluing paintings to the wall, you must clean it thoroughly. The reverse side of the frame, photograph or plate must be degreased. Polymer glue differs from liquid nails in that it does not leave marks on the wall after dismantling. Experts say that such fasteners will be valid for a year.
Wine cork
A compromise in attaching a picture without drilling, but with nails, can be a wine cork and reliable glue. The cork will become a layer between the wall and the frame without causing damage to the wall.
The wine cork is cut into circles 1.5-2 cm wide. This is done with a sharp stationery knife, the circles should be perfectly even. The circle is glued to the wall and pressed tightly. It is worth waiting a while until the adhesive material dries. Next, take a self-tapping screw and screw it into the plug. A picture is hung on the resulting structure.
Cornice rail
A reliable way to hang pictures is a curtain rail. Made from ordinary cornice and high quality fishing line. You will also need glue and plastic hooks. If you plan to hang heavy pictures in frames, then you should stock up on reliable material. It determines how tightly the cornice will stick to the wall. The hanging system allows you to hang several paintings at different heights at once.
Hooks are hung on the cornice, onto which wire, fishing line or nylon thread is attached. The distance between the paintings is taken into account. The rail is glued to the wall, and pictures are attached to the ends of the threads. You can change the position of the images at any time by swapping them or hanging new ones.
Double-sided tape
Small and light frames with photographs or paintings can be attached to the wall with double-sided tape. It is better to take fabric-based or foam tape.
Strips of sufficient length are cut. If the painting is large, use more tape. After this, you need to stick the first layer of tape on the wall. The remaining pieces are attached to the back of the frame. After this, you need to firmly press the picture to the wall.
Decorative tape
To aesthetically decorate a picture on the wall without drilling, you can use a wide decorative tape or cord. Suitable for small and light paintings. For work you will need: hook, ribbon, scissors. Choose a regular needle, pin or paper clip as a hook. In the latter case, a special hole is made in the wallpaper into which a modified paper clip is inserted. One side should be larger, the other smaller. To do this, it is bent in the appropriate direction. After placing one side under the wallpaper, the structure is secured with glue.
You can also use professional means for fastening: a spider hook or special adhesive tapes. After the first fastener is made, you need to hang a decorative ribbon on it. As a result, two edges of the tape should hang down. The pictures are attached using glue. If the image is hung in a frame, polymer glue or liquid nails are used.
Spider hook
The spider is small in size, but can withstand paintings weighing up to nine kilograms. There are four spikes on the upper edge, which guarantee the plastic product high strength and the ability to withstand heavy images. The first step is to hammer the hook into the wall. Do not hit it too hard, otherwise the plastic base will be damaged.
The loop on the back of the frame should be made so that it hides the base of the spider. After this you need to hang the picture. With this mount, the image will hang quietly for at least a year. After this period, it is better to change the hook. After removal, there will be four small holes in the wall that can be easily hidden.
Kreps
Command and Kreps companies produce identical products - Velcro fastening systems. They look like this: the back of each element is sticky. On the front side, at the end of the Velcro, there is a special hook on which the picture is attached. The system consists of an adhesive film onto which Velcro is attached. One Kreps hook can support paintings up to 1.5 kg, Command – up to 1 kg.
Before fixing the Velcro, you must select a location on the wall and clean it thoroughly. There should be no dust, dirt, chips or other unnecessary elements. The adhesive tape is glued to the desired place, the protective layer is first removed. Next, the protective layer is removed from the back of the hook, which is glued to the adhesive tape. The structure is pressed for 30 seconds.
Command and Kreps also produce special Velcro that can withstand weights of up to 1 kg. Each adhesive tape is easy to remove and holds an image that weighs 450 grams.
These methods will help you hang a picture of any weight without damaging the wall.
Support the project - share the material with your friends on social networks:
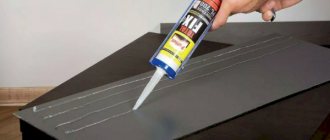
Liquid Nails
Liquid nails are a special glue that securely connects surfaces. Simply apply liquid nails to the back of the frame in small dots (if the painting is heavy, you can coat the entire frame). Then press the painting flat against the wall surface and hold for a few seconds.
This is interesting: A small kitchen is not a problem! Expanding the boundaries
Professional solution
If “artisanal” hanging methods are not satisfactory and you want to know how to properly install the fasteners – following the example of art galleries – it’s worth remembering special hanging systems.
They consist of three main elements - a rail, a strong fishing line or cable, and a hook with a regulator. Thanks to this regulator, you can set the desired position of the hook - at a greater or lesser distance from the rail.
The systems are complemented by connecting, end and corner elements, which makes it possible to position the rail along the entire perimeter of the room, not excluding corners, bay windows and protrusions.
For large and heavy images, craftsmen advise using two hooks: this helps to hang the frame evenly and is especially suitable for heavy products.
Decoration stage
Once the position of all elements has been approved, it’s time to move on to the fasteners. You can make marks at the corners to hang the images exactly as intended. All that remains is to choose the right mount and see your old empty wall as new, bright and beautiful. For example, like this:
We want any interior transformation process to be easy and fun. So that nothing stops you on the path to realizing your ideas. And if you've always dreamed of bright walls that, like a mirror, reflect your character, maybe now is the time to start? We hope our article will be useful to you in this regard.
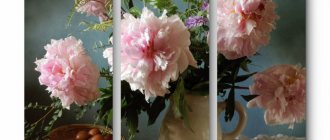
Rules for placing modular paintings
Before you start installing the picture, you need to decide on its location. And this stage must be approached with all responsibility, since the perception of the image and its harmonious combination with the interior of the room directly depend on the correct choice of location for the canvas.
Rules and recommendations for placing a picture:
- A painting that depicts a vertical pattern will visually increase the height of the ceiling, while a horizontal pattern will make the walls wider;
- It is not recommended to hang massive modular paintings in close proximity to a large amount of furniture, as this can introduce disharmony into the interior of the room;
- The place for the painting must be selected taking into account the lighting. If the picture is painted with oil helmets, then you need to make sure that a lot of sunlight does not fall on it, in order to avoid premature aging of the paints. It is also worth making sure that artificial or natural lighting will not create glare on the surface of the canvas;
- Paintings should be placed at least 1.5 meters from the floor so that the image is completely within the field of vision of the eye.
Important: To make sure that the modular painting will look effective in the chosen place, harmoniously combining with the interior, you should first place the composition on the floor and visually assess the proportionality of the canvas and the overall design concept of the room
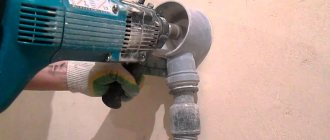
Drilling time clock
Working with a drill is very noisy and it must be carried out in an apartment building at certain hours according to the law. Repair work is prohibited on weekends. On weekdays, you can break the silence from 9 am to 7 pm, in some until 8 pm. In some regions, from 1 pm to 3 pm there is a period of silence. For violation, fines of 500 rubles and above are provided.
Federal Law N - 52 has existed from March 12, 1999 to the present, it specifies noise standards at different times of the day. Amendments are made periodically, and different regions of the country have their own rules.
Working hours for repair work, which also includes work with a drill, differ in different regions of the Russian Federation.