A little dark humor: putting together puzzles develops not only logic, imagination and fine motor skills, but also myopia and osteochondrosis. To justify such a hobby, we will decorate the interior with puzzles. How to make a picture from puzzles so that it looks beautiful and neat on the wall?
Let's learn some nuances so that the design of pictures from puzzles will be successful. Our tips will help you avoid annoying mistakes so that glued puzzles do not have to be thrown into the trash.
We've completed the puzzle - what's next? Let's decorate the interior: make a picture from puzzles
A little dark humor: putting together puzzles develops not only logic, imagination and fine motor skills, but also myopia and osteochondrosis.
To justify such a hobby, we will decorate the interior with puzzles. How to make a picture from puzzles so that it looks beautiful and neat on the wall? Let's learn some nuances so that the design of pictures from puzzles will be successful. Our tips will help you avoid annoying mistakes so that glued puzzles do not have to be thrown into the trash.
Making a frame
After gluing, you can frame the puzzle, which will give the product a decorated and bright look. There are already ready-made options on sale, but if you wish, you can make your own.
To construct frames, you can use different elements:
- Unsharpened colored pencils. They are glued along the perimeter of the assembled and glued image;
- Ceiling plinth. It needs to be cut with a stationery knife, and then glued to the base along the edges of the assembled product;
- Wooden boards. This option is more complicated; sawing requires a jigsaw. You also need a tape measure or ruler for measurements. The frame must be attached to the base, which is made of fiberboard or plywood.
If you decide to frame a picture from puzzles, then do not forget to paint it with acrylic paints. It can be supplemented with various designs that will give the product a bright look and make it more elegant.
Gluing puzzles can be done using different methods, but each of them ensures a strong and durable composition. It is important to do everything carefully and carefully so as not to damage or spoil the product. The selection of a gluing agent is of particular importance; if you decide to make glue for puzzles with your own hands, then it is better to use a product with a thick consistency. But still, to make the picture beautiful and durable, it is better to use special adhesive products.
Source: vseprikleim.ru
How to assemble puzzles
Those who are not in the know will think that this is just a toy for children, but in fact, adults are mainly interested in assembling puzzles. A great hobby to unwind after work. But a beginner, without understanding the nuances, can, on the contrary, undermine the nervous system.
To enjoy the process of assembling puzzles into a mosaic, you should prepare a little:
- find a place to assemble and store the puzzle;
- learn selection methods;
- sort the parts;
- figure out what to do with the finished puzzle.
It's fun to put together large puzzles, but you'll need a lot of space to lay out and fold the pieces like this. Leaving it on the floor or on the table is not an option, since this is not an activity for one day. The solution is to purchase a special mat for putting together puzzles. See how it looks in the video:
You can make a mat yourself from any thick, non-slip fabric. Replace the inflatable roller with foam rubber, and use elastic instead of belts. It is comfortable to work on even on a soft sofa. After the “meditation” session, the mat with the assembled fragment is wound onto a roller, secured with straps and placed in a corner until the next day or transported, for example, to the country house.
The work begins with sorting the parts by color and individual objects and patterns. As always, there will be a lot of blue details from the sky, sea, and ocean. It is convenient to store individual piles or collected small fragments in organizers or in candy boxes.
There are a lot of techniques on how to assemble them correctly; there is even a forum online for those who like to assemble puzzles. You can search for a part by sample, by puzzle, or by brute force. Everyone chooses their own option, but you need to start with the simplest section. If you want to become a cool puzzle collector, don't think about techniques, try experimenting instead.
Either way, you'll have a good time. It’s natural that one would want to be proud of such titanic work. For example, hang a puzzle on the wall, and how to glue it and arrange it into a picture, read below.
Gluing the puzzle from the front side
Fixation occurs using glue or using a special film for fastening puzzles. Glue is poured between the parts, holding everything together tightly. The disadvantage of the option with glue is that you can’t take anything apart later.
The self-adhesive film for the puzzle is glued to the front side and holds the pieces together well. To make the design clearly visible, choose a glossy film. A good sample does not stretch or bubble. If it sticks unevenly, you can peel it off and try again.
Tips from the pros:
- Choose transparent glue that does not become cloudy or dry out over time.
- PVA glue is fine, but make sure it's a quality product.
- There is no need to skimp on film.
- Don't even think about roll tape unless you have someone nearby.
Before starting the gluing process, it is necessary to clean the painting from dust, lint and other contaminants. To avoid staining the table with glue, place tracing paper, parchment or a piece of wallpaper underneath.
Which varnish should I choose?
The most important thing when choosing a varnish is that the label should indicate that it is suitable specifically for painting. Otherwise, the choice of varnish depends on the nature of the image and what effect you want to achieve
The most versatile option is acrylic varnishes. They are available in jars (for brush application) and aerosol cans. The finished coating has different gloss levels:
- gloss – increases the brightness of colors;
- semi-matte – gives a very soft, delicate shine;
- matte – creates an invisible protective film, maintaining the color saturation of the paints.
There are also other types of glossy varnishes:
- Dammar varnish is the optimal ratio of quality and reasonable price and is one of the most common. However, over time it gives a strong yellow tint, so it is completely unsuitable for working in cold colors. For paintings in warm colors, varnishing will add completeness and some aristocracy.
- Acrylic pistachio varnish is a good choice for canvases exposed to cold colors, as it creates a completely transparent coating and does not cloud, but is more expensive than dammar.
- Acrylic styrene varnish is an analogue of the previous varnish. It also retains colors perfectly, dries quickly, does not turn yellow and forms a thin but dense transparent protective film. In addition, it is very water resistant.
Retouch varnish is not used for coating and is recommended for those cases when you need to correct something on an already dry painting. It softens the top layer of paint and ensures its adhesion to the newly applied layer. It is applied before and after the correction.
Do not use mastic or copal varnishes for coating. They are good for mixing paints. When applied, the mastic varnish will darken very much, and you will get something black instead of a bright image. Copal varnish cannot be removed with any solvent, so only very experienced artists use it.
Paintings painted with dry materials - pencil, sepia, pastel, charcoal - are coated with a special fixative varnish. It creates a thin, durable film that allows you to easily wipe off dust from your work and protects colors from fading.
When purchasing varnish, pay attention to the expiration date. Fresh, unexpired varnish - completely transparent
The presence of cloudiness indicates that the coating will take a long time to dry and attract dust for 2-3 months.
Gluing the puzzle from the wrong side
The main question is how to turn the puzzle face down. You will initially need to assemble on an easily movable surface if you plan to attach the finished painting from the wrong side. This can be a sheet of fiberboard, plexiglass or a special mat. In this case, simply cover the top with a durable material, for example, another sheet of fiberboard, and quickly turn the entire structure over to the other side.
Another option is to use cling film:
- In this case, the canvas needs to be assembled on a substrate, which is slightly larger in size than the assembled puzzle itself.
- Wrap the finished puzzle together with the backing with cling film. You can make several layers of cling film.
- Then the entire structure needs to be carefully turned over, placed face down, and the cling film cut along the backing.
- Turn the edges of the film to the side and carefully remove the backing. Now you can glue the puzzles, and the cling film will protect the table from glue.
It is better to glue large paintings first from the front side and then from the back side. First, coat the front side with glue and wait until it dries completely. Now turning the mosaic over will not be difficult. Turn over carefully and coat the wrong side with glue.
What is a puzzle mat?
A special mat for assembling puzzles is a convenient thing that will help you put aside a partially assembled puzzle for storage without deforming it.
Interesting materials:
What is a thick or thin client? What is topiary or tree of happiness? What is options trading? What is identity of consent? What is transport and its types? What is thirty pieces of silver? What is Tricolor Ultra HD? What is Tripartism that is used in the activities of the International Labor Organization? What are newts and how to build them? What is a three-quarter pipe?
How to make a picture from puzzles into a frame
There are many ways to make a picture frame from puzzles:
- The most obvious is to purchase a ready-made frame that fits the size of your mosaic and follow the instructions. Frames for large-sized puzzles can be made to order.
- A beautiful frame emerges from the ceiling plinth. You just need to cut it and glue it to the base around the perimeter of the picture using liquid nails or instant glue. Ideal, because such a frame can be painted in a variety of colors.
- An interesting idea is to make a frame from unsharpened colored pencils, colored slats, pebbles, shells, and buttons. The base in this case should be larger than the drawing itself. The selected material of the required size is glued along the edges and the picture is ready.
What do you glue puzzles onto to make a picture? As a basis you can use:
- fiberboard sheet;
- ceiling tiles;
- Styrofoam;
- cardboard, canvas;
- fabric, gauze, tulle.
You know how to make a picture from puzzles. All that remains is to find out how to insert the glued picture into the frame:
Features of base selection
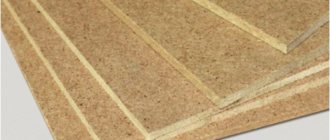
The first step is to select a base for the puzzles; it will hold them in place and preserve the shape of the picture. If the product is small, then whatman paper or a cardboard sheet will do. For options that consist of 100 parts or more, it is worth using a strong and level base. Sheets of plywood or chipboard would be suitable; various adhesives stick well to them.
When considering what to glue puzzles on, you should not miss another option - PVC ceiling tiles. This is an average product, about 500 small parts fit on it. There is a chamfer along the edges; it should be cut off using a stationery knife with a sharp blade. If the future panel will be large in size, then you can combine several PVC tiles.
How to hang a puzzle without a frame
The puzzle picture will look good on the wall even without a frame. In some room decor styles, a frame will even be out of place. How to carefully hang a pre-glued and well-dried puzzle on the wall:
- Using double-sided tape. If the canvas is small, it is enough to cut out a few squares of about two by two centimeters. Glue one in the corners and one in the center. Peel off the paper on the other side and apply it to the wall. If the puzzle is large, then glue it with tape around the entire perimeter and one strip in the center.
- Using sewing pins, but this option is suitable for small paintings.
If you are absolutely sure that a puzzle on the wall will be appropriate, you can firmly glue it to the wall. The glue moment in this case is the most suitable. But if anything happens, you definitely won’t be able to restore the wallpaper and will have to repair it.
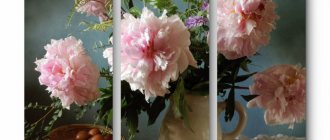
Pictures from puzzles in the interior
Puzzle mosaics will perfectly decorate the walls of any room. Of decisive importance will be the fact that the picture also depicts the framing option itself:
- For a living room or hallway in a classic style, a baguette would be a good solution.
- For a children's room, you can make a frame from scrap material. Laces, ribbons, colored slats, and pebbles are perfect.
- In the bathroom, you can hang a sea-themed painting framed with shells, pieces of sea salt and corals.
- For the kitchen, a puzzle depicting a fruit still life would be a good option. The frame in this case can be either classic wooden or decorated with twigs, dried leaves or artificial fruits.
The amazing is nearby. It used to be just a children's puzzle, but suddenly for many adults, the puzzle became a hobby for many years. Moreover: it has become interior decor. It's all about the image itself and your perseverance. Go for it and you will definitely be able to collect not only 200 parts, but also 2000!
Cardboard photo frame
So, first of all, let's look at the simplest job of making a photo frame from cardboard.
Such a frame can successfully fit into any interior and become an iconic item in your family. To make it you will need the following materials:
- Standard cardboard (can be multi-colored).
- Several old magazines (preferably in good condition).
- PVA glue, super glue or hot glue.
- Needle and thread.
- Stationery thick scissors.
- Pen, pencil, ruler, compass.
Once you have all the necessary materials, you can safely get to work.
- Take cardboard and draw a frame of the size that suits you on it, and then draw another frame in the very center.
- Next, start carefully cutting everything out.
- Then you can start decorating the frame. To do this, you can use threads and embroider a pattern you like, draw a design with a pencil, or cover cardboard with colored paper.
- Then take black cardboard and cut out a frame that would completely match the 2nd frame drawn at the very beginning of the work. Glue it on the back side.
- The final part of the work will be mounting your photo.
By following these instructions, you will have a wonderful DIY photo frame.
How can you hang completed puzzles on the wall without a frame? (photo, video)
Puzzles are a great way to develop a child’s logic, motor skills, attentiveness, and eye. This is also an opportunity to occupy him with something safe for a while, and the site https://bontoy.com.ua/catalog/pazly/ will help you purchase interesting models. Moreover, this hobby is interesting not only for children, but also for adults, because the number of pieces that need to be collected, as well as the design printed on the front side, can be completely different, from a banal cartoon character to a map of the countries of the world. Naturally, if you have assembled a gorgeous map of three thousand pieces (or more), you hardly want to take it apart. And we are faced with the question: how to glue a drawing from small pieces and hang it on the wall, with the slightest loss for it, or with such violations that can be easily corrected. The ideal option would be, of course, without any losses at all, with further decoration of the wall in the house. But what to do if the puzzles did not have a frame to begin with; they were assembled on a piece of newspaper on the floor? In this case, our advice will help you. In fact, gluing the assembled puzzle together is much easier than it might seem at first glance. Moreover, there are several ways to do this. The main thing is that after assembly, choose the right option that is suitable, and then act carefully and clearly.
Method one. We use tape. In fact, this is one of the very first options that comes to mind. In order to glue the puzzle with tape, you need the widest tape and a folded pattern. If you are confident in your accuracy and the picture is not very large, then the tape can be applied to the front side. Otherwise, it would be better to turn it over (photo 1). Carefully apply horizontal stripes, then vertical ones. Excess tape can be cut off.
Method two. PVA glue. The advantages of this method are that it is the cheapest, and the puzzle does not need to be turned over. Apply glue directly to the front side. It is advisable to do this quickly as it dries easily. Don’t be afraid of streaks and stains - when they dry, they will disappear, forming a thin transparent film (photo 2).
After you have glued the front side, it is a good idea to glue the large design onto cardboard or any other hard surface using the same type of glue.
Related article: Loose-fill insulation for walls
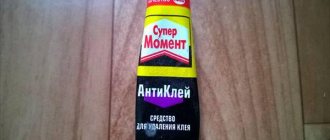
Method three. Special glue for gluing puzzles, for example this one (photo 3).
You can use special glue, which, according to manufacturers, does not harm the front side. This tube is enough for four puzzles with a thousand pieces each. It must be applied with a sponge, which is on the bottle, directly on the front side. To protect the work surface, it is better to place paper under it. The glue dries for about an hour, then the sponge must be washed with water.
Method four. Self-adhesive film. In principle, on the reverse side of such a film, instructions for action are depicted in simple pictures. Separate the paper from the film by about five centimeters (photo 4).
Then we apply self-adhesive tape to the puzzle, glue a separate edge, then evenly and slowly pull back the paper with one hand and cover the entire side of the puzzle. Naturally, you need to glue it on the reverse side. After gluing, carefully smooth the film, pierce the bubbles that were created with a needle to release the air. We cut off the excess (photo 5) and you can broadcast it on the wall.
You will need it
- – assembled puzzle;
- – sheets of fiberboard or plexiglass according to the size of the puzzle;
- – adhesive tape (scotch tape) or office clips;
- - scissors;
- – PVA-M glue;
- – flat brush or sponge;
- – glue for gluing puzzles;
- - putty knife.
To make the picture look neat, it is better to glue it on the reverse side. To do this, the picture must be turned face down. It’s great if you took care of this in advance and assembled the puzzle on a special mobile surface, for example, a sheet of fiberboard or plexiglass. In this case, simply cover the assembled puzzle on top with another sheet of fiberboard, press the sheets together and quickly turn them over. If the puzzle is very large, fasten the fiberboard sheets together with tape or paper clips. Huge puzzles are easier to play with two people.
If the puzzle is assembled on a table, then simply bring the fiberboard sheet to the edge of the table so that they form one even plane. Carefully move the puzzle onto the sheet, then turn it over using the method indicated above. Very large puzzles that are assembled on the floor can be turned over in pieces by hand. In addition, such a puzzle can be glued together without turning it over. Before gluing the puzzle, do not forget to clean it from dust, hairs and dirt.
We recommend: How to choose glue for mice, rats and insects - pests will not pass by
To glue the puzzle, take wide tape and overlap it on the back of the puzzle, vertically and then horizontally. Carefully align and press each strip of tape onto the puzzle. After this, carefully cut off the tape remaining at the edges of the picture. Such a puzzle can be rolled up and thrown into storage, or it can be framed and hung on the wall. Do not tape the puzzle from the front side, because the joint between the strips of tape will be very visible.
You can also fasten the puzzle with PVA glue. This method is not bad because this way you can glue the puzzle without turning it over, and this is especially convenient for very large paintings. To do this, simply apply PVA glue with a brush or lip in a thick layer onto the puzzle.
Pay special attention to the connections between the puzzle pieces. The glue should fill the gaps between them. Please note that PVA glue dries quickly, so you need to act quickly
After applying the glue, you need to wait 2-3 hours, during this period of time the glue will become transparent and form a matte film on the puzzle, while the quality of the picture will not be impaired at all. When gluing a huge puzzle with PVA glue, to be on the safe side, glue it on the back side with tape, then frame the picture
Please note that PVA glue dries quickly, so you need to act quickly. After applying the glue, you need to wait 2-3 hours, during this period of time the glue will become transparent and form a matte film on the puzzle, while the quality of the picture will not be impaired at all. When gluing a huge puzzle with PVA glue, to be on the safe side, glue it on the back side with tape, then frame the picture.
You can also buy special glue for gluing puzzles in the store.
This glue must be applied to the middle of the front side of the puzzle and spread with a spatula over the entire surface of the picture, paying special attention to the connections between the individual parts of the puzzle
Putting together a puzzle is an interesting and exciting process. Therefore, it will be useful for lovers of this activity to know how to glue puzzles into a picture in order to preserve the result of a long assembly process and decorate their home with it.
There are several simple ways to glue a puzzle quickly and firmly.
How to hang a puzzle on the wall?
Share on social media networks:
Puzzles are a fun activity and a great way to develop a child's imagination, logic and attentiveness. This hobby will be interesting not only for children, but also for adults. The number of details and complexity of the drawing can be varied - from the simplest of several dozen pieces with illustrations of cartoon characters to several thousand, from which amazing pictures are obtained: landscapes, world maps or architectural monuments. This canvas can be used to decorate the interior of your home or office. But how to hang a puzzle on the wall without damage or deformation? What to do if there is no frame and the mosaic was assembled on the floor? In this case, there are some tips. The process may seem complicated at first glance, but in fact, it is easier than you think. The main thing is to do the work carefully and carefully, but first the assembled parts must be secured.
Frames for every taste and for any format
At IKEA you will find a wide selection of frames in a variety of shapes, colors and styles.
Some are very simple in appearance and are standard in size, from A6 (10.5 x 14.8 cm) to A1 (59.4 x 84.1 cm). Others come in fewer formats, but have a more sophisticated appearance. Do not forget that the frame can play no less a role in the interior than the photograph in it.
When choosing a specific option, it is important to consider the style and color scheme of the room. Our advice is to use contrasting colors to make your photo stand out. For example, a black frame will look great on a light wall, and a white or silver frame will look great on a dark one.
Method one - tape
One of the most common options is to assemble and hang a puzzle on a wall in the ground:
- It is best to assemble the picture directly on a solid base - cardboard or plywood.
- After assembly, we put the same pre-prepared plywood (chipboard) on top, the size or larger of the picture, and place it on top.
- We secure it on all sides with money binders - you can use regular clothespins.
- Turn it over.
- We remove the top and begin gluing it with wide overlap tape, grabbing the edges of the base on which we assembled.
- Using a utility knife, trim off the excess along the edges.
- We pierce the bubbles and smooth out the unevenness with a ruler.
Important! If you do assemble the puzzle on the floor or table, you need to place thin paper or newspaper under it, carefully lifting the edge, stretch it diagonally, and then follow the method described above.
Making a frame
After gluing, you can frame the puzzle, which will give the product a decorated and bright look. There are already ready-made options on sale, but if you wish, you can make your own.
To construct frames, you can use different elements:
- Unsharpened colored pencils. They are glued along the perimeter of the assembled and glued image;
- Ceiling plinth. It needs to be cut with a stationery knife, and then glued to the base along the edges of the assembled product;
- Wooden boards. This option is more complicated; sawing requires a jigsaw. You also need a tape measure or ruler for measurements. The frame must be attached to the base, which is made of fiberboard or plywood.
If you decide to frame a picture from puzzles, then do not forget to paint it with acrylic paints. It can be supplemented with various designs that will give the product a bright look and make it more elegant.
Method two - PVA glue
Apply glue to the front side with a sponge. You need to do this quickly so that it does not dry out. Don't worry, stains and stains will disappear after drying and only a thin, transparent film will remain.
Important! For extra strength, it is better to glue your picture to cardboard.
You can also use special glue for puzzles - it dries quickly enough (in an hour) and is convenient for using large mosaics (3000-4000 thousand). The principle is the same as with PVA glue.
Important! To avoid damaging the work surface, you can place newspaper on it.
What glue is suitable
How to glue puzzles together so that they do not fall apart in the future and preserve the composition? For these purposes, it is worth choosing an adhesive that can firmly hold the parts on the base. Specialized adhesive compositions and options for household work can be used.
Puzzle pictures are often glued with the following compounds:
- Special glue for puzzles. It usually comes as a kit, in a box with parts. Has a soft and comfortable sponge. The composition has a liquid consistency that penetrates between small elements and produces quick and strong adhesion. The product is odorless and colorless. It forms a transparent glossy layer, so after applying it there is no need to varnish the surface of the painting.
- PVA. This type is very similar to special glue, but there are still slight differences. For application, use a small stationery brush, the composition is applied to the front side, it should fill small gaps between the parts. After the picture should dry, all the white stains will disappear, and in their place a smooth glossy coating will remain;
- Wallpaper adhesive for vinyl products. The product perfectly glues small parts. Depending on the size of the puzzles, you can make the composition with different densities.
First, you should carefully study how to use glue for puzzles. Each product must be used correctly; some require prior preparation.
How to hang a puzzle on the wall without a frame?
If you have assembled a mosaic into a couple of thousand pieces, spending several weeks on it, it is completely natural to want to leave it whole rather than take it apart. But what if you don’t have a frame? Made to order? - This is not a cheap pleasure. Buy ready-made? — It’s unlikely that there will be a suitable size. So how to hang a puzzle on the wall without a frame?
Method 1
You can use double-sided tape:
- If the picture is small, it is enough to cut out five squares about two by two centimeters. Glue one in the corners and one in the center. Peel off the paper on the other side and apply it to the wall.
- If the puzzle is large and heavy, then we glue adhesive tape around the entire perimeter and one strip in the center. Glue it in the right place.
Important! The disadvantage of this option is that it will be impossible to remove the painting without damaging the wallpaper or decorative plaster - traces of the tape will remain.
Method 2
A good option for small mosaics is to attach using sewing pins. But this method is suitable for crafts with no more than a couple of hundred parts. Hanging a large puzzle on the wall will not work this way! They will not hold it, or you will have to use needles, which can ruin the appearance.
Aesthetically, such a product will, of course, look better in a frame - you can make it yourself, and quite inexpensively. We will need a ceiling molding and transparent “liquid nails”.
Important! The edges of the base to which you glue the craft should be the width of the baguettes.
- We cut our ceiling plinth into four pieces of the required length.
- In those places where there will be joints, we make a diagonal cut.
- We glue it with “liquid nails” around the perimeter.
- After making small holes in the upper corners, we hang them on nails.
Important! The frame can be left white, or it can be coated with varnish or acrylic paints. Another little trick: if you glue the assembled mosaic onto a Whatman paper larger in size than itself, you will get a visual frame.
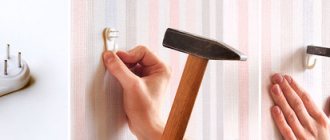
Drilling
If all the previous methods of attaching pictures do not inspire confidence in you, let’s move on to the most reliable one: drilling holes in the wall, placing dowels in them and screwing in screws.
This process is labor-intensive, which will require a whole arsenal of tools and fasteners, which still need to be correctly selected taking into account different types of wall materials. For example, thinner drills and special dowels (“mollies”) are considered suitable for drywall.
If you are ready to put in the effort and start drilling holes, then pay attention to one more nuance: if there is wallpaper, the drill can pull it along with it, which can lead to unsightly tears. It won’t hurt you to hang the picture on the wall, but removing it will be problematic - after all, there will be a hole in the wallpaper. This method is most reliable for permanently placing large paintings in heavy frames that you do not intend to rehang later.
This method is most reliable for permanently placing large paintings in heavy frames that you do not intend to rehang.
When you want to properly hang a picture on the wall, then think about not only the question of what it will be supported on, but also how beautiful it will look from different angles and in different lighting.
When choosing a place where you want to hang a painting on the wall (especially one that has great artistic or personal value), it is important to consider factors that can cause damage to the painting: direct sunlight, high humidity, sudden temperature changes. We offer you to watch another video on the topic of the article. Maybe this will help you choose the most convenient method for hanging pictures.
Maybe this will help you choose the most convenient method for hanging pictures.
We offer you to watch another video on the topic of the article. Maybe this will help you choose the method of hanging pictures that is most convenient for you.
An expert in the field of housekeeping and a master of culinary masterpieces (according to family and friends). I’m used to relying on common sense, everyday experience and women’s intuition.
Found a mistake? Select the text with the mouse and click:
Fresh lemon is not only suitable for tea: clean dirt from the surface of an acrylic bath by rubbing with half a cut citrus, or quickly wash the microwave by placing a container of water and lemon slices in it for 8-10 minutes at maximum power. The softened dirt can simply be wiped off with a sponge.
Threads made of gold and silver, which were used to embroider clothes in the old days, are called gimp. To obtain them, the metal wire was pulled for a long time with pliers to the required fineness. This is where the expression “to drag out the rigmarole” came from - “to do long, monotonous work” or “to delay the completion of a task.”
The dishwasher cleans more than just plates and cups. You can load it with plastic toys, glass lamp shades and even dirty vegetables, such as potatoes, but only without using detergents.
Stretch ceilings made of PVC film can withstand from 70 to 120 liters of water per 1 m2 of their area (depending on the size of the ceiling, the degree of its tension and the quality of the film). So you don’t have to worry about leaks from neighbors above.
The easiest way to remove scale and carbon deposits from the soleplate of the iron is with table salt. Pour a thick layer of salt onto the paper, heat the iron to maximum and run the iron over the salt bed several times, applying light pressure.
There are special traps to combat moths. The sticky layer with which they are covered contains female pheromones that attract males. By sticking to the trap, they are eliminated from the reproduction process, which leads to a decrease in the moth population.
The habit of using an automatic washing machine “sparingly” can lead to the appearance of an unpleasant odor in it. Washing at temperatures below 60℃ and short rinses allow fungi and bacteria from dirty clothes to remain on internal surfaces and actively multiply.
If your favorite things show the first signs of gestation in the form of untidy pellets, you can get rid of them using a special machine - a shaver. It quickly and effectively shaves off clumps of fabric fibers and returns things to their proper appearance.
Before removing various stains from clothing, you need to find out how safe the selected solvent is for the fabric itself. It is applied in a small amount to an inconspicuous area of the item from the inside out for 5-10 minutes. If the material retains its structure and color, you can move on to stains.
How to glue puzzles: different ways
Assiduous and calm people often spend their leisure time putting together large and complex puzzles. As well as children who develop fine motor skills and logic. And now, when all the parts are installed in their place, the logical question arises about what to do with the assembled picture. Take it apart and put it back in the box? Or leave it as a painting? And then how to glue puzzles so that they do not fall apart? There are several ways to make your dream come true.
Related article: Technology for leveling walls under wallpaper
Addresses of framing workshops
Bring your work for decoration to the Lenbaget framing salon closest to your home.
Attention! You can use it in the framing workshop at st. m. Victory Park, st. Frunze 15 and Art. m. Bolshevikov Avenue, Pyatiletok Ave. 14, building 1
Decorating puzzles and photo mosaics in a baguette frame
The popularity of baguette frames dates back centuries, when even in royal palaces the walls were decorated using this interior element. This is a stylish and especially elegant element in the walls of any home.
Puzzles or photo mosaics can be successfully framed into a baguette and the finished product can be placed on the walls of your home. This will give the interior a special zest and will favorably emphasize the overall background of the room. Puzzle frames provide the finished form for a specific piece of art that you plan to display for your guests to see.
Photo mosaic and puzzle design requires the proper style combination, which will be successfully implemented when using a picturesque baguette. frames for puzzles yourself, but the design should be done by creatively-minded professionals. This is exactly the kind of talent that LenBaget workshop specialists possess.
The employees of our framing workshops know exactly which frames for puzzles are best suited to highlight the work and complement the overall background of your home interior. The craftsmen have extensive experience - for more than 15 years they have been framing any objects of art into frames. These are specialists with golden hands and special creative thinking, which is so important for the average client.
How to glue puzzles with glue?
Now in art stores you can find such a product as an adhesive base for mosaics, and puzzles too. It can be either PVA glue or transparent adhesive film. It is advisable to use the latter only for small-sized pictures, since there is a risk that they will turn out with air bubbles or wrinkles. It is very difficult to apply film over a large area. There are two main ways to glue puzzles together.
Option #1: flip the picture
It is very important what the cardboard mosaic was originally assembled on. If it is, for example, a sheet of fiberboard or chipboard, a puzzle mat or cardboard, then turning the finished picture over will not be difficult. To do this, you just need to place another similar sheet on top of the mosaic, press it tightly, and then turn it over. If the picture is very large, then you can additionally fasten the substrates with paper clips or tape. Then you need to apply glue to the wrong side of the puzzle and let it dry completely, as indicated in the instructions. For those who have not purchased adhesive, the same tape may be useful. The strips are laid in width (this will be denser) and overlap. This way the picture will last longer. It doesn’t matter at all whether you get air bubbles under the tape or not. This is still not visible from the inside out, but you should not neglect accuracy.
Option No. 2: without turning over
If the puzzles were assembled on the floor, and the size simply does not allow you to quickly turn over the finished picture, then you can fasten everything together without any turning over. To do this, first of all, you need to slip polyethylene under the future painting. For example, it could be a torn garbage bag. What is it for? To avoid damaging the floor covering with glue. Even the largest painting is not so difficult to drag slowly onto polyethylene, carefully, centimeter by centimeter. After this, you can use various means to hold the puzzle together. For example, thinly diluted PVA glue. Or the same transparent tape. For application it is better to use a wide and flat brush. If you apply transparent tape, you need to do it very carefully so that there are no air bubbles, wrinkles, or folds. It would be a good idea to apply a layer of varnish without color on top of the glue. This will add gloss to the picture and connect the elements even more tightly.
How to choose a base
A number of materials are used as a basis, each with its own pros and cons.
Fiberboard sheet
Since fiberboard is a relatively dense material, you must first adjust it to the size of the picture, because leveling and trimming after gluing can be problematic, and the puzzle itself can be damaged.
PVA is applied to the back of the puzzle in a thin layer and distributed evenly over the entire surface. Excess glue must be disposed of immediately so that it does not leak onto the image. After this, the fiberboard sheet is placed on the puzzle, pressed in all places and sharply turned over. Any glue that appears after pressing on the surface should be carefully removed with a clean cloth. Everything is ready, now let the painting lie and dry.
This method is best suited for large (1000 or more elements) puzzles: the mosaic is easy to glue, its surface remains smooth; Over time, the image does not deteriorate and does not lose its appearance. But you should keep in mind that fiberboard sheets must be cut in advance with special tools; you can’t just handle them at home. In addition, the resulting picture will be quite heavy, massive and will not stay on the wall without additional fastenings.
Styrofoam
As an alternative, a thin sheet of foam plastic is used (like fiberboard, sold in building materials stores). It is light and easy to use, and you can cut it at home - with a stationery knife or tailor's scissors. The image is not distorted after drying, as happens in other cases, but the final painting will have a thickness of 15 mm, which will require a special frame.
Ceiling tiles
Ceiling tiles vary in size and thickness. They are inexpensive and easy to cut. If you take a sample without a convex pattern, the assembled picture will not be too thick (about 4 mm), which will allow you to keep such puzzles in a standard format frame.
1 section accommodates medium-sized puzzles (up to 500 elements). If the pattern is larger, then you can connect several tiles, and it is better to make the joints between them jagged.
Then proceed in the same way as with fiberboard, only after gluing it is advisable to secure the puzzles by lightly pressing the puzzle with a board or something similar so that the image does not deteriorate while it dries.
Gauze or tulle
As a basis for gluing the puzzle to it, you can take a suitable-sized piece of fine-grained gauze or tulle. The glue is applied to the mosaic from the inside out, then a piece of fabric is applied to it and pressed down; excess - immediately removed with a napkin or rag. The final design will not be the most durable, so it is recommended to place the picture in a frame or stretch it onto another surface, using the excess edges of the fabric for this.
Self-adhesive film
The easiest way. Take a roll of film the width of a puzzle or a couple of millimeters less, and cut off a suitable piece. The surface of the mosaic must first be cleaned of dust and moisture, otherwise it will not stick well. The film is removed from the paper by about 5 cm, applied to the puzzle and glued along its entire length. Then you need to move on, gradually pulling back the paper and gently smoothing the film with your other hand or a towel. This must be done to prevent bubbles from appearing, otherwise they can be pierced with a needle.
Mixed option, universal method
Universal gluing is often used. Several technologies are used here at once. For example, before gluing puzzles with tape on the front side, fabric is glued to the back side. Due to this, the picture holds up more confidently. But this method requires a double flip of the finished mosaic. The fabric can be made of any material: cotton, linen, cotton blend. It is advisable to give preference to natural fabrics, since they are the easiest to glue.
Another universal option is a mixture of glue and tape, which are attached to one side. For example, the front one. Before gluing the assembled puzzles together, you need to remove all debris, dust and dirt. To do this you will need a fan brush or a simple thick brush. Apply diluted liquid PVA glue, let it dry for 2 hours, then stick on strips of clear tape. There is no need to apply varnish on top. The picture will be glossy.
Some tips for application
Each of the adhesive materials has its own characteristics in operation. For example, it is recommended to apply tape not just across the width of the painting, but also with an allowance. Why? This will ensure greater structural strength. The excess can then be carefully cut off with a blade or a stationery knife. Only sharpened ones.
Before gluing together a picture from puzzles, pay special attention to where it is located. While moving the composition from the table onto the fiberboard sheets is not too difficult, doing it from the floor is more problematic. It is advisable to immediately start assembling puzzles with the calculation of further gluing on a special mat or on a sheet of plywood. In the future, the picture can be inserted into a frame and hung on the wall as a decorative element.
How to properly glue puzzles of any size? After clearing the picture of excess debris and crumbs, apply adhesive and insert it into the frame. Often such mosaics decorate children's rooms. And, of course, it is worth selecting puzzles in accordance with age and development, so that sooner or later the picture will be assembled and not lie in a box.
Preparation
Before you put the screws, dowels and hammer aside and choose the fastening method that suits you, you need to evaluate two parameters.
- The weight of the painting or any other object that you are going to mount.
- The wall - what it is made of: concrete, plasterboard or brick, and what it is covered with: smooth or textured wallpaper, paint, tiles, and so on.
With the first parameter, everything is simple: not every fastener can support heavy frames, and most are even designed for a weight of up to 1 kg.
The second one is a little more complicated: not all methods can be equally effective on different surfaces. For example, double-sided adhesive tape can only be used on a smooth surface, while Velcro will hold tightly on a textured surface.