Assembling puzzles is a fun and educational activity that adults and children enjoy. They develop fine motor skills, have a positive effect on mental activity, relax and make you take your mind off everyday problems. But still, many often wonder how to glue puzzles into a picture so that it turns out smooth and durable?
First, you should consider popular techniques and prepare the necessary materials. It is important to choose a solid base that will hold the painting and prevent it from deforming. To frame the resulting puzzle creation, you can use a beautiful frame.
Puzzle base
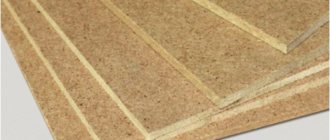
Fiberboard
Wood fiber sheets are a fairly dense material, so it is first adjusted to the size of the puzzles. If you cut and straighten them after gluing, the picture may collapse. The image is glued with regular PVA, the composition is applied evenly in a thin layer over the entire area. Too liquid glue can penetrate between the elements of a folded picture, so its excess is quickly removed from the surface. After applying the glue, the fiberboard is placed on the puzzle, pressed along the perimeter and sharply turned over. The glue that has appeared on the front side of the design is quickly removed with a dry, clean cloth.
Fiberboard is the optimal base for large puzzles with more than 1 thousand pieces. At the same time, they easily sit on PVA, creating an even image while fully preserving the original appearance.
The main difficulty of the method is to cut out the required sheet size in advance, which can only be done with a special tool. Fiberboard adds weight to the picture, so it turns out to be massive and will not stay on the wall without additional fastening.
Styrofoam
To make the whole picture easier, instead of fiberboard, a sheet of foam plastic is taken as a basis. It is light and easy to cut. To cut out the base, use a stationery knife or tailor's scissors. After drying, the painting on the foam will not be distorted, but its thickness will become 1.5 cm larger. Therefore, additional costs for the frame will be required.
Ceiling tiles
Tiles come in different thicknesses and sizes, are inexpensive, and easy to cut. If you choose an option with a flat, non-relief surface, the thickness of the picture will not be too large, which will allow you to insert the puzzle into a standard-shaped frame.
One section accommodates a medium format puzzle containing no more than 500 pieces.
Several tiles are used to glue large puzzles together. It is better to buy cladding with jagged edges for a more reliable connection.
The principle of gluing is the same as on fiberboard.
After gluing, it is advisable to lightly press the drawing onto the base with a board or other weight. Without additional stress, the image may become deformed while drying.
Gauze or tulle
The adhesive mixture is applied to the back of the picture, then a piece of gauze or tulle is tightly applied to it. After pressing the material onto the surface of the puzzles, excess glue is removed with a dry cloth or clean rag. The strength of the painting will be low, so immediately after gluing it must be placed in a frame or stretched onto another more reliable base. To make this possible, the material is cut with a large allowance.
Self-adhesive film
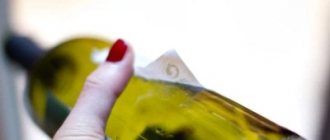
Self-adhesive is sold in rolls. You buy a piece whose width corresponds to the size of the puzzle or is a few millimeters narrower. The required piece is cut out. Dust, moisture, and dirt are removed from the surface of the painting. The film is gradually released from the substrate. First, 5 cm is removed along the entire length, applied to the folded parts, and carefully smoothed out. Next, the paper is removed from the next 5 cm, pressed to the base and ironed again with your hand or a dry towel. These actions remove excess air bubbles from under the self-adhesive. If air chambers do form, they can be easily pierced with a needle.
Main types
Puzzle rugs are classified according to various parameters. So, if we talk about functionality, they are divided into:
Developmental. Thanks to bright colors and different designs, the child gets to know the world around him. This way he can learn colors, letters, numbers and more. Experts note that such rugs develop spatial and geometric thinking in children.
Gaming. From the modules you can build not only a flat floor covering, but also three-dimensional figures. They are very bright and soft. The baby will be happy to play with them.
Decorative. Thanks to the variety of colors and patterns, the puzzle set will become a unique decorative element. Basically, such models are of considerable size and are used permanently - they cover the entire playing area.
Wellness. Some categories of products have a special pimply surface - it performs a massage function.
In the video: bumpers for soft floors and puzzle rugs.
What is needed for gluing
- Base and glue.
- Brush. Select depending on the thickness of the glue. Viscous mixtures can be applied well with a hard-bristled tool; a foam brush is suitable for spreading the liquid composition.
- Foam sponge. Sponges of different shapes and sizes evenly apply a layer of glue, distribute it along the seams, and are used for decoupage. Some adhesives are available in cans with foam sponges at the ends, which replace a brush or sponge.
- Foam roller. When the picture is placed on the base, it is rolled on top with a roller for better fixation and uniform distribution of the glue. Adapted to the size of the surface.
- Scissors or a blade for trimming edges, removing irregularities at the joints of parts and cutting out the base for the picture.
Varieties
There are five types of cork products, often used in the construction industry.
Wallpaper
Some people decide to decorate their walls with special cork wallpaper. This is an environmentally friendly and natural material that will not only decorate the room, but also even out minor unevenness on the surface of the walls. The main advantage of such wallpaper is that its surface is covered with wax, which significantly increases the service life of the coating. Also, the advantages of wallpaper include:
- Strength. Cork wallpaper is quite durable and protected from mechanical damage.
- Resistant to moisture. Such materials do not deteriorate in rooms with high humidity.
Panels
For wall decoration, some people use small panels rather than cork wallpaper. Most often they are made from unnecessary wallpaper waste. Many people value such wood panels for their versatility, as they are suitable for any room interior. The appearance of the material allows it to cover the walls of rooms made in modern, classic and even Gothic styles.
Among the advantages of cork panels are the following:
- Noise insulation. Wood panels are suitable for rooms with thin walls that allow all sounds to pass through.
- Thermal insulation. The material creates a warm indoor climate and does not release heat outside.
- Water resistance. The panels do not deteriorate in conditions of high humidity.
Plate
Cork sheets are wood sheets that are often used to cover the walls of residential premises. The main feature of this material is that its surface is treated with wax. Thanks to this protective layer, the plates are much easier to clean, since they practically do not absorb dirt.
Cork plates can be called universal, as they are used in any interior.
Tile
If it is necessary to finish the floor, special cork tiles are used. This is an environmentally friendly product made from wood. The tile does not have an unpleasant odor and therefore is regularly used for finishing interior coverings of premises.
Among the characteristic features of such wood tiles are:
- Fragility. Such products are quite fragile and therefore must be used carefully.
- Easy to install. Laying the tiles is easy, as you just need to apply adhesive to them.
- Moisture resistance. The material does not absorb moisture thanks to the protective layer of wax.
Underlay for laminate or parquet
There are four types of cork underlay, which are laid under parquet or laminate:
- Traditional. It is laid using the hot method, since when heated, such a substrate is more securely attached to the surfaces.
- Bituminous. On the bottom coating of the substrate there is a slight layer of bitumen, which additionally protects it from high humidity.
- Rubber. When making the material, synthetic rubber is added, which ideally absorbs noise and other extraneous sounds.
What can you glue on?
- The easiest way is to use special adhesives that come with the puzzles. They have a liquid consistency, firmly connect the parts, easily penetrating between the individual elements of the picture. They are odorless, colorless, and after application they form a glossy surface that does not require additional varnishing of the painting.
- Regular PVA has similar properties. It processes the collected image from the front side. At first, white streaks form on top, but after drying, a transparent matte film will form. After the top layer is formed, the puzzle is turned over, coated with PVA again and the base is glued to it. The advantage of PVA is its price. The disadvantage is that the composition contains water, which swells and deforms the cardboard.
- Adhesives for vinyl wallpaper. They are prepared from powder (diluted with water), which allows you to achieve the required thickness. After application, an elastic transparent layer is formed. To allow the glue to penetrate between the puzzles, a thinner consistency is needed.
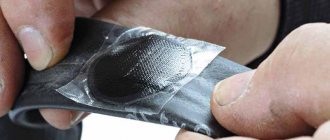
- You can use tape to connect individual puzzles, but a reliable connection is not ensured. It is better to use it as an additional fixative - combine tape with glue.
Mixed option, universal method
Universal gluing is often used. Several technologies are used here at once. For example, before gluing puzzles with tape on the front side, fabric is glued to the back side. Due to this, the picture holds up more confidently. But this method requires a double flip of the finished mosaic. The fabric can be made of any material: cotton, linen, cotton blend. It is advisable to give preference to natural fabrics, since they are the easiest to glue.
Another universal option is a mixture of glue and tape, which are attached to one side. For example, the front one. Before gluing the assembled puzzles together, you need to remove all debris, dust and dirt. To do this you will need a fan brush or a simple thick brush. Apply diluted liquid PVA glue, let it dry for 2 hours, then stick on strips of clear tape. There is no need to apply varnish on top. The picture will be glossy.
Review of the best glues for puzzles
Adhesives differ in the quality of their adhesion and the appearance they give to the glued surfaces.
Step Puzzle
- Without smell;
- dries in 2 hours;
- glue consumption – 80 ml per 1 thousand parts;
- applied to the front side of the image in two layers with a break of 1.5 hours;
- after drying it forms a transparent film;
- masks surface defects, neatly connects torn parts;
- To strengthen the painting, you can additionally apply 1 layer of glue to its reverse side.
Ravensburger Puzzle Conserve
- Has an aerosol release form. The glue from the bottle flows onto the foam nozzle. It does not dry out and remains suitable for work for a long time.
- One 0.2 liter cylinder is enough for 4 thousand parts.
- Drying speed of 1 layer of Ravensburger glue is 1 hour.
- After drying, the film is colorless.
Due to the high degree of penetration between the elements of the painting, it can only be applied to one side.
Fix Puzzle Conserver Permanent
There is a sponge dispenser, so no brush is needed for application. After cleaning the front surface, the glue is applied so as to get into the gaps and crevices between the parts. Shake the bottle before application.
Initially it is white. After drying, the layer becomes transparent and the image is brighter. Used sparingly. Dries in 3 hours.
Educa
At the tip of the balloon there is a foam sponge that absorbs and distributes the composition evenly over the image. The drying time of the layer is about an hour. After drying, there are no streaks or other marks left; after drying, the film becomes transparent. Consumption - a 0.25 liter cylinder is enough for 5-6 thousand parts.
Educa glue can be used by children under 3 years of age.
Ginger cat
Packaged in a bottle with a dispenser. 2 hours after application, the painting can be glued to the base and placed in a frame.
KSK-M
- One bottle (80 ml) is enough to cover an area of at least 0.4 square meters.
- Several layers dry in about 2 hours.
- Before the glue dries completely, you can wash it off with soapy water.
- Odorless, forms a glossy film.
Gluing a painting from the face
You can fix the small parts of the puzzle so that they do not fall apart using film or special glue. One of the disadvantages of this method is its durability, since after gluing it will no longer be possible to disassemble the picture into segments.
Apply the self-adhesive film in an even layer to the front side of the canvas to ensure stable fixation of the puzzle elements. To prevent the image under the film from looking blurry, it is better to use a glossy film. High-quality material fits tightly to the picture, does not stretch or become covered with bubbles. In case of uneven adhesion, it is better to remove the film and re-coat it.
Adviсe:
- A transparent adhesive composition is suitable for work, as it does not dry out, crack or become cloudy over time;
- when choosing PVA, you need to monitor the quality and shelf life of the product;
- Pasting with rolled tape leaves stripes on the surface; this method is also suitable if you have an assistant.
Before gluing, it is necessary to clean the surface of hairs, threads, lint and other contaminants. When working with glue, in order not to spoil the table, it is better to lay a piece of old wallpaper or parchment under the picture.
Gluing instructions
On the front side
A transparent compound or tape is used. First, the image is cleared of dust, dirt, hair, and other debris. To protect the table from getting glue on it, place foil, cardboard or food paper under the folded picture. Large works are glued on both sides.
First, the picture itself is smeared, after drying it is turned over and smeared from the inside out. The prepared base is applied to the adhesive layer. The front side can be coated with transparent varnish for additional fixation and giving the image a glossy shine.
Gluing from the inside out
The technique is used when there is a possibility of damage to the image by glue.
The puzzle is turned face down. To make this easier, the elements are first assembled on a specially prepared substrate (fibreboard, plexiglass or puzzle mat). The finished picture is covered with another sheet of fiberboard and sharply turned over. Before turning huge puzzles containing more than 1 thousand elements, they must be additionally secured with tape or office clips. If the painting was assembled on the floor, it can be pulled onto a backing and turned over using one of the described methods.
The puzzle on the backing may not be covered with fiberboard, but rather wrapped in several layers of cling film. After turning over, all layers of film around the perimeter are cut with scissors or a stationery knife. The edges of the film are pulled to the side, the backing is removed, and gluing begins. The lower part of the cling film protects the table surface.
Is it possible to glue a puzzle with tape?
An alternative way to design a puzzle is to connect the pieces using transparent adhesive tape. The picture is glued on the outside or inside with wide single-sided tape, first horizontally and then vertically. It is advisable not to leave air bubbles or folds, as they cannot be smoothed out later. The strips are glued overlapping so that each subsequent strip partially overlaps the previous one. The pieces of tape peeking out from behind the puzzle are carefully cut off. For strength, the mosaic can be glued on both sides.
What to make a frame from
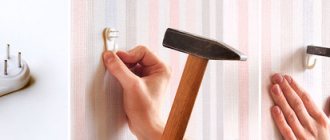
The picture can be inserted into a ready-made frame or you can make it yourself. The original frame will be unsharpened colored pencils glued around the perimeter. A frame made from ceiling plinth will look beautiful. It is cut with a stationery knife and placed on Moment glue or liquid nails along the edge of the picture. The finished frame is painted with acrylic paints.
For a small picture with 50–100 elements, a beautiful frame is made from a shoebox, cutting a hole in it to the size of the finished puzzle. On top it is painted in different colors or decorated with napkins using the decoupage technique.
Relevance in the interior
A mosaic with a large number of segments will decorate any room in the apartment. Not only the size of the canvas matters, but also the theme:
- for a nursery, it is better to build a frame together with the child from available materials: pebbles, laces, ribbons;
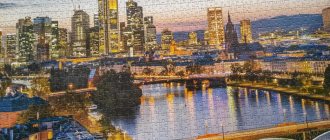
- A neutral city theme and baguette frames are suitable for the living room;
- for the bathroom it is better to choose a marine theme, framing the puzzle with corals, slices of sea salt and a shell;
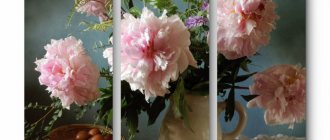
- A bright still life or floral theme is suitable for a stylish kitchen; for lovers of natural textures, a classic wooden frame would be the best choice.
Puzzles can be an effective addition to the interior. The assembled puzzles should be glued to the base, fixed, framed and hung on the wall. The paintings are suitable for the living room, bright kitchen, hallway and bathroom.
Would you use such a decorative element? Yes, it looks interesting.68.42%I have something similar.21.05%I don’t like puzzles...5.26%I’ll leave my opinion in the comments...5.26%Votes: 38
Assembling puzzles is a great hobby that can keep children busy and adults relax after a hard day. This activity perfectly develops motor skills, logic, thinking and imagination. Often, the question arises, what to do with the finished mosaic? It’s a shame to take it apart, because so much work and time was spent, so we’ll tell you how to make a picture from puzzles into a frame and use it to decorate the interior of your home.
Tips and tricks
Here are some additional tips for making your own puzzle:
The easiest way to cut round edges is to use a very precise craft knife. As a last resort, any small sharp blade will do, including kitchen and office knives. You can also use the eraser of a small, round object (such as a pencil or pen) to guide you. If your knife is dull and you end up with ragged edges when cutting a puzzle, you can lightly sand them with fine-grit sandpaper. Before cutting the puzzle with scissors, you can test them on a future puzzle base (for example, cardboard). If the cut is clean, then you can cut the entire puzzle with them. If the cut turns out to be uneven, then it is better to use a thinner base or a sharper knife. Be creative when choosing an image for your puzzle! You can make your puzzle the way you like. Your puzzle can be any shape you like. For example, you can experiment with puzzle shapes based on your image (for example, a cat puzzle in the shape of a cat's head). Young puzzle creators should ask their parents for help and not cut anything without supervision.
Always use caution when using cutting tools and saws. Take proper precautions to protect yourself and others
Never put your fingers in front of the blade. If you don't have the skills or experience to cut your own puzzle, ask for help from someone who knows how.
Other recipes
You can create slime using other ingredients.
Recipe No. 1
- PVA glue is poured into the plate.
- Dye is added, you can use dry. The mass is stirred until smooth, it should turn out thick. It can be kneaded in your hands and squeezed.
- Elastic and viscous slime is ready.
Recipe No. 2
- Thick shampoo and PVA glue are poured into a plate.
- All ingredients are mixed until smooth.
- Now salt is added for thickness; if after mixing the mass does not become thick, you can add a little more salt.
- The slime is washed to remove excess foam.
- Then it is decorated with any additives, for example, rhinestones, sparkles, you can use edible decorations: gummies, popcorn, marshmallows, etc.
Recipe No. 3
- The glue stick is cut into small pieces, you will need 60 g.
- The container is placed in the microwave for 15 seconds, after which you need to check whether the pencil has melted or not. If large pieces are hard, it needs to be heated for another 10 seconds.
- Soda is diluted in water, approximately 1 teaspoon of baking soda and 1 teaspoon of warm water.
- The pencil is added to the mixture.
- The mass is mixed well.
- Add a couple of puffs of air freshener.
- After the slime stops sticking to the walls of the plate, it is ready, you can pick it up and knead it.
- If desired, dye and additives are added.
It is possible to make slime at home in a short time and without high costs. Preparation of slime occurs only under the supervision of an adult, especially if knives, a microwave and a stove are used. After cooking, store the slime only in a dark place, in a jar with a tight lid.
Proper storage and use of anti-stress will prolong its life and the child’s joy. When the slime dries, it is necessary to soak it in water; if it loses elasticity, add thick hand cream or baby cream; if there is excess moisture, use a solution of warm water and table salt; you can use sea salt.
You should not leave the slime in the cold or heat, it will lose its shape and will be unsuitable for play. There is no need to leave slime on upholstered furniture, carpets or clothes; the toy sticks to the fur and leaves marks.
Video