Sometimes there is a desire or need to restore furniture by decorating it with mirror inserts. Knowing how to glue a mirror to a cabinet door, you can cope with this task yourself, without resorting to the services of a professional craftsman. There are several mounting options using different materials. Glue, sealant, liquid nails, and double-sided tape are used. Perhaps someone will prefer the mechanical method.
How to glue a mirror to a cabinet door
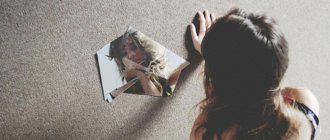
The same thing can be done in different ways. This also applies to gluing a mirror to a cabinet door. There is no need to “reinvent the wheel”. The proposed methods were invented a long time ago and have been tested in practice more than once. It’s easier, of course, to initially buy a mirrored cabinet, but there are other situations. For example, furniture breakdown. Sometimes it is necessary to seal a crack that appears on the cabinet or even a hole that appears due to the fact that the door was accidentally broken.
Methods and types of gluing mirrors
Building materials today are reliable. Using special glue, you can be sure that the mirror will be securely fastened, which means you don’t have to worry about it falling and possible injuries to others as a result of such a nuisance.
However, this condition only works if the technology is impeccably implemented. In most cases, chemical compounds are used to stick a mirror on the door. These can be construction sealants, special glue, liquid nails, silicone. All of the above products have excellent adhesion, which ensures strong adhesion of two surfaces.
Due to the difference in composition, the gluing process occurs differently. After hardening, the adhesive mass can become plastic or hard, transparent and colored. The hardening process occurs in two ways - as a result of moisture evaporation and under the influence of chemical reactions. Sometimes double-sided tape is used to glue the mirror cloth.
Step-by-step instructions for gluing a mirror
Usually a mirror of the same size is attached to the cabinet door. It has considerable weight, so it requires reliable fixation. It is also necessary to ensure that the mirror sheet is positioned evenly, so it is important to position it correctly on the door.
The procedure will be as follows:
- They first draw a sketch, which indicates the exact dimensions of the door leaf and mirror, and also marks the necessary holes, for example, for a door handle. Not everyone can drill a hole in glass. For people without skills, it is better to entrust this operation to specialists, immediately ordering a mirror of the required size and with cutouts in the required places.
- If the cabinet is completely made independently, holes are first made on the doors for hinges on the inside. It is necessary to strictly adhere to the specified dimensions and pay attention to symmetry.
- Then the door is placed on the work table and a mirror is fitted to it. Once you are sure that the dimensions match, you can move on to the next step.
- If the mirror will occupy only part of the door, it is necessary to outline in advance the location of the mirror sheet using a template; the marking should be as accurate as possible.
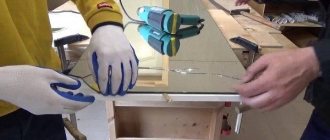
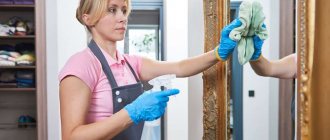
- Before gluing, both surfaces must be degreased with a solvent, applying it with a rag. To prevent the surface of the mirror from being damaged, it is laid face down on a soft fabric backing.
- Now glue is applied in a zigzag pattern to the back surface of the mirror, making intervals of no more than 10 cm and stepping back from the edge by about 3 cm.
- After the glue is applied, the mirror is carefully placed on the door in accordance with the marks made. If the mirror sheet is large, this work needs to be done by two people.
- At the finishing stage, the glass should be carefully pressed against the surface of the door. Final fixation will occur in a day. All this time, the cabinet door with the glued mirror should lie on a horizontal surface. The mirror surface is covered with a cloth on top and weights are placed in several places to make the gluing of the surfaces stronger.
The weight load should be distributed evenly over the entire area of the mirror. If the canvas accidentally moves, it must be corrected immediately. Once the glue dries, this will no longer be possible.
First steps. Slab countertops
Sano published a blog entry in Furniture made from slabs, solids, and various differences, October 6, 2022, blog entry
The first attempts to make something from the brought slabs. Although there may be some attempts, the material costs money and the right to make mistakes is as much as there is money in your pocket. Train at your own expense, as they say.
Therefore, each board is carefully inspected and tried on; the proverb about measure seven times is in action.
The work itself is not tricky, creative, there are several boards and they need to be selected so that they look beautiful and there is no overspending. All sizing and trimming is done with the minimum possible removal of material, simply sawed off a little here, cut a little there with a chisel.
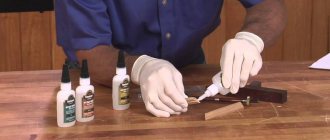
Glue selection
Glass glue is usually sold in tubes. It is convenient to squeeze it out using a special construction gun. The choice of which glue to use remains with the consumer.
Professional furniture makers use the following compositions:
- "SOUDAL WORLD-O-BOND." The highest quality adhesive specifically designed for mirrors. After hardening, the composition forms a plastic seam, which is important when two surfaces that are not uniform in terms of rigidity are glued together. The only disadvantage of this glue can be considered its high price.
- SOUDAL 47A. Another product from the Belgian brand for glass structures and mirrors. The glue dries quickly, does not spoil the amalgam, and ensures reliable fastening of glass to rough surfaces made of natural wood. The manufacturer does not recommend gluing a mirror to a smooth laminated compartment door.
- "SOUDAL FIX ALL" . Glue from the same line, which has a slightly different composition. Some furniture production professionals have doubts about this product due to its lack of plasticity after drying.
Sometimes on the Internet you can find advice on gluing a mirror with super-strong Moment Montazh glue. However, experts recommend this brand only if there is a special mark “for mirrors”. Regular assembly adhesive becomes too hard after hardening. Because wood and glass have different coefficients of thermal expansion, tension can develop between the bonded surfaces, causing the seam to pull away from the mirror and damage the amalgam.
Specialist recommendation
According to the recommendations of many experts, the most practical and durable method is an integrated approach with the simultaneous use of tape and glue.
Simultaneous use of two methods (adhesive tape and glue)
The entire fastening sequence is preserved, only first we glue strips of double-sided tape to the cabinet doors, then apply additional glue in the spaces between the tape.
Let's hope that all the tips will be useful to you in attaching the mirror, and that the work will be done quickly and efficiently. A glued mirror will improve the look of the closet. What methods to use to glue the mirror will depend on your skills and the availability of materials for the work.
Alternative Methods
It is not necessary to use specialized glue to glue the mirror. There are other building materials that cope with this task.
For liquid nails
The “liquid nails” composition is available in different modifications. You need to choose the one that is marked “for mirrors” on the bottle. “Liquid nails” are based on synthetic rubber; various polymers are added to it, in particular, special clay, which gives the composition increased plasticity.
The product can glue:
- panels;
- tiles;
- glass;
- metal;
- tree.
It is permissible to glue dissimilar surfaces. “Liquid nails” are squeezed out of the tube using a special gun by pressing the lever. Before use, be sure to read the instructions.
Using unsuitable “liquid nails” can ruin the amalgam or make the connection weak. The composition is applied along the perimeter in a broken line, departing 2.5-3 cm from the edge. Several large patches are made in the center of the contour, evenly distributing them over the area.
The larger the doors, the greater the consumption of “liquid nails”. After 10 minutes, the mirror is pressed against the cabinet door, then removed and finally pressed a second time. At room temperature, the composition hardens within 24 hours. It is important to choose a high-quality composition of a proven brand, for example, “MAKROFLEX MF 930” or “KRASS” and “TITAN” (Poland).
For sealant
When choosing a sealant to glue a mirror, first of all pay attention to the composition. Acrylic sealants are completely unsuitable for working with mirror surfaces. Such compositions have weak adhesion and are intended for fastening lightweight elements, such as tiles and foam baguettes.
Silicone-based sealants are suitable for mirrors. They do not corrode amalgam and have high adhesive properties and elasticity. The composition must be universal or intended for interior finishing work. The structure of the sealant also matters; it should not be too liquid.
Silicone compounds are the most chemically neutral and contain a minimum of harmful substances. The surfaces of the mirror and cabinet must first be degreased. If we are talking about gluing a small mirror to the inner surface, the door can be hung in place in just 30 minutes. In other cases, it is kept in a horizontal position for exactly one day.
With double-sided tape
The fastest way to attach a mirror to the surface of the cabinet is with double-sided tape. You can get the job done in literally 5 minutes. If the mirror is glued crookedly, you can tear it off and re-glue it or remove it at any time. True, this method is only suitable for small mirror inserts. The adhesive tape may not be able to withstand a significant weight, the mirror will fall off and break.
It is necessary to apply strips of adhesive tape in 2 rows, using segments 15-20 cm long. The strips are glued in pairs in the corners and in the middle of the mirror. Then the protective paper layer is removed and the mirror sheet is pressed tightly against the door. For reliability, you can apply silicone sealant or suitable glue between the strips of tape.
Step-by-step instructions for sticking a mirror with tape
If you choose the option of fixing the mirror to the cabinet doors using double-sided tape, only by adhering to a sequential operating algorithm will you be able to achieve the desired result:
- Holding the end of the tape from the reel, pull it and cut the required length to glue part of the surface.
- Carefully holding the tape, apply it to the product, leveling the adhesive material gradually.
- Measure and cut additional pieces of tape and fill the gaps on the back of the mirror plane.
- Set the product aside, placing it on the front side.
- Decide exactly where the mirror will be located. Measure the boundaries with a pencil.
- With the help of a friend, lift the mirror and place it on the tape to the cabinet doors, focusing on the drawing you made.
- You can press the surface firmly by making sure that the device is positioned correctly.
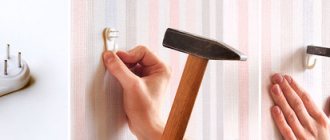
Mechanical fastening method
You can attach the mirror to the cabinet mechanically. For this, various types of fasteners are used:
- through holders;
- metal staples;
- furniture fasteners with decorative overlays.
The most economical way is to use staples. This type of fastening is simple and reliable; the mirror is fixed at the edges. Fastening with overlays is also quite simple. In this case, the mirror is fixed with special plugs at the top and bottom. Through holders are more difficult to install, since you have to drill holes in the mirror sheet for them. In addition, this method of fastening will require special tools.
Advantages of installing entrance mirror doors
A steel entrance door has become commonplace in modern apartments. It has many advantages, but its main advantage is safety. Currently, manufacturers are generous with offers regarding the manufacture of different options for the door leaf, including its decorative finish, as well as built-in security locking systems. Color solutions also differ in many options, which is confirmed by photos of entrance doors on specialized websites. However, a demanding client always wants something more. Therefore, thanks to market demands, an original design appeared relatively recently - a metal entrance door with a mirror.
A mirror on the front door can visually enlarge the space and add light to the room
Mirrors in the interior have a purely decorative and practical function. Designers use the technique of installing mirrors in a room to visually expand the space, increase the degree of illumination, etc. Installing a mirror sheet on the front door meets the basic requirements for organizing a hallway and carries an additional functional and decorative load. Among the main advantages of installing a mirror on the door to an apartment are the following:
- A visual increase in the space of a small hallway is created, and the higher the size of the installed mirror, the greater the effect can be achieved. In this case, it is ideal to use a full-length mirror.
- You can increase the illumination of a space without increasing the brightness of the lamps.
- The mirror panel on the door can fully replace the traditionally installed mirror in the hallway, while saving useful space.
- Allows you to eliminate the need for mirrored doors in built-in wardrobes.
- Can become a bright decorative accent in the hallway.
- It visually “lightens” the structure, which is easy to see in the photo: the entrance doors “lose” their massiveness and heaviness.
General Tips
When working with a mirror, there are specifics that must be taken into account. Professionals advise:
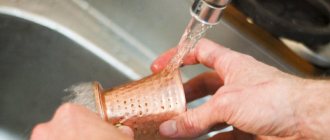
- Glass is a fragile and smooth material. The mirror may accidentally slip out of your hands and break. Before you get down to business, you need to put on gloves (preferably with pimples on them). In this case, the glass will be held securely in your hands. But it is better to cut off the fingertips of gloves in order to maintain the sensitivity necessary when checking the quality of the connection.
- If the temperature and humidity conditions in the room often change (for example, household members like to ventilate the room), strips of glue and tape are applied vertically. When they are placed horizontally, air pockets are formed in which moisture will accumulate, which can lead to detachments.
- It is better not to use markings on a white cabinet, otherwise you will have to scrub off noticeable marks later. In this case, masking tape will come to the rescue. It can be easily removed after gluing and does not harm the surface at all.
- The table on which the cabinet door is placed before work must be of such dimensions that the entire part fits on it. If the tabletop is shorter, the piece may bend under its own weight, causing the edges to droop slightly. As a result, a gap is formed between the door and the mirror, and the quality of the gluing will suffer.
The mirror canvas is afraid of damage on both sides. To avoid accidentally scratching the front part or the amalgam layer, the mirror is always placed on a base covered with soft material (a blanket, a rug, a bedspread). Especially if you place it on the floor, where there may be small grains of sand.
Necessary materials
Before you begin, you need to prepare the following materials: mirror, liquid nails, glue or silicone for gluing the mirror, double-sided tape, masking tape, degreaser.
There are several ways to glue a mirror.
Now you need to wait for the glue to dry.
Questions and answers
Those who are doing this kind of work for the first time may have various questions along the way. It is better to get answers to them in advance in order to more accurately determine the chosen method of mounting the mirror on the cabinet doors.
What tool can be used if there is a need to drill several holes in the mirror?
To do this, you will need special arrow-shaped drills; they are usually used to drill ceramic tiles. Cardboard washers with holes of the required diameter are glued on both sides at the drilling site. A piece of rubber is placed underneath. The drill speed should be minimal, and the surface should be degreased. During the drilling process, the mirror is watered. You need to pause while working every 10 seconds to prevent the glass from overheating.
Why do we need metal feet and stops?
These devices are used to fasten heavy mirrors mechanically. To ensure maximum tightness, rubber gaskets are additionally used. First, the legs are attached, then the mirror sheet is laid, after which the devices press the mirror to the surface.
Any craftsman with minimal skills in men's housework can handle gluing a mirror to a closet. It is important to choose the right fastening method and do all manipulations slowly, because glass requires careful and careful handling.
Method No. 2: Decorating wardrobe doors with corner patterns
If you don't want to cover the entire surface of the door, we recommend using vinyl decals with elegant angular patterns. Here you will get additional benefits:
— corner patterns are smaller, so the sticker will cost less;
— small elements are much easier and faster to apply;
— by decorating the corners, you will allow the mirror to serve you as a mirror.
When applying a small vinyl decal, we recommend removing the backing first. Place it on a flat surface with the pattern down, pick up one of the corners and carefully remove it at an acute angle. If any element sticks to the backing, return the area to its place, iron it again with a squeegee and try to remove further. The sticker should remain on the transparent film with the adhesive layer facing up.
When applying the sticker, take the upper corners of the mounting film and stick it, smoothing it from top to bottom along the marking lines. It’s good if you have a second person helping you to support the sticker from below so that it doesn’t stick prematurely.
Method No. 5 Matting glass and mirrors using paste or aerosol
Drawings on the mirrors and glass of the wardrobe, applied using the matting method, look very noble and elegant. Matting is a technology that allows you to give a smooth glass surface roughness and opacity. To do this, a special chemical composition is applied.
Matting is usually done to order and is quite expensive. We want to tell you how to make this spectacular decor for a wardrobe with your own hands.
- Disposable (adhesive) or reusable stencil for wardrobes;
- Paste or aerosol for matting;
- Spatula for applying paste.