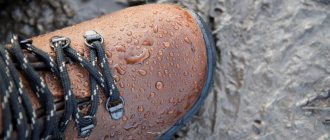
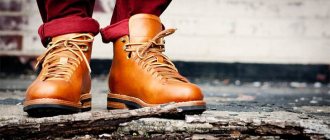
No hike is complete without good shoes, especially if it’s a mountain hike. Mountain hiking shoes should fix the ankle, not slip, and breathe well. In addition, boots should not get wet for as long as possible, because wet shoes lead to chafing and calluses, are unhygienic, unpleasant and contribute to freezing of the feet and morbidity. First of all, the design of the boots and the quality of their tailoring are important here, but the properties of the water-repellent impregnation applied to the shoes are also important.
We have found, in our opinion, a very successful water-repellent treatment for leather hiking boots. It is better not to use it for impregnation of ordinary city shoes, since impregnation changes the color of the shoes (makes them darker). Impregnation works well when it is applied in a thick layer (in several layers). Thanks to this impregnation, shoes remain dry for up to 2 weeks after application! How long the impregnation on your shoes will last depends on weather conditions, the properties of the leather, the quality of the seams, the thickness of the water-repellent impregnation and other factors. In any case, the impregnation will last at least 2 days, after which its water-repellent properties will begin to weaken.
The ingredients and technology for applying water-repellent impregnation are not complicated and are accessible to anyone. If you have half an hour of free time, and on the way home you’re not too lazy to stop at a pharmacy and a couple of other stores, you can make water-repellent impregnation for shoes with your own hands with a supply for several months in advance.
DIY water-repellent impregnation for shoes
DIY water-repellent mixture for shoes is not at all difficult to make at home. All ingredients for preparing a waterproof product will be natural.
Protection from moisture is needed not only for winter shoes, but also for summer, spring and autumn. A home remedy is no worse than a store-bought water-repellent spray, which is so necessary in any season of the year.
This impregnation will make any pair waterproof and protect against moisture and damage. Natural ingredients - linseed and castor oil - will not only protect against dampness, but also increase the wear life.
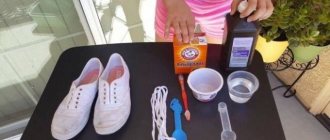
Preparing the product is not at all difficult, I think you can find white paraffin candles at home, castor and linseed oil can be bought at a pharmacy or store. To prepare a water repellent we will need:
- Castor oil (2 teaspoons).
- Flaxseed oil (2 teaspoons).
- Paraffin (1 teaspoon, grated candle).
The remaining linseed oil after the shoes have been impregnated with oils and paraffin will be beneficial for health. Flaxseed oil has a rich chemical composition and nutritional value; you can read about its beneficial properties in this article.
Flaxseed oil is good not only for shoes, but also for health, especially women's. It is also used for cosmetic purposes to improve facial skin, so the oil will not go to waste if a certain amount remains.
The remaining castor oil can be used as a natural remedy for hair and eyelash growth. Castor oil and onion hair masks will benefit your hair and make it thick and shiny. I wrote earlier how to make a castor oil mask with onion for hair.
For leather and suede
Do not confuse such water-repellent agents that are used only for shoes. The consequences may be different. When answering the question about which impregnation is better, you should consider:
- Aerosol is suitable for use, but it will not work on suede. It is processed using universal products consisting of fluorocarbon resins. Wax and fat can stick fibers together and damage suede and nubuck products.
- For leather products the opposite is true. It is important that the product contains more wax and fat. It is advisable that the composition include seal or goose fat, since they have high penetrating ability.
Silicone impregnations have long been considered the best. Since water flows off the surface after treatment, it is therefore not absorbed. With the help of a protective silicone film, the surface is softly enveloped, but the air exchange will not be worse. The effective effect occurs after 8-9 hours, so treatment is performed in the evenings. The procedure has its own subtleties:
- Fluorocarbon resins are being replaced by silicone by many manufacturers. Then the effect of impregnation will be completely different. An invisible film appears on the surface, which, on the one hand, repels water, and on the other, prevents the shoes from “breathing.”
- Fluorocarbon resin works differently: its components are distributed between the fibers. If moisture gets on the product, it will be in the form of drops that can be easily removed.
Before purchasing the product, you need to familiarize yourself with the composition. Honest manufacturers always indicate the exact names of the components. According to customer reviews, you should choose only proven products.
The process of preparing impregnation for shoes
The main thing when preparing impregnation is to follow the sequence of actions. Making water-repellent impregnation for shoes at home will take very little time.
I have candles of different colors at home, but for the product we only use white candles without colored dye. We grate them on a fine grater and get paraffin crumbs, which we need one teaspoon.
Pour castor and linseed oil into a bowl, add paraffin, stir until completely dissolved, and then heat the mixture in a steam bath. The resulting liquid is cooled to a warm state. Next, pour the resulting mass into a prepared jar, for example, a baby food jar, an empty cream jar, or any other container.
Kinds
Many manufacturers produce water-repellent products. Each of them has its own properties. There are also water-repellent impregnations for shoes. Reviews about them confirm excellent results. The products are available in different forms:
- Creams. They are divided into 2 types: thick and liquid. The former are ideal for leather shoes. They are also used on bags and gloves. The composition contains solvent, wax, animal fat, and dyes. Liquid creams are suitable for warm weather. They contain few solvents, and often contain water instead. Such products do little to protect shoes, but they make them shiny.
- Spray. The product is considered universal. It is used for various materials, including clothing. The spray is easy to apply and does not require special brushes or tools. It is sprayed on shoes, bags, clothes. Just do not perform the procedure indoors. The spray has a longer shelf life compared to the cream.
- Water-repellent impregnations for shoes. Customer reviews indicate that such products differ from creams and sprays. They penetrate deeply into the material. This ensures long-term protection from external influences. To choose the best water-repellent impregnation for shoes, reviews advise selecting it for each specific product. So, for nubuck, a material with fibers, a product with fluorocarbon resin is required. If the shoes are suede, then silicone impregnation is suitable. For other materials, compositions of water repellents will be required.
How to properly apply impregnation to shoes
How to apply impregnation correctly so that it is beneficial and has waterproof properties? Before treating shoes, wash and dry them. First I clean off the dirt with a dry brush and use an old toothbrush to clean the soles.
I don’t throw away used toothbrushes; they are useful not only for cleaning shoe welts well, but also for helping with many other household chores. For example, I use them to paint hard-to-reach places in radiators or to clean narrow sliding glass areas on a loggia.
I wipe the top and bottom of the shoes, seams, and shoe welts with a damp cloth or foam sponge slightly moistened in a solution of laundry soap. Then I let it dry before the next step of processing with the impregnation I prepared myself.
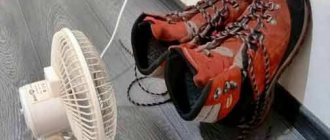
Before applying the prepared product, I will run a stream of hot air from a hairdryer over the entire surface of my boots. This is necessary for better absorption and formation of a protective layer on the shoes.
To impregnate shoes, I take a cotton pad and apply a thick layer of thick cream onto my shoe; don’t be afraid that it will turn white and leave marks. To ensure that no stains remain from the impregnation, you need to dry the surface of the shoes again with a hairdryer. A warm stream of air is needed to better absorb the homemade mixture.
I leave the pair for 7-8 hours to absorb the shoe impregnation mixture. I do not recommend going outside immediately after applying the protective waterproof layer. Now I need to check how the universal shoe polish I prepared myself will behave if I pour a glass of water on my shoe. The experiment was a success, I see droplets of liquid flowing from my shoe.
I usually do the processing in the evening, and in the morning my favorite boots are ready for a walk in rainy weather and slush. Feet will be dry unless you deliberately wander through deep puddles. Then your feet will definitely get wet, and no amount of soaking will help.
It is necessary to apply impregnation for shoes every time before going outside again. This is necessary so that the protection of shoes from water is more effective. Prices for ingredients for homemade waterproof impregnation of shoes are as follows: linseed oil (2 tsp, 15 rubles), castor oil (2 tsp, 1 rub. ), paraffin (1 tsp, 2 rubles), total 18 rubles.
The castor and linseed oil left over from preparing the impregnation will not be wasted. Self-prepared impregnation for shoes cost me less than industrial means for getting wet; it does not contain chemicals.
By treating shoes in this way, we not only keep our feet dry, but also increase their wear resistance. This wonderful folk recipe will not let you down - your feet will always be dry, and your boots will delight you with their beautiful appearance.
Water-repellent mastic at home
I want to share a good product for protecting skin and fabric from water. I looked for recipes on the Internet and eventually came up with my own, which suited me and which I recommend to you. This mastic gives the leather a pleasant shine if polished (like shoes) and also has water-repellent properties - no rain is scary! I use it for thick leather and I know that it also works great for thick fabric from which backpacks, etc. are sewn. A little later I will take photos of the processing of the backpack and post it here in this thread.
This is what this mastic looks like:
And here is the recipe:
Two parts melted beeswax
One part flax seed oil
One part turpentine (called turpentine in English - this is turpentine if I'm not mistaken)
Turpentine acts as a softener - helps maintain a paste-like consistency.
I replaced 1/3 of the beeswax with carnauba wax - it gives more shine. But it is also very hard (it is the hardest wax known) - maybe that’s why my paste is not a paste at all but a harder mass.
Melt the wax IN A WATER BATH. Do not place directly on fire - all components are highly flammable! It is advisable to cook outside and no children or animals nearby!
When the wax melted, remove it from the heat and add oil in a thin stream. Stir constantly with a wooden stick. If the wax suddenly curls up a little, after adding the oil, place it in a water bath again until it dissolves. Stir all the time.
Then remove from heat and ABOVE it add turpentine in a thin stream, stirring all the time. Very flammable - be careful!
If the wax has curdled, then after the turpentine is added and mixed, you can put it in a water bath until it dissolves and is completely mixed. Then remove everything from the heat and pour into jars. Glass screw-on ones will work, or aluminum ones from under candies.. Even tin ones from under coffee will work.
Until completely cooled.
If you see that the wax is too hard, then put it in a water bath again, dissolve completely and add a little more oil and turpentine (remove from heat!)
Then pour it into jars again.
If you haven’t added too much carnauba wax (according to the recipe, it’s not needed at all), then it should turn out like shoe wax—soft enough to easily apply and rub in. Apply both to the skin and to thick fabric (backpack) - apply, rub in and then blow with a hot hairdryer so that it is absorbed into the fabric and dries. The water will roll off like a duck's back later.
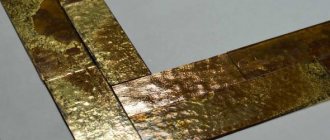
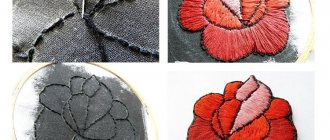
Here I applied mastic to half a piece of leather - you can see the border between the treated and untreated parts
Then I dripped some water on both halves
On the untreated part of the skin, water immediately began to be absorbed, but on the waxed part, it sat on the surface.
The bottom drop began to be absorbed (shown by the red arrow) - I think that either the mastic was not rubbed in well or the wrinkles on the skin were too deep and more wax needed to be rubbed in there
10 minutes have passed
On the left, the water was absorbed long ago, but on the right, it remained as it was.
Even that droplet at the bottom couldn't get through.
I hope you find this recipe useful!
If your shoes are wet
If you do get your shoes wet, you need to dry them thoroughly. At the same time, you should not place suede or leather products on the radiator or near heating devices. They shorten the life of products, which then crack and become deformed.
Shoes should be dried at room temperature under natural conditions. After complete drying, the shoes are treated with cream or spray.
Insoles from wet shoes are removed and dried separately. It is better to have at least two pairs of boots, boots and shoes for each season, so that wet shoes have time to completely dry and soak.
To speed up the drying process, place crumpled newspapers without illustrations or photographs or light paper inside each shoe or boot. When newspapers become wet, replace them with dry ones. For more information on how to properly dry shoes, see the link https://vsepodomu.ru/garderob/kak-bystro-vysushit-obuv/.
Why do boots get wet in winter?
- The sole has come off. Most often, such a “wet matter” is associated precisely with damage to the sole or its poor-quality “adhesion” to the boot itself.
- Poorly made shoes. Cheap boots “2 pairs for the price of 1” are always of poor quality. Manufacturers use low-quality materials, and the production process leaves much to be desired. Considering that suede and leather themselves do not allow moisture to pass through, we can confidently talk about poor-quality seams or the presence of holes and cracks.
- Chemical reagents. They are used to sprinkle roads in the winter, and it’s no secret that such products can “kill” even the strongest boots in one winter.
- Lack of special impregnation on shoes (note: the manufacturer’s task).
- Synthetic materials. Frost causes artificial leather and other synthetic materials to crack, as a result of which shoes also lose their “moisture resistance.”
Store-bought products to help make shoes waterproof
Salamander
The rich shoe polish produced by this manufacturer significantly improves the appearance.
Plus, the cream perfectly masks small scratches and does not allow moisture to enter the boot, since natural wax is used for production.
Collonil Nanopro
This manufacturer of water-repellent impregnations is known for producing convenient spray-on products. Suitable for products made of nubuck, leather and suede.
Available Chemical Waterproofing Compounds
- Dissolve 500g of laundry soap in 5l of boiling water. Soak the material well, then squeeze lightly. Without drying it, immerse it for a while in an aqueous solution of ordinary (potassium-aluminum) alum (500g per 5l, and for stronger impregnation you can take 1000g). Dry without wringing.
- Dissolve 450g of laundry soap in 4.5 liters of boiling water, add 250g of laundry soda and 450g of rosin powder. The processing procedure is the same. Both of these methods are good, but the first is simpler and faster (suitable, in particular, for fishing nets).
- One of the simplest and most effective methods, which also makes it possible to make waterproof fabric with fire-resistant properties, is impregnation with alum and lead sugar (lead acetate). In one 3-liter container, 150 g of lead sugar is diluted, in another, in the same volume, 150 g of ordinary alum (or another option - 75 g of both products for the same amount of water). They need to be allowed to settle and drained together, separating them from the sediment. Let the resulting emulsion stand for several hours, and then, when the liquid becomes clear, drain it, separating it from the sediment. Soak the textiles in this liquid overnight or even a day, and then dry without wringing. Since the composition is poisonous, the dishes should be thoroughly boiled and washed.
- Dissolve 400g of alum in 2.25 liters of boiling water, add 9.125l of H₂O at room temperature. Soak the textiles in this mixture for 24 hours, and then squeeze it out lightly and immerse it for 5-6 hours in another mixture: 225 g of lead sugar, poured 9.125 liters of warm water.
- Dip the material into a 40% solution of laundry soap, wring it weakly and immerse it in a 20% solution of copper sulfate. Dry without wringing. The material is painted green.
- In a combination of 285 g of quicklime and 115 g of alum per 12.3 liters of H₂O, keep for 12 hours, and then dry it without squeezing. This material is used for tents.
- Soak textiles, ropes, slings, nets for 4-5 days in a solution of copper sulfate (300g per 12l H₂O), then dry and rinse in soap emulsion. This will protect them from rotting and give them special strength.
What to choose from?
What is the best water-repellent treatment for shoes? Reviews confirm that the most reliable means are:
- Woly Sport. This impregnation is presented in the form of an aerosol. It is created on the basis of nanotechnology. Its price is about 400 rubles. Area of use: any fabric, but most suitable for sports shoes.
- Olvist. This water-repellent product costs about 250 rubles. It is considered universal, as it is used in the processing of textiles, smooth and fleecy leather.
- Water-repellent impregnation for shoes "Salton". According to reviews, it is one of the best in terms of impact. The surface of the product does not deteriorate from moisture.
- Textile Protech. Impregnation differs from others in that it is produced not in an aerosol can, but in a bottle with a spray bottle. Almost everything is processed with it - from shoes to covers and awnings. It costs about 1,700 rubles.
- Nikwax. The price of this aerosol is about 250 rubles. The manufacturer produces this product for different materials.
- Water-repellent impregnation for Futon shoes. According to reviews, it reliably protects the product from moisture. It is enough to apply it according to the instructions so that the material always looks neat.
These remedies are considered the most effective. Their operating principle is approximately the same. Regular treatments will preserve your shoes for many years.
The problem of wet shoes and boots, especially during the spring thaw, worries many citizens of our country. Residents of the southern regions walk like this all winter. The way out of this situation is water-repellent shoes, but they can sometimes fail. Regardless of whether your shoes had such impregnation or not, you can do it yourself and, thereby, protect not only the boots themselves, but also your feet from moisture.
Materials
To make water-repellent impregnation of boots with your own hands, you will need:
- the shoes or boots themselves;
- wax candle;
- cotton fabric.
Step 1
. First you will need to prepare your shoes. Its surface must be cleaned of dirt and dust, and the boots themselves must be completely dry. Please note that porous materials, such as leather, cotton, nylon, canvas, etc., are suitable for this water-repellent impregnation.
Step 2
. To ensure that the impregnation base adheres to the surface of the boots better and more uniformly, warm it up with a hairdryer.
Step 3
. Take a wax candle. It is desirable that it be the most ordinary without dyes, glitter and other things. Rub the entire surface of the shoe with a candle. Rub thoroughly, without missing a single area; to do this, install good lighting in the place where you will do all the work.
Step 4
. After completely covering the surface of the shoe with wax, turn on the hair dryer. Set it to the highest temperature possible and start blowing air onto the waxed material. Under the influence of hot air, it will begin to melt and be absorbed into the surface of the boots.
After the procedure, you can take a strip of cloth and rub your boots. Test the applied water-repellent layer in action. If necessary, you can apply two or three layers of wax, but do not overdo it so that the material of the shoes or boots does not become rough.
When using conventional impregnation with fluorocarbon resins, protection is created inside the skin.
Molecules of fluorocarbon resins fill the empty spaces between the skin molecules and create a molecular mesh that does not allow water molecules to pass through, but at the same time allows steam molecules to pass through and the skin of the product does not lose the ability to “breathe”.
Choosing the right winter cosmetics for shoes
When choosing any product, you can be guided by the presence of the “TEX” marking. It can look different and go in conjunction with different words, for example “For All Tex”, HIGH-TEX”, etc.
This marking means that the product is suitable for clothing and shoes with sewn-in climate membranes, such as Gore-Tex. Important properties of products with this marking: they are less aggressive and do not clog the pores of the product’s skin (the skin “breathes”).
For each type of shoe - its own cream
Smooth skin -
the composition should contain waxes, water-repellent components (fluorine-containing resins), a good advantage of the cream will be the presence of mink fat.
Mink oil does not leave greasy spots or streaks and adapts the skin well to sudden temperature changes. The skin does not lose its shine. You can also use water-repellent impregnation to increase the protection time against salt.
How to save money on shoe cosmetics
There is little point in using very expensive products for inexpensive shoes.
The skin will not become noticeably better.
Inexpensive shoes are made from split leather (velor/nubuck) or from low-quality leather, usually with defects, as a result of which they are covered with paint or polymer to hide the defects.
Before salt, all shoes are equal
Regular cleaning of reagents: smooth skin immediately upon entering the room with a damp sponge or cloth. Suede/velor/nubuck - immediately after drying the shoes with a brush for Suede/velor/nubuck.
Materials that better withstand salt and winter weather
How to save shoes that have white stains on them
The cleaner draws salt onto the surface of the shoe, after which it is easy to remove it from rough leather - with a brush for suede/velor/nubuck, with a smooth - damp cloth or sponge, after brushing off the released salt with a brush with natural bristles.
After such restoration, color restoration is most often required.
It is also important to apply it correctly!
- Method of 3rd application of impregnation. We apply the product to shoes three times with an interval between procedures of 1 day. Only after such a procedure can you be sure of the reliability of your shoes.
- Using a spray, we spray it not with one “spray” , but until the product stops being absorbed into the structure of the shoe.
- When using impregnation on old shoes, we first thoroughly clean the surface of the shoe, then wash it and dry it thoroughly. And only then can you apply the product.
- Choosing the right product! For example, oily water-repellent creams are only suitable for rough leather, while for other materials it is better to use sprays and emulsions. It is also worth noting that leatherette is not able to absorb oils and sprays.
What is waterproof
The word “waterproof” translated from English is more of a concept than a simple definition. The situation looks approximately the same as with the word “Xerox”, when in literal translation it is just the name of the company, but the practice has developed when this word is understood as any copying machine. And even a verb appeared - to photocopy, that is, to copy. Same here: Waterproof - adjective: waterproof, waterproof, waterproof. Waterproof - noun: a waterproof cloak (cloak) like a Mackintosh. Waterproof - verb: to make waterproof.
Source