- The simplest stationary driver
It is hardly possible to live in an apartment without a device for drying clothes. Such designs are not cheap, so the question of how to make a clothes dryer with your own hands is very relevant. Next, we’ll tell you in more detail about how to make a practical device using available materials.
Today, drying clothes in the house is a common occurrence.
DIY ceiling dryer installation
Most commercial dryers are mounted to the ceiling in approximately the same way, with only minor differences.
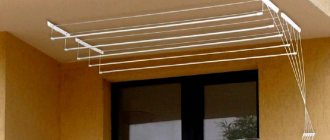
Let's consider installation using the example of a simple retractable model to a concrete ceiling covered with clapboard. <img class=” wp-image-29058″ src=”https://svoimi-rykami.ru/wp-content/uploads/2016 /08/oR0Gq2r08m8-6-copy.jpg" alt="Design of retractable ceiling dryer" width="599″ height="599″ />
Design of a retractable ceiling dryer
Step 1. The surface of the ceiling is wiped from dust and other contaminants. Place the first bracket on the ceiling perpendicular to the load-bearing wall and mark the drilling locations with a pencil. From these points, measure a distance equal to the length of the dryer bars, attach a second bracket, parallel to the first, and also make marks for the fasteners. For each bracket there should be two holes located at a distance of about 7-10 cm from the edge.
Step 2. At the marked points, drill holes through the lining into the concrete base so that the dryer is fixed as firmly as possible.
<img class=” wp-image-29053″ src=”https://svoimi-rykami.ru/wp-content/uploads/2016 /08/oR0Gq2r08m8-3-copy.jpg" alt="Drilling holes for fasteners" width="604″ height="604″ />
Drilling holes for fasteners
Step 3. Place the bracket on the surface again, align the holes on it with the holes in the ceiling and screw it in with anchor bolts.
Step 4. Assemble the dryer: insert the crossbars into the holes in the side bars and put on the plugs. Bolts secure the structure to the brackets.
Step 5. The cord is threaded through the central hole on the side panel, lifted up and threaded through the hole in the bracket. Then they pull the cord along the ceiling to another bracket, pass it through the holes again and tie it with a knot on the side bar.
Step 6. Attach the clamp to the other end of the cord and check the ease of movement of the dryer by pulling and releasing the cord.
<img class=” wp-image-29056″ src=”https://svoimi-rykami.ru/wp-content/uploads/2016 /08/Pull-out-dryer-in-an-unfolded-state.jpg" alt="Pull-out-dryer-in-an-unfolded state" width="598″ height="336″ /&amp ;amp;gt;
Pull-out dryer unfolded
<img class=”size-full wp-image-29057″ src=”https://svoimi-rykami.ru/wp-content/ uploads/2016/08/Linen-hanger-on-balcony.jpg" alt="Linen-hanger on balcony" width="600″ height="338″ /& >
Clothes hanger for the balcony
Location and design requirements
It is possible to make a clothes dryer yourself for installation on the floor, hanging from the ceiling, hanging on a radiator, on a wall and installing outdoors. Floor and street dryers can be stationary or mobile (adjustable); suspended and mounted ones are mounted in place once. There are many more exotic varieties: clothes dryers are firmly in the top 10 design classes in terms of the number of patents issued for them. But we will deal with those that are easy to make and can be used for a long time without hassle. The technical requirements for a homemade clothes dryer are no different:
- Should not rust or otherwise stain things.
- Must withstand weight up to 30-35 kg (a full large basin of poorly wrung out laundry or two wet carpets).
- The capacity of the dryer in terms of the number and size of items on it must correspond to the load-bearing capacity. Simply, the dryer should never collapse under the weight of things piled to the limit.
- Mounting of hanging and wall-mounted dryers should be simple, reliable, and least damaging to building structures and finishes.
- The adjustable dryer when folded should not weigh more than 10-12 kg, but it should be easy to unfold and securely fixed in its working position.
- It is highly desirable to be able to dry bed linen by hanging it, rather than spreading it out, i.e. hangers (bars or cords for things) in the working position should be as high as possible above the floor/ground.
- It is also highly desirable that in order to hang/remove things you do not need to climb on a stool, etc. stand and/or move along the dryer.
- It would just be desirable that things could be hung without clothespins.
- If necessary, a mobile dryer should be installed in the bathtub to shake out (glasses with water) things that cannot be wrung out after washing.
Radiator grille
Shoes get wet quickly but dry slowly - this depressing fact makes many people think about how to speed up this process.
Often they simply put wet boots on the radiator, but this can affect them in the most negative way. The fact is that boots dry unevenly near such a heat source. Moisture evaporates only from the outside, remaining wet inside. This leads to shoe deformation and cracking. If some parts are glued, they may simply fall off.
To avoid negative consequences, you can make your own device for drying shoes using a radiator. To do this you will need: several slats with a thickness of 0.5 cm, nails and soft synthetic fiber cloth.
You can quickly build a device using a hammer, sandpaper, an electric jigsaw and a construction stapler.
- First you need to make a diagram of the dryer.
- Then you should measure the required length from the rail and cut it.
- The internal dividers are nailed only after the side ones are attached. There should be a small distance of one centimeter between the slats.
- To avoid damaging the battery, a soft synthetic fabric is attached to the homemade dryer. A construction stapler will easily cope with this task.
- To secure the slats to the radiator, you can make hooks from leftover wood.
This drying method does not allow your favorite pair to come into contact with the surface of the radiator. Therefore, it dries evenly, without the risk of being spoiled.
What are the requirements?
Despite the fact that we are talking about simple structures, they must still have certain quality characteristics, which include:
- Ability to withstand weight depending on the operational needs assigned to them, but not less than 5 kg;
- Fastenings should be easy to use, but reliable enough so that the structure does not collapse on the residents’ heads;
- Structural elements should not be subject to rust, so as not to dirty things;
- If possible, it is necessary to calculate the height of the structure in such a way that you do not have to climb onto the bench to hang things.
Also read on our website: How to make a folding table on the balcony with your own hands
Important options to select
Making delicious and healthy marshmallows
For an electric dryer to become a truly good helper during the harvest season, it must be:
This will be influenced by the number and volume of pallets or surface area. Options for dryers up to 5 trays are a good choice for a small family. They are capable of drying several kilograms of food at a time. For more serious harvests, devices with 6 or more tiers are purchased. Models with 15-20 sections are capable of drying up to 15 kg of fresh food.
Allows you to dry various fruits and vegetables
Directly depends on the capacity of the device. A good option are 350-600 W models, which have sufficient capacity, efficiency, and do not consume a huge amount of energy.
You can set the desired temperature
Makes it possible to preserve all the beneficial properties and vitamins in products. Many convective devices are available with fixed 3 modes:
- 30-40С (Low) – light load
- 45-55С (Medium) – average load
- 60-75C (High) – high load
The last 2 modes are relevant for preparations from vegetables, fruits, berries, mushrooms, meat, and fish.
Plastic dryer for vegetables and fruits
Available in 2 main versions:
- metal – strong, reliable, durable; has significant weight; may get warm during operation
- plastic – light in weight, easy to clean
Plastic models are easy to assemble and disassemble, make it possible to increase the number of tiers, and are also transparent, which is convenient for monitoring the drying process.
With mechanical control
- the electronic view is equipped with a touch screen and keys for convenience; less exposed to pollution; adjustment is more precise
- mechanical appearance is reliable
Horizontal arrangement of trays is a more convenient option
- Trays are located vertically (one above the other) in many convective type electric dryers. Heating can be from above or below. The first option is more durable and easier to maintain, because... nothing gets on the heating block. Although devices with bottom heating cope well with large volumes of products
- horizontal arrangement of pallets is more convenient. Trays can be easily removed without affecting others. The heating block is located on the rear wall. It is also possible to simulate the chamber space by removing the pallets altogether. This way you can place large items, such as yogurt jars.
It is possible to make pastille
- the ability to prepare marshmallows or dry-dry meat and fish
- Thanks to the system of independent supply of hot air to each of the pallets, there is no need to swap them during drying
- There is no risk of getting over-dried food if the device has an auto-shut-off timer
- a device with overheating protection will be safer and last longer
- the adjustable height of the trays is useful, for example, for mushrooms, in order to dry them without chopping them
Good quality sofas: how to choose a universal model for relaxing and sleeping. Popular manufacturers + Reviews
How to choose the right one
Before purchasing, pay attention to several factors:
- The service life of metal is longer than that of plastic.
- When choosing a plastic model, the appearance is examined. If there are chips, it is better to choose another model of better quality.
- It is preferable to choose stainless steel rods.
- The permissible weight is taken into account.
- Pay attention to the size in any condition.
It is important that when opening balcony windows the dryer does not interfere.
Ceiling options are more often chosen for balconies. They are universal and multifunctional. They know how to fold.
This is the case when the laundry dries quickly and well, blown by the breeze, smells pleasant and does not take up the space of the balcony or loggia at all
If finances allow, they prefer an electric model. Its service life is longer than conventional dryers. There is a backlight, hair dryer and remote control.
Tips for choosing
To ensure that the dryer lasts as long as possible, the following factors should be taken into account when choosing a model:
- material of manufacture;
- permissible load;
- dimensions of the structure;
- complexity of installation;
- equipment.
The most common are dryers made of aluminum, stainless steel, plastic, followed by rope and wooden structures.
Aluminum models are lightweight and affordable, but with active use they will not last long. Aluminum tends to oxidize over time, causing black spots to appear on clothing. In addition, under increased load, the aluminum tubes bend noticeably, and such a dryer does not look very aesthetically pleasing
If you have a large family and have to do a lot of washing often, you should pay attention to other materials.
Stainless steel structures coated with polymer compounds are durable and have a very attractive appearance. They serve for decades without oxidizing or losing their original shape.
Chrome elements fit harmoniously into the interior of the balcony and are easy to clean from any dirt. And their only drawback is the high price.
Plastic dryers are very light, inexpensive, do not leave stains on clothes, and are easy to clean from dust. You just can’t load them too much, otherwise the tubes will become deformed, and the plastic clamps quickly become damaged due to frequent use.
Rope models are the simplest and cheapest, and you can make them yourself with almost no effort. But they also have more disadvantages: ropes sag quickly, leave creases on clothes, are less easy to clean from dust, and fray. In addition, hanging ropes or fishing line does not look very attractive.
Dryers made of wood are less common on balconies, and most often they are homemade structures. They look original, are easy to use, and are great for eco-style interiors. True, over time, wooden planks dry out, darken, and can become deformed from moisture, and therefore they do not last long.
Before purchasing a dryer, determine its location on the ceiling and take measurements. If a chandelier hangs there or a fan is installed, not a single element of the dryer should come into contact with them. Also take into account the distance between the edge of the window sash and the ceiling, because an incorrectly fixed structure will interfere with opening the window
When choosing a model, check the reliability of all fasteners and the integrity of components, and also pay attention to the permissible load indicators
How to choose the right ceiling clothes dryer
If you plan to install the dryer yourself, make sure that it comes with detailed instructions, because some models are not so easy to figure out. Finally, check the package for reliable fasteners - you may need to purchase them separately.
Mounted
Wall-mounted clothes dryers are small-sized, quick-detachable or cantilever, attached to the wall. From console dryers, a frame with hangers or cords is pulled out by a rod. When not in use, the console dryer looks like some kind of decoration or is simply not an eyesore.
To battery
Drying small items after a small wash is usually done in winter, when everything is wet and cold. Therefore, winter wall-mounted dryers are temporarily placed on heating radiators. Looking at the branded products (above in the figure), one gets the impression that their designers were firmly drilled into it at corporate trainings: the battery stands in the middle of the room and there is no wall on it.
Branded and homemade clothes dryers hung on radiators
Amateur imitations of the “company” (below in the figure) can be very neat, and made, as they say, with a blunt ax, but without taking into account the same circumstance. The original stationary design at the bottom left looks good, especially in the hallway, but it is too complicated for its purpose and its author overlooked another trick: suddenly, God forbid, there is a leak, the dryer will have to be broken, risking causing a gust and a flood. Instead of breaking it, you will receive an invoice for the full cost of emergency work and compensation for their consequences. The heating network operates the heating system right down to the subscriber devices. If it turns out that the consumer unauthorizedly carried out work on them that was not provided for by the technical regulations, there will be no need to prove that you are not a camel. It will not be taken into account anywhere, by anyone or in any way.
You can create a removable clothes dryer for a radiator with your own hands much more simply and easily by making it from wire rod covered HERE; For diagram, dimensions and explanations, see the figure:
Battery clothes dryer
The “horns” of the frame rest on the wall behind the battery, that’s the whole “trick”. Before covering HERE, the frame blank is bent horizontally in place. The hangers, already covered HERE, are put on the frame through the “horns” and move freely along it. If you need to fix it, this can be done by crimping the hinges on the assembled dryer, hanging them in a vice, or tapping them with a hammer. Both are done through spacers made of wood or plywood. If you work carefully, the coating from HERE remains intact.
Wall mounted
The classic version of a wall-mounted dryer is a folding frame, on the top left on the trail. rice. It’s good for everyone, except that it also “decorates” the wall well, which often gets damp behind the dryer. Much more practical is the console retractable telescopic dryer, below left, but the prices... ask, you’ll find out.
Wall-mounted clothes dryers and a diagram of a homemade telescopic retractable clothes dryer
At first glance, it seems that a telescopic dryer cannot be reproduced at home, but this is not so. How a homemade wall-mounted telescopic clothes dryer works is shown in Fig. It is not as elegant as the branded ones, but it has almost twice the capacity. And this design is also more durable: its links will never come loose, because the extended ones do not jam into each other, but lie one on top of the other.
The sidewalls of the links are made of 20 m of plywood, moisture-resistant or twice impregnated with a water-polymer emulsion. Earrings – wire rod covered HERE; hung from it. The ears of the earrings (the ends bending inwards) are fixed with mounting glue. The upper mounting hole in the lower link is drilled from the rear. You will have to screw the self-tapping screw into it without a screwdriver, using a screwdriver with a long blade, holding it slightly to the side. This is the only inconvenience when installing this structure.
Note: wall-mounted dryers with retractable cords are often made outdoors so that the cords collect less dust and are less conspicuous. A remote support, to which the rod with ropes are attached, is still needed for such a dryer. How to make a cantilever wall-mounted outdoor dryer, see the video below:
Making a drill for wood carving with your own hands
And yet, if we talk about an easy-to-use drill, most users agree that the best option is the one in which you, as they say, hold the motor in your hands. With all this, it should not be heavy, bulky, and should not tear off the hand when starting.
We bring to your attention an example of making such a drill for small jobs with our own hands.
For this particular drill the following was used:
- brushless electric motor with permanent magnets DPM-25;
- a piece of pipe from a vacuum cleaner;
- collet clamp with replaceable inserts;
- power button;
- 2 banana plugs;
- two-wire power supply wire;
- heat shrink tubes.
DPM-25 electric motors are represented by a large number of modifications with significantly different parameters. So, the number of revolutions they produce can be from 2500 rpm. up to 9000 rpm. So you can choose with the characteristics you need. You can buy them in many online stores or on the radio market, which is several times cheaper.
It must be said that in addition to 25 engines, there are also 30 and 32 and more powerful ones, and also with different parameters.
I now have an engine waiting its turn for something of the same appearance and design, powered by the same 27 volts, but with a diameter of 100 mm. Both this and the ones we offer you for a homemade drill were used in aviation technology.
The button can be with or without locking. Collet clamps are selected in a radio shop according to the motor shank (this one is 2 mm) and the diameters of the tool shanks that are planned to be used for work. Here, the variety of options is even greater than when choosing an engine.
You can also use a collet clamp from a dental drill. In specialized stores it is not that expensive, but you can find very inexpensive used ones.
And there are also plenty of options for supplying electricity to the engine. A very convenient and simple method using a tulip-type connector, where “+” is supplied to the central wire, and “–” to the outer cup. And given that the motor is reversible, the direction of rotation should be adjusted on the power supply:
These small digressions will not distract us much from the process of making a particular drill, but they can be useful in terms of varying its design.
1. Cut off the part of the vacuum cleaner tube that goes to the narrowing - this way the motor will be installed more securely, with a length so that it is convenient to hold the tool in your hand.
2. We cut a heat-shrinkable tube with a diameter of 32 mm along the length of the electric motor housing and, securing it to the shaft in a vise, rotating it by the power wires, we seat it, evenly heating it with a technical hair dryer from the center to both ends. In this case, we will just get the required size to fit it tightly in the tube. But, if you use a different tube for the housing, you can use electrical tape by winding the required amount of it on both ends of the motor housing.
3. Drill the hole for the electrical wire in the right place, based on the parameters of the button and the wire itself.
4. We cut out the restrictive rings and the seat for the button from suitable sized plastic containers for medications, children’s toys such as soap bubbles, etc.
5. Connect the wires through the button. Better - by soldering method. And, of course, do not forget to use heat-shrinkable tubing in the soldering areas to eliminate the slightest possibility of a short circuit.
6. Assembling the drill. If the sizes of the rings were chosen successfully, we simply press them into the body tube, and if not, then we use either hot melt glue or any suitable one for the materials used.
7. Place a collet chuck with a collet under the desired bur or drill, connect the drill to the power source. All.
The length of the body was chosen solely for reasons of convenience of placing the instrument in the hand.
The tool is powered by a factory-made regulated power supply - not a cheap thing, but very useful for many purposes in the home workshop. You can also use any step-down transformer that has outputs from 25 to 32 volts - permissible voltages for operating this engine, but it is better to adjust it to a nominal value of 27 volts.
It remains to add that such a drill is simply irreplaceable when used as a micro drill when carrying out small work on wood, when using drills with a diameter of less than 1 mm, and for grinding and polishing work in hard-to-reach places.
If you decide to make a drill with your own hands, then you should definitely know that instead of collet clamps, a three-jaw microchuck is often installed on such a tool. They come in different designs and parameters, which determines how they are mounted on the electric motor shaft. Sometimes hot glue is also used for this purpose, but alignment is difficult to do, although it is possible, but this method is only suitable for low-speed machines with low torque.
So there are many manufacturing methods and options for using such a tool as a drill.
Dear readers, if you have any questions, please ask them using the form below. We will be glad to communicate with you;)
Making tool
To make a clothes dryer yourself, the master must have the following tools:
- impact drill;
- screwdriver;
- sets of Phillips and flat screwdrivers;
- roulette;
- a hacksaw for wood (if the material for production is wood);
- a hacksaw for metal (if you are going to make a drayer from aluminum, stainless steel or plastic);
- sets of drills, dowels and screws.
Carpenter's tools for woodworking
Clothes dryer for the balcony: do it yourself
Drying clothes in multi-storey buildings is one of the pressing issues. Often, apartment residents use either a balcony or a bathroom for this purpose, having previously installed a special dryer in these rooms.
The most practical option, in our opinion, is the balcony, because there is better air flow, which significantly speeds up the drying process. Therefore, we will deal with drying equipment on the balcony, the main principle of which will be hanging things that should not disturb anyone. Don't worry about the fact that your balcony is completely open and there is no place to tie ropes. We are confident that a way out of any situation can be found.
Where is the best place to place the dryer?
Wall-mounted dryers save home space, hold a lot of things and when folded do not create obstacles in everyday life. Suitable for placement in any convenient place: on a balcony, loggia, in bathrooms and living spaces. Dryers of this type are mounted on a load-bearing wall.
Important! Mounting a homemade clothes dryer on partition walls is unacceptable - the weight of the laundry can cause it to fall and damage the finish.
Ceiling-mounted drying devices are usually placed on balconies, loggias, and bathrooms. Due to the fact that they are mounted on the ceiling, they do not interfere with the use of the room.
Floor dryers are characterized by mobility, so they can be installed in any room. In working condition they take up a lot of space, which is why they are not recommended for use on the balcony or in the bathroom.
What are the criteria for choosing a dryer?
Before you start choosing a dryer, decide how much laundry you will dry at one time.
Linen volume
It must be calculated based on the load of the washing machine and the number of washes performed at a time. For a large family, you should choose a model that can withstand a maximum weight of 20-30 kg; for a family of 3-4 people, 15 kg will be enough; for one person, you can limit yourself to 5-10 kg.
The useful length of the ropes or drying rods matters. It can be 1.5 meters for some wall-mounted ones, and up to 20 meters for exhaust ones.
These characteristics depend on the design, method of fastening and material of manufacture.
There are several ways to attach dryers, which allows you to choose the most convenient option. First of all, decide where it will be installed.
Where can it be mounted: floor racks, wall brackets, window options, etc.
- the floor can be placed in any free space and, if necessary, moved to another place;
- wall-mounted is permanently attached to one or two walls, always ready for use;
- the ceiling without linen is completely invisible, does not take up useful space, and can withstand a large volume of laundry;
- wall-ceiling or vine - the most popular option with adjustable height of individual rods;
- other types: with attachment to a radiator, a bathtub, hanging nets for delicate items - convenient as additional ones to the main dryer.
When making a choice, pay attention to some design features
Design features
At first glance, dryers may not differ from each other. But some models are equipped with useful features that will make them easier to use and save space in the house, while others are not.
- monolithic - one-piece structures, suitable for spacious rooms, as they do not fold;
- sliding ones have retractable elements, which allows you to increase the usable area if necessary;
- folding ones take up space only when in working order, after which they can be put away in a pantry or closet;
- electric ones dry a large volume of laundry in a short time, which is very convenient for a large family.
It is very important to choose the right material from which the dryer is made
Material of manufacture
- aluminum;
- plastic;
- tree;
- stainless steel.
Aluminum is the lightest
The material is light, but not very durable. Under heavy loads, parts of such a dryer may bend or break. In air, aluminum oxidizes, forming a black coating on the surface that stains laundry.
Plastic is brittle
It is good because it does not oxidize, does not stain laundry, and is lightweight. Unfortunately, it does not always pass the fracture test and is only suitable for light loads.
Wood - eco-style
Environmentally friendly material, does not oxidize and does not get dirty. But there is a drawback - the wood swells from water and becomes deformed with frequent use. Do-it-yourself dryers are often made from wood by home craftsmen. It is better to use it for the frame, and use a different material for the working rods.
Stainless steel - strong and heavy
It has more weight compared to other options, but also increased strength. This is the most popular and practical option. The coating of such structures can be powder, spraying, or enamel. The powder wears off over time, exposing the metal. It is preferable to choose enamel.
The price range for dryers is wide, as is the list of manufacturers. The most popular are four manufacturers.
Popular dryer manufacturers
- Gimi is an Italian company that supplies a wide range of high-quality dryers for every taste and budget.
- Meliconi also comes from Italy. Specializes in luxury products that are distinguished by excellent quality, but also high prices.
- Dorgular is a Turkish manufacturer of inexpensive but high-quality dryers. The products are not burdened with frills, but are distinguished by their simplicity and long service life.
- Leifheit is a German supplier and manufacturer. The highest quality of products combined with German meticulousness and foresight make the products convenient and practical. As a rule, they are supplied with various useful little things.
How to choose the right clothes dryer - video
Let's take a closer look at some types of these home helpers. The simplest among them are portable.
Optimal conditions for drying clothes
Owners of private houses in the village dry clothes the old fashioned way. They hang it on ropes stretched in the yard between two supports. The natural drying method is considered the most optimal. This is confirmed by a number of advantages:
- When drying naturally, the laundry does not dry out and is saturated with oxygen. On the street, toxic fragrances from washing powders erode. Linen brought in from the cold smells fresh, but dried items indoors may have a musty smell.
- Outside, especially in warm weather, laundry dries faster. This happens due to wind blowing. Moisture from the fabric evaporates faster.
- Laundry drying outside does not harm a person. If you do this indoors, fungus appears on the walls from the evaporating moisture. In addition, all family members living in the house breathe these fumes, which contain particles of washing powder.
Outdoor conditions are considered the most optimal for drying clothes, but they are not always available. The obstacle is inclement weather or the lack of a private yard for the person living in the apartment.
Devices in the form of different grid configurations help dry laundry indoors
If it is impossible to use outdoor conditions, drying clothes is moved indoors. They come up with various devices in the form of gratings. However, here too you need to think about the optimal location for them. Ideal conditions on the balcony. Here, moisture evaporation is not dangerous for living family members. Even if the balcony is glazed, opening the windows can create a draft to speed up drying.
If you exclude the balcony, then it is optimal to place the dryer indoors near the radiator. Warm air causes moisture to evaporate faster. However, the bedroom will not do. In the hall, drying laundry spoils the interior. It is optimal to place the dryer near the radiator, where it is least visible, for example, in the bathroom or kitchen.
Floor structures
Sliding floor clothes dryers are a wonderful mobile design for arrangement in any room of the apartment, while when folded they do not take up much space and can be easily stored in the pantry. These dryers are quite simple to disassemble, but they vary in parameters and layout.
Among the advantages are mobility, ease of installation, variety of product range, compactness, and the ability to install dryers, as in the photo, in the bathroom and other rooms. However, fairly large structures can be heavy, but for ease of movement they are equipped with wheels.
Having once taken up the task of modernizing floor-mounted clothes dryers, designers came up with many original options that even looked like innovative installations.
Types of dryers depending on location
Ready-made kits are varied, but even among such an assortment, the most successful designs can be distinguished.
Mobile dryers
The main “trump card” of such products is the ability to move and change position. This is very convenient for small rooms, when every centimeter of space is distributed, and there is not enough space for a full-size hanging model. Also, such dryers will help out the guests of rented housing, because the installation of the hanging structure must be discussed in advance with the owners.
How to make a clothes dryer with your own hands
Before you get started, you should:
- determine the maximum weight of laundry for which it will be designed;
- decide in which room it will be located;
- see what materials are available;
- Having decided on a suitable model, you should familiarize yourself with how best to make it by studying tips and recommendations.
Wall dryer
The following materials will be required:
- For the base that will be mounted on the wall, you can use moisture-resistant plywood, a board with a joint groove, laminated chipboard, or a shelf from an old cabinet.
- Sanded bars and slats.
- Locking lock, hinges (2), folding mechanisms (2), hooks, hanging fastenings (2).
- Nails or screws.
- Varnish, enamel - to choose from.
- Carpenter's glue.
The work is performed in the following sequence:
- Create a drawing of the future structure with dimensions, taking into account that the optimal distance between the planks is 8-9 cm.
- Saw off 4 bars and strips of the required size. Treat the rough surface with sandpaper or an angle grinder (grinder).
- Drill blind holes for the planks symmetrically in two bars. If the planks have a square or rectangular cross-section, round the edges.
- Coat the holes with glue, assemble the frame together with the slats, fasten with nails or self-tapping screws.
- Make the base 10-15 cm larger than the frame.
- Paint the structure or varnish it.
- Screw on the locking lock on the top side of the base, on the back side - fastenings for hanging, on the side - a folding mechanism, at the bottom - the required number of hooks, just above which fasten the loops, and on them the frame.
Folding floor
Necessary materials:
- bars;
- furniture screws (4), partially threaded bolts (2);
- clothesline;
- paint (varnish).
Sequencing:
We recommend: How to remove glue from clothes
- Assemble two U-shaped structures. To do this, you need to saw off 4 bars of equal length for the vertical sides and three for the horizontal crossbars. The second cross member is made shorter than the first by two beam widths, the third (central) by four.
- Drill holes in the top of the vertical bars and at a distance equal to 1/3 of their length, marked from the bottom.
- Based on the length of the bolts and screws, make holes under them at the ends of the crossbars.
- Drill symmetrical holes for the cord in both crossbars at equal intervals.
- Paint all the parts and, after drying, assemble the structure.
- Pull in the cord.
Homemade ceiling options
Necessary materials:
- bars (2);
- round or rectangular strips (5);
- wood screws, screws with a ring (3);
- clothesline;
- varnish or enamel.
Progress:
- Saw off 2 bars of the same length and 5 planks.
- Paint the resulting parts in 2 layers.
- On both sides of the center of the block, mark marks every 10 cm, drill through holes and insert strips into them.
- If the plank is rectangular in cross-section, then you can screw them in with self-tapping screws along the marked marks, overlapping.
- Drill 2 holes for dowel-nails on the ceiling and one on the wall.
- Tie ropes to the resulting structure, pull them through the rings on the ceiling and tie them to a screw with a ring on the wall.
Date: September 25, 2022
Homemade drying rack from hangers
Materials:
- an old curtain rod along with the rings, fasteners and plugs on it;
- hangers;
- screws assembled with dowels.
Progress:
- Inspect the cornice mounting system and make appropriate marks on the ceiling.
- Drill holes according to the marks, insert dowels and screw the cornice to them with self-tapping screws.
- Hang the hangers on the curtain rings and secure the joints with electrical tape.