Appliques on clothes are a wonderful way to design old things in an original way and bring old things back to life. Very often this type of needlework is used to hide a hole or stain that cannot be removed on a T-shirt, shirt, jeans and other wardrobe items. The process of applying the applique is quite simple, and even a beginner in needlework can easily figure it out.
Description of the application creation process
When assembling an applique for children, the basic component of the work will be fabric; it is applied to a special base of the following types:
- Cardboard.
- Plastic.
- Plywood.
- Cloth.
From small scraps, parents can cut out the necessary parts, which the child will subsequently attach using one of the common methods.
- Hand stitching is quite popular, because for such manipulations you do not need to have special equipment, you just need to get a needle and thread of a suitable shade.
- A sewing machine is also often used when creating crafts; this device can significantly reduce the time that will be spent in the process of making a picture or scene.
- The use of adhesive fabric with a lining will allow you to fix the elements on the base as firmly as possible; for this you will need a regular iron heated to a certain temperature.
Recommendation! There are ready-made images in art stores that can be used to decorate a child’s clothes by gluing them or to hide a stain on a favorite T-shirt. The process is quite exciting, so the work is worth doing together with young family members.
Basic principles
The technique of fabric appliqué involves applying and securing fabric elements to a background along the contour of the intended image.
There are two ways to fix applique parts:
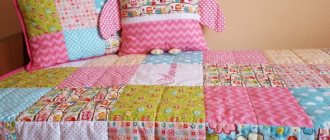
- Sewing. Used as decoration for clothes, bedspreads, pillows, capes and other home textiles.
- Gluing. Used in the manufacture of panels and paintings.
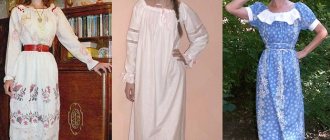
As shown in the photo of fabric appliqués, they are:
- decorative;
- subject;
- plot.
They are also divided into single- and multi-color.
The appliqué method allows you to create intricate patterns and amazing designs that can be used in interior decoration and the creation of souvenirs.
Postcards made using this technique look especially original.
As for materials, it is appropriate to use felt, fur, leather, felt. But you can also use ordinary fabrics, such as cotton, wool, linen, chintz.
Silk, velvet fabrics, burlap and cloth are suitable as a background. A good solution would be canvas and linen. The main rule is that the density of the background should be higher than the density of the sewn decor.
All types of applications
When choosing a template, you need to be guided by personal taste; bright and unusual designs have proven themselves well; you should pay attention to them first.
- There are several generally accepted types of crafts, among which there is a simple approach to performing the process.
- Before starting work, you need to select a sketch, after which the pattern is transferred to the clothing or base, but do not forget about the allowance, it is needed for further manipulations related to attaching the element.
- During assembly, hand or machine stitching is often used; when choosing a gluing method, special attention is paid to the structure of the fabric; the workpieces should not crumble when heated. Otherwise, the appearance will deteriorate, and all efforts will not bring the expected result.
Sweatshirt pattern with applique
- A voluminous sweatshirt with a large, cheerful appliqué and cozy pockets will appeal to children of any age.
- download the sweatshirt pattern for free using the following links:
- Paid sizes
| Size (height) | Bust | Waist circumference | Hip girth | Age appropriate | the price of the pattern is 75 rubles, How to buy here? |
| size 74 | 49-51 | 47-49 | 49-51 | 9 months | |
| size 80 | 51-53 | 48-50 | 51-53 | 1 year | |
| size 98 | 54-56 | 51-53 | 55-58 | 3 years | |
| size 104 | 55-57 | 52-54 | 57-60 | 4 years | |
| size 110 | 56-58 | 53-55 | 59-62 | 5 years | |
| size 116 | 57-59 | 54-56 | 61-64 | 6 years | |
| size 134 | 64-68 | 58-61 | 69-73 | 9 years | |
| size 140 | 67-71 | 59-62 | 72-76 | 10 years | |
| size 146 | 70-74 | 62-64 | 75-80 | 11 years | |
| size 152 | 74-76 | 64-65 | 79-83 | 12 years | |
| size 158 | 76-82 | 65-66 | 82-84 | 13 years | |
| size 164 | 82-86 | 66-67 | 84-85 | 14 years |
* As a result of payment, a file with a pattern is automatically sent to your specified email. If the file has not arrived within 30 minutes, then you need to send a request to search for a pattern . No need to pay again!
Patterns are given without seam allowances.
Recommendations for choosing fabric : fleece, footer, velor, etc.
When developing patterns, we were guided by this model:
The composition of the pattern set:
The description of sewing the model is made for size 86. Difficulty level: below average.
You will need: - main fabric 1.50 m wide - 0.60 m; — additional fabric with a width of 0.90 m – 0.30 m; - auxiliary fabric (thin cotton knitwear) width 1.40 m - 0.30 m; - buttons; - sewing threads;
- cushioning material - thin non-woven fabric.
Source: https://materials.tell4all.ru/vykrojka-tolstovki-s-applikaciej/
Double layer crafts
To learn how to make this type of product with your own hands, you need to start getting acquainted with easier options; the process of creating a composition is a little more complicated.
Two identical patterns are sewn together, and after the work is completed, the toy for children or interior decoration is turned inside out. To give the product a shape, it is filled with filler; the following are perfect for implementing such solutions:
- Cotton wool.
- Sintepon.
- Small foam.
As soon as the appearance suits the master who took up the process, the decorative part can be attached to the base or clothing. Using this technique, you can create a wide variety of paintings or scenes.
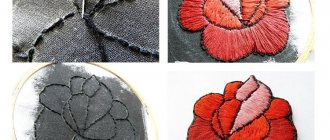
Reversible type
Before working on a beautiful applique, you will need to practice, because the technique is considered complicated. Before starting to implement your plan, experienced craftsmen recommend taking several pieces of fabric and working with them, and then moving on to the process of decorating the decorative elements.
The selected pattern or image is sewn onto the wrong side of a thick sweater, T-shirt, pillow, blanket or kitchen utensil; it is advisable to choose a blank in a contrasting color.
After which the upper part of the item is removed using sharp scissors; the process will require maximum care.
It is necessary to cut the fibers until the image from the inside becomes completely visible, after which the edges must be processed so that the item does not unravel and looks finished.
Important! The technique is quite complicated, so there is definitely no need to rush; to remove the top layer, it is better to take nail scissors with sharp ends.
DIY appliques for clothes
“Shooting star” for Mabel from Gravity Falls sweatshirt
It is first necessary to decatify the fabrics. For more information about what kind of “beast” this “decating” is, read the article “Village fabric? Methods of decatification." This is necessary so that the finished product does not lose its shape after washing, for example, the main part of the sweater will stretch, while the shreds will shrink. All the knitwear will gather in waves and hang over the applique.
We modeled exactly how our rays and star would look right on the pattern.
We select fabric for the applique parts, mark the parts with chalk and cut out the parts of the desired shape.
We iron the cut parts with an iron and steam. We put them side by side and, satisfied with the result, move on to the next step.
After all the parts are prepared, place them on the ironing board face down, closer to each other, so that there is a gap of about 5 mm. Cover the top of the scraps with adhesive interlining, rough side down. Iron with steam iron.
If your unit does not have such a function, use an iron (a light ironing cloth made from natural fibers) generously moistened with water from a spray bottle. We iron the details well. The interlining may stick to the fabric covering of the ironing board; this is normal.
We cut out our parts from the non-woven fabric.
Next comes the turn of gluing the parts with adhesive tape. You can skip this point and suffer, and then do as advised))) It’s better to glue small parts first and then cut them out. Adhesive tape sticks to fabrics much more strongly and tearing it off the ironing surface is a dubious pleasure. So we put three rays together and glued them together.
We place the details on the main fabric. We select threads by color. If you have a limited selection of threads, experiment with color combinations.
Secure with pins. If you are happy with the result, iron the parts, moving from the center to the edge, gradually pulling out the pins and aligning the pattern. Do not iron on the pins - it will leave imprints.
After everything is secured, we begin to sew on the applique details. First, we go through a regular wide stitch along the edge of the parts.
Non-stretch fabric should be on top.
We will sew on the star at the end, since it is the main element of the applique.
If this is your first time using the zigzag function, practice on a scrap piece of fabric. Due to the monotony of the process, you may miss the moment of turning or the line will simply go to the side. And it’s extremely tedious to rip out such a line. In this applique we have used frequent zig-zag stitching for a better look.
- As a result, we get beautiful appliqués on clothes with our own hands.
How to make applique on clothes
Name of the dance group. Letters
Now let's move on to the patch for the dance group.
First, on the pattern itself, we figure out what size the letters should be and their location. We draw the letters on the leatherette and immediately glue them with adhesive tape. We did not glue the interlining, since the leatherette itself is quite dense.
Leatherette should be ironed carefully, at least for the sake of your iron. Thin fabric melts at high temperatures. When using an iron at maximum setting, even ironing will not save you.
We cut out the letters and apply them to the part of the costume on which they are to be sewn. We pass with an iron from the knitwear side.
We sewed letters onto knitwear. As in the first case, our main fabric is quite capricious.
In this case, we decided to help ourselves a little and before we started embroidering the letters, we sewed a piece of a knitwear suit to its paper pattern. This is how we fixed the knitwear.
Since we sew from such a capricious material as leatherette, there are some tricks here. We generously paint over the letters with chalk so that the machine’s foot glides better and does not leave a trail along the applique, which will be very difficult to remove later. As in the previous version, we sew the letters with a wide stitch along the contour.
This time we chose a wide zig-zag step. Leatherette, unlike knitwear and gabardine, is a non-flowing fabric.
- The difference in zig-zag width is clearly visible from the reverse side.
- This is how he looks from the face.
- Author of the article: Nitashi Eraklier
Sewing and photographs: Workshop MY CODe. Groups on VK and FB
Recommendations from experts
When assembling paintings or scenes that will participate in exhibitions, you can avoid noticeable seams on the workpieces. To do this, experienced craftsmen often use a hot glue gun; thanks to such a practical tool, they can create neat and attractive crafts.
But when working with children, you need to follow safety precautions; it is better not to let your child touch the metal parts of the device.
Among the most suitable fabrics it is worth highlighting:
- Felt.
- Cotton.
- Wool.
- Leather.
When performing manipulations, it will not be superfluous to pay attention to the advice of experts, because people with experience can share useful skills and real-life cases that will help to avoid mistakes.
If the craft contains many small components, before major fixation they should first be distributed on the base and pinned with pins, evaluate the appearance or make adjustments.
To make the seams less noticeable, you can purchase the thinnest needles and buy cotton threads, then the masterpiece will be worthy of prizes at the exhibition. The allowance is very important; if you forget to leave it, then some problems will arise with fastening.
Felt decor
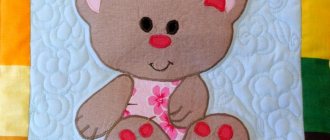
When making appliqués from a material such as felt, geometric shapes are used. If you are a beginner, then experiment by creating a “Heart” work.
Here are instructions with a description for beginners:
- Using the template, cut out two hearts and several flowers.
- Finish the edges with a buttonhole stitch.
- Sew two hearts together, filling them from the inside with padding poly.
- Attach the remaining elements of the product in layers, focusing on the selected pattern.
- Decorate the composition with beads, ribbons, beads, and rhinestones.