Children absolutely love secluded corners where they can fantasize or play an exciting game. For this reason, children often build homemade houses from scrap materials: pillows, bedspreads, chairs. You can make your child’s leisure time exciting with the help of a DIY children’s hut.
But first, it is advisable to decide where the structure will be located: on the street or in the room. The choice will depend on the list of materials used and dimensions.
Wigwam in the house
During the cold season, a wigwam is an excellent option for games in the room. It is one of the attributes of a children's room decorated in Scandinavian style. A textile house in the form of an Indian hut can be made using:
- strong wooden twigs or slats, connected at the top with a rope, and at the bottom opened in the form of a polyhedron;
- a textile cover or fabric triangles attached to a frame made of rods.
The stability of the structure will be ensured by transverse rods attached to the bottom of the wigwam.
Such a hut will become indispensable if you use it to store numerous toys.
How to make it yourself
Having prepared the necessary material and chosen a suitable location for the construction of the structure, construction should begin.
Method No. 1
You can simply build a hut at home if you follow the following sequence of steps:
| № | Stage | Description |
| 1 | Prepare furniture for construction | If you have large sheets of cardboard in the house, you can also use them. They will help strengthen the structure. |
| 2 | Arrange the furniture | It should be located in a circle so that it does not fall during the operation of the future home. |
| 3 | Create a roof | If you have a large blanket, cover the furniture placed in the previous step with it. If there is none, you can use several blankets. They must first be connected with clothespins, paper clips or other fasteners. To prevent such a roof, represented by a blanket or several blankets fastened together, from falling during the operation of the house, it is better to secure it using rubber bands. |
| 4 | Decorate the hut door | To do this, you need to leave an open hole, the size of which will be sufficient to allow you to get in and out. The door can be located in any part of the structure: in the front or back. |
| 5 | Fix the hut | Place heavy objects around the edges of the hut that could prevent falls. The role of such objects can be played by books or large candles. |
| 7 | Give the name of the building | So that everyone knows the name of a cozy house in which you can have a good rest, you should write its name on a piece of paper and secure it near the entrance hole. |
| 8 | Decorate the interior | To make the interior soft and cozy, you can throw blankets, poufs, and pillows. |
To make spending time in the hut not boring, you can take a smartphone or laptop with you. If the new room seems too dark, you can bring a few flashlights or use extension cords to turn on an electric lighting fixture. In that case, you can read here.
You can also bring non-perishable food and drinks inside.
The following edibles may be a good option:
- fruits;
- chips;
- cookie;
- bottled drinks;
- straw;
- juice in bags.
Method No. 2
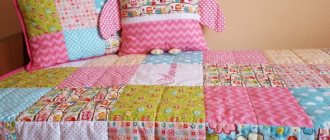
You can build a hut at home from pillows as follows:
- Prepare pillows and cushions from the sofa.
- Pillows and bolsters, which will be the most dense, should be used as the walls of the future structure. Place them vertically, not horizontally, otherwise the structure will quickly collapse. The role of the supporting wall for such a structure can be played by the back of the sofa. You just need to place pillows on the sides and then cover them with a blanket.
- When the soft walls are ready, place a hard pillow on top or simply cover everything with a large blanket.
- Make the floor. You can also take pillows or other soft products for this.
Method No. 3
You can build a hut from chairs, a sofa and pillows.
To do this you need:
- Choose a room that will be well suited for construction . It is best to choose a room that already has all the necessary elements. Chief among them will be the sofa: it must be in the room. Chairs, blankets, pillows and other “building materials” can be brought from neighboring rooms.
- Having chosen a room, remove the pillows from the sofa installed in it. They must be removed from both the seats and the backs. It is important to consider that valuable items, such as coins and toys, may be found underneath them. If any are found, put them in a box, which in the future can serve as a chest stored in the fortress. Before moving on to the next step, you need to remove crumbs, dust and other debris from the sofa.
- Build the walls of the fortress. Their role will be played by the pillows that were removed from the sofa at the previous stage. The walls are erected as follows: the pillow must be placed on the seat of the sofa so that its flat side rests on the armrest. You can also use ordinary pillows taken from the bed to build walls. Then you should put 2-3 pieces on each armrest. It is important to ensure that the top edge of the pillow is flush with the back of the sofa. To do this, you need several pillows, which must be stacked one on top of the other.
- Create a roof. For this, as a rule, a blanket is used. Its narrow edges are best placed on pillows, while the long edge should lie on the back of the sofa. The canvas, which will act as a roof, must be well stretched over the fortress. You can use a sheet instead of a blanket. It is lighter, so it will not put much pressure on the pillows, which means they will not fall inside the structure. It is worth keeping in mind that light does not pass through heavy thick blankets, which creates a cozy and mysterious atmosphere in the hut. However, they have a lot of weight, which can cause the structure to collapse.
- Expand the space . Other pieces of furniture and a few more pillows will help increase the strength. One of the simplest options for enlarging such a hut is to install 2 chairs with backs on the sides. They should be positioned so that they “look” at each other. Then you need to lean pillows against their legs and cover them with a blanket on top.
Method No. 4
In winter, you can arrange a wigwam in the children's room. It can become a temporary home for children or a permanent attribute of the room.
To make it you will need the following materials:
- wooden sticks;
- rope or rope;
- thick fabric.
Building a home wigwam is quick and easy:
- Wooden sticks are tied together to form a frame.
- The fabric is attached to them and distributed evenly.
Such a hut can serve as a place to store toys.
Method No. 5
To create a tent-fortress you need the following materials:
- pillows, it is best to use hard types from under armchairs and sofas;
- blankets, bedspreads;
- heavy books;
- furniture.
The stages of creating a soft fortress will be as follows:
- Install heavy furniture, such as a sofa, armchairs, or bookcase, as load-bearing walls.
- Stretch blankets and bedspreads over the walls. If their ends reach the floor, secure them with stacks of books; if not, secure them by clamping them with the cabinet doors.
- Check the strength for strength and stability.
- Cover the floor with a warm blanket and pillows.
Method number 6
The simplest version of a hut can be made from chairs, blankets and pillows.
To create it you need to prepare:
- 4 dining chairs with backs;
- medium sized bedspread;
- large bedspread;
- decorative pillows for game participants;
- books, candles.
The stages of construction of the structure are as follows:
- Place 2 chairs with their backs facing each other. The distance between them should be 1.5-2 m.
- Place a middle blanket on the floor between the chairs. Place pillows on it.
- Cover the backs of the chairs with a large blanket.
- Secure the blanket roof with books or other heavy objects placed on the seats of chairs.
It’s easy to build a cozy hut for children at home using available materials.
For children under 3 years old, you can create a simple hut by throwing a blanket or blanket on the dining table and covering the floor with soft objects.
House - tent
If the area of the children's room does not allow placing a hut on the floor, you can make a removable awning over the child's bed. This option will allow him to independently turn his sleeping place into a play area.
As a frame, you can use narrow bent metal-plastic tubes connected with tape. Textiles stretched over tubes will serve as a roof in an improvised tent. The homemade house is easy to install and fold without the help of adults, which children will certainly appreciate.
Useful tips
To make your hut more comfortable and stable, we bring to your attention a few small tricks that will help you with this:
- Use a battery-powered flashlight to illuminate your indoor space. It must be placed on the “ceiling” or floor.
- Using pillowcases and towels, seal any cracks.
- If it gets hot, you can place a portable fan nearby.
- Pretend and fantasize. This way your game will be much more interesting.
- Use a pillow or cardboard box instead of a door.
- You can also use chairs, cushions and boxes to divide the fort into rooms.
- To make your fortress last longer, take lightweight blankets and sheets.
- For construction, try to use those items that no one will need in the near future.
- The hut is best placed in the center of the room. Avoid places near a door or window.
- Do not use breakable or fragile items. In addition to damaging them, they can also be harmful to your health and injure you.
- Avoid using plastic sheets as they give off an unpleasant and sometimes toxic odor.
- Do not turn on light bulbs inside. They can become hot, creating a fire hazard.
- Be careful with large objects.
- Don't create a big mess, as it will take a long time to clean up later.
- Always build a hut together with friends, because it is much more interesting.
Building a wigwam or hut in your home is a very simple task. Absolutely all items can be used. The most important thing is to approach the process with enthusiasm and imagination. Build, create, invite friends, have fun and benefit!
Cardboard version
For kids you can make a small house out of cardboard. Among the advantages of this design:
- quick installation;
- ease of manufacture;
- an opportunity for a child to show creativity and do their own interior decoration using paints and pencils.
Parents just need to use a couple of large boxes, scissors, glue and tape to give the house the desired shape. Following your child's imagination, you can build princess castles or fortresses for a knight. And it doesn’t matter that the structure is fragile. This is more than compensated by the pleasure of creating and playing it!
What you need
In order to make your child happy with an impromptu playhouse made from scrap materials, you need building elements.
Pillows can be anything, but each type has its own characteristics. Please note that modern synthetic bedding is too light for the construction of house walls. This material can be made suitable for play only if the products have dense padding and the correct shape.
Feather and down pillows are considered more allergenic, but they are heavier, which means they are better suited for creating a load-bearing structure. Unlike synthetic fibers, natural filler takes the desired shape through simple manipulations.
Somewhere in the middle, both in weight and ease of use for the walls of the house, there are pillows stuffed with cotton wool. Well, the best option is various poufs, headrests and other accessories from a sofa or bed. Compared to pillows, they are much denser and harder, which makes it possible to quickly build a house.
As for the blanket, the lighter it is, the better. Firstly, it will not begin to slide off the pillows under its own weight. Secondly, the child sitting inside will not be so hot.
Traveler's hut
Older children can make their own structure from available materials: ropes, sheets and pegs. To do this, it will be enough to perform the following steps:
- stretch a rope between the trees;
- throw a sheet or blanket on top;
- Stretch the edges of the blanket and secure it to the ground with wooden pegs.
Such a house, made with your own hands, will give your children double pleasure. Blankets or pillows will add comfort, and thematic attributes will help you feel like a hero of a fascinating story: a flashlight, binoculars, a flask and a backpack.
What you need
In order to make your child happy with an impromptu playhouse made from scrap materials, you need building elements.
Pillows can be anything, but each type has its own characteristics. Please note that modern synthetic bedding is too light for the construction of house walls. This material can be made suitable for play only if the products have dense padding and the correct shape. Feather and down pillows are considered more allergenic, but they are heavier, which means they are better suited for creating a load-bearing structure. Unlike synthetic fibers, natural filler takes the desired shape through simple manipulations.
Somewhere in the middle, both in weight and ease of use for the walls of the house, there are pillows stuffed with cotton wool. Well, the best option is various poufs, headrests and other accessories from a sofa or bed. Compared to pillows, they are much denser and harder, which makes it possible to quickly build a house.
As for the blanket, the lighter it is, the better. Firstly, it will not begin to slide off the pillows under its own weight. Secondly, the child sitting inside will not be so hot.
Construction process
There is one little trick in the method below. The fact is that if you build all the walls from pillows, there may not be enough of them. Therefore, you need to assemble the structure as follows:
- Line up the pillows in parallel along some elevation - the seat of the sofa, its back, etc. Place heavier items on the bottom, lighter items on top. This way you will achieve maximum stability.
- Cover the structure with a blanket on top so that one edge goes behind the makeshift wall, and the other on the surface of the sofa or its back. This part can be pressed down on top with a pair of poufs.
- Make sure that the “roof” of the house does not cover it completely. It is better to leave “windows” for air circulation, so the child will not feel stuffy inside the home.
Playing the role of a wolf trying to blow this house down or a fireman saving it from a fire, you will have an unforgettable time with your children.
Dream tent
Young ladies will love a summer house in the form of a tent. To build it you will need:
- gymnastic hoop;
- a long piece of fabric or sheet;
- rope for fastening.
The basis of the structure will be a hoop, and the walls will be a long fabric attached to it. The hoop is suspended from a tree branch with a rope at such a height that the edges of the fabric reach the ground. The roof can be made from a separate piece of fabric, sewing it to the hoop around the circumference. In this case, to hang the structure it will be enough to use a strong ribbon sewn to the center of the dome.
Useful tips
To make your hut more comfortable and stable, we bring to your attention a few small tricks that will help you with this:
- Use a battery-powered flashlight to illuminate your indoor space. It must be placed on the “ceiling” or floor.
- Using pillowcases and towels, seal any cracks.
- If it gets hot, you can place a portable fan nearby.
- Pretend and fantasize. This way your game will be much more interesting.
- Use a pillow or cardboard box instead of a door.
- You can also use chairs, cushions and boxes to divide the fort into rooms.
- To make your fortress last longer, take lightweight blankets and sheets.
- For construction, try to use those items that no one will need in the near future.
- The hut is best placed in the center of the room. Avoid places near a door or window.
- Do not use breakable or fragile items. In addition to damaging them, they can also be harmful to your health and injure you.
- Avoid using plastic sheets as they give off an unpleasant and sometimes toxic odor.
- Do not turn on light bulbs inside. They can become hot, creating a fire hazard.
- Be careful with large objects.
- Don't create a big mess, as it will take a long time to clean up later.
- Always build a hut together with friends, because it is much more interesting.
"Living" house
Lovers of adventure and wandering will be delighted with the “living” hut. Long flexible branches will help make a child's dream come true. Having acquired a sufficient number of them, a circle should be drawn in the space allocated for construction. Then everything is simple: the branches are dug vertically along the outlined circle with thin parts upward. Inclining the resulting structure in a conical shape towards the center, fix it tightly enough from above.
By planting climbing plants around the perimeter of the frame, you can make a “living” hut that will delight its young inhabitant every season.
A playhouse for a child is not just another toy or whim. A personal space in the form of a hut will allow children to develop their imagination and enjoy exciting games, and older children to dream.
photo: depositphotos.com/zuzulicea, avk78, iriana78, nkrivko, zuzulicea, tan4ikk, iriana88w, tory
Making buildings
While hiking, the question may arise about how to build a hut in the forest. Therefore, it is better to understand this matter as early as possible.
Each type of hut has certain assembly stages that should not be disturbed so that it does not fall apart too quickly. To begin with, you can try to assemble a lean-to structure, since this is the simplest structure that can be erected within a few hours.
Lean hut
For assembly, use various branches that can be found nearby. Usually such huts are built in the forest. What the assembly looks like:
- First you need to find a high, dry place. The structure should stand at a distance of several meters from a thick tree with strong branches.
- A strong pole approximately 2.5 m long should be cut down. It will be laid on the branches of the tree so that the height from the ground surface is about 1.5 m.
- Using strips of bark, roots or tape, it is necessary to tie the ramp poles, which will rest against the ground, to the made crossbar.
- The resulting frame should be tightly covered with thin branches, foliage, and then spruce branches.
- At the ends of the hut it is necessary to hammer the pegs well, and then lay the branches tightly.
- In order not to lie on the cold ground, you need to build a warm floor using spruce branches or ordinary grass. The insulation layer should be approximately 30 cm so that the person does not freeze.
To prevent it from being cold inside the canopy, it is necessary to light a fire near the entrance, behind which a reflector is installed - a fence made of stakes driven into the ground, as well as branches intertwined with each other. Thanks to this structure, heat will pass inside the structure.
Gable structure
This option can also be made during a forest hike. But it will require collecting a significant amount of available materials. First you need to select a suitable site and clear it of debris and stones. It is worth noting that you should never install a hut near anthills or animal burrows.