Experience shows that there is no need to rush to throw away old things. If you have at least a little imagination, a little experience in working with threads, needles and scissors, then you can make unique things from items that have long gone out of fashion. This will help update your wardrobe and save a lot of money. Let's take, for example, an old, worn fur coat. It will no longer be possible to use it for its intended purpose. But it can still serve well. And it doesn’t matter whether the fur coat is made of natural or artificial fur. You can make many interesting products from it with your own hands.
Mittens from an old fur coat
This is a necessary item for any wardrobe. Mittens are a great addition to winter boots, handbags, hats, and scarves. Good specimens in retail outlets are quite expensive, since to produce such a product you need to have at least two animal skins. But an old, worn fur coat will save you from unexpected expenses.
Making a pattern for mittens is quite simple. It looks like this:
This is a scaled version that can be enlarged to the size you need. Cutting is carried out in two copies. What should you not forget? Mittens are worn on the left and right hands, so they should be mirror-like in appearance. Due to the similarity of the parts, you should sign them with the letters “l” and “p” so as not to get confused later.
Sewing mittens is not difficult. The following must be taken into account:
- It is necessary to cut out the parts in such a way that the mittens fit freely on your hands;
- It is imperative to leave seam allowances;
- if you plan to put only a collar on the mittens, then there may not be enough fur, so the palms can be cut out of another warm material (leather will do);
- Fur gloves are worn not only by women, but also by men. The stronger sex prefers to fish and hunt in them in winter. To make mittens look more respectable for men, they should be sewn with fur on the inside.
What to make from a mink coat?
Mink fur can easily be turned into all of the above-mentioned products, you just have to put your hands to it. A fur shawl and hat will look fresh and elegant. For the stole, we cut squares from linen that has been preserved in excellent condition and crochet them around the perimeter. By connecting them together in a certain order, we get a shawl that can be used to warm your shoulders or give to mature women in your family.
Before starting work, you need to outline a scheme and act according to the plan. Squares can be easily replaced with rectangles, circles, triangles, and diamonds.
There is a technology for knitting from mink tape. It’s not even really knitting: fur strips are pulled into a finished knitted hat with a coarse knit. A similar technique is used to knit a scarf, stole, cape, poncho, vest, jacket, coat, fur coat. Products connected in this way are warm, comfortable, and stylish. Volumetric items made from a combination of two types of fur, for example, mink and silver fox, look very dignified, fresh and new.
What to wear with a yellow sweater?
What is a hoodie
Fur bag
A fairly common item among fashionistas, especially considering that such beauty is made in a single copy. The handbag can be either miniature or quite spacious, solid or with patchwork inserts. This piece will also be decorated with fur accessories that never go out of style.
To make a bag you need to get:
- fur patches;
- a sheet of cardboard or whatman paper;
- zipper;
- chalk or soap (for drawing details);
- lining fabric;
- scissors;
- thread and needle.
A pattern is made from whatman paper. It is good to use pieces of leather, which are perfectly combined with fur patches and make the handbag more durable.
The instructions for making such a product are elementary. A pattern is prepared in the sizes you need. Pieces of fur with seam allowances are cut out using patterns. Heavily worn and holey places are avoided. All flaps are sewn together, the lining is sewn on, taking into account the handles and zipper. If the fur interferes with fastening the snake, it must be cut short in that area. You can decorate the handbag with other pieces of fur, straps, clasps and other decorative details.
Handmade ideas
There are actually a great many ideas. An out-of-fashion or shabby fur coat will become the basis for many necessary things:
- soft toys;
- vests;
- warm insoles;
- fur tops for shoes;
- bags or backpacks;
- eyeglass case;
- rug;
- blanket;
- stole;
- hats;
- scarf;
- couplings;
- decorative pillows.
Let's also add leg warmers, ugg boots, mittens, and slippers. It’s impossible to list everything.
Cloth
Remaking a fur coat is, first of all, sewing a sheepskin coat or a winter vest:
- the length is shortened or left untouched if the degree of wear is small, and the selected style allows this;
- for a vest, the sleeves are ripped off and the armhole line is processed; for a short fur coat, the inner, most worn part of the fur on the sleeve is replaced with leather or suede;
- straight cut slightly fitted;
- abrasions in the fastener area are cut off and leather strips are sewn from the top to the bottom of the product, a long two-way zipper is sewn to them; The vest can be left unfastened.
You can also combine fur with drape, quilted fleece, or thick knitwear in products. One of the most interesting options is the combination of two types of fur with different textures in one product .
A very interesting hat can be made from an old fur coat if the fur is long-haired. Mink is used to sew and knit hats and berets. Scarf, stole, cape, coat - strips of fur (preferably two types) are sewn together. The product is cut out from the resulting fabric. The mittens turn out warm and beautiful, and they are quite easy to sew.
Important. When connecting fur strips to each other, make sure that the pile lies in the same direction.
Interior items
- Home craftsmen make carpets and rugs, furniture covers, sofa cushions, eyeglass cases, covers for gadgets, chairs, car seats, and soft toys for children.
- They collect entire paintings from fur and leather - still lifes, floral and geometric designs. Flower pots with plants made entirely of tinted multi-colored short-pile fur are placed on the windows and shelves of the book sections.
- A fluffy bed cover is in trend in “interior” fashion. It is sewn from fur of the same or different textures, often different in color. Long strips are sewn together, leaving 15–30 cm free on each edge. This is how you get a designer item that you can never buy in a store.
Accessories and shoes
The following small fur items are also worthy of attention:
- headphones for wearing instead of a hat in the off-season;
- original keychain or pendant;
- decoration element for a lady's hat;
- hair clip with a fur “rose”;
- fluffy long earrings;
- brooch decorated with a strip of fur.
Don’t forget that excellent warm insoles are cut from fur coats. The upper and sometimes the middle part of the boots are trimmed with fur, and home slippers are made from it.
A long pile bag will look very stylish and relevant - an exclusive fashion item that others will not have. It can be made whole or patchwork, small or voluminous - it’s up to you to decide.
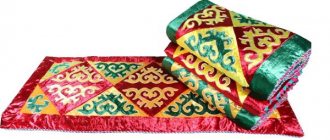
Rug made from an old fur coat
A very necessary thing in the house. Moreover, rugs can be both large and small, of regular geometric shape or completely free of it. The most correct option is to place such a rug next to the bed so that when you wake up, you place your feet not on the cold floor, but on a warm and soft bedding. This will not only lift your spirits, but also make the climb more enjoyable.
Carpets can be made oval, square, round, in the shape of flowers or hunting trophies. The set of tools should be the same as in the previous version. The scraps are cut out, sewn together, and a lining is made. You can even leave worn areas. They will give the product a certain charm.
Fur insoles
There is nothing easier than cutting out insoles from an old fur coat. Moreover, even a personal pattern is not required. You just need to take any old insoles and, using them as patterns, cut new ones out of fur. The speed of making insoles lies in the fact that there is no need for sewing. And no lining is needed. The quality of the fur also does not play a special role. The main thing is that there are no holes.
It is worth paying attention to the main nuance. Fur insoles take up quite a lot of space in shoes, so they can be used when your shoes are a little big. Otherwise, you may end up with calluses. The fur, of course, can be trimmed, but this will not provide the proper warmth.
DIY pompom rug
A beautiful thing made with your own hands from an old fur coat. When making it, you can use even the smallest scraps.
Set of necessary tools:
- large needle;
- scissors;
- saucer;
- yarn;
- Crochet hook;
- plastic mesh to create a base;
- sheet of cardboard.
Place a saucer on the cardboard and trace it with a pencil. A circle is cut out along the contour and used as a template. Pieces of fur are cut out using the template. Using a needle and yarn, the fur patches are gathered along the contour and pulled together. The thread is tied tightly. You get pompoms.
Using a plastic mesh, a base for the carpet is made. It can be given a rectangular, round, square, oval or any other shape. Take the first pompom and place it on the edge of the base. Using a hook, the yarn on which the pompom is assembled is pulled to the wrong side. Tied with a double knot. All other pompoms are attached in the same way. If the rug is made for small children, then it can be depicted in the form of a lamb, sun, or bear.
The nuances of working with a pattern
The work ahead is not easy, but still doable, the main thing is to prepare well and calculate everything correctly.
You will need:
- Furrier knife
- Special needles
- Strong threads (No. 40)
- Tweezers
- The main component is the pattern of a new product
The last element can be obtained in several ways:
- The almighty Internet, as they say, will help you
- There are also specialized printed publications - books, magazines with patterns
- You can order it for friends who are more knowledgeable about patterns
- Order from the studio
- Don't be afraid and draw it yourself
- Rip open old clothes and re-cut the pattern (in this situation, a robe is best)
To get the pattern (back, front panels and sleeves), you need to take the following measurements:
- chest girth OG
- waist circumference FROM
- hip circumference OB
- neck girth ОШ
- product length DI
- sleeve length DR
- seam length from armpit to waist
- shoulder width
- shoulder length.
IMPORTANT!
In the pattern drawing, we divide the numerical values of the horizontal measurements in half.
Before altering an old fur coat with your own hands, determine the quality of its fur, whether everything can be taken for reuse or whether it is better to throw something away. To do this, lightly wet the areas that cause special suspicion and gently stretch them. If the flesh begins to tear and fur hairs fly, the service life of this piece has come to an end.
The next step is to determine whether you have enough fur for an updated style or a fresh item; if there is a shortage, it can somehow be combined with other materials (leather, fabric, other fur).
Then you can begin to rip: first the lining, and then the fur parts with a tailor's ripper.
Helpful Tips:
- When cutting out parts, secure paper patterns to the fur with push pins
- When cutting out a part, use a very sharp knife so that it cuts with the lightest touch; pressing too hard risks cutting the pile
- do not press the fur to the table
- Make seams of finished parts only with strong cotton threads; synthetic ones will cut the flesh
- Use the remains of the cut fur for mittens, muffs, scarf decoration, or hats.
Blanket made from an old fur coat
Currently, the mouton fur coat is out of fashion. But this does not mean that she needs to be retired. This fur makes bags look bad, but the blanket will be delightful both in appearance and in its warmth. There is no need to spend a lot of effort and free time to make a blanket. It is enough to rip the fur coat apart at the seams without touching the side seams. If there are damaged areas, they should be removed and new patches sewn in their place. The result will be a wonderful canvas.
It is necessary to sew from the wrong side so that the seams are not visible. The shape of the blanket can be varied, depending on your preferences and imagination. To keep the edges from fraying and look neat, you should sew bias tape to them.
Vest made from an old fur coat
An irreplaceable thing in winter, when the house is cool. To make it, you will need a worn fur coat, in which, as a rule, the sleeves are very frayed. The vest is made quickly and with minimal experience in this matter. The sleeves are torn off from the fur coat, and the seams are treated with either leather or thick fabric. Much attention must be paid to the lining. As a rule, it already looks unsightly and needs to be updated.
Before you start sewing a vest, you need to make sure that both the outer and inner sides of the fur coat are in good condition. If there are problems with this, then the transformation into a vest may not take place. In this case, even a master will not help. If the fur coat was too long, then it is worth shortening it to the required length. You can gird yourself with a neat strap made of suede or leather. You need to get a little creative with the neckline and also pay attention to the clasp.
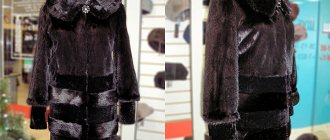
How to change an old mouton fur coat into a modern one?
Mouton fur coats are durable and practical. They are very warm and inexpensive. But most often the styles of mouton fur coats are of the same type and boring in design. How to make them original?
- A long fur coat can be shortened and updated with leather inserts. If you have a narrow fur coat, you can get out of this situation by inserting leather wedges;
- If a fur coat is being altered for a young lady, then a pattern of trimmed fur would be appropriate;
- An original belt will help emphasize your waist.
If the fur coat has become too large, you can sew it in and adjust it to fit your figure. But, if you turn to professionals, then such alterations will be considered tailoring, not repairs, and will be expensive. So maybe it makes sense to buy a new fur coat, and alter the old one and make another product out of it? The choice always remains with the woman.
If you are afraid to reshape a fur coat with your own hands, contact a specialized studio. You can find out how much it costs to alter a fur coat from this article.
Photos of fur coats before and after
Hat made from an old fur coat
An outdated mink coat can, in skillful hands, turn into a beautiful mink beret or kubanka. To do this, you need to make a pattern for the headdress on a sheet of whatman paper. Transfer it to the fur and cut out the product, not forgetting the seam allowances. The beret is carefully sewn from the wrong side, turned inside out, and the lining is sewn to it.
Mink can also be used to trim hoods on jackets, cuffs on coats or any other outerwear. A piece of mink will perfectly complement the color of a fashionable leather handbag.
Handwash
Removable collar or fur coat with artificial pile on a synthetic base:
- Wipe any visible dirt with warm water and liquid soap or shampoo.
- Soak the product (water temperature 30°-40°) for 10-20 minutes.
- When washing, do not rub, wrinkle, or twist the fur too much.
- Rinse in warm water several times until the detergent is completely rinsed out. When changing the rinse water, you should reduce its temperature (start with warm water, end with cooler water).
- Squeeze very carefully, running your hands over the product from top to bottom, then blot with a towel or any non-fading soft cloth.
- Hang on a hanger in a well-ventilated area, away from direct sunlight and heat sources.
- When the fur dries slightly, you need to comb it with a comb with infrequent teeth.
Stoles, capes, coats
Before you start updating your old nutria fur coat, you need to understand the quality of the fur. The new nutria item is very warm and durable, repels water perfectly and is not afraid of wet snow. But over time, these wonderful properties may disappear. The main thing is that the long fur and underfur remain of high quality.
The possibility of transformation will, first of all, be influenced by the dressing of the fur. If it is shorn or plucked, then its structure remains plastic and soft, which makes it possible to make any products from fur, including jackets, waistcoats, jackets. Nutria goes well with leather, suede and knitwear, as well as other furs.
One cannot help but pay attention to the capes, coats and stoles made from nutria. This is quite a long and painstaking job of making them, but the result will exceed all your expectations. If you have never worked with fur, then it is best to contact a specialist in this field, since for such work you need not only to have sufficient experience, but also to know the technology, and to master the nuances of using long-haired and short-haired fur.
It is worth noting that nutria fur is very easy to dye, so any “new” product can be given the necessary rich shade. But it is not recommended to do this at home, and it is best to go to a dry cleaner.
Remaking an astrakhan fur coat
Karakul has been a fairly popular fur for a long time. But fur coats made from it are not original. Old astrakhan fur coats do not look fashionable. The solution to this may be the decision to alter an old astrakhan fur coat.
Remaking an astrakhan fur coat: BEFORE and AFTER photos
You can sew a fluffy collar to an outdated model. Here you should carefully consider the choice of fur color.
Combination of astrakhan fur and other fur (mink and sheepskin)
Combining fur with leather also looks good.
Fur pillow
This beauty will decorate any sofa. And don’t despair if you don’t have cutting and sewing courses under your belt. There would be desire, patience, free time and an old fur coat. You need to choose the shape and size of the pillow yourself.
The list of everything needed is as follows:
- thick paper;
- scissors;
- needle;
- threads;
- ruler;
- snake;
- stuffing material;
- sewing machine;
- decorative details;
- pieces of fur, leatherette or leather, felt, fleece.
Before making a pattern, you need to decide on the dimensions of the finished product. It is worth keeping in mind that the stuffed finished pillow will be smaller than the pattern, so you need to add 3-4 centimeters to each edge, not counting the seam allowances.
A pillow of the correct geometric shape is cut out quite simply. A figure with the appropriate dimensions is drawn on thick paper, cut out and applied to the fur. Three sides of the figure are sewn on a machine, the fourth is left for sewing in the snake. Afterwards the pillow is filled with padding polyester or foam rubber. If you have feathers, you can use those too.
Square pillow pattern
In the same way, you can make a pillow from thick fabric, decorating it with fur inserts or decorative elements.
Recut your fur coats
At first glance, it seems that changing the length of a fur coat is a simple task. In practice it turns out that this is not the case. Often a shortened product will bulge and not fit the figure. As a result, the expensive item is damaged. In cases where a master gets down to business, this will never happen. Another popular modification of fur products is cutting up the sleeves. Just such a small modification can completely change the appearance of the product.
Often, fur items lose their attractiveness due to a heavily worn cuff or collar. You can save an item and breathe new life into it by making a new collar or cuff for it. At the request of the client, the master will change the style of the fur coat: narrow it, change the direction of the skins in the finished product, make a belt if there was none before.
This is interesting: Helena Bonham Carter in her youth
Even very shabby and outdated products will look perfect after restoration work.
Fur scarf
It looks very interesting and is done very quickly. Especially if you still have an old fur coat that has long gone out of fashion or is too worn out. And it doesn’t matter whether it’s made of faux fur or natural fur. The scarf will look chic.
Required tool:
- pins, threads, needle;
- centimeter;
- scissors or furrier's knife;
- chalk or pen;
- sewing machine.
You set the parameters for the scarf yourself, based on your wishes or a real piece of fur. We cut out a rectangle 30 centimeters wide and 140 centimeters long. If there is no such length of fur, then you can cut out several parts and then sew them into one. The strip is folded in half (so that the width of the product is 15 centimeters) and all sides are sewn together, except for one small one. It is needed so that the scarf can be turned inside out. You can sew either by hand or by machine.
After turning the unsewn edge, it is sewn up manually with a hidden seam, constantly straightening the bent fibers. The finished product is very thick and difficult to tie. Therefore, you can make a through cut in the scarf, stepping back from its narrow side by 25 centimeters. The second end of the scarf is threaded through the hole. You can also use decorative pins and loops to secure the product.
Fur toy made from an old fur coat
All kids love something unusual. So why not give them pleasure by making a toy with their own hands. Maybe an old fur coat can make a great bird. To do this you need to take the following steps:
- cut out all the details of the future toy;
- sew together all the details of the head, including the forehead, eyes, eyebrows, beak, carefully process the undercuts;
- side wedges are inserted into the chin, ears and head;
- the abdomen is sewn together from parts;
- feathers are sewn to the wings;
- then the tail, abdomen, back, and wings are sewn together;
- wings, tail and head are sewn to the body;
- eyes are attached to the head (you can use glue);
- The paws are made of fabric and claws are attached to them.
The feathered friend is ready!
In a similar way, you can make any other soft toy: from bunnies and bears to cars and houses.
Pet bedding
To ensure that animals sleep comfortably on the floor, bedding must be provided. They can be very diverse. But fur rugs are popular. And it doesn’t matter if it’s an old fur coat made from a rabbit, fox or mouton. Pets feel comfortable on such a bedding.
Fur bedding is made as follows:
| Preparatory stage | Buttons or other fasteners and the lining are torn off from an old fur coat, and the sleeves, back, hood or collar are separated. All pieces are carefully washed and checked to ensure that the fur is not showing too much. Fur flaps are dried and combed. |
| Stage one | We cut out a rectangle of thick fabric 60 x 70 cm and the same from fur. We process the edges using an overlocker. |
| Second phase | We sew the three edges of the two rectangles and turn the product inside out. The fourth side is equipped with a zipper. This is necessary so that something like a pillow or a small amount of filler can be placed inside. |
Fur headphones
To make these headphones you will need:
- scissors;
- black rim;
- felt fabric;
- artificial fur;
- hot melt adhesive.
Using scissors, cut out two interconnected circles from the fabric. Fur is applied to only one side of the circle. The eights are folded and the batting is placed inside. The rim is glued along the contour. The headphones are ready. They can be decorated with a brooch, rhinestones, bows.
Returning natural shine
Apply glycerin to a cloth and wipe the fur.
Dilute hair shampoo without any additional additives in a small amount of water (1 tablespoon + 3.5 liters of water). Apply the resulting solution to the fur with a cotton pad, wait about 10 minutes and wipe with a pad soaked in clean water.
To make the faux fur not only shine, but also become fluffy, add 0.5 liters of water and 0.5 liters of ethyl alcohol to glycerin in the amount of one teaspoon. The mixture is applied to the fur using a cotton swab or spray bottle.
After applying the products, as soon as the fur is dry, it must be combed.
DIY fur coat blanket
For these purposes, you may need not one, but several old fur coats. It all depends on the size of the bedspread. In addition to fur, you must have:
- blade or sharp scissors for ripping seams;
- ruler or centimeter;
- marker or chalk;
- knife;
- sewing machine;
- lining fabric;
- threads;
- liquid sealant.
Step-by-step instructions for making a fur blanket.
- We only take clean fur. If you have doubts about its cleanliness, then you should resort to dry cleaning.
- The fur coat is separated from the lining and sleeves, and all existing seams are ripped out.
- The size of the bedspread is determined. This will depend on the quality of the fur coat and its size. You can use the patchwork method, then the dimensions will be more impressive.
- The top of the product is measured using a ruler or centimeter. Lines are drawn on the wrong side.
- The fur is cut along the drawn lines using scissors or a special knife.
- All newly formed seams are treated with liquid sealant.
- If the bedspread consists of many shreds, then they are sewn together manually or using a sewing machine. In this case, special threads and needles are used for sewing fur.
- The lining fabric is sewn to the resulting bedspread.
Fur carpet
To create it you will need several old fur coats; for example, you can use your own and your child’s. The size of the carpet will depend on the amount of sewing material collected; you need to identify areas of fur coats without defects on the reverse side.
The process of creating a warm fur rug will look like this:
- The fur coat is laid out on the floor, and all unnecessary and damaged parts are removed from it using a scalpel or a utility knife.
- Squares or strips of equal length and width are cut from the cut suitable material. The pattern of these parts should be carried out along the seam so as not to damage the structure of the fur.
- The prepared fur pieces are turned over with their front side on the floor and laid out according to the parameters of the future product.
- All joining sides are sewn together with an overlock stitch, which is performed over the edge, while maintaining a uniform distance of 2-3 mm between stitches.
- To smooth the seams, they are sprayed with water and then left for 20 minutes.
Fur carpets are sewn square or rectangular, experienced craftsmen manage to make them oval, and some manage to create entire floor paintings from small fur parts.
Small pieces of fur can be used to create incredible pillows, handbags and backpacks. Such products will be especially useful, by the way, in winter. For them, you can use all the remaining trimmings after making other products.
You can share or save for yourself:
Discussion of the article:
- Lera:
11/12/2018 at 12:08If a mouton fur coat has become too small, can it be remade?
- Ninel:
11/12/2018 at 12:09
Are there any patterns on how to alter a mink fur hat?
- Ariel:
11/12/2018 at 12:11
How to convert a trapezoid-style fur coat into a jacket?
- Nata:
04/20/2019 at 16:44
Wow, so many things you can wear. But it’s not like you have to do everything yourself, you have to give it to a studio, right? It seems to me that only “fur coat seamstresses” can create this. And they will ask for a lot of money for this. Still, I won’t rush to do handicrafts, but will go and buy myself something ready-made in the store. And if it’s not enough, then I’ll arrange an installment plan, I heard in Elena Furs they offer interest-free. You can quietly pay yourself and look decent at the same time.
DIY fur coat cover
Many people prefer to have this luxury in their car. The seat is comfortable and not cold. The cover can be used not only for seats, but also for the backrest. Making covers - capes from fur is quite simple and does not require any special financial costs.
Before you start work, you need to acquire:
- scissors;
- dense natural fabric;
- a needle;
- threads;
- pins;
- chalk or marker;
- sewing machine
There is no need to make patterns for sewing fur covers. Enough:
- disconnect the headrest;
- spread the fabric over the seat and back with a 10cm overlap;
- make two holes for installing the headrest;
- put the headrest in place, thereby fixing the upper part of the fabric;
- the flap is leveled along the seat and slightly stretched;
- excess edges are folded inward and secured using pins;
- places on the flap are determined for fastening elastic bands or laces;
- the fabric is removed and stitched along the intended contours;
- The cape cover is attached to the seats using an elastic band or strings.
How to alter a fur coat?
Consistent completion of all stages of converting an old fur coat into a new one will be the key to a successful result.
- Rip the fur coat into separate pieces.
- Check the condition of the fur. Areas of the skin that cause suspicion should be moistened with warm water up to +35°C. After 30 minutes, the skin should be slightly stretched. If it breaks, the product will not last long. This is evidenced by the crumbling fur fibers.
- The cutting should be done with a special fur knife or blade. They must be used carefully - lightly touching the surface of the skin. Scissors are not used for cutting, because... they can damage the pile.
- Using patterns and templates, cut out the details of the new product. Patterns are made according to individual sizes. When cutting, the material should be laid with the flesh side up and the fur side down.
- Sewing a new fur coat, jacket or other fur product is done by hand. To connect the parts, a “goat” seam is used, as well as a bidirectional “over the edge” seam.
- The thread (No. 40-45 cotton) should not be too tight, but it should not be loosened either. Where the load on the seam will be significant, it should be strengthened by placing doublerin or adhesive pads, they are sold in sewing stores.
- The finished seam should be leveled: a damp cloth is placed on the seam and the whole thing is pressed down with a weight until it dries completely.
- At the end of the work, the fur should be combed in the seam area against the pile and along the pile.
This is interesting: DIY Halloween costume for a boy
If the area of the skin at the seam site seems weak, then it should be strengthened with a plaster and stitched together with it.
Fur coat before and after alteration
Schemes and patterns will help you get the desired product, and photos will show how a new fur coat is transformed after alteration.
Fur stool cape
Kitchen stools will look more impressive if you sew fur capes on them using long-forgotten fur coats. Such covers not only add softness to the chairs, but also keep them in their original condition. These capes wash well.
Necessary materials:
- a piece of fur;
- elastic or lace;
- strong thread;
- chalk for marking;
- pins;
- needles;
- ruler;
- sewing machine.
Using a ruler and chalk, the dimensions of the future cover are drawn on the reverse side of the fur flap. This takes into account the thickness of the seat and seam allowances. The figure is cut out using scissors or a special knife, the edges are folded and hemmed, leaving 2 - 3 cm of free space for retracting the elastic or lace. The elastic band or cord is pulled in, the cover is put on the stool, the elastic band is tightened well so that the cape fits tightly on the stool. The edges of the elastic are sewn together.
Fur hair scrunchie
This product belongs to the hand-made category and perfectly decorates hair. This type of elastic can be made using a piece from an old mink coat. For work you will need the following materials:
- manicure scissors;
- thick elastic band;
- a piece of mink fur;
- beads or beads;
- felt;
- voluminous button;
- a needle with a thin eye;
- threads;
- middle needle;
- glue "moment".
The stages of making jewelry are as follows:
- A flower is made from a piece of mink to decorate the hairpin. Petals should be voluminous. This is possible thanks to darts.
- Using a felt-tip pen or pen, we mark the outline of the future elastic band. We cut out the workpiece using a knife or scissors.
- The petals are first sewn up with a dart, and then the edges are joined with a seam. The bottom edge remains unstitched. This makes it easier to sew or glue the petals.
- A circle of the diameter you choose is cut out of felt or leather. All manufactured petals are sewn to it. There can be from 7 to 10, depending on the size.
- We cut out a circle with a diameter of up to 4 cm from felt. The core is decorated with beads or beads.
- This piece of fabric is used to wrap a button. It will resemble a ball with embroidery.
- This decorated core is sewn onto a leather circle. The fur flower is ready. Now you need to sew it to the elastic band and you can tie your hair with the decoration.
The easiest way is to tie or sew a piece of fur onto a regular elastic band.
Earrings with fur
To do this you need to have:
- a thin strip of mink fur;
- a couple of beads in the form of rings;
- a pair of brightly colored beads with edges;
- two 2 cm wires to secure the fur circle;
- 2 earrings;
- round nose pliers;
- threads;
- a thin needle.
This type of work requires perseverance and attentiveness. The procedure is as follows:
- The mink strip is folded into a circle and secured with a needle and thread.
- We cut off the excess fur with scissors.
- Carefully tuck the fur tip into the circle.
- To the resulting circle we first apply a bead in the form of a ring, and then a ribbed one. Two beads are sewn to the fur.
- We make a bend at the end of the wire and thread it into the fur circle so that the circle hangs evenly on the wire.
- We also bend the second end of the wire.
- We fasten the rounded end of the wire to the earring ring.
- We make the second earring in the same way. Now you can wear this beauty.
Caring for Faux Fur Wardrobe Items
Fur on the collar of a sheepskin coat, hood, jacket is recommended:
- Once every 2 months (if possible, every month) knock out dust from the inside. And clean the outside with a clothes brush;
- store wardrobe items in a well-ventilated area;
- hang in the closet on a separate hanger, not next to other clothes, so that the lint does not get crushed;
- during prolonged non-use, store in a clothing case; — to prevent abrasions, do not wear bags over your shoulder or on your sleeve.
For faux fur, dry cleaning is preferable. Wet is recommended for use when the pile is short and avoiding contact of moisture with its base.
You should resort to hand or machine washing in rare cases, since there are such negative consequences as:
- the insulation may clump into clumps;
- the fabric base may shrink greatly from full contact with water;
- long fur can become tangled and tangled.