A meat grinder is simply an indispensable device for grinding different types of meat. If previously most housewives used manual machines, now more and more users prefer electric devices. This is not surprising, because an electric meat grinder grinds meat of any quality in a matter of minutes, saving the housewife time and effort.
Unfortunately, all electrical appliances tend to break down, and repairing them is somewhat more difficult than manual ones. This article will tell you how to repair a meat grinder at home, and what you can do with your own hands.
We repair an electric meat grinder with our own hands
The electric assistant today is very popular and in high demand among Russian buyers. Despite high-quality manufacturing and high operational reliability, electrical appliances tend to break down over time. Many breakdowns can be fixed at home, so we will tell you in detail about repairing an electric meat grinder, which you can easily do yourself.
Typical faults
It doesn’t matter what kind of meat grinder you have - Kenwood, Zelmer or Mulinex, each of them has its own nuances, but the malfunctions of all are quite typical. Electric meat grinder repair specialists have compiled the following list of the main problems encountered in these products:
- violation of various contacts of the electrical circuit;
- engine rotor deformation;
- breakage of gear teeth of the gearbox - occurs due to increased load;
- electric motor malfunctions, extreme wear of brushes;
- wear of the cutting tool due to processing too stringy meat, small bones falling due to user oversight;
- breakdown of keys and safety devices;
- damage to insulation, power cord;
- replacing the motor or rewinding its windings.
Many failures of reliable equipment occur due to violations of operating conditions, and only a few are due to factory defects or human error during assembly.
Instructions for disassembling and troubleshooting at home
It is not always necessary to take the device to a service center at the slightest breakdown, where it can successfully lie for many weeks, and you will also have to pay a decent amount for repairs.
If the meat grinder does not turn on at all, the cause of the breakdown may be a lack of contact or a malfunction of the control panel.
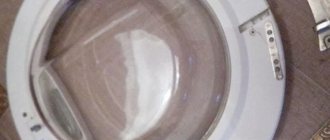
Disassemble the device by unscrewing all the necessary screws. Sometimes the plastic parts of the case snap together, then you should find all the grooves and VERY CAREFULLY snap them off. Otherwise, the case may be damaged and you will not be able to fold it back. An example of disassembling the case can be seen in the drawings of the disassembly of the “SCARLETT” model.
SCARLETT meat grinder disassembly diagram: unscrew the metal panel
SCARLETT meat grinder disassembly diagram: remove the mounting screws
Scheme for disassembling the SCARLETT meat grinder: remove the gearbox
Check all the contacts, the connection of the power cord to the device, maybe something needs to be twisted or soldered.
If the meat grinder turns on, but the auger does not grind the product, the cause may be a faulty gearbox. Bearings could crumble or gears could wear out due to heavy load or stones.
In this case, disassemble the relay and check all parts for defects. Do the gears turn easily, are all the teeth present, and is there any excess play when moving? Turn on the device disassembled without loading the auger.
Meat grinder relay gears
Do this carefully so that all the parts do not fly apart and something does not interfere with the operation of the engine!
Don’t forget to take pictures or remember the location of the parts so you don’t have to worry about what to put where.
Relay failure is the most common reason for a meat grinder to fail.
If the cause is defective gears (which is very likely, since they are made of plastic), you should replace the damaged parts with new ones. It is not so easy to find new gears on sale; for most models they are not sold separately. You may have to contact local services to buy the necessary used part from another device or try spare parts from other models.
In some rare cases, the cause of interruptions in turning the auger may be wear of the socket for its fastening or misalignment of the shaft. This can happen from constant increased load on the device or improperly made socket from too soft metal. Loosening of the auger and licking of the rotational mechanisms is a very big problem. To eliminate this, you will need the help of specialists.
If the meat grinder works, but does not reach the required speed, there is most likely an overload. This problem most often occurs in Kenwood mg devices.
The device should be disconnected from the power supply, disassembled, cleaned and cut the meat before feeding it into the meat grinder into smaller portions.
The main cause of extraneous noise and knocking in the operation of devices is the ingress of unnecessary objects: small bones or veins. They can get stuck and clog the connections between different parts of the device. Also, food particles may dry out on parts that have not been washed sufficiently after previous use, which can cause blockages.
In such cases, the device should be disassembled, cleaned, and all foreign objects removed.
Sometimes the cause of extraneous noise and sharp sounds in the operation of an electric meat grinder can be scattered bearings. They are easy to find on sale and replace.
Causes and methods of eliminating them
If any malfunction occurs, it is necessary to immediately carry out diagnostics to find out the cause and localize the breakdown. The mechanical part of the product is inspected visually, and the electrical circuits are checked with special instruments. If a visual inspection of all parts of the mechanical part does not give a positive result, then you need to dismantle the product and inspect the gearbox and electric motor. It is possible that the lubricant of the rubbing parts is clogged, the bearings are not working correctly and need to be replaced.
Timely diagnostics allows you to identify and eliminate faults at an early stage of their development, which significantly extends the service life of the entire product.
Let us consider in detail the malfunctions of the meat grinder and methods for correcting them.
- The engine does not reach the specified speed - the reason may be a breakdown of the switch or the engine itself. Replace worn mechanisms or electric motor.
- Interruptions in the operation of the drive were noticed - extreme wear of the graphite brushes; new ones need to be installed.
- Extraneous sounds, a burning smell when the product is operating - the motor is faulty. To restore it, diagnostics, repair or complete replacement is necessary. However, the cost of replacing the engine is quite high - it would be more cost-effective to purchase a new meat grinder and solve the problem.
- The cause of sounds that are unusual for the normal operation of the meat grinder may be bearings that wear out during operation. To confirm the diagnosis, it is necessary to disassemble the main body of the product, get to the place of their installation and check the rotation, if necessary, replace it.
- Reducing the rotation speed of the electric motor means overload, food supply is too fast, the meat grinder does not have time to grind them. The Kenwood mg model is especially susceptible to this malfunction. Reduce the supply dosage, and everything will return to normal.
- There is no shaft rotation - the gearbox transmission mechanism is jammed. One of the gears or its teeth may be broken and needs to be replaced.
- The auger of the product has stopped. If the engine operates in the same mode, then turn off the meat grinder and dismantle its mechanical part to find out the reason.
In the latter option, there are several reasons for the occurrence of such an unusual failure: incorrect assembly of the gearbox, rotation of the engine shaft, broken teeth of the drive gear, and very rarely, licking of the connection by the auger shaft (erasure of the hexagon).
On a note! The mismatch between the metal of the part leads to its failure under extreme load.
If the hexagonal receiver into which the auger shaft is inserted is made by mistake from a softer metal, then during operation it will quickly flare out, or its edges will grind off, and tight contact will be broken . The same thing can happen with the tip of the auger. It is difficult to repair a meat grinder with such problems yourself; the help of professional repairmen of similar equipment is required.
Restoring the auger shaft
During operation of the meat grinder, the tightness of the connection between the driven shaft of the gearbox and the auger shaft weakens significantly over time. As a result, the gap gradually increases, which contributes to the rotation of the mechanism relative to each other.
There are cases when unscrupulous manufacturers do not achieve full compatibility of parts, completing the design with elements only for certain parameters. For example, by diameter or length.
Remember, the biggest danger is the mismatch of the material of the part to the expected degree of load on it.
If the auger is not completely seated on the driven shaft of the gearbox, malfunctions occur during operation of the meat grinder. The cause of the failure is usually the use of a part whose actual length is 6mm shorter than required, which significantly reduces the effective joint area.
The problem can be fixed using electric welding and emery stone.
The principle of the procedure is as follows: shorten the auger shaft by 3mm by welding an X8 hexagonal socket head to it, which allows you to add 14mm to it. Then it is necessary, using an emery stone, to grind it down so that the driven shaft of the gearbox in the assembled state fits completely into the auger shaft, while after installing the knife, the grid should, on the contrary, not fully fit into the seat.
The quality of cutting the product directly depends on the tightness of the clamping nut between the knife and the grate.
To avoid damage to the device, it is strictly prohibited to use defective elements to complete the device.
Terms of use
In order for an electric meat grinder to please you with flawless operation for a long time, you need to follow simple recommendations for proper operation:
- Before starting work, always carefully check the correct assembly and secure fixation of all parts;
- pay special attention to the contact between the cutting tool and the grille - they must fit tightly, the fixing nut must be tightened with force;
- cut the product into pieces not exceeding the diameter of the loading cylinder to avoid getting stuck;
- disassemble, clean and rinse all parts and the internal volume of the meat grinder after each use;
- store all parts of the mechanical part of the product only in disassembled form.
Special attention! Before processing meat and fish, it is necessary to free them from bones, remove large veins, and ensure that small bones that can damage the knives do not get inside the product.
Do not turn on the meat grinder without loading, do not try to push stuck pieces of product with your hands - there is a special pusher for this, never overload it. If you thoroughly fulfill all the requirements, then the product will work flawlessly for the entire period assigned to it by the manufacturer, and it will not need repairs yourself.
Electric meat grinder device
- Electric meat grinder device
- Operating rules
- Causes of problems and solutions
- How to disassemble a meat grinder and clean it
- Great power. It is capable of grinding a large number of products in the shortest time.
- Modern models do not require rigid fixation; they can be easily placed on the table in any place convenient for the hostess.
- The modern device is safe to use. Products enter it through a narrow neck using a special pusher.
To learn how to use this device correctly, it is recommended that you familiarize yourself with its design. When disassembled it looks like this:
- Plastic or metal case.
- An electric motor that is located inside the device.
- Meat receiver equipped with a food tray.
- The pusher is made of plastic.
- Screw shaft.
- Knives. The kit usually contains several attachments.
- Grates, there are also several of them, for large and small shredding.
- Fixing cover.
Some models contain additional parts, but the above are the main and mandatory elements that are included in the kit of this equipment.
Proper care
In most cases, a meat grinder is used to grind meat into minced meat. That is why one of the main parts and components of the mechanism is a knife, which is responsible for the quality of grinding the product. If it is installed incorrectly, the meat will not be minced. Of course, the mechanism will work, with the help of a screw the product will be pushed to the grate, but the process will not go further. Let's consider the installation of a knife in each type.
In an electric meat grinder
- When the screw shaft is installed in the housing, you can begin to fix the knife. It must be inserted onto the thinner end of the shaft.
- The correct positioning of the knife is of great importance. The convex side should be inward, and the flat side should be outward.
- Next, the cutting element is attached to the grille.
Operating rules
Currently, there are a huge number of companies that produce meat grinders, including: Moulinex, Cameron, Delfa, Zelmer, Kambrook and others. But the operating rules are the same for everyone. In order for the device to serve for a long time, the following rules must be observed:
- Before turning on the device, you must make sure that it is correctly assembled and all elements are securely fastened in place.
- Ensure that the working part is firmly attached to the support.
- Ground the device before use.
- Make sure that the knives fit snugly on the grate. This will ensure better grinding.
- Pre-cut the food into pieces and load them in small portions.
- After each use, it is necessary to thoroughly wash and dry cutting objects.
Kitchen appliances may only be used for their intended purpose.
You cannot turn on an electric meat grinder without any food in it.
Causes of problems and solutions
If the device does break down, you will have to carry out a whole range of measures in order to repair it. To fix the problem as quickly as possible, you will need to diagnose the device.
First, a visual inspection is carried out. If it does not bring any results, then the reason lies in the body of the structure. The lubricant may have become clogged or overheated.
Advice! It is necessary to immediately eliminate the cause of the breakdown, and not wait for the mechanism to completely fail. In the latter case, returning the equipment to working condition becomes quite a difficult task.
There are reasons for breakdowns that require disassembling kitchen appliances to eliminate them. Here is one of them - bearings ensure the rotation of the entire mechanism, and accordingly they are most susceptible to wear. The fact that the part has failed is indicated by the appearance of loud noise when the device is turned on. In order to fix the problem, you will have to disassemble the meat grinder.
- Remove the plugs that are located on the back wall of the plastic case.
- Turn the product over.
- Unscrew the screws that secure the bottom of the mechanical device to the body.
- Remove the front flap.
- Use a Phillips screwdriver to unscrew the board from the metal case.
- Remove the bearing and replace it with a new one.
- Reassemble the unit using these instructions in reverse.
Braun G1300 meat grinder repair
While cranking the meat, a medium-sized bone accidentally got into the meat grinder, after which it began to hum, but stopped rotating.
Disassembling the meat grinder can be done easily and simply; to do this, you need to unscrew the four screws in the lower part of the body with a regular Phillips screwdriver, after which it is very easy to remove the casing. After this, we remove the large gear by picking up and removing the split locking washer in front of it.
When I examined the gear I noticed that many of the plastic teeth had been ground off. I had to change it because I didn’t want to pay 500 rubles for a new gear, so I printed it on a 3D printer. Reassembled in reverse order and everything works
DIY repair of Panasonic MK-G1300P meat grinder
After putting crackers into the meat grinder, it began to crack and after some time stopped turning, so I had to carefully disassemble it to identify and fix the problem.
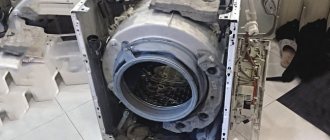
Disassembly is quite simple, firstly we remove the front gray panel of the latch from below, then unscrew the five screws and separate the halves. Now you can clearly see the engine and gearbox housing
We unscrew the four screws on the gearbox housing and open it. We see broken teeth on the largest gear. We couldn’t find them on sale. Therefore, they were borrowed from a VITEK meat grinder, although we had to slightly sharpen the hexagon axis and the seat of the auger.
The meat grinder seems to be working, but at the same time it makes extraneous noise and sometimes cracks; there were no such sounds before.
In order to repair the meat grinder, you will need to determine the source of the problem and disassemble the electric meat grinder. First of all, unscrew the screws, which are marked with red arrows in the pictures below.
Now we separate our disassembly object into two parts and see that it consists of two main units: a gearbox in which plastic gears are installed, and an electric motor, thanks to which rotational movements are carried out.
Now you can disassemble the gearbox to check the gears and engine.
After this, remove the gearbox cover. Plastic gears are each installed on its own rod. Remember the location of the gears, or better yet, take a photo of them if they differ from our image.
After removing the gears from the rods and inspecting them, I discovered broken plastic teeth on the smallest of them. The breakdown is unpleasant, because to repair the meat grinder you will need to replace the gear, but finding it will not be so easy, because you will need to find either exactly the same dead device, or order its production from a familiar machine operator. You can also try to order different sets from China with similar elements, but it’s not a guarantee that you’ll get it.
In many models, the clutch is the calculated weak link, which must break first when the mechanism jams, so that the gearbox gears and the electric motor remain intact. This bushing breaks off only when it is jammed hard enough. Such protection is relevant for meat grinders from almost all companies in which the gearbox gears are made of plastic. If overloaded in some models, the gear teeth may break off. This will lead to more expensive repairs. And in this case, you can change the special bushing yourself, which is usually in stock.
A meat grinder is simply an indispensable device for grinding different types of meat. If previously most housewives used manual machines, now more and more users prefer electric devices. This is not surprising, because an electric meat grinder grinds meat of any quality in a matter of minutes, saving the housewife time and effort.
Unfortunately, all electrical appliances tend to break down, and repairing them is somewhat more difficult than manual ones. This article will tell you how to repair a meat grinder at home, and what you can do with your own hands.
How to disassemble a meat grinder and clean it
Mostly housewives store it assembled, explaining this by convenience. But in any case, after use, the meat grinder will have to be disassembled, thoroughly washed and dried. It is quite easy to disassemble and does not require any additional tools.
Inside the meat grinder mechanism
- A removable meat receiver is removed from the neck.
- Next, you will have to unscrew the nut that secures the structure. It unscrews counterclockwise. Sometimes the nut is screwed on very tightly, in this case you can use a dry towel and the task will become easier.
- The grid and knife are removed from the shaft.
All parts of the device should be thoroughly washed and dried. Only after this can you assemble it and put it in the closet
Currently, there are a large number of models. Moreover, each of them has different power. It all depends on what products are purchased for grinding and in what quantity.
There are models with a power of 200-800 W, they are also called “baby”. They can handle meat if it is without a single vein. Basically, housewives buy more powerful ones - from 1000 to 1600 W. Using this technique, you can process 2 kg of any meat in just one minute. It copes with large pieces and even small bones.
Also, when choosing equipment, you should pay attention to such an indicator as productivity. The noise level also matters. You can read reviews on this topic, since manufacturers do not indicate the characteristics of this indicator.
The auger, knives and grids must be made of durable, inflexible material. After all, it is they who bear the entire burden during work. It is recommended to choose self-sharpening knives made of steel or forged.
The neck should not be too narrow, otherwise it will be impossible to push large pieces of meat into it, and this is not entirely convenient.
The choice of an electric meat grinder directly depends on its design. The simpler and more convenient it is, the more joy the purchase of equipment will bring.
You can also find out from our article: How can you clean a meat grinder after a dishwasher?
Causes of breakdowns
The main reasons why electric meat grinders of all brands fail is their improper use. Only a small percentage is due to poor quality workmanship. The quality of the parts themselves depends on the reliability of the manufacturer. You shouldn’t skimp on it, as repairs can be much more expensive, and parts are not so easy to find on sale.
If the meat grinder turns black after washing it in the dishwasher and how to clean it, read here.
The most common malfunctions of meat grinders:
- the device does not turn on at all;
- the meat grinder turns on, but the disc does not grind the product;
- the drive works, but does not reach the required number of revolutions;
- you can hear burning or smoke during operation;
- increased extraneous noise or knocking that was not previously noticed.
What happens if you put crackers in a meat grinder? Do not repeat
I would like to share a review about one of the most popular appliances in my kitchen - the Moulinex ME 625 H8 meat grinder. I bought this baby about 5 years ago. A lot of water has passed under the bridge since then, so I’ll share what you can do with it and what you can’t. And I want to warn you against mistakes!
GENERAL INFORMATION
The price for the meat grinder was about 2.5 thousand rubles. It is not expensive, this amount can be spent on dinner at a restaurant, or you can buy a meat grinder that will serve for many years.
buy it at any hardware store. I don’t know if this exact model is available, since they are being improved every year. Take a new one and you won’t regret it!
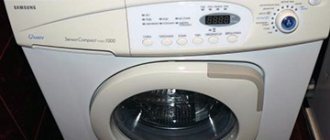
EQUIPMENT
When assembled, the meat grinder looks like this. It weighs quite a bit, so I don't carry it from place to place. I always have it handy in the top cabinet in the kitchen so that I can quickly get it out and use it when needed. By the way, I keep it assembled.
The set includes grates with small and large holes, as well as an attachment for making sausages. In addition, there is a grater attachment for chopping vegetables, but no matter how much I tried to use it, I couldn’t do it. The vegetables are not chopped, but remain whole. Therefore, I consider this attachment to be useless.
And of course, there is a plastic transparent bowl , which is placed on top of the meat grinder, which allows you to load a large number of products into it at once, gradually moving them into the hole.
To protect your hands, the kit includes a plastic stick with a diameter and length exactly like the neck of a meat grinder. This is what I use to push food towards the knives.
The neck is wide enough to fit a lot of food into it. So you don't have to cut them too finely. I cut a large onion into 4 parts. I can generally cut a chicken fillet into 6 pieces and put it in there, it will fit. But the hole is not so wide that you could get injured by accidentally sticking your hand in.
The knives are very sharp, so you need to be careful when using them.
WHAT AM I COOKING?
I mainly use a meat grinder to grind minced meat. I make cutlets, zrazy, and also fillings for pancakes with chicken and mushrooms. Once I tried to make breadcrumbs and almost killed the meat grinder.
I prepare minced meat at home, since in the store they add skin and fat to it. For ME personally, the skin is garbage, I don’t eat it.
USAGE
To start using the meat grinder, you need to assemble it (I always keep it assembled. Firstly, it’s faster and more convenient, and secondly, there is no risk of dropping a heavy part from the meat grinder when you remove it from the top shelf). Assembly takes 30 seconds maximum.
Then you need to plug it into the outlet and press “on”. The meat grinder will operate until the “of” button is pressed. Both of these buttons are halves of one large button, so the button can be found very quickly and it is difficult to confuse it with something else.
In addition to the red on/off button, there is a button for removing the metal neck. If you don't press it, you won't be able to disassemble the meat grinder.
The meat grinder is very loud . My cat is still hiding, although he has been living with her for 3 years. After 11 pm it is better not to use it, you can wake up all the neighbors.
She makes 1 kilogram of minced meat in less than a minute. I worked with her continuously for about 5 minutes maximum. Probably, if you work longer, it will heat up. But I never need that much time, since I always prepare the food in advance - washing and cutting onions and meat, soaking the crumb of the loaf, and then I start rolling.
The minced meat turns out very tender, and the cutlets made from it are incredibly tasty. My secret is that you need to load the ingredients into the meat grinder alternately, then they mix perfectly.
Once I tried to make breadcrumbs in a meat grinder. Don't repeat my mistakes! I dried the crackers and let's put them in the meat grinder. I don’t understand why, whether moisture got into the knives, or from the heating of the mechanism, or whether I didn’t dry the crackers in the oven, but after a minute the meat grinder began to hum somehow, and the breadcrumbs flew out of the grate more and more slowly. This happened until the entire body of the meat grinder was completely clogged, turning into a hard gingerbread. The bread completely blocked all the holes, the knives stood up and did not move. I couldn’t find anything better than pouring water in there, compacting everything even harder. And what was I thinking? I then decided that now I should just throw away the meat grinder, because Nadya couldn’t pick out bread with a knife and fork. But we decided to take her to the service. There the repairmen laughed for a long time, but they cleaned the bread and repaired the engine that had burned out (from such efforts). Since then I buy breadcrumbs at the store and don’t worry about it
CARE AND STORAGE
After using the meat grinder, I immediately wash it, leave it on the dryer until the moisture has completely evaporated, and then collect it and put it on the shelf until next time.
I don’t wash it in the dishwasher to avoid dulling the knives.
After almost 6 years, nothing else happened to her except that incident. I recommend it with confidence, it is a very useful thing in the household.
Thank you for reading my review. I hope it was helpful. If so, take a couple of seconds to appreciate it.
How to repair almost any electric meat grinder
An electric meat grinder has long been an indispensable assistant in any kitchen; in this article we will look at how to fix it in the event of a breakdown;
first, you need to determine the malfunction. What malfunctions occur in such meat grinders, firstly, it may not turn on at all, or work intermittently, also the meat grinder motor may work but the auger does not turn, or a grinding sound can be heard, the power of the meat grinder may also decrease, or it may be very noisy
What to do if the meat grinder does not turn on. First, of course, you need to check the integrity of the cord and plug of the meat grinder. Check to see if there are any cuts or cracks on the cord, then after disassembling the meat grinder, you need to ring the cord with a multimeter
Next, we disassemble the meat grinder; to do this, you need to unscrew all the mounting screws, which can be different, from ordinary ones for a Phillips screwdriver, to triangular ones; you may also come across a screw with an incomplete slot for a special screwdriver.
After disassembling, you need to check the integrity of all wires and connections. Also ring the meat grinder mode switch; over time, their contacts may burn out; if this happens, they need to be cleaned.
If all the wires are in place and the switches are intact, then the motor is checked, and the motor control board, if there is one, some models do not have a motor control board.
It’s easy to check the board; just test all the elements with a multimeter. The motor reverse relays on the board usually fail, then it is clear that there will be no reverse on the meat grinder, and one of the breaking resistors on the board may also break, they can also be easily checked with a multimeter.
If all the elements on the board are intact, check the thermal fuse on the motor; it is wrapped in insulating tape and pressed tightly to the motor body. The thermal fuse is needed to protect the motor from overheating; if the meat grinder is used for too long, the motor heats up and can burn out, but when the thermal fuse heats up, its resistance changes and it disconnects the motor from the mains until it cools down. If the thermal fuse burns out, the motor's contact with the mains is interrupted and the motor will not run. It is best to replace the thermal fuse with the same one that was damaged, or something similar.
You can, of course, simply close the burnt thermal fuse and continue to use the meat grinder, but after that the engine may overheat greatly and also burn out, then the engine will have to be changed.
Therefore, it is better to immediately replace the burnt thermal fuse with a new one, then the meat grinder will last for a long time.
If the fuse turns out to be intact, then you need to ring the motor windings for a break, and check the brushes, maybe they are just worn out, and if necessary, replace them.
If the meat grinder engine is running, but the meat grinder auger does not rotate, or grinding noises and other noises are heard from the meat grinder, then the meat grinder gearbox is faulty. It must be disassembled; if there are damaged gears, they will have to be replaced; you also need to check the backlash of the gears; if it is large, then you will need to place a washer of the appropriate size in that place. After repair, the gears should be lubricated with a small amount of machine oil.
If everything is done correctly, then after repair the meat grinder will work like new.
Source
Assembly instructions for an electric meat grinder: principle and sequence of installation of parts
A meat grinder is one of the most basic and in-demand cooking tools. And despite the wide selection of household appliances today, even super-fashionable food processors or blenders have not been able to supplant this device.
And if literally 10-15 years ago every apartment had only a mechanical type of meat grinder, today almost every housewife has an improved electric model. How to properly assemble an electric meat grinder, and are there any nuances to the assembly process?
Types and features of designs
Thanks to the significant rise in the market of household appliances and modern appliances, the choice of meat grinders is quite wide, and allows everyone to choose the most suitable option for themselves in many respects. Theoretically, they can be divided into two types - electric and manual, that is, mechanical.
Thanks to the large number of attachments and knives, these devices are very multifunctional and convenient to use. With their help, you can not only twist minced meat, but also make many different dishes, for example, sausages or sausages, prepare freshly squeezed juice, vegetable puree, you can even make your own pasta (pasta).
Today, the electric type of meat grinder is very popular. Firstly, working with such a device does not require any physical effort. Secondly, it will take much less time to process food using such a device, because you just need to place the product in the meat receiver and press the start button. In just a few minutes, minced meat or any other product will be ready. And thirdly, unlike mechanical devices, this device has many different attachments.
However, there are also negative sides. And the first of them is the lack of control over the presence of bones in the meat. If manual meat grinders are not afraid of this problem, then in the case of their modern analogues, the device may simply deteriorate. The second disadvantage is that the entire cooking process is directly related to electrical power. Therefore, if the power is turned off or the motor in the device burns out, or some other part breaks down, then it will simply not be possible to prepare food using an electric meat grinder.
Unlike the manual type, when working with an electric meat grinder, it is possible to select the degree of minced meat grinding, thanks to different grinding speeds.
What does an electric meat grinder consist of?
The design of this type of kitchen appliance consists of durable plastic. And if in the case of a manual one, the entire body consists of metal, then in this case there are only individual metal elements. A motor is built into this body, which performs the main function. By pressing the start button, the device is activated and begins to work.
Another difference is the absence of a handle. There is simply no need for it here, since the machine performs the main function independently, from the operation of the engine. Almost all models have a removable meat receiver, which must be attached to the main body before starting work.
The kit usually includes a special pusher for the food being processed, with which it is convenient to move the food towards the knife. At the end of the screw there is a corrugated plastic rod that provides fixation. And thanks to the convexities on the knife, more gentle and high-quality chopping of meat occurs. This is one of the differences between the new model and the old one.
Assembling a manual meat grinder
A light excursion into the design features of a mechanical meat grinder will be useful to every housewife who has not encountered assembling one.
So, you can assemble a manual meat grinder, taking into account the design of the device and the procedure:
- The basis of the meat grinder is its body
. You need to take the auger and insert it into this housing. Here you need to act carefully, not to confuse the thin and thick end of the shaft. The latter should extend from the back of the body to the handle. As a rule, the thread is located only at one end - at the back, where the meat grinder handle, secured with a special screw, is also put on. - The knife
is inserted exclusively with the blade facing outwards. The edges of the knife will come into contact with the grid during operation, due to which the knife will be sharpened. Thanks to this design feature, the meat grinder not only gets the job done quickly and efficiently, but does not require any adjustments to the blades. - Net
. This element can be installed on either side, but it is better that the worn part is turned towards the knife. In this case, operation of the device will be even more convenient and efficient. When putting on the mesh, place the small notch on the surface of the mesh onto a special bump on the body of the meat grinder so that the element fits as tightly as possible. - The tightening ring
covers the entire circumference of the mesh, for which it is necessary to tighten the thread. You don’t need to put it on too tightly, because you will have to make a lot of effort to rotate the handle, and this still won’t affect the efficiency of processing meat products, but the mesh with the knife will wear out much faster.
To attach such a meat grinder to a work surface (table or stool), you need to use a foot - it screws the device tightly. To keep the meat grinder motionless, you can place a piece of soft cloth in the gap between the table top and the foot.
How to properly assemble an electric meat grinder?
If you have already encountered assembling a manual meat grinder, then assembling an electric product will not bring any difficulties. As a rule, the assembly process is described precisely and in detail in the instructions for a particular model, and depending on different manufacturers, some nuances may vary slightly.
Algorithm for assembling an electric meat grinder:
- The first step is to connect the gearbox housing to the metal housing of the auger. The end of the auger must be immersed in the plastic groove of the gearbox. Afterwards, you need to smoothly scroll it counterclockwise until you hear a characteristic click. If the parts are not connected tightly, the motor simply will not be able to turn the auger during operation.
- When inserting the auger, pay special attention to ensure that the protrusion clearly aligns with the hole on the body. Otherwise, the screw shaft simply may not work.
- It is necessary to put a blade and a grid on the other end of the auger, paying attention to the coincidence of the protrusions and holes. At this stage, it is important to place the knife blade on the correct side.
Secure all parts with a clamping nut, as if using a manual meat grinder. - Install the loading bowl, after which you can begin working directly with the device.
Assembling a manual meat grinder
A light excursion into the design features of a mechanical meat grinder will be useful to every housewife who has not encountered assembling one.
So, you can assemble a manual meat grinder, taking into account the design of the device and the procedure:
- The basis of the meat grinder is its body
. You need to take the auger and insert it into this housing. Here you need to act carefully, not to confuse the thin and thick end of the shaft. The latter should extend from the back of the body to the handle. As a rule, the thread is located only at one end - at the back, where the meat grinder handle, secured with a special screw, is also put on. - The knife
is inserted exclusively with the blade facing outwards. The edges of the knife will come into contact with the grid during operation, due to which the knife will be sharpened. Thanks to this design feature, the meat grinder not only gets the job done quickly and efficiently, but does not require any adjustments to the blades. - Net
. This element can be installed on either side, but it is better that the worn part is turned towards the knife. In this case, operation of the device will be even more convenient and efficient. When putting on the mesh, place the small notch on the surface of the mesh onto a special bump on the body of the meat grinder so that the element fits as tightly as possible. - The tightening ring
covers the entire circumference of the mesh, for which it is necessary to tighten the thread. You don’t need to put it on too tightly, because you will have to make a lot of effort to rotate the handle, and this still won’t affect the efficiency of processing meat products, but the mesh with the knife will wear out much faster.
To attach such a meat grinder to a work surface (table or stool), you need to use a foot - it screws the device tightly. To keep the meat grinder motionless, you can place a piece of soft cloth in the gap between the table top and the foot.
How to disassemble and clean a meat grinder?
After each use, it is important to completely disassemble and clean the household appliance to avoid food drying out and the proliferation of bacteria and pathogenic microorganisms. This can lead not only to a number of diseases, but also to the unsuitability of equipment. Washing the assembled device is not permitted!
It is simply impossible to completely clean a mechanical meat grinder when assembled, and in the case of an electric one, a short circuit and fire may occur.
Algorithm for disassembling an electric meat grinder:
- In the case of a removable meat receiver, the first step is to get rid of this particular part by pulling it out of the neck.
- Next, you need to turn the clamping nut, carefully holding all the contents.
- Take out the grate and knife blade.
- Remove the auger from the body of the electric meat grinder.
After disassembling the device, you must thoroughly rinse all parts with detergent and running water, and the grille can be cleaned with a match or toothpick. After washing the parts, it is recommended to place them on a napkin or spreader, leaving them to dry completely.
The electric meat grinder and all its parts must be stored in a dry place. Otherwise, fungus and rust may form, which will render the device unusable.
It is not recommended to wash knives with hot water, as this reduces their sharpness, rendering the device inoperable. And the body of the meat grinder, into which the motor is built, can be simply wiped with a damp cloth or cloth. It is forbidden to lower the housing under running water, as this will render the meat grinder unusable and may subsequently cause a fire, electric shock or short circuit.
Installation of additional components
Most modern meat grinders come with additional knives, grates with various holes and attachments for preparing sausages or kebbe. If it is necessary to use them, the order of assembling the meat grinder may vary, which is also usually specified in detail in the instructions for the device from the manufacturer.
In this case, you should adhere to the following algorithm for assembling an electric meat grinder:
In the case of preparing sausages, instead of knives and grates, you will need to attach a special attachment to the auger, which is secured with a clamping nut. And for the purpose of making cookies or pasta, you can use metal or plastic shaped rings.
When assembling an electric meat grinder, it is better to follow the factory instructions from the manufacturer. If a household appliance malfunctions, it is recommended to contact a service center for diagnostics and repair if necessary.