Causes of leaks in the washing machine
The washing machine is not an object that can be lifted and inspected from all sides. I still have a place in my bathroom, but my sister’s washing machine is in a niche, and you can’t just get to it.
I have compiled a list for myself that can be used to troubleshoot washing machines. If you are an appliance repairman, add items to my list in the comments.
Hoses and pipes
If you bend the washing machine, you can slip your hand with your phone and the flashlight on underneath it. I turn on the video recording and move my hand, shooting a video.
I brought in my wife to help: she kept the washing machine tilted while I was filming the video. Holding the washing machine alone and filming a video is not an option - if you don’t hold the washing machine, it will fall, break, and also crush your hands.
I watched the video and did not see that the water leaks were coming from somewhere above. You need to remove the cover from the washing machine and inspect it from above.
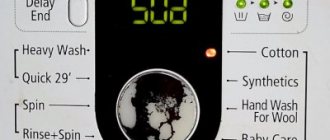
Powder and conditioner dispenser
I took off the cover and saw that the frame of the washing machine began to rust near the dispenser. Although I was unable to detect a leak, I decided that the dispenser needed to be flushed. When I took it apart, I saw that it was clogged with plaque. These are hardness salts. They fall out when there is hard water in the tap. Ideally, do a water analysis .
Below I will tell you how I easily cleaned the dispenser of deposits in the simplest way.
I have water from a well with high hardness. I planned to install a water treatment system, but so far I haven’t been able to raise money for it. When you live in an old house, you are faced with the problem of renovation.
Before you have time to save up for one thing, something else, and more important, breaks down. You have to spend money there. So I still live without water treatment.
Although I have already ordered a special filter for the washing machine on Yandex Market, which will soften the water.
Tank leak
I hope that in the next 2-3 years my tank will not leak. In principle, it can leak in two places: on the bearing seal and on the door seal. If the seal leaks, you will most likely have to buy a new washing machine. Now they are made almost disposable.
You can take the washing machine for repair, but three of my friends still had to buy another washing machine after replacing the seal. I’ll explain why I don’t see the point in repairing the machine if it starts leaking again in a month or two.
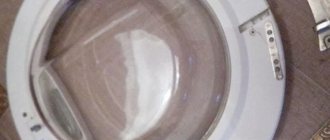
Door seal
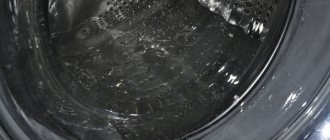
If there is a leak through the cuff, you should immediately inspect it carefully. We had this: my wife noticed a water leak through the door. After washing, I started wiping the cuff and saw that a coin had flown into it and was not allowing the rubber seal to shrink. That's why the leak occurred.
Prevention
When the washing machine leaks during the spin cycle, it’s too late to think about prevention. Factory defects are not always the cause of trouble (often we ourselves are to blame). If you take good care of your property, your appliances will last for many years.
Follow these guidelines:
- When loading vertically, the drum doors must fit snugly against the body (check this before closing the lid);
- clean the drain filter every four months;
- clean the heating element (lime deposits accumulate there, so inspect the part every 2-3 months);
- place bras in special bags (this will protect the drum from mechanical damage);
- between washing sessions, turn off the unit (this will protect against breakdowns due to power surges);
- install the machine in the kitchen (the humidity level is lower there);
- poison rodents and cockroaches (their feces clog filters and hoses, which leads to damage to the mechanism);
- avoid overload (the recommended limit in kilograms is specified in the instructions);
- equip the system with a water softener filter.
To prevent leaks, clean your washing machine filter regularly.
Let us add that you should only use powders for vending machines, and pumping hot water into the drum is strictly prohibited. The water from the boiler room is saturated with drugs that can harm equipment. You should also not wash car mats, shoes and feather pillows in the tank - this is a recipe for mechanical damage to the tank. Operate the device wisely - this way you will extend the life of the device by 1.5-2 years.
Share Like Share Tweet Pin
Washing machine maintenance
Periodically, you need to do maintenance to ensure that the washing machine lasts a long time - everyone knows this.
But no one does anything until the washing machine breaks down. I know - I’m like that myself.
But taking into account the fact that our LG washing machine is already more than 8 years old, we have a choice: either if the washing machine breaks down, prepare to buy a new one, or delay the moment of breakdown as far as possible. But for this you need to do at least the following activities:
Cleaning the heating element
The heating element is needed to heat water during washing. If it breaks, the washing machine will not wash things well. The easiest way to clean the heating element without disassembling the washing machine is to use a descaling agent.
Topperr express descaling powder
Cleaning the dispenser
Due to the fact that our dispenser was clogged and we did not notice it in time, the body of the washing machine began to rust. I removed the dispenser from my LG washing machine quite simply:
- He pulled out the tray;
- Removed the top cover from the washing machine;
- Disconnected the pipes.
In Pyaterochka I bought 9 liters of vinegar and poured it into a bucket. In this bucket lowered the tray and dispenser. A day later, vinegar dissolved all the deposits in the dispenser and tray. I washed them under water and put everything back in place.
Cleaning the washing machine pump
I did not remove the drainage pump for disassembly. I unscrewed the plug and carefully wiped the inside of the pump housing with a rag.
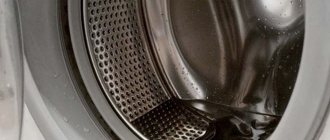
Cleaning the hatch cuff
My husband regularly wipes the door cuff with Domestos. It disinfects well and fungus and bacteria will not grow in the gum.
Violation of the integrity of one of the hoses
During operation, this part often loses its quality, and over time, leaks may form in it. For diagnosis, you can use a simple method: wrap the hose with toilet paper. If it becomes wet in a certain place, then we can safely conclude that there is a leak there. If depressurization is detected at the junction of the hose and the housing, then first of all it is necessary to replace the gasket.
The device has two hoses: inlet and drain. If water appears on the floor when filling the tank, the first option is damaged; if the washing machine leaks from below during the spin cycle, the second option is damaged.
If the diagnostic result is a violation of the integrity of one of the hoses, then it is easy to solve the problem at home, without calling a technician.
If a small hole is found on the hose, it can be patched with high-quality rubber material using glue that can withstand moisture. For the first time, you can safely use ordinary wide electrical tape. However, this is an exclusively forced temporary measure. Most experts argue that the optimal solution to the problem is to replace the hose with a high-quality analogue, rather than repair it. In addition, the cost of such an element is inexpensive, and the new hose will ensure uninterrupted operation of the technical device.
Reasons why water fills into a switched off washing machine
There are only two reasons: the washing machine valve is either clogged or broken. Many manufacturers of washing machines insure against valve clogging and install a mesh filter for this.
It is installed in the valve itself. But still, some grain of sand can fly through these filters and get stuck in the solenoid valve for the water supply to the washing machine.
Or hardness salts have precipitated if there is water with increased hardness in the water supply. Because of this, it does not close tightly and allows water to pass through. I think that’s why the water in the washing machine fills itself, even if the machine is turned off.
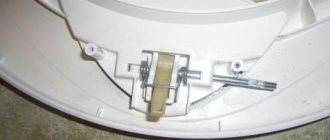
And when the washing machine does not fill or the water does not fill well, this same valve is to blame. I have an LG washing machine, when I opened its lid, I saw that my washing machine has a double valve installed.
Valve for washing machine
As far as I know, valves come with one, two and three outlets. These exits can be at different angles. I bought a universal solenoid valve for a washing machine with two outputs with an angle of 180° on Yandex Market.
There are also valves with an angle of 90°. Roughly speaking, this is the angle through which the water flow in the valve turns relative to the inlet. On my washing machine, the direction of the water in the valve does not change; as the water entered in a horizontal position, it left the valve. That's why they write: angle 180°.
In principle, any valve can be installed on the washing machine, as long as the hose is long enough and the number of outlets matches. You also need to look at what chips (terminals) you have on your washer. They need to be identical to the valve. Otherwise you will have to redo them yourself.
Before replacing the water supply valve, my wife noticed that sometimes the IE error popped up on the washing machine. This error means that the washer does not have enough water. Moreover, when the washing machine is turned off, there is always water in the drum.
Apparently, the valve could not open and close completely. I think hard water is to blame for this. Gradually the lime clogged it, so it worked poorly.
After replacing the valve, the washer started working like new. I replaced the valve with my own hands in 10-15 minutes.
Instructions for replacing the solenoid valve for a washing machine
- I turn off the water;
- I unscrew the water supply hose from the washing machine;
- I remove the terminals from the valve and tighten the clamps with pliers;
- I disconnect the hoses from the valve;
- I unscrew the 2 screws that hold the valve;
- I install the valve and put everything back together in reverse order.
If my experience was useful to someone or you can add something, write in the comments.
The process of preparing for repairs
How to proceed to prepare the washing machine to eliminate a leak from below:
- Shut off access to water,
- Remove the inlet and drain hose (the hose, not the pipe!)
- Place a cloth on the floor
- Remove the washing machine dispenser,
- Remove the hose from the service hatch from below and use it to drain the water that remains in the system from the hatch,
- Remove the drain filter, clean it at the same time or replace it,
- Tilt and lay the washing machine on its side.
Completing all of the above steps will ensure safe and comfortable work. The water must be drained to prevent the board from flooding and, consequently, damage. For further work you will need a “–” screwdriver and pliers.
Calling a specialist: where to find and how much will it cost?
If water appears under the washing machine, it is necessary to determine and eliminate the cause of the malfunction of the device. In cases where it is not possible to carry out repairs and diagnostics on your own, or there is simply no time for this, you need to seek help from a washing equipment repair company.
You can select a company on the Internet. There you can also find prices for services and read reviews about the company.
The cost of work does not include the price of parts requiring replacement. The average prices for repairs in the capital are as follows:
- replacement of the drain hose - from 1,600 rubles;
- replacement of the inlet hose – from RUB 1,200;
- replacement of the drain filter – from 1,300 rubles;
- tank replacement – from 4,600 rubles. etc.
It is recommended to contact officially registered companies providing services for equipment repair, since private repairmen do not always have the proper qualifications and are not responsible for the quality of repairs.
Checking and repairing the dispenser pipe
This part of the washing machine can also fail, but this does not happen so often. Finding and replacing this element will be a little more difficult, but it can be done. First of all, you need to remove the front panel.
In many washing machines this is done as follows:
- The powder dispenser is removed. This procedure is performed differently in different models.
- The fasteners that hold the display panel are unscrewed.
- The bottom panel is removed.
- The rubber seal of the hatch is removed. But to do this you need to remove the wire clamp with a screwdriver. This should be done carefully so as not to damage the rubber.
- The next step is to remove the cuff of the washing machine.
- The fasteners holding the blocker are unscrewed,
- The front panel of the case is detached.
Thus, access to the dispenser is open. First of all, you need to remove the fasteners that hold the pipe. Then you can disconnect the element by pulling the ends. Inspecting the tube will tell you if there is a blockage. If not, the next step is to carefully inspect the item for damage.