Microfiber with dirt magnets
This method was originally invented for cleaning aquariums. produces special kits that have a similar operating principle.
This kit includes two small microfibers with neodymium magnets, a detergent and a long grip.
The principle of working with such a kit is quite simple:
- Remove the light bulb from the headlight.
- One microfiber is moistened with detergent and placed into the optical instrument using a long gripper. They lean against the glass.
- The second microfiber is placed against the outside of the glass, just opposite the first microfiber.
- Now you need to carefully move the device from the outside, and inside the microfiber will move in parallel with the help of magnets.
Before carrying out such a procedure, you should make sure that the kit is absolutely clean, without any particles that could scratch the glass.
See also:
How to remove scratches on car glass?
How to properly wash headlights from the inside without disassembling them
In the post you will see a brief sequence of actions, and in more detail the process can be seen in the video version of the events (link at the end of the post).
This post would not exist if I had not lived in a “wonderfully thought out” area of another new building. The intersections of which are flooded with every more or less heavy rain, so much so that no, no, and the water pumping station of the Mosvodokanal will come to turn the Venetian canals back into ordinary courtyard streets.
In short, after another swim from my own home, the fog lights turned into small aquariums, even without fish. Dismantling by peeling off the glass is, to put it mildly, not the easiest option and not the most reliable in terms of consequences. So, we will somehow clean it indiscriminately.
Below is a brief sequence of actions, and the process can be seen in more detail in the video version of the events at the end of the post.
The method has been personally tested more than once, and is suitable for almost all types of more or less modern headlights (i.e. with glued glass). The only “but” is if the reflector is alive.
If it has long since turned yellow or even started to go in places, there is no need to go there under any pretext - it will only get worse. This has also been done many times already. So.
Water and foam for dust
For this method you will need clean (preferably distilled) water and foam rubber, which must be cut into cubes. After all the bulbs have been removed, water is poured into the headlight and cubes are poured into it. The optical device must be shaken in different directions or turned over in different directions.
If there is too much dirt, the procedure will need to be repeated. Immediately after washing, the inner glass should be dried with a hairdryer to avoid streaks.
See also:
How to remove tinting glue from glass
Removing the headlight
To clean the reflector, plastic and auxiliary parts from the inside, you will need to remove the headlights from the car.
To remove the optics, on some models you will need to remove the bumper. To do this you need:
- Turn out the wheels and remove the fender liner clips that are attached to the edge of the bumper.
- Remove the radiator grille.
- Unscrew the screws and remove the clips that hold the bumper.
- Carefully remove the part without damaging the headlight glass or lens.
When dismantling the front bumper, you should pay attention to the corners, which shift when the fasteners are unscrewed and can damage the optics.
Dirt from the inside can only be removed with the headlight removed. After dismantling all unnecessary parts, just unscrew a few bolts and the optics can be easily removed.
The hole for the lamp can be removed directly from the car. To do this you need:
- Remove the protective boot.
- Bend the retaining tendrils and remove the lamp.
- Disconnect the block with wires and place the light element in a box or clean cloth.
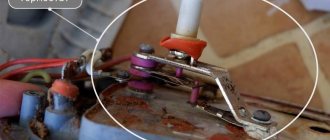
When removing the lamp, avoid accidentally touching the bulb with sealant, glue or fingers. Any contamination of the part will significantly reduce the declared service life.
Glue and varnish remover
To remove varnish, glue or sealant, experienced drivers advise using vinegar or White Spirit. If these remedies are ineffective, you can treat with gasoline, alcohol or ordinary hot water. To soften the sealant, heat it with a hairdryer or apply sunflower oil for 10-15 minutes.
To effectively remove varnish or glue, you can purchase WD-40. If you have nail polish remover without acetone at home, you can use it to remove glue.
Cleaning the outside of the headlight
This operation is easier the more often it is performed. You cannot allow the headlight glass to develop until a cloudy yellow coating appears that is firmly attached to the surface, but you can deal with it.
Glass washing
First, you need to wash the headlight as thoroughly as possible from dirt and grease deposits. An ordinary car shampoo, specially designed to be harmless to glass and paintwork, will help.
For greater effectiveness, it is applied to the glass in maximum concentration and left for about half an hour. After which it is washed off with a rag and plenty of water.
The dull outer layer can be refreshed using regular toothpaste, which is generally intended for this, only for teeth. It contains a fine abrasive capable of polishing.
How to clean plaque with toothpaste
The paste is applied to a sponge or napkin, and then rubbed in a circular motion. It works slowly, so the procedure will require diligence and patience.
If you have a small-sized polishing machine or appropriate attachments for the drill, the process can be accelerated, but there is a danger of “digging holes”, making the surface uneven and glare.
The main thing here is not to abuse the speed and pressure on the glass, especially plastic, which easily overheats. Although ordinary glass does not tolerate local overheating, which can cause it to crack.
Periodically, the paste should be washed off and the current result assessed.
Removing sealant, glue or varnish with sunflower oil
It is very difficult to remove substances with good adhesion that accidentally get on glass.
Ordinary vegetable oil can help, the effect of which is to soften, relatively speaking, the sealant, penetrate under its layer and weaken adhesion to the surface.
After which the layer can be easily removed mechanically, with a rag or a soft scraper. The freed area is washed with detergent or degreased with alcohol solutions. For example, included in household glass cleaners.
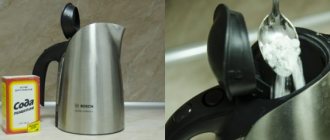
Methanol for electronics and polycarbonate parts
This product has gained popularity due to its rapid evaporation, after which no traces remain. The advantages of methanol also include safety in relation to the internal components of the headlight. It is important to remember that care must be taken when working with this toxic and flammable substance.
To begin with, dismantle the headlights, remove the light bulbs, and then pour in 200 ml of the substance. The headlight is turned over and rocked from side to side for several minutes. The liquid is poured out and the procedure is repeated several more times. The remains are dried with a hair dryer.
See also:
Replacing low beam lamps in Opel Astra H, J and GTC
Cleaning the headlights yourself is not difficult, the main thing is to follow some rules: do not use acetone for plastic, and alcohol for the reflector.
Selection of detergent composition
The aggressive components of most products can damage the surface of the headlight and the reflector. When choosing, it is important to pay attention to the composition, as you can purchase a low-quality product without a degreaser.
Distilled water does not leave streaks on the surface of transparent plastic and reflector, but is not able to wash away stagnant dust or haze from burning lamps.
An excellent detergent is regular toothpaste diluted in purified water. However, such a liquid requires careful rinsing, otherwise the plastic will become covered with a white coating.
How to wash internal headlight parts:
- soap composition;
- dishwashing liquid;
- shower gel.
Cosmetic micellar water to remove makeup will also help to wash the headlight from the inside. When choosing, you should pay attention to the absence of alcohol, which can easily wash off the coating and render the optics unusable.
Anti-gravel: DIY protective coating
Headlights must be as sealed as possible. This will prevent moisture from accumulating inside and allowing a large amount of contaminants to penetrate.
Internal cleaning is rarely carried out when the headlights have served more than one season. But outside, you need to take care of the optics much more often and more actively. If you do not want the glass to become cloudy and scratched, you should use protective films for headlights, which will significantly extend their service life. Their advantage is a good level of protection and the ability to quickly change as needed.
That's all for me. If you have anything to add or have any questions, write in the comments.
Subscribe, leave reviews, come to us again and don't forget to bring your friends!
Source
We fight yellowness and bluish bloom
Plastic headlight polishing and protection kit includes cleaning abrasive paste, protective spray and microfiber cloth
To quickly eliminate cloudy deposits and yellowness, just pop into an auto chemical store and choose a DIY headlight polishing kit. Various manufacturers have been offering something similar in retail for a long time. For example, the German brand Autosol has in its arsenal a convenient kit called “Set for polishing and protecting plastic headlights.” It includes a cleaning abrasive paste, protective spray and a microfiber cloth.
In the end, everything is done right in the parking lot. First, as mentioned above, the contact surface must be isolated with masking tape from adjacent parts. Headlights that have been cleaned of dust and dirt (an important point, since remaining debris can severely scratch the surface when wiped) should be carefully coated with restoring paste and polished by hand using a napkin.
By applying some effort for 10-15 minutes, you will be able to notice that the picture changes and the body becomes more transparent. At the end of this stage, the plastic is thoroughly washed with a stream of water or cleaned with a napkin so that no abrasive particles remain on the surface.
Ideally, the headlights should regain their original appearance, as if the car had just come out of the showroom. But to consolidate the result, a mild spray is used. This preservative is applied to the cleaned surface, after which, if necessary, it is wiped to a glossy shine with a microfiber cloth.
Cleaning the headlight using a flexible grip and sponge/microfiber
This method involves using a flexible gripper and a sponge or microfiber cut to the desired size. You need to remove the light bulb, install a sponge (preferably with open cells) or microfiber on the grip and insert it into the opening for the light bulb. Next, you need to carefully move the sponge or microfiber along the transparent part of the headlight, removing dirt. The flexible grip can be bent at different angles, allowing access to all areas of the transparent part of the headlight. Also, as in the previous method, a sponge or microfiber can be used either with or without a cleaning agent (non-abrasive).
Why you need to care for your lenses
When you wear lenses, deposits gradually form on their surface, which primarily include components of tear fluid such as fats and proteins. They provide a favorable environment for the growth of bacteria that enter the surface of the eye and lens.
Cleaning lenses is an important point, as dust settles on them. When you apply makeup, particles of cosmetics get on them. If you touch your eyes with your hands, dust and microorganisms again get on the lenses.
Pollution impairs the quality of vision. Bacteria from the surface of lenses can enter the eyes, leading to various diseases.
If you use daily disposable lenses, no special care is needed - you simply take them off and throw them away, and then put on new, clean ones. And it’s a completely different matter when it comes to scheduled replacement lenses. They require regular and careful care.
No. 4. Abrasive pastes
If there are a lot of scratches on the surface of the lampshade, you can use tooth powder instead of paste; it is more abrasive.
Expert opinion
Ekaterina Korneva, expert in the field of care, cleanliness and beauty
I will help you understand all the intricacies.
If you don’t want to buy special products in order to save time or money, then you can resort to improvised methods. The magnet method can be used with or without a cleaning agent, depending on the degree of contamination of the inside of the diffuser and the transparent part of the diffuser headlights The most affordable ways to restore headlight reflectors with your own hands If you have any questions, please contact me, I will be happy to answer!
Cleaning reflectors yourself
The reflector serves to collect all the light generated by the lamp into a single beam. With use, the reflector begins to become cloudy.
If you notice that the light from your optics has become dim and scattered, you need to tidy up the reflector.
To clean it indiscriminately, you can use the following method: