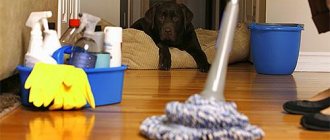
Wooden floor coverings retain their aesthetic appearance for a long time, withstand loads well and prevent heat loss.
But if installed incorrectly or worn, the floorboards move relative to each other and the supporting beams (joists), which leads to a loud creaking sound.
To remove extraneous sounds, it is not necessary to re-layer the coating: it is enough to eliminate the mobility of the joints.
In this article we will tell you how to remove the creaking of a wooden floor in an apartment without disassembling it.
Why does the board covering squeak?
Creaking occurs when coating elements rub against each other, against beams, or foreign objects caught in joints and cracks.
The reasons for the free movement of floorboards can be:
cracks in the wood, small debris getting into the structure;- errors when laying the floor, poor fixation of the coating;
- rusting or loosening of metal fasteners;
- the use of damp wood in the manufacture of floorboards and joists, which leads to rotting and warping of the boards;
- damage to the tree by insects or fungi due to high humidity, improper cleaning, untimely treatment with protective compounds, etc.;
- deflection of the sheathing, wear of the gaskets between the joists and boards;
- high mechanical load.
How to determine the location?
to find out where the worn floorboards are located :
- Go down to the floor below and listen carefully to where the floor creaks when walking. The ceilings amplify the sound, so it will be heard best under the joists.
- Inspect floorboards for gaps, cracks and dirt. Deformation of boards due to moisture can be detected using a building level.
- Walk along all the floorboards at different paces, paying attention to the range of movement of the boards.
Pulling up a wooden floor
Eliminating squeaks by pulling or reassembling the floor is a labor-intensive process, but it is cost-effective and reliable. Each of the names of this method reflects an important stage of the repair process. This option involves a preliminary check of the condition of the floorboards and joists by sorting through them. If a defect is detected, then the elements of the flooring need to be corrected, or completely removed and replaced.
This method is recognized as one of the most effective ways to eliminate floor squeaks. This is due to the fact that absolutely all nails are replaced with self-tapping screws. They are devoid of the creaking characteristic of nails at the points of their connection with wood.
The nail is held in the wood due to its split layers, which can tightly grip the metal. However, over time, due to a weakening grip, the metal may begin to rust and noticeably decrease in diameter. The result of this unpleasant process is that same creaking. Well, replacing inconvenient nails with more practical self-tapping screws is an effective way to eliminate floor squeaks.
How to eliminate sound without dismantling the floorboards, without opening the floor?
To eliminate unpleasant sound, you need to limit the amplitude of movement of the boards under load. This can be done by wedging, re-fixing, or creating an additional layer of flooring.
Polyurethane foam
Using construction foam, you can fill the gaps between the floorboards and the cavities under the joists. This makes the structure more rigid and eliminates mutual friction of the boards.
To eliminate the squeak you need to:
- Clean the work area and remove any clogged debris from the cracks between the floorboards.
Spray the inside of the gap with a spray bottle.
Shake the foam container and fill the defect to 30% of the volume. It is recommended to repair wooden floors at a temperature of +5…+25°C. If the foam was stored in a cold basement or cellar, it is recommended to warm it up in a bucket of warm water.- Wait for it to harden and repeat. If you blow out the crack right away, then when curing the foam will expand and protrude onto the floor surface.
- Trim off excess polyurethane foam. Cover the surface with wood putty and varnish.
- To save material, the lower part of large cracks can be filled with diluted alabaster or cement. The consistency of the solution should resemble tile grout or thick glue.
As you walk, the foam gradually cracks, so the creaking may occur again. If a problem occurs, repeat the procedure. Foam blowing should be carried out wearing gloves, goggles and a respirator.
If filling the cracks does not solve the problem, then the cause of the squeak may be movement of the joists. Cement mortar is used to fix the support beams.
To reduce the mobility of lags, you need:
- identify creaking areas, drill several holes in them down to the concrete floor;
- dilute the cement to the consistency of liquid sour cream;
- using a large syringe without a needle, inject a small portion of the solution into each hole;
- pump cement into the cavities under the joists until the solution stops entering the openings made.
After the solution has hardened, the holes are filled with plaster or wood mastic. To ensure uniform hardening, cement should be poured in small portions, allowing them to dry for at least 24 hours.
Using self-tapping screws
You can firmly fix the floorboards to the joists using self-tapping screws:
- Find movable floorboards. Determine the position of the lags underneath them by the heads of the nails and make marks. If the caps are recessed into the floorboards, then you can find the fasteners using a magnet.
Drill holes where the boards are attached to the beams. The holes should be located in the middle of the floorboards.- Prepare self-tapping screws with incomplete threads. If the thickness of the board is more than 40 mm, then full-threaded fasteners can be used for fixation.
- Using a screwdriver, screw the screws into the holes, sinking them into the wood 2 mm.
If there is no joist under the floorboard, the cap will remain on the surface. The reason for the lack of support may be the destruction of wood or the use of shortened timber. In these cases, you need to unscrew the fasteners and continue fixing in other areas. - Seal the grooves in the floorboards with mastic or wood varnish. After the composition has dried, check the floor for squeaks.
The holes should be 1-2 mm smaller than the diameter of the screw so that the fasteners are screwed in with tension.
If it is not the boards that have become mobile, but the logs themselves, then you can attach them to the concrete base with anchors. The height of the fasteners must correspond to the thickness of the entire floor covering, taking into account the depth of immersion in the concrete.
Holes are drilled in the floorboards, plastic anchor shells are inserted into them, and then metal studs are inserted. The fasteners are screwed into the boards with recess. The recesses in the floorboards are filled with putty or mastic.
The video will show you how to eliminate squeaking without opening the wooden floor:
Wedging method
If the creaking of the floor is caused by cracks and gaps between the boards, then small spacer wedges can be used for fixation. When wedging, the boards will be pressed tightly against each other, which will prevent them from moving under load.
How to eliminate squeaking using wedges:
- Prepare a mallet, wood glue and thin wooden slats 10-15 cm long. The number of slats depends on the area of the room, the number of creaking floorboards and the frequency of placing wedges.
- Clean cracks, joints and cracks in the flooring.
- Coat several wedges with glue. Its layer should be thin so that when wedging, a minimum part of the glue is squeezed onto the surface. For more reliable fixation, wood glue can be mixed with PVA in a ratio of 1:2 or 1:3.
- Hammer the treated wedges into the gaps at intervals of 20-25 cm. Coat a new batch of spacers with glue and repeat the procedure.
- After fixing all creaking boards, leave them until completely dry. When the glue has hardened, cut off the protruding ends of the wedges with a plane.
- Fill small cracks and gaps around the spacers with a mixture of wood glue and fine sawdust. After the composition has dried, sand the filled cracks and cover with paint and varnish.
Using dowels
If the boards come apart at the joints and move under load, they can be secured with dowels. They are small wooden rods that connect two adjacent boards.
How to solve the problem using dowels:
identify and mark any squeaky floorboards;- prepare an electric drill, a mallet, glue and 2 dowels for each joint of the moving board;
- drill holes in the floorboards at an angle of 45 degrees - the directions of the drill should be perpendicular to each other, so one hole is made from the side of the movable board, and the other from the opposite side;
- coat the dowels with wood glue or its mixture with PVA;
- drive the fasteners in with a small mallet;
- wipe off any glue that appears on the surface;
- after the composition has hardened, cut the end of the dowel flush with the floorboard, sand and putty;
- Paint and varnish the sanded area.
The method does not require searching for logs, but is effective only in cases where the cause of the creaking is the mobility of the floorboards.
Additional flooring
An additional layer on top of the floorboards helps distribute the load evenly and muffle squeaks.
To strengthen the floor you need:
- Calculate the area of the room, prepare the required number of large-format sheets of plywood or chipboard with a thickness of at least 12 mm.
- Determine the location of the creaking floorboards, secure them to the joists with self-tapping screws;
- Lay the underlay on the floor, and then 1-2 layers of plywood.
- To firmly fix the sheets, you need to coat them with wood glue.
- Secure all wood-based sheets with self-tapping screws at equal intervals of 25-30 cm.
You need to plan the installation of chipboard or plywood so that the joints of the sheets do not coincide with loose boards.
The disadvantages of the method are high cost compared to fixation with self-tapping screws or foam, as well as low efficiency. When the joists and boards wear out, the sheets can only muffle the creaking, but will not eliminate its cause.
Other means
In addition to the methods listed above, to combat squeaking you can:
- fill the gaps in the joints with cord treated with glue;
- fix the joints with wood putty or sealant made from varnish, sawdust and paint;
- fill cracks with talc-based powder.
Laying plywood over wood floors
If the floor that is bothering you with squeaking has a flat surface, then in order to eliminate the problem, you can lay sheets of plywood on top of the base. Laying should be done with glue, and the thickness of the plywood should ideally be 12 millimeters. It is recommended to lay these sheets at an angle in the direction of the main laying of the boards.
At the same time, it is impossible to say that this method will help you remove the squeak forever, but for a certain period you will definitely forget about it.
Prevention of breakdowns
To prevent creaking, you need to follow a few simple rules:
Place a backing made of foamed polyethylene, rubber or other non-woven material on top of the joists.- Observe the recommended distance between support bars. Check that all boards are level using a bubble level.
- Leave gaps between the outer floorboard and the wall.
- Use only dried wood for floor installation (moisture content of beams and boards is no more than 12%). In dry rooms, maple and conifers are used, and in wet rooms, larch, alder and ash are used.
- Provide natural ventilation and maintain low humidity in the room.
- Treat floors annually with antiseptic and water-repellent compounds.
To prevent premature wear, the gap between the support beams is selected in accordance with the size of the boards.
Floorboards with a thickness of 20-30 mm can be laid on joists in increments of 300-500 mm, and 45-50 mm in increments of 800-1000 mm. In areas where you plan to install heavy furniture, you can reduce this distance by 50-100 mm.
Determining the source of the squeak
The best way to find where the sound is coming from is to hear it from below. This is available in a private house with a basement or stairs down. Have someone walk around the upstairs room while you determine the source of the squeak. This way you will more accurately understand where the problem is.
Most often, the plywood base under the top covering creaks, it rubs against the beams. This happens because wood, when exposed to different humidity conditions, can become moisturized and then dry out. As a result, deformation begins and an annoying creak appears.
If it is impossible to examine the floor from below, proceed with an external inspection:
- Check the condition of the floorboards. The boards must be rigidly fixed, have no deflections, and not move.
- Make sure there are no cracks, chips, or dents on the boards.
- Inspect support joists and beams if accessible.
Having determined the source where the creaking is coming from, proceed with the repair.
Useful tips
The following recommendations will be helpful in troubleshooting the problem
- to secure the boards, use only anodized, not black, self-tapping screws;
- holes in the floor should be 1-2 mm smaller than the diameter of the fasteners;
- Before screwing in the fasteners, blunt the end of each self-tapping screw to prevent damage to the concrete flooring;
- to avoid severe shrinkage, instead of polyurethane foam, you can use epoxy or polymer glue to fill cracks;
- If there is a slight creaking, the cracks at the joints of the boards can be rubbed with a soft wax candle.
Hammering wedges
Often, squeaking occurs due to the formation of cracks between the floorboards. Poorly prepared boards can dry out, come apart and form cracks over time. The smallest gaps can be sprinkled with talcum powder, graphite powder or baby powder to reduce friction on wooden elements.
Small wedges should be driven into larger cracks. The wedges should be driven in at the same distance, approximately 15-20 cm, one after the other. The top of the restoration area can be filled with ready-made putty to match the floor, or you can mix wood sawdust with glue and repair problem areas.
Summing up
Various sounds and squeaks that arise as a result of friction of the material and as a result of moisture can be eliminated independently. To do this, it will be enough just to screw in additional screws or foam the internal space under the defective areas. You can use wedging or other methods mentioned above.
And if you lack any knowledge, skills and abilities in this matter, you can use the services of specialists who will definitely solve your problem flawlessly. But don't rush to conclusions. In fact, renovating a wooden floor is not the most difficult task.
“We make a diagnosis”
Before planning repair work, it is important to determine the severity of the problem and clarify the places where intervention is required. How can you figure out whether the floors in general, the boards in certain areas, the joists, or the coating are creaking? To determine the “diagnosis” on the floor, you need to walk, jump, and lightly tap
Areas where creaking is heard are examined more carefully. So:
How can you figure out whether the floors in general, the boards in certain areas, the joists, or the coating are creaking? To determine the “diagnosis” on the floor, you need to walk, jump, and lightly tap. Areas where creaking is heard are examined more carefully. So:
- under pressure (the weight of a person, a slight blow), the boards or covering slightly bend over a significant area. The problem is a loose fit of the flooring to the joists, sagging joists, too thin boards or sheets of flooring;
- the board or sheet bends under pressure only in one place with a clear creaking - a crack or break is most likely;
- the board or sheet does not bend, but moves on fastenings (screws, nails) - it is necessary to strengthen or replace the fastenings;
- there is no obvious deflection or movement, but the smell of mold and rot is heard - the board or joist underneath is damaged and requires replacement.
We suggest you read How to get rid of sweat stains on clothes, a review of effective methods
Only the most common causes of squeaking are given; more details should be clarified locally. In this case, it is necessary to take into account the type of floors (wooden beams, metal beams, slabs), the method of installing the joists (with or without fastening), the type of subfloor (plank or sheet), as well as the covering option.
Fixation with anchors
If all of the above methods do not produce results, the floor in the apartment still creaks, which means you need to try to remove the sound by securing the floorboards with additional fasteners to the base itself, that is, to the concrete.
To do this, metal anchors are used, which are drilled along the entire length of the wooden structure until it penetrates into the concrete base. In this way, it is possible to eliminate annoying noise with a high probability. Anchors should be made at least 1 m apart from each other.