The washing machine is leaking from under the door - what to do?
Having habitually started your washing machine, you were distracted by other things, and when you came to check its operation, you found a puddle of water near it? We recommend putting aside all household chores and urgently taking appropriate measures. You should not delay repairs by placing containers under the hatch or spreading rags on the floor, because after a while the situation will worsen and water leakage will intensify. So, what should you do if your washing machine is leaking from under the door?
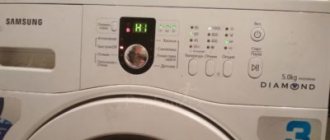
There is dirt on the door
To eliminate a water leak, it is recommended to understand what contributes to its occurrence. In some cases, the formation of a leak is not caused by a breakdown of the washing machine, but by ordinary contamination of its door.
Limescale accumulates at the bottom of the loading hatch glass. If the layer is small, then it does not affect the normal operation of the washing machine, but most housewives simply do not see it, and after a certain time a lime crust appears on the glass.
The layer of scale gradually thickens, and when its thickness becomes two to three millimeters, the door no longer fits tightly to the body of the machine, and the scale interferes with the normal closing of the hatch.
As a result, due to a loosely closed hatch, water begins to leak from under the door. Fixing this problem is quite simple. You will have to carefully check the surface of the door, find where the limescale deposits have accumulated and remove it with a brush with metal bristles. As soon as you remove the main crust, remove the remaining plaque with a simple rag or abrasive sponge. At the end of this procedure, the door will close normally, the washing machine will again operate in normal mode, without water leakage.
Prevention measures
To avoid the problem of leakage from the powder tray, it is advisable to remember the following preventive measures:
- The washing machine must be installed according to the rules, using a building level tool.
- The powder tray must be washed periodically to avoid clogging.
- The powder receptacle should be protected from children's pranks.
- For washing, only special products intended for automatic washing machines should be used. You cannot pour, for example, soap shavings into the cuvette. This can not only lead to clogging and leakage of water from the tray, but will also lead to other, more serious damage.
Damage to the rubber cuff
If water is running down the front of the machine, make sure it is coming from under the door and not from the powder receptacle. Water can ooze from the dispenser tray in small streams, go around the control panel, approach the hatch and create the impression that this is where the leak has appeared.
But when you are absolutely sure that water is leaking under the door, it is recommended to check the integrity of the cuff, since a leak may occur due to severe wear of the sealing element. When closed, the washing machine system should be sealed, but if damage appears on the cuff, this condition will not be met.
By the way, the cuff does not necessarily have to have cracks or tears. It may become wavy or too stiff, which can also cause water leakage.
You can replace the cuff yourself or invite an experienced specialist to do this work.
Sometimes water leaks are caused by small foreign objects stuck between the rubber seal and the glass of the loading hatch door, preventing a tight connection. In the case where the seal is quite flexible and looks normal, simply clean the rubber itself and all surfaces of the hatch in contact with it, removing lint, small particles of fabric, and washing powder residues.
You need to know that cracks and tears are not necessarily located at the bottom of the sealing rubber. Quite often they are located high and allow water to leak during rinsing or spinning. Remember that each case of cuff leakage is individual.
Hose is leaking
Symptoms: leaking from under the car or under the hose.
Drain and inlet hoses are fragile products; they can break, crack, fray, or simply be defective from the very beginning. Gaskets often leak at the places where hoses are attached: they may simply not be fully tightened, the gaskets are of poor quality, or the hoses were screwed on by someone with crooked hands and the gasket was skewed.
Whatever happens to the hose, you can easily fix it yourself: tighten the crack with electrical tape, seal it with waterproof glue, replace the gasket. Just keep in mind that all these are temporary measures and with strong pressure the leak may appear again. If the hose is damaged, it is better to replace it, especially since it is not that expensive.
Broken door hinges or lock
Sometimes water flows from the hatch during washing due to improper operation of the washing machine or defects made during assembly.
If this is where the problem lies, it is quite simple to fix it by replacing the failed loops with new analogues. The most savvy washing machine owners can try to figure out where exactly the deformation occurred and try to level the surface without purchasing new hinges to replace it. By the way, to replace the fasteners on the hatch door you will need an open-end wrench, Phillips and slotted screwdrivers.
The washing machine can leak due to the failure of the door locking device. The reasons why the fastenings of the locking device fail are purely individual and depend on the brand of the washing machine and its model. It doesn’t matter at all what you use – Bosch, Ariston, Samsung, LG or another brand, in some the springs burst, in others the gaskets tear, which increases the backlash.
In this case, it is best to have a professional troubleshoot and fix it, because you will only waste time trying to figure out the cause of the water leak. But if you have a desire to work independently, we recommend the following algorithm of actions:
- Using a Phillips screwdriver, remove the panel of plastic material located around the glass of the loading door from its inside;
- loosen the door fastening of the hatch, disconnect it from the body part;
- we check the locking device of the hatch, we specify how movable the tongue of the mechanism is;
- Having discovered wear on any of the elements, we try to eliminate it.
What to do first if the washing machine is leaking
Like other household appliances, the washing machine has its own service life. It depends on the quality of the product, correct use, care and other factors affecting performance.
Having discovered a leak, you need not to panic, but to pull yourself together and quickly act in the direction of finding the source of the leak and resolving the situation. The presence of water in the wrong place threatens possible problems with the neighbors below and with the machine itself. A leak will damage the electronics of the unit, ultimately killing it.
Necessary actions
If you notice that the washing machine is leaking, you should immediately disconnect it from the power supply. At the same time, you should not step into water that has formed a puddle.
Important: the leaked contents of the washing machine, if it is still connected to electricity, can cause an electric shock, which is often fatal.
Now you need to proceed with further steps to detect the source of the problem:
- Turn off the water supply to the unit.
- Open the drain filter, which is located in the front, left or lower right corner.
- Drain off any remaining water. There may be a lot of liquid. You should select a container with a low side and place it close to the hole.
- Wipe up the puddle.
- Open the machine door and take out the laundry.
Important: if the wash is interrupted due to a leak, water remains in the drum. Its presence is easy to notice through the transparent window of the loading hatch, even when the tank is filled with laundry. Before you take things out, you need to place a wide container under the door.
Only after this will it be safe to start looking for the problem yourself or call a specialist.
If the wash cycle ends before a leak is detected, there is no point in draining the remaining water through the filter. This is only relevant if the breakdown occurred during the operation of the unit, interrupting it.
The device weighs a lot. It is better for a man to look for the breakdown, since you will need to move and tilt it.
What to pay attention to first
First of all, you need to check all components that are in the public domain and located close to the suspected location of the leak. It is easy to spot in a puddle.
There is a chance that the problem is not in the washing machine itself, but in the old pipe, and water has simply flowed under the machine. If everything is in order with this, you need to start inspecting the communication system, which is connected directly to the machine. If you do not find the cause of the leak in this area, you will have to look for it in the unit itself.
Main types of breakdowns and their repair
A visual inspection of the case will not help much. First of all, they study the hoses connected to the unit, and then its internal mechanisms. To do the latter, you need to move the washing machine to make access easier, tilt it, or completely remove the back or side wall. Access paths to the mechanical contents of the machine depend on the design of the model.
Drain or inlet hose
It often happens that a leak is associated with incorrectly connected or damaged hoses of the filling/drain system. They detach quite easily.
It is worth considering a very common case when the drain hose is not initially connected to the drainage system. If the unit is in an inconvenient place or far from the unit, it is not securely attached to the side of the sink, bathtub or even toilet. This happens when the owners do the installation themselves, rather than turning to specialists.
With such a connection, leakage becomes almost a regular problem due to a simple human factor - forgetfulness. When taking a bath or using other plumbing amenities, the hose is removed and then not reattached. As a result, the next wash will turn into a flood.
If there is a drain hose that is not connected to the sewer, you need to pay attention to its position. Such exploitation is a violation, but not so critical that anyone would care much about it.
When checking, properly connected drain or inlet hoses must be carefully inspected and probed. The corrugation is easily deformed and can crack at the bend. This is the most common cause of leakage.
It is not difficult to fix this problem. The tubes are easy to replace by purchasing an exact copy. It is better to purchase original ones, which will last longer, rather than fragile fakes. The problem with the drain hose is manifested by the presence of a constant leak during the drainage of water during washing or in the spin mode.
Drain filter
If the washing machine is leaking directly from below, in the area of the drain filter, most likely it is simply not screwed on properly. This happens if it was cleaned or excess water was removed, and then not turned enough.
It is necessary to remove the filter and then close it tightly until the end. This should be done without applying force, otherwise there is a risk of breaking the thread, and you will definitely need to call a specialist to fix it.
There is also a possibility that the filter is clogged due to the fact that regular preventive cleaning is not carried out. In this case, you need to take it out, remove all the debris, wash it and put it back.
Powder compartment
When the machine starts working, at the beginning of the wash cycle or rinse mode, water flows into the detergent hopper. If the ditch is clogged, the soap solution will flow outward and not toward the laundry, thereby creating a small puddle on the floor.
You need to maintain the dispenser and clean it periodically to avoid clogging. In case of obstruction of liquid drainage areas, the cuvette is completely removed and thoroughly cleaned. In addition to washing powder, there is a residue left on it from hard water, and sometimes mold.
Pipes
A failed intake valve pipe can also cause a leak. To get it, you will have to dismantle the upper part of the case and replace the broken part. If the problem is with the water intake pipe, it may not need to be completely replaced.
It is enough to disconnect it, treat the break with sealant and re-glue it with rubber-based glue. You can run a test wash after all applied substances have completely dried.
The pipes can fail because manufacturers of inexpensive models of household appliances usually skimp on such parts. As a rule, they begin to leak after 1-2 years of intensive use of the unit.
Rubber cuff
The reason that the washing machine is leaking from below may be a leaky cuff of the laundry loading hatch. When the crack or puncture is at the front, water flows through the door. If the inner part is worn out, then it comes from under the bottom.
This element is damaged mainly due to improper use of the washing machine:
- the seal is often pinched;
- small hard objects get into the clothes drum.
You cannot do without completely replacing the part. You need to dismantle the door and take out the rubber seal. The damaged area can be sealed with a patch if it is small. But even in this case, the repaired part will not last long. It is better to immediately buy and install a new one.
Drain pump
If it has become unusable due to age or due to mechanical damage, then the location of the leak will be visible. If necessary, you can check for integrity by unscrewing it completely. It can't be repaired, you need to replace it with a new one.
This is interesting: in commercials for washing machine care products they often show that due to a broken heating element, the unit breaks down and immediately leaks. In fact, for this to actually happen, it must explode, which happens very rarely and is accompanied by a lot of noise. The only sign of a burnt-out heating element is washing with cold water at a set high temperature.
Being perhaps the most durable element, the tank should not leak. Practice shows the opposite. The cause of its malfunction may be foreign sharp objects that provoke a crack.
Those who like to wash shoes, belts, outerwear and bras with wires without placing the product in a special bag will encounter just such a breakdown. The same goes for those who forget to check their pockets before placing clothes in the drum.
The problem is very global, and the only option to solve it without completely replacing the equipment is to call a specialist who will dismantle the old tank and install a new one.
Oil seal deformation
If a leak appears when spinning clothes, you should inspect the seal for damage. A large amount of water in the tank with strong vibration of the unit causes excess liquid to pour out. If necessary, you will have to replace it with a new one. Simultaneously with this procedure, it is recommended to immediately update the bearings.
Any malfunction of the washing machine, especially during its operation, must be responded to immediately so as not to increase the scale of the disaster by flooding and the final failure of the unit. Most problems with it can be solved by replacing parts at home. If there is a leak, but you couldn’t find the source yourself, you can always contact specialists who will definitely find the breakdown and carry out repairs as soon as possible.
Why water flows from under the washing machine: causes and elimination of the defect
What to do if you find that water is leaking from under the washing machine and a large puddle is forming on the floor? Fix the breakdown as quickly as possible, because a malfunction not only causes inconvenience, but can also lead to damage to furniture or even flooding of neighbors.
A leak in your washing machine can flood your neighbors.
Primary diagnosis
If you suddenly find a puddle under or near the washer, do not step into the puddle under any circumstances! Immediately unplug the machine and, just in case, turn off the water supply to it. And only after this you can begin the inspection.
If a leak occurs during washing or water flows in after rinsing or spinning, first remove the laundry from the tank and drain the remaining water from the machine: open the hatch at the bottom at the front, place some container in there, and unscrew the filter. A lot can leak in a washing machine, so take your time and be consistent: you need to establish exactly where the water is coming from and at what stage of the wash the leak appears.
It is possible that the car is in perfect order, but water has leaked from somewhere else: first, carefully check all the places where water can leak in the room: sewerage, pipes, hoses, sink, bathroom.
Emergency procedures
For many years now, automatic washing machines (hereinafter also referred to as SM, SMA) have freed people from the routine work of washing clothes. They themselves heat the water to the required temperature, dose out the washing powder, determine the washing, rinsing and spinning time, and even dry the washed clothes. Leading manufacturers of washing equipment - Bosch, Samsung, Beko, LG, Electrolux and others - equip their washing equipment with a leakage protection system that blocks the flow of water and flooding of premises. But, unfortunately, leaks are still quite common.
If you see a leak on the floor, under no circumstances step into the puddle or try to wipe it away! It is necessary to immediately turn off the power to the unit by unplugging the plug from the socket. If the SM remains energized, it will pose a threat to the lives of others.
The second urgent step is to turn off the water supply to the machine by turning the appropriate tap. After this, you will have to drain all the liquid from the unit using the emergency drain hose. What it is? The emergency pipe is a small hose with a plug, located behind a special door next to the drain filter.
If there is no emergency hose in the SMA, water is drained through the filter hole in the front panel
Next, empty the drum of laundry. Only after all the above steps can you begin to inspect and find out why the washing machine is leaking.
Call the master
If you can’t figure out the leak in your LG machine on your own, you can contact a household appliance repair company. It is not difficult to find such companies on the Internet by indicating the name of your city in the search query.
To avoid falling for scammers and incompetent professionals, it is better to contact companies that have been operating on the market for a long time and have positive reviews.
The cost of the technician’s work will depend on the severity of the breakdown and the complexity of the repair. Payment for spare parts required is made separately.
The average price for work in Moscow is:
- replacement of the drain hose – from 1,500 rubles;
- eliminating drain blockage – from 1,400 rubles;
- replacement of detergent dispenser – from 1,200 rubles;
- cleaning the drain filter – from 1,300 rubles;
- pipe replacement – from 2,000 rubles;
- pump replacement/repair – 2,100 rubles;
- tank replacement – from 4,600 rubles, etc.
To invite a specialist, you should call the phone number listed on the company’s website or leave your contact details for communication. When applying you should indicate:
- type of malfunction;
- car make/model.
After the repair has been carried out, the machine is started without adding laundry. If the work is successful, the master issues a guarantee for the repairs performed.
Why is water leaking from under the washing machine?
The main reasons for this defect are: violations of the rules of operation of the SMA, the use of low-quality washing powders, as well as defects that arose during the manufacture of components and parts. If we talk about specific malfunctions, these include:
- violation of tightness at the connections of the inlet and drain hoses, violation of their integrity;
- leak in the drain pump (pump);
- damage to the tank body (crack or hole);
- violation of the tightness of the connections of the filler and drain pipes inside the SM housing;
- damage to the elastic cuff of the hatch door;
- wear of the oil seal that seals the bearings on the drum shaft;
- There is a blockage in the hopper of the washing powder dispenser tray.
Finding out the causes of the leak and eliminating them
First you need to carefully inspect the washing machine. If you notice, for example, that water is running from under the hatch door, the reason is obvious - the tightness of the elastic cuff is broken. Inspecting the inlet and drain hoses, the door seal and the dispenser will also help localize the problem.
A careful inspection of the equipment will help localize the breakdown.
If you remember at which stage of the wash the leak started - for example, during rinsing or spinning - this will also help in determining the source of the accident. When the washing machine leaks when filling with water, immediately check the inlet hose and its connections.
Checking hoses
Start by visually inspecting the fill and drain hoses along their entire length. You may be able to immediately see a longitudinal crack or other damage.
Inlet hose damaged by a pet
The cause of such damage may be the rearrangement of furniture, which caused the hose to be kinked or over-tensioned, as well as other mechanical influences. If both hoses look intact, disconnect them from the machine and check as follows:
- plug the hose on one side;
- wrap toilet paper around it along its entire length;
- fill with water.
If there is a leak, a wet spot will appear in this area on the paper. Do not forget also about the SM fitting to which the inlet hose is connected - the connection may not be reliable. After checking the hoses, connect them firmly to the unit.
Replace the damaged hose with a new one. You can purchase it in specialized stores that sell washing equipment and accessories. If this is not possible, use waterproof glue and a rubber patch to restore integrity.
Depressurization of the drain filter
A loose filter is most often the cause of a leaking washing machine. This defect is easily detected if the puddle is small and located under this part, for example, in the left corner. In many models, the CM filter is located in the lower right corner of the case.
Eliminating liquid leakage from the drain filter
Unscrew the filter, check its contents and clean it. Then screw it in tightly, making sure that the force applied does not cause the plastic threads to break. After this, run the wash cycle again and make sure that the filter was the cause of the water.
Leaking from the powder receptacle
Each SMA has a pull-out tray where washing powder and detergent additives are placed. During operation, these substances are washed out of the hopper with water. But if any of them, being of poor quality, does not completely dissolve when washed, a blockage appears in the mesh or small holes of the hopper. Another reason for this phenomenon may be poor quality tap water.
Dispenser tray in a washing machine
The liquid cannot pass through the dispenser quickly, and some of it spills out. This is how a leak appears from the powder receptacle. The defect can be eliminated very simply: remove the tray and thoroughly rinse the mesh or holes in the hopper with a stream of water. Then put the dispenser back in place and start washing again by loading the powder.
Damage to the elastic cuff of the hatch
Housewives do not always check the pockets of their clothes when placing them in the machine drum. Foreign objects may be quite sharp - so much so that they can damage the cuff. So a leak appears from the hatch door.
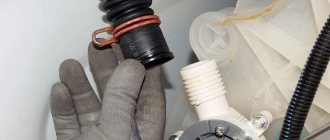
The process of removing the cuff for repair
If the hole is small, repair the damage using waterproof glue and an elastic patch. The cuff must first be removed by removing the clamp that holds it in the hole. It is better to install the repaired rubber part in place so that the patch is at the top of the hatch. This way it will be subject to less stress.
If the repair does not bring results and water continues to flow out of the door, you will have to replace the damaged cuff with a new one. Watch the video to learn how to replace the cuff in an Indesit washing machine:
The tank filler pipe is leaking
Water enters the tank through the filler pipe. Vibrations created by the rotation of the drum can cause the joint between the part and the tank to become depressurized.
The connection point between the filler pipe and the tank in the washing machine
To restore the connection, the pipe will have to be removed. Carefully remove any remaining old glue from its surface, as well as from the surface of the tank. Once both surfaces are completely dry, attach the fill pipe to the tank using epoxy glue or polyurethane sealant to secure it. You can also use any other strong, waterproof glue.
Fill valve pipe is leaking
In order to check the integrity of the pipe and the tightness of its connections, remove the top cover of the washing machine under which it is located.
Fill valve with two branches
It is possible that the clamps at the joints are loose and the pipe is leaking, then they will have to be tightened or replaced with new ones. If the pipe is damaged, also replace it with a new one.
Leaking from the drain pipe
This problem may appear after just a few months of using the SMA. Due to vibration, pipes made from low-quality materials are damaged in the form of cracks. The seal at the junction with the tank or pump may be damaged.
Drain pipe and pump, bottom view
To inspect areas of possible damage, place the machine on its side. From the bottom there will be access to the drainage path. There is no point in repairing a damaged pipe - after a while it will leak again, so it is better to replace it with a new one. The problem of leakage at the junction with the tank can be solved by replacing or tightening the clamp or re-gluing the junction (it all depends on the specific SM model).
Pump depressurization
One of the common causes of fluid leakage from the SMA is a leak in the drain pump. It begins to flow due to a sharp object that got into the pump volute and damaged it.
Electrolux washing machine drain pump
This part is relatively inexpensive, so it is better to purchase it at a specialized store and replace it yourself.
This video is about replacing the pump in a washing machine:
Tank damage
If your washing machine is leaking from the bottom during a wash cycle, it may be due to a damaged tub. The plastic part may be damaged if shoes, belts and other items with metal parts are loaded into it with clothes and laundry.
You can localize the damage if you place the CM on its side and carefully inspect it from below, illuminating the tank with a flashlight. Traces left by water will indicate the location of the damage.
Crack in plastic tank
In a metal tank, the rubber gasket connecting its two components may leak. Since the tank is an expensive part in the SMA design, replace the gasket or try to seal the resulting crack with polyurethane sealant. If it is located in a hard-to-reach place, you will have to completely disassemble the washing machine. In this case, it is better to call a specialist and consult with him what is best to do: repair or immediately replace the tank.
Leakage through the seal
The oil seal is one of the structural parts of the tank that protects the bearings from water getting into them. The washing machine drum rotates on bearings. The washing machine leaks if the oil seal has lost elasticity during operation. In this case, water not only gets on the bearings, destroying them, but also flows out of the tank.
Oil seal that protects the shaft and drum bearings from moisture
To replace an oil seal that is leaking, you will need to fully operate the SM. Along with the oil seal, the bearings must be replaced immediately. It is better to entrust such work to a qualified specialist.
In conclusion, it is worth noting that a washing machine leaks for many reasons. If the location of the fluid leak cannot be detected visually, you should contact a service center, which will send a qualified technician.
How to fix it?
Knowing the cause of a leak in a washing device, you can often fix it yourself. For example, if the problem is in the drain hose, then such a malfunction can be temporarily eliminated by using the most ordinary insulating tape. In the drain system, the fluid pressure is quite low, so covering the damage with electrical tape will allow you to do a couple more washes. However, in the end you will have to buy a new hose and replace the leaky one.
As for leaky hoses and pipes located inside the device, they will only need a complete replacement. But if the cause is connections, then the leak can be eliminated quite simply. It is enough to coat the joint with rubber glue and wait for it to dry completely (about 20 minutes). But while drying, it is advisable to tightly compress the joint.
The drain filter is also easy to change. You need to unscrew it from the neck. After this, inspect the threads and make sure there is no dirt or dried salt deposits on it. After cleaning, install a new filter and carefully tighten the cap so that it fits as tightly as possible.
A leaking car door indicates damage to the cuff. Minor cracks in it can be repaired using waterproof glue and an elastic patch. To do this, you need to remove the seal by first removing the clamp holding it in the hole. When installing the restored cuff, it is advisable to make sure that it is on top of the hatch. So the load on it will be minimal.
The metal tank consists of two parts, between which there is a rubber gasket. If there is a fault in it, then the gasket is replaced with a new one. If cracks are found in the plastic, they are eliminated using polyurethane sealant. Of course, if they are large or located in places that are difficult to reach, then it will be necessary to disassemble the washing unit. However, it is better to have a leak from the tank repaired by professionals, as the problem may be more global, including replacing the tank. Sometimes it is more profitable to buy a new washing unit than to replace the tank.
It should be clarified that scale formed on the heating element in the washing device cannot cause a leak. This is only possible in cases where the heating element explodes and burns through the tank. However, this happens quite rarely.
Practice shows that any problem can be dealt with, if not on your own, then with the help of specialists
It is important to remember that the response to a malfunction must be very fast. Otherwise, a small breakdown can lead to more serious consequences.