The ability to tie a tie is the basis of business etiquette for a modern man and gentleman. There is no doubt that every man would like to know how to tie a tie. There are approximately 85 variations of tie knots that suit both formal and informal dress codes.
Do you know at least one way to tie a tie? If not, we suggest learning how to tie a tie in 12 ways! The visual aid that we have prepared for you will help you easily master simple and complex tie knots.
Choose an interesting knot for yourself and learn how to tie a tie! We wish you success!
An easy way to tie a tie or Kent knot
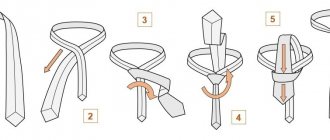
The Kent knot or Kent is the simplest knot with which to start learning. The knot is suitable for classic and informal clothing styles for all types of ties and shirt collar shapes.
Click to enlarge the diagram of the Kent node!
More details here ->>>
Classic way
Every man at least once in his life planned to attend an event with a strict dress code. But the plans of many representatives of the stronger sex never came true, since they could not “defeat” the tie and tie it beautifully. But this is done quite simply:
- the tie is put on the neck so that its wide part is on the left (on the side of the owner of the neck piece);
- the narrow part of the neck accessory is located above the wide one (about 2 times);
- the wide and narrow sides intersect (the wide side remains on top);
- The wide side is “wrapped” once around the narrow part;
- the wide part of the tie on the inside is inserted above the intersection of the two parts of the product and is brought out into the “ring” that appears as a result of throwing one side over the other.
The photo shows a diagram of the technique of tying a tie in the classical way:
After this, all that remains is to shape the resulting tie knot and adjust the force of its pressure on the neck.
By the way, in order for “dimples” to appear on the product at the bottom of the knot, it is enough to squeeze it on both sides with your fingers. For information : this method of tying a tie is often called a quadruple tie. Because a man is only 4 simple steps away from a perfect looking neckpiece.
Simple and versatile Four-in-Hand
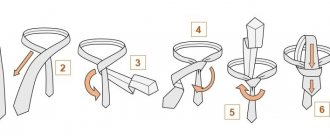
The Quarter Knot or Four-in-Hand is the most versatile, yet simplest way to tie a tie. It consists of 7 steps (see illustration), but is suitable for any occasion and style of clothing. The knot fits classic, medium and wide collars.
Click to enlarge the diagram of the Four-in-Hand knot!
Video on how to tie a tie with a Quarter knot
We have made a video clip for you so that you can watch live how a tie knot is tied.
More details here ->>>
History of the tie
According to one version, humanity owes its appearance to the warriors of ancient China. A piece of cloth around their neck served as protection from the piercing winds.
According to another - the Romans: speakers tied scarves around their necks, thus warming their ligaments on the eve of the upcoming speech; legionnaires were passionate fans of these scarves, which protected their skin from friction with their armor.
Another version tells of Croatian mercenaries wearing neckerchiefs, used during battles to distinguish friend from foe.
The concept of a “tie” (“cravate” in French) was first used during the time of Louis XIV, when men wore lace scarves. There was even a position - Kravatje - this man served as the supplier of these products to the king himself.
And mass popularity came to them by the end of the 17th century, when not a single dandy and dandy in Europe could do without a dozen scarves in their wardrobe. And then it became fashionable to wrap scarves several times. The men, with their chins up, now looked slightly arrogant. Special clubs were also created where anyone could learn how to tie such a scarf beautifully, as well as wear it correctly.
With turn-down collars, the first ties, the ancestors of today's, came into fashion from the English aristocrats. Visitors and participants in equestrian competitions, members of yacht clubs now had to compete with each other in newfangled accessories.
At the same time, the whole science of properly tying a tie was born. Books were published with stories about how to create the most extraordinary “knots” on the neck. Russia learned about the tie in the times of Peter the Great, as a scarf from the German “hals” - neck and “tuch” - scarf.
But it was only in 1924 that the two- or three-piece tie familiar to modern people saw the light of day. Today, a huge number of technologies for tying ties are known, and no one is surprised by the fashion for tie knots.
Symmetrical Windsor knot
The Windsor knot is a voluminous and symmetrical knot that looks great on collars with soft corners (like on polo shirts), medium and wide collars.
Click to enlarge the Windsor node diagram!
Tying a Windsor Knot – Video
More details here ->>>
Model selection
When going to work, an event or a date, first decide which of the many models will be most appropriate. Unless, of course, you have one tie for all occasions.
Today, ties are presented in a wide enough range that choosing can become a problem:
- Butterfly
This tie looks great with a tuxedo. Black is a classic color, but a confident man can choose any color.
- Dotted
Be careful with large peas. And small ones are universal.
- Club
Suitable for informal settings. With his drawings he can tell about the owner’s hobbies and draw attention to his person.
- Plain
It should match the colors of the suit, shirt, even shoes.
- Striped
With him, choose a plain shirt with a suit. He will make it clear how serious and straightforward his owner is.
- With print
It is quite suitable for work or a meeting. Don't opt for particularly fun patterns.
- Dark
Put on a light shirt and confidently head to a business meeting. A jacket a tone darker will give him special elegance.
- Bright
A common choice for a young man. For the older generation, this can only be worn at a resort when wearing a light, light suit.
Fashionable asymmetry or Prince Albert knot
The Prince Albert knot or Prince Albert knot is a rather sophisticated and asymmetrical knot for a tie. Looks great on thin men. We recommend using a thin tie up to 5-6 cm wide. Suitable for medium, wide and button collars.
Click to enlarge the diagram of the Prince Albert node!
More details here ->>>
Step-by-step instructions for tying a Prince Albert knot
It is generally accepted that this proud name comes from the name of the English Prince Albert of Saxe-Coburg-Gotha, who had a reputation as a trendsetter. It is not historically confirmed that he wore a tie with this particular knot, but the name stuck.
"Prince Albert" requires a decent distance between the corners of the shirt collar, looks beautiful with button collars. Suitable for narrow ties made of soft fabrics (for example, silk).
A distinctive feature is a double loop , due to which a more “solid” thickening occurs. The first (bottom) layer peeks out slightly from under the top one - this is what “Prince Albert” looks like if you tie the tie correctly ( diagram here):
- The tie is turned with the inner side towards you, with the seams inward. The wide end (working) should be on the right. Moving from left to right, the wide side should be wrapped around the narrow side (this part just hangs quietly).
- Shift the wide edge from right to left over the thin one and circle it once.
- Repeat this action again: wrap the wide end, trying to place it slightly lower than the previous position. To avoid over-tightening, place your finger in the first loop - this will make the next step easier.
- Carefully pull the working edge towards the neck and thread it under the formed “collar”, bringing it forward. On the front part it is threaded through the loop that was formed first.
- Slowly tightening, the wide part is pulled down. All that remains is to adjust the knot for uniform placement.
Before finally tightening the result of your efforts, the pros advise to pinch the wide edge with your fingers at a distance below 5 cm from the knot so that the tie has two neat vertical folds.
When performing the final step, they are held and then released. You will get a spectacular dimple just below the knot.
Kelvin knot
The Kelvin knot or Kelvin is named after the physicist and inventor William Thomson, 1st Baron Kelvin - the same one who invented the Kelvin scale. Very similar to the Quarter Knot, suitable for short and classic collars.
Click to enlarge the Kelvin node diagram!
More details here ->>>
What to do if your tie is too long?
Sometimes, no matter how you tie an accessory, the narrow end always ends up lower than the other.
But according to the rules of etiquette, this is unacceptable. So what to do? Should I take the product to the studio to have it shortened? This option is permissible only in extreme cases. There are other ways to deal with this problem. Some men hide the peeking end between the buttons of their shirt or under their trouser belt. According to the rules, this cannot be done. But such a trick can sometimes be resorted to. To prevent the unexpected from happening (the tip does not come out and appear outside), you must wear a clip. It will help keep the accessory in place and prevent the tip from coming out.
The most rational solution is to choose the right tying method . Classic knots are easy to tie and do not require much fabric. And, for example, Eldridge or Trinity, on the contrary, take most of the narrow edge. Therefore, before cutting your tie, you need to try tying it in different ways.
Half Windsor Knot
The Half Windsor knot is a universal knot, perfect for wide and thick ties. The knot is quite symmetrical and suitable for wide collars and collars with soft corners.
Click to enlarge the diagram of the half windsor node!
More details here ->>>
What should you do first?
Was the product still too big? Then you can move on to the next step - have your Pandora bracelet reduced by a professional jeweler. How does a craftsman reduce Pandora jewelry? He will most likely remove a piece of snake near the part where the charms are screwed on. After that, he carefully solders the snake into place. Ideally, there will be no trace of the intervention. It is also worth asking the jeweler to check the proportionality of all sections of the bracelet and, if it is broken, correct the problem.
First, you should make sure that the size of the bracelet is really too big. To understand objectively, it is worth trying on the product with the entire set of charms and pendants that you plan to wear every day. You also need to think about the future - will you add charms to this bracelet? If yes, then a small margin of size is definitely needed.
Do leather bracelets
Pandora? Yes - this operation can also be carried out by a jeweler, simply by cutting a strand of leather to the required size and carrying out processing. Naturally, you should trust the operation of changing the size of Pandora bracelets only to experienced craftsmen who are familiar with the features of the products of this brand. By the way, owners of jewelry that fits the appropriate size will also have to contact a jeweler: over time, they will stretch a little.
Pratt or American knot
The Pratt knot, or Pratt knot, was invented by US Chamber of Commerce employee Jerry Pratt. The knot is universal and suitable for a classic collar and with rounded ends.
Click to enlarge the Pratt node diagram!
More details here ->>>
Does tie length matter?
Choosing the type of knot and length of the tie matters
, width doesn't matter when it comes to the appropriate length for your tie. This means that when you stand in your normal position, your tied tie should reach the middle of your waistband, or waistband if you are wearing one.
Interesting materials:
How to print an envelope in Word? How to print envelopes from a list in Word? How to print multiple return envelopes in Word? How to print specific pages in Word? How to print a certificate in Word? How to print a page in Word 2010? How to print a cover page in Word 2016? How to print color labels in Word? How to print only certain pages in Word? How to print an entire document in Word?
Even more interesting and complex knots
Eldridge knot
Trinity Knot
Van Wijk knot
Knot "Balthus"
Murrell knot
The bow tie
How to tie a children's tie with an elastic band
The elastic version is a finished product that does not require weaving. The models are attached to an elastic band and fixed at the back, on the collar.
To create a fashionable design you need to perform the following steps:
- The tie is laid out with the wrong side out, and an elastic band is laid out on top for further fastening.
- The narrow end of the accessory is laid out on top of the elastic band.
- Then the narrow edge needs to be placed under the wide one.
- The thin edge is placed on the left and is passed through the elastic and then pulled down.
- The plexuses are aligned and the knot made is tightened.
Materials used for children's ties include silk, satin, wool and jacquard fabric. The tie is selected according to the season. Satin and silk models are suitable for the warm season. For winter - wool. Many models of ties are put on very simply with the help of special elastic bands and hooks that are hidden under the collar.
I hope you find this review useful and find the right tie options for any occasion. Goodbye, dear guests!
Choosing the right tie knot
Tie knots differ from each other. Size, symmetry and shape can vary greatly. Depending on the tie, the type of knot and the ability to tie a tie, the result will be different. For example, wide ties are often tied with only medium knots, such as "Quarter" or "Kent". Thin ones can be tied with any knots, including Windsor or Pratt knots.
Each node is individual. The instructions and recommendations that we propose to study will improve your image. Will allow you to find uniqueness and elegance. It is not difficult to understand how to tie a tie; study the pictures and diagrams. On the page we have attached a photo of a tied tie to help you understand what a knot looks like. Experiment! Play with shapes and fabrics, colors and tie patterns. People around you will definitely pay attention to you.
By the way, in our online store you can buy a handmade wool tie or buy a thin tie that your colleagues, friends and loved ones will definitely notice. The “wow” effect is guaranteed!
TIES IN THE BOWANDTIE ONLINE STORE
GO TO STORE
Tie length calculator
Are you unsure which tie size is right for you? Use the tie length calculator to help you calculate the recommended length based on your height and collar size. After making the calculation, feel free to go shopping in the store.
How to tie a tie correctly
If you are just learning how to tie a tie, you will have difficulties. We recommend checking out our published article on how to tie a tie correctly.
Tie color
How to choose the color of a tie? This question is asked by many people when choosing a tie for a suit or shirt. We have prepared material that tells about the 12 most popular tie colors, and also provided recommendations for which men's suits and shirts this or that color will suit.
Tie drawing
How to choose a pattern on a tie? Depending on the upcoming event, you need to decide which print or pattern best suits the formal or informal dress code. Read about 9 types of patterns on a tie, and also follow the recommendations on where it is appropriate to wear a particular tie.
How to buy a quality tie
When purchasing a men's accessory, make sure of the quality of the product. This is important in cases where these accessories are visible to others and form a business style. A good, high-quality tie meets several requirements, which we described in detail in the prepared article.
How to tie an Eldridge knot correctly
An unusual and original way to tie a tie knot.
It cannot be called simple, but a man who has mastered this wisdom will always be the center of attention.
The peculiarity of this option is that it is impossible to pull it up ready-made, so initially you will have to knit it close to the collar of the shirt.
The tie is placed around the neck, the wide edge is placed on the right. Unlike previous methods, the “working” part here will be narrow .
- With your right hand, take the wide part, forming a small fold on the canvas with your fingers. The thin edge is brought from left to right, made a revolution around the wide one (passed from the back side), and moved upwards and tucked inward. He ends up on the left. On the back side it is directed to the right.
- From right to left, the working edge is brought in, tucked in from the inside out, out through the neck loop, and directed to the left side.
- Next you need to move it from left to right from the inside of the tie. It turns out that it comes out from the right side.
- This is not the simplest manipulation: going around the top of the triangle formed in the center, you need to tuck the thin edge into the loop that has formed on the left. The result should be slightly tightened, but not overtightened.
- The thin part, which after the previous step ends up on the left and is directed slightly upward, is tucked on the left under the thin part of the tie that wraps around the neck - moving from top to bottom.
- The previous step is repeated again: the thin edge is folded over the tie at the neck. There is no need to tighten it all the way; a small space is required.
- The thin edge on the inside of the work is moved from left to right. It should appear on the right side.
- Moving from right to left over the forming knot, the thin end is passed into the loop that was formed in the 6th step (at the moment when we deliberately “didn’t reach it”).
- The thin edge (already noticeably shortened) is tucked under the collar.
The resulting knot is straightened, bringing it to perfection.
If you didn’t succeed in tying a tie with an Eldridge knot step by step according to the instructions and photos, it’s not a problem, because the task is not easy. A couple of attempts - and the skill will come.
Main rules
Before tying a tie, it is important to familiarize yourself with the basic rules. To do this, you should follow the following recommendations:
- Tie your tie near the mirror. This will help you monitor the process and do everything as quickly as possible.
- Button up your shirt and turn up your collar. In this position it will be easier to create nodes.
- Determine the length of the tip that will be used to decorate the composition. A wide edge is often used for this. In this case, the thin fragment should be placed above the navel.
- After fixing the accessory, lower the shirt collar and look in the mirror to make sure the knot is neat.
What you need to know about tie knots
According to the observations of scientists at the University of Cambridge, men spend only nine movements to tie a tie. But they are enough to tie a stylish accessory in 85 ways. It is unlikely that you need to sort out all the combinations, but the most common ways of tying a tie are worth studying.
5 rules of elegance
Looking elegant and stylish is a real art. To understand it, it is important not only to learn how to tie a men's tie correctly. It is necessary to learn how to masterfully choose from a variety of techniques the most suitable for each case. Initially, remember five important nuances.
- Choose a knot based on color. Bright accessories themselves attract the eye. Therefore, you should not practice complex knots on them. In addition, refraction of the pattern may look unsightly. And on pastel plain ties, intricate variations look quite original.
- Tie exclusively at the neck. Creating knots in your hands or on the table will not lead to a positive result. Initially, put the accessory on your neck. Then start practicing tying. Remember that this is the only way to create a tight knot and maintain proportions.
- Consider the density of the material. It is easier to create a complex knot on simple, thin fabrics. A heavy or wool tie is not conducive to creating complex designs. Therefore, when choosing “powerful” accessories, limit yourself to simple, classic tying methods.
- Stick to proportions. When tying, keep in mind the following nuance: the end of the tie should cover the belt buckle.
- Create a strong knot. An accessory tied carelessly, with a weak knot, looks sloppy and unaesthetic. However, one should not rush to the other extreme. An overly tight knot will not highlight the sophistication of tying, so all your ingenuity will go to waste. Ideally, it should be durable and moderately tight.
To make the knot look elegant, squeeze the tie with your finger lengthwise before tying. Folds should form on the sides. Without removing your finger, tighten the knot. This way you will form a neat and beautiful hole. But this method can only be practiced on light and soft tissues. On woolen, thick ties, the pit will look rough.
Common methods
Do you want to amaze others with your impeccable taste? Then you need to familiarize yourself with the intricacies of choosing nodes. A detailed table will help with this.
Table - Types of knots and their brief characteristics
| Node name | Main features |
| Simple knots | |
| "Kent" | — A slightly asymmetrical knot is formed when tying; — used for heavy, dense fabrics; - goes harmoniously with a classic, narrow collar |
| "Quarter" | — It is a cone-shaped unit; - interpreted as a classical method; - recommended for wide and medium collars |
| "Prince Albert" | - Has a slightly asymmetrical knot; - distinguished by a strict and businesslike appearance; - needs strong tightening; - looks harmonious with medium and button-up collars |
| "Windsor" | — Has an even shape; - does not wrinkle or get tangled (you can easily tie a thin tie); - has a completely symmetrical node |
| "Half Windsor" | — Tied with a universal knot; — used for thick and soft fabrics; - matches with any collars |
| Butterfly | — Tied under a tailcoat or tuxedo; - combines with special butterfly collars, short and medium |
| Complex designs | |
| "Eldridge" | — Tied with a narrow end; - has a large knot resembling a spike of wheat; - blooms quickly (fragile) |
| "Trinity" | — Tied with a narrow end; — has a large knot, so it is not recommended for thin men; - harmoniously suits different collars (shark, button-up, medium, wide) |