Going to first grade for the first time, every child knows that a bright and eventful life awaits him in the future. But remember how it was in the Soviet Union? At the beginning, the guys received the honorary title of October and the first red badge in their lives. Upon reaching the age of ten, the badge was replaced by a red pioneer tie. However, in order for this to happen, it was necessary to study, respect and help elders, and take an active part in public life.
Growing up Octobrists were taught the Pioneer oath, and also developed the ability to tie a Pioneer tie correctly. In those days it seemed like a whole science, but maybe it was so? Let's try to figure it out.
How to tie a pioneer tie correctly
Before we look at the basic methods of tying a tie, let's find out why this technology is so important. The pioneer organization was the Soviet interpretation of the scout movement. The red pioneer tie was a symbol of the main features of the younger generation, which were honored in the USSR:
- Duty to the Motherland;
- Honor;
- Devotion to the state and party;
- Courage.
The tie was tied not with a simple, but with a special knot.
The simplest method was a classic knot, tied twice, with the right end always placed on top. Information. At the beginning, knots were not used to tie a tie, since special clips were in use.
This clip depicted a fire, a sickle and a hammer, as well as the well-known motto of the Soviet pioneers - “Always ready.” However, after some people discovered images of Zinoviev’s enemy in the image, a whole wave of refusals of clamps took place throughout the state. Since then, exclusively beautiful and neat knots have been used.
Characteristics
The tie that the pioneers wore is a kind of neck scarf, made in a red tone. When molten, it has the shape of a triangle. In Soviet times, this accessory indicated membership in the pioneers. All schoolchildren had to know how to tie a pioneer tie.
Despite the fact that the attribute was used specifically by Soviet schoolchildren, it was invented in the United States. In the twenties of the last century, it was customary to tie triangular scarves to scouts. This idea was copied by USSR officials. At the same time, the shade of the accessory was only changed.
Nowadays it is not customary to wear pioneer ties in everyday life. As a rule, they are used when shooting films and staging performances that highlight the Soviet period. Also, similar attributes are sometimes used in summer camps.
Step-by-step diagram in pictures
In order to tie a tie using a clip, as was done in Belarus, Ukraine and other countries of the USSR, you must follow the instructions:
- A red scarf is draped around the neck;
- Next, a special clamp must be prepared;
- Alternately, each end of the pioneer tie is threaded into the holes of the retainer;
- The clamp closes.
This is interesting: How to properly tie a tie with a double knot
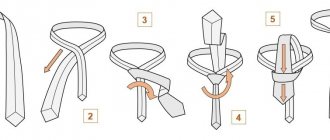
If you want to tie your leader or pioneer tie in the classic way, as they did in the USSR, these step-by-step instructions are for you:
- First of all, the scarf is put on the neck;
- The ends must be crossed so that the right one is on top of the left one;
- The right end is threaded upward through the resulting neck loop;
- The left end also rises up, then is drawn from the right side into the loop;
- Both ends are tightened.
In the picture presented you can clearly see how quickly and simply the pioneers tied their tie. It should be noted that this method is the easiest to tie and in most cases no one had any difficulties with its implementation.
Let's consider another knitting option, which is called cowboy:
- First of all, the scarf is also placed around the neck. Both ends must be crossed, but so that the right end is on top of the left. Next, the right end needs to be pulled up through the resulting neck loop;
- After this, the right side of the pioneer tie goes down, and the left goes up from bottom to top;
- Next, the left side is carefully threaded through the formed eyelet on the right side, and out from the opposite side;
- Finally, you need to tighten the knot. So the real cowboy tie is ready.
And here is another simplest option for how to tie a scarf. In this case, you just need to make two classic knots, but make sure that the right end is always on top of the left.
Important! Before tying a tie, you need to fold its ends once or twice. How to do this is shown in the photo below.
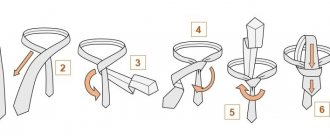
To tie a square knot, follow the instructions below or the diagram:
- As in all other cases, first you need to put the tie around your neck and cross the ends;
- Remember that the right end is always on top of the left;
- Next, the right end is threaded into the neck loop using the “bottom-up” method;
- Then the right side of the accessory is passed behind the left end and threaded into the resulting eyelet;
- Pull both ends to tighten the knot.
This is interesting: Is it possible to wash leather and suede gloves?
Another great way to wear a pioneer tie is the Tie Loop. This design is ideal for various formal events, since its appearance resembles the knot of a classic men's tie. So:
- The tie goes around the neck;
- The ends of the tie are then crossed so that the right side overlaps the left;
- After this, the left end bends around the right in front;
- Next, it is passed through the neck loop using the “bottom-up” method and threaded into the resulting eyelet;
- The ends of the tie are tightened.
Attention! If, after all, sophistication with knots is not for you, we recommend making your own clamp. You can use wood, leather or other available materials.
The manufacturing technology of such a clamp is absolutely simple, and you do not need to spend money on purchasing materials, because everything you need is at hand. So, let's look at the process diagram for making a stylish woven leather clip. Please note that in the picture the black part is the wrong side.
How to tie a red and green Belarusian tie step by step
After the collapse of the USSR, Belarus is reviving the tradition of wearing pioneer ties among schoolchildren. True, now they are painted not in the classic red color, but in red-green. It is these shades that represent the state Belarusian flag. Today, every schoolchild in this country knows how to properly tie a pioneer tie.
The wearing method is almost identical to that generally accepted in the Soviet Union, but it still has its own characteristics. Since the tie is two-color, there should only be one shade per knot. It is unacceptable for it to have two colors at once. In order to tie a tie correctly, perform the following steps:
- Throw a triangular scarf around the neck so that the red (right) and green (left) sides are approximately at the same level.
- The green edge is taken in the left hand and placed crosswise over the red one, and then passed from below so that both corners are positioned vertically: the green one is on top, and the red one is below.
- The green end of the tie is wrapped around the red edge from right to left.
- The same edge is threaded from left to right into the small hole that appears between the two ends.
- The knot is tightened to form a pad.
- The ends are carefully straightened so that they are straight.
If everything is done correctly, the colors of the falling corners match the base. The pad turns out green.
After carefully studying the master classes and practicing a little, you can learn how to make different knots from a pioneer tie. There's nothing complicated about it. A stylish accessory will make you feel like a true patriot or add originality to your image.
How to clean a tie: 6 ways
If, after all, the tie is dirty, and the cost of dry cleaning is comparable to its cost, then you can use the following tips:
- Stains from alcoholic drinks on a tie should be immediately sprinkled with salt and then washed with water.
- Carbonated soft drinks can be easily removed from ties using plain cold water.
- If your tie is stained with blood, do not try to wash it with hot water - it will only fix the blood stains on the fabric. To remove this type of stain, it is recommended to use a stream of cold water. If this does not help, then drip a few drops of ammonia onto the stain.
- Traces of chocolate, as well as tea and coffee without milk, are eradicated with water and soap.
- Fountain pen ink. Inks of different compositions clean differently. Try softening the stain with cold water, all-purpose stain remover, or lemon juice.
- Lipstick. Fight it with stain remover, then with water and soap.
Don’t forget: you can’t wash (let alone wring out) a tie!
What is a pioneer tie and what was it a symbol of?
There is no need to explain how to properly tie a pioneer tie to all those who were born in the early 80s. Most likely they will never forget how to do it. But today’s youth, who are interested in the pioneer tie, which has already become a vintage accessory, should explain and even clearly show (photo instructions will help) how to tie it correctly.
But first, let's talk about the tie in principle. During the Soviet era, it was considered the main confirmation of its owner’s membership in the pioneer movement. The young pioneers, honored to bear this title, put on their ties with pride and honor, realizing all the responsibility that fell on their shoulders.
It was believed that the pioneer's bright red tie embodied the colors of the Soviet banner. The ability to tie it correctly was highly valued. Moreover, each pioneer paid attention to the care of his tie every day, washing and ironing the accessory on time.
Not a single pioneer schoolchild allowed himself to appear outside the threshold of the house in a crumpled or dirty neckerchief; moreover, the teacher reserved the right to expel a student from class if his appearance did not correspond to the norm. The loss of a tie was considered a real grief, mixed with an unimaginable shame.
Half Windsor knot
It would seem why it was necessary to create a tie knot, which is extremely similar to the already existing method of tying a tie. But in fact it is necessary, and here’s why:
- this option for beautiful product design takes less time;
- this method is easier for “beginners”;
- The half-Windsor knot looks much narrower and more elegant than its “big brother.”
And to tie a neckpiece in this way, you need to:
- place it on the neck (the longer and wider end is on the left);
- place the left side on top of the right;
- pass the wide part under the narrower one;
- pass the tip of the wide part of the tie from the outside into the tie knot and bring it out from the inside to the right;
- circle the narrow, short part of the product with the wider side;
- place the tip of the wide part from the inside under the knot in order to insert its “ring” made in the previous step from the outside.
The diagram shows how to tie a Half Windsor knot on a tie:
History of the pioneer tie
People first started talking about a neck brace for pioneers in 1922. At that time, there was a trend in the United States to tie green scarves to children to signify their Scout status. The Soviet government decided not to “reinvent the wheel”, but simply adopted and implemented an idea that was successfully working abroad.
Naturally, red was chosen as the shade of the accessory for the pioneers, because it was the main color of the Communist Party and the flag of the USSR.
The pioneering phrase “Always ready” is also in a certain way connected with this part of the form. The fact is that initially the attribute was not tied, but secured on the shoulders using a special clip. It was engraved with the phrase “Be Prepared!” and also depicted a hammer and sickle and a fire of five logs and three tongues (Soviet symbols).
Somewhat later, in the 60s, ties began to be tied around the neck in various ways. Different models of this accessory appeared, but they all had one thing in common: the red color and the need to create a knot on the neck.
The tie was ceremoniously tied for Octobrists who had reached the age of 10. From that moment on, they were considered pioneers and were very proud of their new (adult) status. The item of clothing had to be worn every day, so you had to learn how to quickly and accurately attach the thing to your shoulders.
Interesting Facts
Pioneer organizations still exist in some countries. The pioneers of the GDR wore blue neckerchiefs. The DRA pioneers wore ties with a tricolor border. Pioneers of Belarus wear two-color ties in the colors of the flag of this state. Pioneers of Cuba wear blue and red ties depending on the age of the student. During the Soviet Union, a tie was also worn in the pioneer camp. At the end of shifts, it was a common custom to write addresses and wishes to comrades on ties (nowadays they write on T-shirts). The ability to paint a pioneer tie with drawings was highly valued. Every pioneer had a photo from the camp with this decoration. Ties were painted after joining the Komsomol and replacing them with badges.
Choosing the right node
To tie a tie correctly, it is not enough to memorize all the possible ways to create knots. You still need to learn how to combine them correctly.
So, for example, woolen neck accessories, which are usually worn in the cold season , are recommended to be tied only with maximum simple knots. After all, a large pile of fabric, which, on top of everything else, is also puffy, looks sloppy.
On the contrary, silk ties tied in a quadruple way lose their elasticity very quickly. Therefore, it is better to design them with “semi-official knots”, for example, half-Windsor or double.
What else do you need to know to avoid making a stylistic mistake?
- The smaller the distance between the shirt collars, the narrower the tie knot should be.
- The wider the lapels of the jacket, the wider the knot on the product can be.
For information : the larger the man, the larger the knot of his tie should be. The same scheme works in the opposite direction.
- The shorter the owner of the neckpiece, the larger his tie knot should be and the shorter the length of the already tied accessory should be.
- The younger the representative of the stronger sex, the simpler the knot on his neck piece should be (the exception is when a child or young man attends an event with a strict dress code).
For example, children's neck accessories are usually tied with a quadruple knot or a special knot for ties with an elastic band. The pioneer tie is tied with a knot vaguely reminiscent of a half-Windsor knot .
Legend of the tie
At the time the pioneer organization was founded, its members did not have any distinctive signs. There is a version that during one of the congresses or solemn rallies, working women took off their scarves and tied them around the necks of their children, bequeathing them to keep them and be proud of them, since they are the same color as the banner.
Contrary to this legend, some historians argue that the idea of using a tie as a distinctive sign was borrowed, like everything else in the pioneer organization, from the English scouts. Only the ideologists of that time were able to add some special meaning to the symbolism that the pioneer tie embodied. The USSR thus created the initial stage in the formation of communist consciousness in society.
How to care for a tie: 5 important tips
If not properly cared for, a tie can quickly lose its attractive appearance and will have to be thrown away. In order for it to serve you faithfully, you need to properly care for it.
- Be sure to untie your tie after you take it off. This will help avoid “twisting” of the fibers and causing wrinkles. You need to untie it in the reverse order to how you tied it.
- The tie must be stored hanging. There are special hangers for this, but a regular wardrobe with clothes will do. The main thing is that other things do not touch the tie. After using the tie for a day, it is advisable to let it “hang” for 2-3 days so that the wrinkles are smoothed out.
- You cannot iron your tie. Well, if you need to smooth out any wrinkles that have appeared, carefully roll up the tie and leave it like that overnight. By morning all the folds will straighten out. If you decide to go over it with an iron, inserting a cardboard template, then remember that friction will fade the gloss and damage the fibers. After that, your tie will go straight to the trash bin.
- You can't wash your tie either. Washing deteriorates its appearance: wrinkles appear, fibers are pulled out and the color becomes duller. If you need to remove stains, only dry cleaning will help you.
- Try not to allow the tie to come into contact with the seat belt: the belt creates dirty “rubs” that are often impossible to get rid of.
When and how it appeared and how it was different
The so-called leader's tie was born in 1922. This date is his official birthday. The very idea of the accessory was borrowed from the scouts, only their main color was green. And, if everything is clear with the red color of the pioneer scarf, then the shape symbolized the unity of three main directions:
- communists;
- Komsomol members;
- pioneers.
This explains why a particular pioneer tie knot was chosen to create the triangle. It was important to end up with absolutely equal length parts with a symmetrical knot placed exactly in the center.
After its final consolidation in 1960, the pioneer tie was changed several more times. The fabrics (from cotton to silk acetate) and fastening options changed. Initially it was a clamp, but over time they settled on a standard unit.
In the 1960-1980s, ties were ceremoniously worn at the school line. Usually this mission was entrusted to the school's pioneer leader. The event was accompanied by marching music, each future pioneer took an oath, and in turn, the pioneer leader, putting a scarf around each person’s neck, taught them how to beautifully tie the correct knot. In general, it was not at all difficult, so even junior schoolchildren quickly coped with the task, continuing to hone their skills as they used the accessory.
It was generally accepted that an incorrectly or sloppily tied tie would be the beginning of an equally incorrect, chaotic day. A loose knot was a symbol of the same weak-willed pioneer, while a strong and neat knot symbolized the reliability and determination of a pioneer, always ready to answer the call “Be ready!” in the affirmative.