The width of men's ties varied from one decade to the next. Throughout the world in the 1960s, it was fashionable to wear thin ties; closer to the 1980s, ties over 4 inches (10 cm or more) became popular. The history of changes in the tie is very varied.
Today, the most common ties are 3.25 to 3.75 inches (8.25 cm to 9.53 cm) wide, but thinner ties are no more than 2.5 inches (6.35 cm) wide. .) are increasingly gaining popularity among young people.
How to tie a thin tie is becoming an increasingly pressing problem, as the thin tie comes out of “fashion circles” and becomes an attribute of a man’s everyday clothes and wardrobe.
In general, there are no special technologies that allow you to tie a thin tie. The principle of forming a knot is exactly the same as when tying a regular tie. Therefore, you can safely use the guide where you will learn how to tie a tie.
At the same time, when purchasing a thin tie in a store, you cannot just wear it with a casual classic suit or jacket. Therefore, in this article we will talk about the features of using a thin tie and what knots are best for a thin tie.
There must be proportion in everything
Follow the basic rule - the width of the tie should match or be very close to the width of the jacket lapels (for what lapels are, read the article on the classic men's suit). Single-breasted European models (Italian and English models in particular) with one or two buttons are perfect. You will not have any problems choosing a style, and you can easily select a tie with a width of 1.5 - 2.5 inches (3.8 - 6.35 cm).
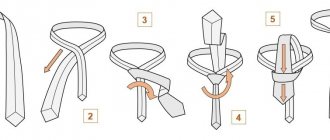
Four
The first, and one of the most suitable ways to tie a “herring” is a four, or as it is also called, a quadruple knot. With it you can quickly and beautifully tie a narrow tie. In addition, if you have a wide neck, this method will perfectly hide this disadvantage.
- Take the wide side and place it on the left for convenience. Bring the thick end lower than the narrow end.
- Place the working end behind the narrow one and make a full turn - a loop is formed.
- Place your fingers inside the loop and pull the long part of the accessory up through it from the inside.
- Pass the wide end through the knot and tighten with the narrow end.
Interesting! The "Four" knot was invented by young Englishmen and comes from the word "Four-In-Hand" (Four in hand). This was the name of their club because they drove four-horse carriages. Due to the strong wind, their neckerchiefs and ties quickly came undone, so a way to tie the “Four” came to the rescue.
How to tie a thin tie
Partially, here too it is necessary to follow the proportions and harmony of sizes. A thin tie looks better if it is tied with a small knot. Ties that are not very wide are generally more suitable for a casual dress code than a formal style, so the knots can be a little unkempt and slightly loose.
THIN TIES IN OUR ONLINE STORE
GO TO STORE
The best knots for a thin tie can be considered “Quarter” and “Half Windsor”. Below are detailed step-by-step diagrams on how to tie a thin tie with these two knots.
Quarter Knot
Half Windsor Knot
Step-by-step description of the process
For everyday bows, simple knots are usually used, and for important events, more complex and formal ones are used.
The most commonly used everyday options are:
- light or simple knot:
- Pratt node;
- Windsor knot.
Complex knots (butterfly):
- Elridge node;
- Trinity node;
- Christensen knot;
- Wismar node.
The last options listed require more insight and experience.
Light knot
The pattern for tying a light knot will be as follows:
- We unfold the product with the wrong side up, place the wide end of the tie on the left shoulder, and place the narrow end on the right;
- we bring the wide end to the right, the narrow end to the left above it;
- We throw the wide end over the narrow one in the form of a loop, pull it through the neckline onto the chest, insert it into the resulting loop at the narrow end from top to bottom, tighten the knot to the required diameter.
advertising is not displayed
Pratt knot
The Pratt knot will differ in that when the wide part is thrown over the narrow part, the loop is wrapped towards the neck from top to bottom, only then from right to left, thus forming a double knot.
Double Windsor
The Double Windsor got its name from the fact that, in addition to the usual throwing of the wide end over the narrow one and wrapping the loop to the neck, a double wrap around the narrow part of the tie is used.
Butterfly
The butterfly has always decorated costumes at official events and holidays; for everyday wear it is usually not tied. The instructions will be as follows:
Elridge is perfect for an important social event; for a business meeting it will be too smart;
Accessories paired with a thin tie
Choose a plain, thin tie to pair with a great fitted Italian or British suit, complemented perfectly (style-wise) by a tie clip and/or pocket square. In my opinion, it is best to choose a tie clip made of silver or steel (stainless or chrome plated). Obviously, a thin tie is lighter than a regular tie, and without a tie clip, it will flop around in all directions, which is quite inconvenient. You can learn more about tie accessories in my previous post.
TIE CLAMPS IN OUR ONLINE STORE
GO TO STORE
So, having figured out how to tie a thin tie and which knot is best to use, we can conclude that everything needs proportion and harmony of sizes. However, this should not scare you, but rather encourage you to take a closer look at the new trends in modern fashion for men's suits and jackets, where the thin tie is so firmly established.
I wish you good luck in your experiments!
Types and choice of clothes for a bow tie
For most guys, a bow tie immediately evokes fear of being in an awkward situation. But there is no need to be afraid, there is always a time and place to wear this sophisticated accessory. Here are some examples of when it is correct to wear a bow tie:
- wedding or formal event. In this case, the outfits are often more formal, so you shouldn't be afraid of looking overdressed. In addition, most likely there will be many men in bow ties in the crowd;
- At work. After a certain amount of time has passed, you can determine whether this type of tie would be appropriate in the office. You can opt for a dark blue or gray butterfly with a thin stripe;
- at night time. A night out on the town would be a great excuse to try wearing a bowtie. For such an occasion, a casual style is suitable - a shirt with buttons, a vest and a bow tie. This is exactly the time to try a butterfly with pretty patterns or fun colors.
Now many men love to wear such ties. The biggest problem for them, however, is not only that they do not know how to tie a bow tie and what to do with it, but also how to wear it.
Basic rules for combining bow ties and other elements in clothing:
The bow tie. These ties pretty much follow the same rules as any other accessory, and rule number one is to wear a bowtie that is proportional to your body size. Another point to consider is the shine of the fabric. If the bow tie is shiny, it is formal, while matte bow ties are more casual.
Expert opinion. Helen Goldman. Male stylist and image maker. Black and white bow ties are intended exclusively for special occasions. A bowtie is a must have for a more colorful look in your everyday outfit and is a great way to add a pop of color to your outfit and enhance your look.
When creating your image, you should adhere to the recommendation that the shirt and bow tie be of two different colors. A good combination is considered if one of the elements is in a neutral color, and the second is brighter. Neutral colors are considered to be black, white, gray, ivory, khaki, dark blue. To make combinations safer, you can combine colors that are close to each other, such as red and orange or blue and purple. An alternative is to combine completely opposite color spectrums, such as red and blue or green and orange.
Another option for a bow tie combination is to wear one part in a solid color and the other with a print. For example, if you wear a purple shirt, you can decorate it with a butterfly that has a light purple, blue or light green pattern;
Two prints. To wear two patterns in an ensemble at the same time, you should remember the rule that the two print models must be of different sizes. This means that when wearing a shirt and bow tie with a stripe print, one part should contain a thick stripe and the other should contain thin stripes. This applies to any type of pattern, texture or print;
In winter, a gray cardigan or sweater goes well with a classic blue trouser suit, then you should choose a blue or gray-blue bowtie with a matching handkerchief in the front pocket;
With a deep blue suit and a light blue shirt, you should take a dark blue bow tie with yellow and red thin stripes;
Another win-win option is velvet. This ensemble is suitable for a wedding. Velvet is a great fabric choice for skinny guys. Black classic trousers with a black vest and a velvet jacket of the same color are suitable for this.
For a bow tie and handkerchief you need to pay attention to silk fabrics
For reference! A pattern is a symmetrically repeating design, a print is an image that has a clear composition, and a texture is a pattern that can not only be seen, but also felt.
Windsor knot
This method and type of knot is named after the Duke of Windsor, who apparently preferred it to all others. In addition to the fact that it is ideal for special occasions, this knot is also the most comfortable - it does not tighten the collar of the shirt, allowing you to freely loosen it and remove it without untying it. The main thing you need to know about this method is that the tie for it must be 4 centimeters longer than the standard one, so that it can go down almost to the belt.
Cavendish
The next way to properly tie a narrow tie is a knot called “Cavendish”. It got its name not from the famous physicist, but because of the scientists Thomas Fink and Yong Mao, who proved that you can tie a tie in at least 85 ways. At first glance, it may seem that this method was created only for the most gifted, but in fact it is an elementary repetition of the “Four” knot twice. After tying, the knot will have a slightly asymmetrical triangle shape.
- To tie a tie correctly, take the narrow part in your right hand and the wide part in your left.
- Cross the working segment beyond the narrow one.
- After this, turn the working part around the narrow one, all the while holding the loop with your fingers.
- Lift the working part up, threading it through the neck loop.
- Now pull it out and lower it down through the loop created by the knot
- Adjust the loop by pulling the narrow end.
Windsor
The next way to beautifully tie a narrow tie is the Windsor knot. As many people jokingly note, tying a knot will be quite easy if you choose from the list of the most difficult ones to tie. Using this knot you can make a good impression, as it will look voluminous and powerful. In fact, tying this knot is quite simple, since it consists of several repetitions of the same action.
- Cross the thick edge over the narrow one.
- Then wrap it around the resulting loop.
- Pass the thick piece behind the narrow one and wrap it around the neckline again (turn the wide end around twice).
- Place a wide piece on the resulting knot and wrap it around the loop again from the inside.
- Thread the wide end through the loop and tighten.
Pratt
We suggest tying a narrow tie using the “Pratt” method - named after Jerry Pratt, who works for the US Chamber of Commerce. This unit is also often called the "American" or "Shelby" unit. The appearance of the knot is suitable for both an official business meeting and daily wear in the office, and tying it does not take much time.
- Turn the tie over to the wrong side.
- Bring the long section below the narrow one and lift it up.
- Pass it through the inside of the neck loop.
- Make a half turn with the thick end from right to left.
- Lift it up again and bring it through the loop below that appears from the knots.
- Tighten the accessory using the narrow edge.