An elastic tie is lightweight elegance for kids. Its advantages are obvious. The student can tie the accessory without outside interference. In addition, during the day the item will not cause a feeling of discomfort; you will not have to constantly adjust it. An elastic tie is easy to care for. However, in force majeure situations, if a thing comes undone, you need to have an idea of how to fix it correctly.
Suitable materials
Various materials can be used to make a tie. The following fabrics are considered the most practical:
- wool;
- jacquard;
- atlas;
- silk.
It is recommended to choose natural materials. When using synthetic fabrics, the knot no longer looks so elegant.
You also need to take into account the time of year when the stylish, modern accessory will be used. In winter, wool models will be the best solution. Silk and satin are suitable for summer.
Tie tying technology
It is extremely important to understand how to tie a tie with an elastic band. It is worth noting that you will not have to perform such actions regularly. It is enough to give the product the desired shape once and fix it in this position with a thread. In the future, the accessory is put on without any effort. The child will be able to cope with this task even on his own.
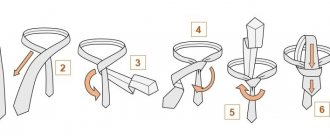
To tie a children's tie with an elastic band, you need to follow the following instructions:
- Place the tie wrong side up.
- Place elastic band on top.
- Throw the tie over the elastic band placed on it, pointing it towards you.
- Bring the thin part to the left and pass it under the elastic then down.
- Tie as neat a knot as possible, pulling out both ends.
- Assemble the lower elements of the assembly and form an upside-down triangle on the outside of the product.
Step-by-step photo instructions will help you figure out how to tie a tie with an elastic band. The scheme is quite simple and understandable. Therefore, there is no need to additionally watch training videos to learn the popular way of performing such actions.
All that remains is to secure the knot with threads. Thanks to this, you will no longer have to resort to re-tying your tie even after washing. It maintains the correct shape. You just need to straighten the edges.
What is an accessory?
The tie consists of two parts - a finished knot and an elastic band sewn to it on both sides. Instead, there may be a thin braid that is fastened with a clasp or button at the back under the collar. This option is called a regatta. Its main advantage is that you don’t have to think every time about how best to tie a tie with an elastic band. Just fasten the clasp. This saves time and effort. The regatta is equally suitable for men and women. There are different options for tying tie knots:
- classical;
- bow;
- butterfly.
The regatta tie is suitable for people of different ages; it can be used as an addition to the suit of an adult man, a teenager and a schoolchild.
Due to the convenience of fastening regattas, today they are used in school uniforms and employees of various departments. It can be worn to any formal, formal or festive event.
Butterfly
Bow
Classic
Master class on self-production
It is not at all necessary to purchase a tie for your child in preparation for the September 1st holiday. You can easily sew it yourself. A step-by-step master class will help you cope with this task.
To create an accessory at home you will need the following tools and materials:
- suitable fabric;
- interlining;
- scissors;
- paper;
- ruler;
- pencil;
- threads;
- rubber;
- sewing machine.
When everything you need is already at hand, you can safely get to work. The first step is to create a pattern for a tie with an elastic band. Its length is 25.5 cm and its width is 7 cm. However, these dimensions can be changed at your own discretion if desired. In this case, the pattern of the tie with an elastic band will be slightly different.
A rectangular piece made of non-woven fabric and selected fabric is cut out without allowances. On the other two elements it is necessary to indent one centimeter. Taking it into account, we cut these details.
The non-woven fabric is then ironed. After this, you need to fold the corner and the main part of the future tie together with the front side. This design is sewn on a sewing machine.
Now you should cut the corners, turn the workpiece inside out and iron it thoroughly.
The resulting part is folded lengthwise and immediately afterwards stitched. After this, the workpiece is turned inside out, straightened and ironed again.
The next step is to create a node. To do this, you need to fold the rectangular element lengthwise and stitch it on a machine, forming a kind of tube. After this, the part must be turned out. It is ironed so that the seam is in the center of either side.
The strip is folded in the same way as shown in the photo and then cut along the line indicated in the photo.
By performing several stitches, an elastic band is basted to the product, and all the parts are assembled together, as shown in the photograph.
Now you need to stitch everything and then thread the tie into the created knot.
All that remains is to tighten this knot and you can evaluate the result of the work done. The school tie is already completely ready at this stage. You can safely offer it to a boy to try on.
Correctly tie a short zipper for a child: photo
The zip tie was first used by yachtsmen. They didn't have time to tie this attribute, so they sewed a zipper on the back. This accessory is usually worn by office workers. It is also suitable for schoolchildren for daily wear.
This zipper accessory is elastic and easy to secure. Models for different professions are available for sale.
Attention! The knot of such a tie is completely closed. Opens together with the shirt collar.
The zipper on this item can be active, or it can be decorative. In the first case, its shade is identical to the shade of the accessory and the zipper is practically invisible, in the second, it is deliberately highlighted.
A zipper divides the item into two halves, which are fixed on the shirt. If the zipper is closed, the tie looks traditional. A knot is not tied on the accessory. It is an imitation with a latch that is easy to fasten.
To wear such a pattern to a boy for school, he will need a special shirt. To fasten it, use the zipper on the tie.
The accessory node is located under the shirt collar and is a pentagon. The knot takes up the entire space between the edges of the collar and extends beyond their boundaries, which allows you to keep the corners of the collar in one position.
Information. A tie with a zipper is most often worn by schoolchildren. It is easy to put on and attach to clothing. In addition, the item allows you to create a festive look without extra effort and expense.
A tie is an integral part of a school suit. You can’t come to a matinee or school assembly without this accessory. But at the same time, this attribute should not create inconvenience when worn. Correcting the position of an item should not violate the integrity of the image. A zip tie helps solve this problem.
This is interesting: How to tie a men's tie correctly - common methods
Master class on sewing a butterfly
When making such a model, the work is conventionally divided into three stages. On the first one, a pattern is made. The second involves preparing all the details. At the third stage, all elements are stitched together. Each of these points should be considered in as much detail as possible.
The first step is to create a pattern. In this case, the work does not cause absolutely any difficulties. You just need to prepare three rectangles with the following parameters:
- 8x13 cm;
- 13x23.5 cm;
- 11.5x22 cm.
It is most convenient to carry out these manipulations on an ironing board. In this case, the patterns are fixed on the surface with pins.
Now you need to attach the resulting pattern to the board and carefully cut out each element on the fabric. As a result, there should be three triangles of different sizes.
The largest element is taken to work first. It must be folded lengthwise and ironed to smooth out the fold. After this, the workpiece is straightened and folded again, but this time across. In this case, the contours of the fold and the edges must match.
Exactly the same manipulations should be performed with the second edge. It is folded strictly along the fold line in a vertical direction in a folded form and ironed. At the next stage, the fabric is overlapped on the second side.
Similar actions now need to be performed with a medium-sized part. The smallest element is folded lengthwise, then unfolded and folded again along the edges to the fold contour. In this form, the workpiece is ironed. In this way, the fabric is folded until a narrow ribbon can be created. Each of the folds must be ironed.
At this stage, the butterfly consists of individual elements. They need to be combined into a single whole. In this case, it is necessary to sew the middle element with a regular seam and tighten it a little. The same actions are performed with the largest part.
You can sew the edges of the smallest piece using absolutely any seam. Even a basting one will do. The large and medium element are now connected and stitched. A kind of ring is formed in the center, created by their third part.
Now you need to sew an elastic band to the bow. To do this, measure the required length, cut the tape with scissors and pull it into the ring. In order to be able to adjust the width in the future, it is recommended to additionally equip the accessory with a beautiful clasp.
Windsor style
- We wrap the accessory around the neck with the seams inward. The wide part should be on the right, lowered to the level of the strap.
- We make the parts crosswise so that the wide one is on top.
- From under the bottom we insert the wide part into the ring on the neck and pull it out so that the seam is on the outside.
- We lower the wide part down.
- From the reverse side we stretch the wide part and pull it to the right so that the seam looks outward.
- We insert the wide part into the loop on the top of the neck.
- There should be two knots around the neck. Pull the wide part to the right.
- We insert the wide part to the right in front of the two knots, and the end should point to the left.
- At the bottom we insert the wide part into the loop on the neck so that the seams face outwards.
- We insert the wide part into the knot of the tie from above.
- We construct it so that the knot becomes tight and straighten it.
Additional recommendations
A classic silk accessory must be securely fastened with a knot. It is additionally recommended to stitch it so that wearing the original product does not cause any difficulties. In this case, the elastic band deserves special attention. It comes in several varieties.
The simplest option is most often used. True, it is also possible to use an elastic band, which is initially already looped. As it wears out, it needs to be replaced. This method of fastening is considered the most affordable and simplest.
Also, men often choose accessories with ribbons equipped with fasteners under their jacket and shirt. The peculiarity of this product is the ability to adjust the length depending on the volume of the neck.
It is useful for everyone to know the rules for wearing and tying a male accessory. Having learned how to put it on, you can go further and start making such a product yourself. The process is quite simple. It does not require large material and time costs. As a result of the efforts made, it will be possible to create a unique thing. You can choose absolutely any color for it. For example, a black or blue accessory would be an excellent solution. It can be either wide or narrow, made in various styles.
"Trinity"
The Trinity knot is very original and unusual, which will immediately make you stand out. But tying it is not so difficult, all instructions and diagrams are below.
Trinity node diagram
Video instruction.
How to choose a pattern on a tie to use the classic method of tying a tie knot? Depending on the upcoming event that you need to attend, you need to decide early on which patterned prints will best suit a formal or informal dress code. It is recommended to read on the Internet about the designs that appear on ties. After this, it is advised to follow the recommendations that advise in what cases it is advisable to use certain ties.