Over time, the sleeves of knitted sweaters often stretch out. We have to figure out how to shorten the sleeves of a knitted sweater without cutting them, tucking them to the desired length. But over time, the number of layers of sleeve folding increases, resulting in a rough, thick cuff. Cutting it is not at all easy, given that the loops of the knitwear can come down during work. The finished shortened sleeve should remain elastic along the lower edge, so hemming it with a traditional non-stretch stitch will not work.
Reduce the size of a wool sweater
First you need to determine the type of material from which the jacket is made. There are materials that shrink significantly when washed. So it’s enough to wash the item and not sew it up. These types of fabrics include wool, cashmere, fleece and some types of knitwear.
If the fabric is not of this type, you can still try using a special washing method.
- To do this, soak the item in hot water for one hour, the time is approximate, not exact. You don't have to add powder, although for wool you can use a wool product (preferably a liquid product).
- Then wash it in the machine on the delicate cycle or by hand in water at a temperature of at least 60 degrees. Attention! If you try to correct the size of a sweater in the washing machine, it may not shrink evenly, the wool may change its structure and the overall appearance may change.
- Automatic spinning also contributes to fabric shrinkage! Be careful with delicate fabrics. However, if the jacket is made of particularly delicate fabric, then this should not be done so as not to damage it. Delicate fabrics include cashmere and angora wool.
- Do not hang the item washed in this way on a dryer or line, but place the jacket on a fabric that perfectly absorbs moisture, straighten it and leave it to dry.
After such actions, the jacket should decrease in size. Materials that do not shrink when washed will need to be sutured. This can be done in several ways. To reduce the sleeve part, you need to unravel the seams in the place where you need to remove the excess, and then stitch again, but with a larger margin.
You can also change the size of the sweater by adding darts to it. This method is good if you also want to slightly change the style of the product. Usually darts are made in the waist area. On the wrong side of the sweater, outline the lines of future darts. A mark is made along these lines, after which the jacket needs to be tried on.
If the size is back to normal, then the dart lines can be machine stitched. In addition, you can narrow the waist area by reducing the size of the sweater at the side seams. To do this, simply make a running stitch parallel to the existing seam.
Advantages and disadvantages of the noodle dress, who suits the style
Most women at least once in their lives have a question: how to shorten a dress? There can be many reasons for this. Here are some of them.
- On a thinner figure, the item fits looser, making it longer.
- An outdated model can be revived by making it shorter.
- Boring length of the product.
- Change of style.
If you have chosen a dress to shorten and made a firm decision to modify it, you need to know the main points, using which you will get an excellent result. This is especially true when you need to shorten quickly. We'll tell you how to turn a long dress into a short one.
What to combine with
The noodle dress is a universal option for almost any occasion: be it a date, workdays or a holiday celebration. You just need to know a few rules that will make combining such an outfit with other clothes much easier.
In order not to make a mistake and choose a dress that will look good on your figure, follow these recommendations:
- A noodle dress made of fabric with added elastane is perfect for pregnant girls. This fabric has excellent stretch, is pleasant to the touch, and very soft;
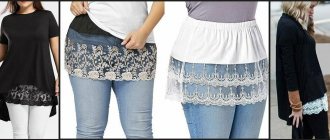
- A long noodle dress below the knee is contraindicated for girls with short stature or disproportionately short legs. It visually “cuts” the leg just above the ankle, making it 4-5 centimeters shorter, which reduces height;
- A noodle dress with a slit at the back or side is perfect for a romantic date or photo shoot and will add a sexy, feminine feel to your look. For a winter outfit, the cut should not be more than 10-15 centimeters. Bare thighs will look out of place in winter weather;
- For girls of short or medium height, it is better to choose an outfit that is knee-length or slightly higher in order to balance the figure and make it more proportional;
- A short-sleeve noodle dress is suitable for autumn-spring or summer; it will look beautiful with heeled sandals, pumps or platform sandals;
- A dress with long sleeves is perfect for the winter period; it will look appropriate both at a business meeting and at a birthday party.
If you don’t have much time to choose an outfit, and the desire to conquer everyone with your sense of style is endless, you can draw inspiration from ready-made looks using a noodle dress as the main element:
- To create an office look, a noodle dress can be combined with jackets or blazers made of thick, textured fabrics. Pumps and mid-heeled sandals are perfect for this combination. Accessories include stud earrings or a watch on a wide strap;
- For a bold, unusual look, a noodle dress is combined with a leather jacket, flat boots, and massive jewelry in the form of chains or bracelets;
- For an autumn look, you can add a wide belt to match the dress or a contrasting one, high-heeled boots, a coat with a zipper or buttons. A shawl or scarf, originally tied around the neck, will look beautiful;
- For a winter look, you can add leg warmers or thick leggings to the dress if the dress is above the knee length. Leather gloves will be an original addition.
Using these simple rules, choosing a noodle dress and creating a wonderful look with it will not be difficult!
Beautiful colors and shades
The choice of noodle dress color directly depends on the woman’s color type, her figure and taste preferences. But there are also classic options suitable for almost any occasion:
How to shorten the length of a factory sleeve
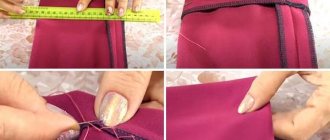
Unravel one row in the middle of the fabric, carefully pulling the thread out of each loop. Gradually gather the opening loops of the cuff one by one with a needle onto a thick thread. This will separate the cuff from the main fabric.
When the cuff has completely separated, I try on the sweater and once again determine how long to shorten the sleeve, and only then separate the excess part in the place where the mark was made, just like the cuff.
How to reduce sleeve length without cutting
Not all women want to cut off the material on their sleeves. Is it possible to reduce the length without cutting? Try this procedure:
- Measure the required sleeve length, fold, baste, and iron.
- Fold the bottom edge so that there is enough space to insert a wide elastic band.
- Insert a wide elastic band. You will get some really cute cuffs.
The stretched sleeve can be shortened through the top. To do this, the sleeve is evaporated and, raised by the required amount, sewn in again. Excess fabric along the edge can be left inside if it is not bulky. You can cut off the excess by processing the seam allowance with bias tape along with the armhole allowance of the front and back.
The first option is the easiest to implement: it is better to take a wide elastic band and apply it thickly to the sleeve. Get a stylish cuff.
This option can be implemented not at the very edge of the sleeve, but a little higher, at the 3/4 level. In this case, you will get an imitation of natural gathering, as if the sleeves were naturally rolled up. The elastic band in this version is fastened with hidden stitches, manually.
We reduce the stretched collar (neck) by crocheting
Another thing I didn't like about this sweater was the collar. At first it seemed normal, but when worn (I wore it a couple of times at home), it stretched so that it could be worn on one shoulder.
Neck too big
But I want a normal neckline. Therefore, I simply crochet it, slightly tightening it in those places that I want to reduce. I use the same threads that were left after cutting the bottom of the sleeve.
Stretched neckline reduced by crochet binding
Another jumper's collar is fine, but the sleeves need reworking.
The neckline on the pink pullover suits me
We do exactly the same as with the previous one. Unravel the bottom of the seam.
We begin to unravel the seam
We take out the thread, cut it, separate the knitted fabric, unravel the lower part, winding the threads into balls. Crochet it.
Here I decided to knit several rows and finish with a scalloped edge, or picot. Simple and modest. The knitting itself is openwork. I want the bottom to be narrower at the wrist, so I knit it tightly.
Shortening the sleeves of a pink pullover
Initially, the cuffs were tied with an elastic band, but you can immediately see that it was of little use. Therefore, I simply made the bottom of the sleeves narrower; the arm will fit smoothly; you can also roll up the sleeves if you wish.
It seems like I always shorten my sleeves almost the same way, but it still turns out a little differently!
Sweater decor - alteration and decoration of knitted clothes with ribbons
If you are happy with everything about a sweater, but you want to modify the item, update it, decorate it, then this post talks about a simple but unusual original decoration of knitwear. Namely, ribbons. The color, thickness, and texture of the tapes can be different, and the final result depends on them.
Similar articles:
Machine embroidery of a sweater with flowers using free-motion technique Knitted and crocheted slippers with description - 4 models How to decorate a knitted sweater with beads with examples Bottle decor with crocheted napkins with beads Toys with patterns - a bear and a hare from a knitted sweater Crochet toys for beginners - bear, monkey Knitted hare, crochet egg warmers-covers for the kitchen Openwork crocheted blouse with sleeves made from motifs for the summer, diagram...
If the sleeves are long, what should I do?
Every person has knitted items. They are comfortable, practical, and keep you warm in cool weather. But the problem is that their sleeves often stretch or sag.
It's okay, they can be carefully hemmed. Knitted fabric differs from ordinary fabric in its structure, so you need to be patient in order to beautifully process the bottom of this part.
If a machine-knitted sweater has long sleeves, then we will do this work.
- On the product with cuffs, mark the new length. For example, you need to shorten it by 10 centimeters, measure 10 centimeters upward from the cuff with a ruler, draw a cutting line with chalk, leaving 1-15 cm for sewing on the cuff.
- Cut off the cuffs and sleeve along the marked line.
- We put a needle on the machine for sewing knitwear, selecting the “knitted stitch” function. If there is no such needle, then we leave the same needle, put a “zigzag”, the width of the step is 1-2, and the length is 2-3 to get an elastic seam.
- We remove the front part of the car and put the sleeve on the protruding part. We process the cut part.
- If the sleeve is too wide, step back 1 cm from the edge, sew a line in wide increments, and tighten it to the required size.
- Place the cuff face to face on the finished edge and sew with a zigzag stitch.
- We process the cuts using an overlocker or by hand.
Little tricks for repairing knitwear
Short women often face this problem: the long sleeves of their favorite dress make it difficult to wear this product. They need to be hemmed using different techniques.
Blind seam
The blind seam, made by hand, looks great.
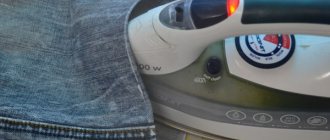
- First, bend the sleeve to the required length, iron it without smoothing the fabric, but applying the iron so as not to stretch the stitching.
- Then sew a basting stitch.
- Next, choosing one of the hidden seams, fold the sleeve of the dress.
Oblique seam
A running bias stitch is perfect for holding layers of fabric together. The needle goes from top to bottom or bottom to top.
The best choice is a seam where small spaces are left between short stitches.
Seam, needle forward
You can hem this part with a seam similar to machine stitching. This is the most reliable of the hand stitches:
- Insert the needle into the tissue, then after 5 mm bring it forward.
- Insert the needle again, stepping back from the needle exit point by 3 mm.
- Pull the needle out at a distance of 6 mm (= double stitch length).
- Then bring the needle to the point of the first needle withdrawal and bring it out again at a distance equal to twice the length of the stitch, continue in the same way from right to left, as in the figure.
Another type of stitch, which is performed from right to left, will help to hem unnoticeably.
Goat
The finishing seam “Kozlik” is also considered strong and reliable. Its disadvantage is the ability to catch on something sharp.
The stitch should be done from left to right.
Operating procedure:
- Finish the bottom of the sleeves with an overlocker.
- Turn the hem allowance inside out and press.
- Hem with a goat stitch.
To do the job correctly and accurately, use a needle to grab one or two threads of the fabric above and below from the edge of the overlock stitch. The distance between the grips is approximately 1 cm, but no more. Before fastening the thread, stretch the fabric slightly.
How to make decorative stitching
To decorate a dull project, you can highlight the hem stitches with a different color thread using a double or triple decorative stitch. The optimal stitch width is 2.5 cm.
Finish the bottom of the sleeves with an overlocker. Turn the hem allowance inside out and press.
Use a blind stitch on your sewing machine. Adjust the stitch width so that the needle lightly catches the fabric at the fold. Try it on a separate piece of paper first.
Then sew a seam along the exposed edge of the hem allowance. The best stitch length is 1 mm.
How to shorten knitted sleeves with an elastic band
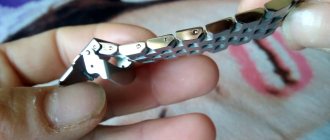
There is an option to shorten the sleeves of a knitted turtleneck or jumper without cutting the fabric. At the same time, you will not only give the stretched sleeve a neat appearance, but also slightly change its shape, creating a more interesting silhouette. Take an elastic band, cut two small pieces and stitch vertically at the bottom of the sleeve, gathering it slightly.
You can also attach the elastic not at the edge of the cuff, but at about 3/4 level, then you will get the effect of a stylish and relaxed rolled up sleeve. You can sew on the elastic tape either by machine or by hand using a hidden seam.
How to cut knitted fabric. Tips and master classes
Why cut knitted fabric?
The conversation will not only be about Fair Isle, the traditional technique of cut jacquard, which is knitted in the round, knowing that it will then be subjected to scissors.
In popular Scottish patterns, circular parts are knitted first - the front back and sleeves, and then the armholes and neckline are cut out.
Sometimes it turns out that you need to cut a ready-made fabric, knitted with knitting needles: plans have changed, the dimensions have been missed, the product has stretched out after washing, or you just need to update an old sweater.
So, how to cut a knitted fabric lengthwise without the loops creeping in? Undoubtedly, it is necessary to strengthen the edges of the future cut.
This can be done using a regular needle and thread or, for example, a crochet hook, if you walk a chain of air loops along the vertical jumpers. By the way, you can avoid manual work altogether if you have a sewing machine - just lay zigzag stitches along an imaginary cut line.
If you have an overlocker, you can immediately cut the product not only lengthwise, but also in any direction, and the edge will immediately be overcast.
Well, if you don’t have the equipment at hand or you don’t need stitching, then there are other ways to cut a knitted fabric so that the loops don’t crawl and the edge doesn’t unravel.
How to cut knitted fabric. Master classes
1. How to cut knitted fabric using the Fair Isle jacquard technique, master class from the blog “See Eunny knit”.
2. How to cut knitting, video master class from Garnstudio Drops design.
3. How to cut knitted fabric using an overlocker, an idea from MARIONS GEWERKELTES.
4. How to cut crocheted fabric, master class from Garoshka.
5. Useful article: How to cut a knitted fabric from the site “Podelochka”.
6. Video master class on how to cut a knitted fabric with knitting needles from the channel “Knitting SHERURUKOM”.
Discussion of the article
You can rate the article, share your opinion, and subscribe to comments on the article.
How to shorten the sleeves of a jacket with cuffs
As with lining and buttons, cuffed sleeves are often found on denim jackets. To shorten such a sleeve, follow these steps.
The presence of a cuff makes shortening the sleeve somewhat more difficult, but even a beginner can cope with this procedure
- Measure the required length on the sleeves of the jacket using a chalk.
- Remove the cuffs from the sleeves using scissors.
- Pin the sleeves of the jacket along the shoulder and side seams.
- From the control mark at the bottom of the sleeves, subtract the width of the cuffs and add 1 cm to the seam: cut the sleeves at this mark.
- Pin the sleeves at the bottom just above the marked line.
- Trim the excess, straighten the cut line.
- Open the cuffs of the jacket, iron them and cut them along new contours.
- If the cuffs have elastic, leave a small hole for it.
- Fold each cuff in half lengthwise and machine stitch the layers of fabric together.
- Finished cuffs are attached to the new sleeve line using a sewing machine.
- Finally, insert the elastic into the cuffs, sew the ends together and straighten the cuffs.
Goat
The finishing seam “Kozlik” is also considered strong and reliable. Its disadvantage is the ability to catch on something sharp. The stitch should be done from left to right.
- Finish the bottom of the sleeves with an overlocker.
- Turn the hem allowance inside out and press.
- Hem with a goat stitch.
To do the job correctly and accurately, use a needle to grab one or two threads of the fabric above and below from the edge of the overlock stitch. The distance between the grips is approximately 1 cm, but no more. Before fastening the thread, stretch the fabric slightly.