Photo drum (photo drum) is an internal part of the laser cartridge with which printing is performed. The drum resource is more than 10,000 pages. However, due to low-quality toner, high room humidity, or temperature changes, the photo roller may begin to print pages with defects: a gray background, stripes, blots, and dots.
Most of the above problems can be solved by cleaning the photo drum. It is produced at the MiraxPrint service center and is included in the cost of refilling cartridges. Thus, we provide our customers with the opportunity to save money not only on printing, but also on the maintenance of office equipment!
However, those users who are accustomed to doing everything with their own hands can familiarize themselves with the recommendations from the specialists of the MiraxPrint service center in order to properly clean the photodrum, while avoiding damage to an expensive part.
Cleaning the photo roller yourself may cause damage. In this case, you take full responsibility for the performance of the part.
Products for cleaning and polishing the photodrum.
It is important for a specialist repairing copying equipment, or simply using it, to know that the organic photoreceptor is strictly prohibited from being cleaned with any substances not specifically intended for this purpose.
Alcohol, and especially acetone, that gets on the coating of the photodrum, even in small quantities, can irreversibly damage it, leaving stains that cannot be removed, which will appear on copies as completely white areas or areas of reduced image contrast. Sometimes such damage can be dealt with by polishing the drum, but in many cases the drum will have to be replaced with a new one. Users should not touch or attempt to clean the drum surface at all. Specialists are advised to remove minor stains using a soft, dry cloth, completely clean or sprinkled with new, unused toner. In this case, the rag should move in a direction perpendicular to the direction of rotation of the drum, only lightly pressing on its surface.
To remove more serious stains, as well as minor scratches on the photoreceptor layer, you can use special pastes for polishing organic drums. It is advisable to use only those pastes whose packaging specifically states that they are suitable for drums of specific models of copiers. In second place are pastes produced for equipment from certain manufacturers: if the tube of paste says that it can be used with Sharp equipment, then most likely the paste is suitable for almost all devices of this company.
Meanwhile, it should be remembered that some exotic drums either require a special composition of polishing cream, or do not tolerate any polishing or cleaning agents at all. In this case, any attempt to use other compounds may lead to the final loss of their working properties. Usually this is not very scary, since polishing the photodrum is resorted to as a last resort, designed to at least slightly extend the service life of a part that has already exhausted its service life.
Polishing should be done as follows:
1. Prepare several clean rags made of soft fabric that will not lose fiber during wiping, and a tube of polishing cream.
2. Remove the drum cartridge from the copier.
3. Remove the photoconductor from the cartridge.
4. Wipe the drum to remove any remaining toner, paper fibers, dust, or adhering dirt. To do this, you can dampen one of the rags in warm water and then wipe the drum dry.
5. Apply polishing cream to a rag and spread evenly, in a thin layer, over the surface of the drum. Lightly rub the paste into the photoreceptor and leave to dry for two to three minutes.
6. Place the drum vertically, pressing its end surface firmly against the table. Take the same rag and carefully, pressing firmly, rub the paste into the surface of the drum.
7. Continue doing this until the cream is absorbed into the photoreceptor and the surface shines.
If too much cream has been applied, its residue on the surface cannot be completely removed. In this case, remove the excess with a damp cloth and then wipe the drum dry.
However, it is recommended to do this in any case, since unnoticeable traces of cream may remain on the surface, which will subsequently affect the quality of the copies produced by the device.
Source
Hot method
If even the cold soaking method does not give the desired result, it’s time to move on to the hot cleaning method. There is nothing complicated about it either. At its core, it is almost no different from the cold method, except that the water used for soaking must be hot.
Dilute the detergent in a container with hot water and immerse it in the resulting solution so that it goes under water. Next, it should be left to soak in the hot solution until the water reaches room temperature for about 30-40 minutes. This method can revive even the most dried-out paint and even when the printer has not been used for a very long time.
You can also clean the inkjet cartridge nozzles using steam. To do this, you need to take a steam generator for clothes, and if you don’t have one, a regular electric kettle will do just fine.
You should boil the kettle, lock the auto-off button so that the kettle does not turn off while boiling, and carefully bring the cartridge with the nozzles to the spout of the kettle, from which steam will come out. It should be kept at a distance of 10 centimeters from the spout of the kettle.
Holding it over the steam for 1-2 minutes is enough, after which the kettle should be turned off, and after cooling, rinse it, since during the soaking process, ink may drip onto the kettle. The cartridge must also be wiped dry with a lint-free cellulose or paper napkin and left to dry with the nozzles facing up on a horizontal surface for about 30 minutes.
If everything is done correctly, but the printing problem has not been resolved, you will have to contact a specialist. Perhaps the cause of the breakdown is that the paint in it has not dried, and the cartridge needs to be replaced, since it has served its entire useful life. And in order not to subsequently encounter problems with dried paint, it is best to carry out regular, at least once a month, light cleaning and inspection of the device parts. In this case, all printed documents will be guaranteed to delight you with image quality.
How to clean your laser printer drum yourself
The service life of the photodrum is quite long. However, it depends on many factors. For example, it is important what quality the paper used for printing is. The type of toner is also important. The temperature and humidity in the room are also important. And therefore the photo roller in some cases fails ahead of time.
The human factor also needs to be taken into account. After all, along with the paper, a variety of foreign objects and substances sometimes get into the printer. If this happens, the photoreceptor becomes damaged or contaminated. When low-quality toner is used, it may remain on the drum. After this, the print quality becomes worse.
This may explain the fact that in some situations there is an urgent need to clean the laser printer.
Please note that not all laser printers have automatic cartridge cleaning. Some people find that these printers are difficult to clean and maintain in proper working order. However, unlike inkjet printers, whose insides are often covered with ink residue, laser printers are very easy to clean. True, provided that you have prepared the necessary tools and equipment.
IMPORTANT! Cleaning the laser printer drum is not difficult. All you need is a competent and thorough approach. You need to do this when, after printing documents, some defects remain on the sheets. This could be, for example, a gray background, black stripes and dots.
It happens that the toner is incompatible with the photo roller. That is why, in order to get high-quality printing, you need to use a photo roller and toner from the same manufacturer. If you neglect this rule, you may even have to repair the photodrum. In most cases it has to be changed. And such work is far from within the power of the average user.
Software cleaning
Many inkjet machines are equipped with built-in automatic cleaning programs. To carry it out, proceed as follows:
- open the control panel;
- go to the printing equipment settings;
- there select the required section - “Remedies and cartridge cleaning”;
- make a test print of a blank sheet.
If the function is missing, you can download the program from disk or the Internet and install it. Then in the print settings, select the “Printer Maintenance” section, then you will need to open the print settings and start cleaning. In this case, you must follow the instructions of the program. Most often, the procedure must be performed repeatedly.
When the software method does not help, then you can get rid of the problem in several other ways. For different models of inkjet technology, the algorithms are the same, only the method of accessing the cartridges differs. To do this, you may need a set of screwdrivers with different bits.
The operation scheme, regardless of the chosen cleaning method, is as follows:
- removing the cartridge;
- soaking;
- washing;
- drying;
- gas station;
- installation in the printer;
- control printout.
How to clean the photo drum
You can also use compressed air cylinders. Cleaning products made with isopropyl alcohol are good. Specifically, Xerox Cleaning Fluid.
Wet wipes are not suitable for cleaning. Otherwise, the photo roll will become unusable.
Do not use detergents that contain solvent, ammonia or alcohol. It is better to buy a cleaning kit specifically designed for cartridges.
You will also need the following.
— Dust mask. Powdered toner may cause respiratory irritation if inhaled. Therefore, before opening the toner cartridge compartment, make sure that the room is well ventilated. And don't forget to wear a dust mask.
— Latex gloves. Toner affects the skin and leads to irritation. Latex or rubber gloves will provide you with protection.
IMPORTANT! Do not clean the roller in bright light. This may cause the photosensitive layer to glow.
It is better to use pastes if their packaging clearly states that they are suitable for drums of specific models of copiers. Pastes that are made for equipment from certain manufacturers have also proven themselves to be effective. When a tube of paste indicates that it can be used with Sharp equipment, then with a high probability we can say that it is suitable for all other devices of this company.
The photoreceptors of most models are identical in their chemical and physical properties. Compatibility is usually excellent. No problem. In particular, many copiers can be treated with a polishing suspension, which is produced under the brand “Pride, Quality, Consistence” (logo - 6 triangles of different colors) and which is intended for EPL/HP Illsi laser printers.
Some exotic drums require a special polishing cream formulation. Some people cannot tolerate any polishing or cleaning products at all. And the use of any composition leads to the fact that the working properties are completely lost.
Actually, it's not very scary. After all, polishing the photodrum is the last resort that at least slightly extends the service life of a part that has actually already exhausted its service life.
Tips from TonFix service experts
- 1 Prepare talcum powder or starting powder. After all manipulations, it is recommended to apply a layer of talc or toner to the photo roll. This is necessary to ensure that the roller does not jam.
- 2 Use rubber gloves to avoid leaving fingerprints.
- 3 Lubricate the drum axles with conductive lubricant in HP and Canon cartridges.
- 4 Make sure that sunlight does not reach the area where you will clean the roller.
- 5 Do not use flammable products near the printer.
Final stage
In the case when, in order to clean the photo drum, you still need to remove the photo drum, then before installing it, you need to powder it with talcum powder. This is the name of the special lubricating powder. If this is not done, then it is possible that the photo shaft will rest against the squeegee and jam.
If you do work at home, you can use toner from the same cartridge to lubricate the drum. Working it out may also be useful for this.
After the installation is completed, you need to rotate the drum as it moves and clean any remaining talc or toner from the charge roller.
IMPORTANT! Many Samsung, Xerox and Brother cartridges do not require lubricating the photo roller before installation. This procedure must be performed only for cartridges with a waste hopper (HP and Canon).
Now you know the answer to the question of how to clean the laser printer drum. It's not as difficult as it seems. You just need to perform all operations carefully. Care when cleaning the surface of the photo roll will prevent damage to it. For those who do not have the necessary skills or are afraid of ruining something, it is better to contact the service center specialists.
Source
Are the cartridges dry? Restore them by evaporation!
Using this method, you can quickly restore a cartridge that has stopped printing. The method is very simple: hold the dried cartridge with the working surface over the steam, but no more than five seconds, otherwise the body may melt. If ten approaches of five seconds do not give a positive result, then you will have to either buy a new cartridge or try another evaporation method.
Cartridges that have built-in print elements can be restored as follows. Pour hot water into the container so that the depth is no more than one centimeter. Then lower the cartridge with the dried paint into it with the nozzles facing down.
Do three sets of thirty seconds. After this, blot the nozzles with a paper napkin. Now you can check the cartridge. Print out several test sheets, each of the primary colors in turn. This should be done using the “best quality” function. Now you can try to print the photo, but the quality can already be set to “normal”.
DIY photo drum polishing
STARTCOPI CONFERENCE Printers, copiers, MFPs, faxes and other office equipment: issues of repair, maintenance, refilling, selection
0. MegaByte
06.01.15 12:41
The New Year holidays were a success.
2. MegaByte
01/06/15 12:47
(1) Yeah corporate party is his mother))
The friendly Chinese seem to have a machine for restoring photo layers. It costs as much as half a Boeing, plus expenses. And we need it.
And at home only OLS.
5. todenkopf
01/06/15 12:54
Instructions: 1. buy a new drum 2. throw away the old drum
6. MegaByte
01/06/15 12:55
(3) well, it’s clear that it costs a lot. How can I find out the addresses? I need to start the entire technological process from scratch onto a bare blank)
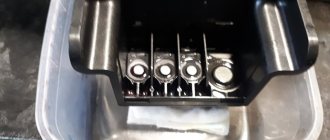
What is the device of a photodrum
The photodrum is a special shaft on which a selenium coating is applied. The shaft is usually light green or light blue in color.
How long can the drum be used? Ideally, the drum resource is long enough. It is up to 12 thousand printed pages. The life of the drum primarily depends on four factors. We are talking about the type of toner, paper quality, room temperature and humidity.
The photodrum may fail much earlier. Usually the users themselves are to blame for this. It is their fault that various objects such as paper clips get into it. That is why it is recommended that before you start printing, you carefully inspect everything and take measures to prevent any small parts from getting into the printer along with the paper.
For prevention, the selenium-coated shaft needs to be cleaned from time to time. Because some toner particles may remain on it.
Recommendations
Print a test page to make sure the printer is working properly. On some Samsung or Canon models, you can do this directly from the menu on the HP printer display; on other models, you may need to run the printer software on your computer to print a test page.
Printer cartridge
Never attempt to clean the inside of your laser printer while it is turned on! The DCP 7010's laser technology uses very high temperatures to bind the toner to the paper, so you can suffer serious burns if you're not careful.
What are the steps in the drum cleaning procedure?
Laser printers require manual cleaning of the photoconductor drum. Here, the features of laser printing are such that the built-in “cleaning” function does not help. The entire procedure consists of several operations.
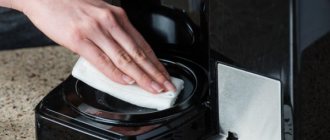
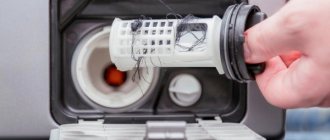
The printer must be turned off from the network. After this, open the front cover. There is a special button for this. Release the lock on the left side and remove the cartridge.
Move aside the protective curtain. After this, you can see a blue or green drum. The photodrum should only be held by the ends. Then you need to carefully turn it. In this case, it is advisable not to touch the photosensitive surface with your fingers. If this is not done, then fingerprints will appear on the sheets for a very long time.
The surface is wiped with a lint-free cloth or swab. The napkin may be damp, but after using it you need to wipe everything dry. Sharp objects are not used for cleaning.
We return the cartridge to the printer. Press it until it clicks. No need to clean in bright light. Then you definitely won’t expose the photosensitive layer.
Initially, the function of cleaning the drum is performed by a squeegee, that is, a special built-in blade. However, it gradually wears out. And the toner remains on the surface. The more adhesion, the more the silicone edge of the squeegee wears out and the quality of cleaning the drum surface becomes worse.
Do not use detergents containing alcohol, ammonia or solvent. This will damage the surface, and then the drum will have to be replaced. You need to buy a special cleaning kit for cartridges. Do not use easily flammable products, like various sprays.
Don't have special cleaning skills? And you don't do it regularly? In this case, it makes sense to entrust such a task to those who work in service centers. Professionals with experience in this type of work will perform a complete disassembly of the cartridge. They will detach the toner container. And they will do it better. They clean the drum quickly and carefully.
Source
Fault prevention
Any equipment requires proper care and operation. This helps to avoid many problems. In order for the printer to serve for a long time and without failures, it is enough to follow the following recommendations.
- The room in which the printing equipment is located should be kept clean. Wet weekly cleaning is necessary, since dust is the worst enemy of a printer or MFP.
- You should carefully clean the printer with a vacuum cleaner once a month. This will collect dust particles and ink (for laser printers). Areas wet from paint should be removed with a rag.
- Every printer has a software method for cleaning the printer head. How to start it can be found in the instructions for the device. This cleaning should be done regularly.
- If the printer is color, and most often only black text is printed, then it is worth doing a color test print once a week. Otherwise, the paint may dry out and clog the nozzles.
- When refilling laser printers, experts recommend cleaning the waste ink bin regardless of its filling level.
When cleaning the cartridge, you do not need to do any complex manipulations, but the procedure itself is quite labor-intensive. The easiest option when working independently is to use special built-in programs. If none of the methods considered leads to the desired result, then it is necessary to remove contaminants from the equipment involved in printing. When this does not help, you should contact the service center specialists. They will accurately determine the cause of the problem and recommend options for eliminating it.
What is Printer Drum Cleaning?
The drum is the main working part of the cartridge, so problems with the quality of its surface are immediately displayed when printing.
Cleaning may be necessary after refilling the cartridge, especially if you did this yourself.
Sometimes the toner is incompatible with the drum, especially if they are from different manufacturers. Therefore, for high-quality printing, it is recommended to use the same brand of toner and drum. In this case, the cartridge must be refilled and the drum must be thoroughly cleaned of old powder.
In laser printers, this procedure must be done manually, since the built-in “cleaning” function does not help due to the nature of laser printing.
The process of cleaning print heads on Windows OS
Before cleaning the cartridge in the printer, you should test the nozzles. This will ensure that cleaning is necessary. To run the test, you need to go to the Start menu, then find Devices and Printers, find the device icon in the list that appears. After right-clicking on it, you need to select Printing settings / Tools / Nozzle check. The printed image is compared with the “reference” one, and the quality of the printed image is assessed. If the printer prints poorly, streaks, or there are no colors in the image, then it needs to be cleaned. How to do it:
- Go to Devices and Printers again;
- right-click on the shortcut for the required equipment;
- Next, select Print Settings;
- in the next window you need to find the Service tab, and in it - the Print head cleaning item;
- To start the head cleaning process, you need to press the Start button;
- All you have to do is wait for the process to complete;
- After this, the device will prompt you to run the nozzle test again.
You should evaluate the print quality after the procedure, since most likely you will have to clean the inkjet printer cartridge again. As a rule, 2-3 procedures performed in a row are sufficient.
If there is no positive result after the steps taken, it is assumed that the cartridges are damaged or their service life has expired.
How to start the procedure directly from the printer?
The print head cleaning procedure can be started by simply pressing buttons on the equipment control panel, without using computer programs. To do this, you need to go to the device settings and find the head cleaning function. The process starts after clicking the Start or Start button.
At the end of the procedure, the equipment will prompt you to run a nozzle test. It is recommended to delay printing for about an hour and clean the inkjet printer one or two more times, based on how quickly the problem was resolved.
How to clean the printer drum yourself
When wiping, there is a danger of exposing the photosensitive layer, so try not to carry out the cleaning operation in bright light.
Initially, the cleaning blade (squeegee) successfully copes with the function of cleaning the drum during operation. But with the slightest wear, the pressing force decreases, or the gap between it and the drum increases, the toner partially remains on the surface and sticks. Moreover, as sticking increases, the wear of the silicone edge of the squeegee increases, the quality of cleaning the drum surface deteriorates - and so on in a circle, with the problem getting worse.
When is it time to clean
The printer requires periodic cleaning. This process will significantly extend the life of the device. Determining the need for cleaning is not so difficult, but this may not always help. Therefore, experts do not advise waiting for signs, but carrying out activities regularly for the purpose of prevention. Precursors to cleaning the printing device may be:
- Extraneous sounds during operation.
- Poor print quality. For example, streaks when printing.
- There are ink or toner stains on the printed pages.
- Frequent paper jams.
- Any deviation from the usual form of work.