If your gas water heater's pilot light goes out, this may indicate a critical situation. It is caused by various problems. But most often this happens due to dust getting into the wick or scale formation.
To solve the problem, cleaning is necessary. You can call a specialist for help or do everything yourself, using instructions, photos and videos.
Why do you need to clean the gas water heater and is it possible to do it yourself?
The geyser is connected immediately to two communications - a water supply and a gas pipeline. Therefore, it can suffer from soot and soot, as well as from the formation of salt masses, which are inevitable when heating water.
That is why it is necessary to clean the gas water heater, which will prolong the effective operation of the device. After all, dirty igniters can stimulate an emergency situation, and a build-up of scale will simply reduce the efficiency of water heating.
For this task, you can invite a specialist who has experience, but it is also possible to clean the gas water heater with your own hands. A specialist can also install a gas water heater.
Prevention
Prevention is necessary to prevent scale, which is the main scourge of geysers (for example, such as Zanussi water heaters). It appears not only as a result of salt deposits from hard water, but also as a result of constant high temperature in the device. To ensure that the pipes are clogged with this “muck” as little as possible, it is necessary to set the optimal temperature.
Another way to prevent scale is to install water purification filters or electric softeners. They do not allow harmful salts to pass through, allowing the heat exchanger pipes to last longer. However, the cleanliness of the filter and electric softener also needs to be monitored.
What you can do on your own
Before work, turn off the gas and water supply to the column. Under no circumstances should you try to repair the gas part of the device without the help of others! This may lead to an emergency.
- burner for soot and soot;
- internal parts from dust;
- heat exchanger – from scale;
- water pipes.
- condition of the water intake unit;
- connection density;
- serviceability of the traction sensor;
- presence of lubricant.
All operations are carried out in a certain sequence.
Descaling: work order
To carry out such manipulation, you can use both folk remedies and chemical solutions. Having cast your vote in favor of chemistry, you must follow the instructions exactly. If you choose citric acid or vinegar, then the work consists of the following steps:
- the gas water heater is turned off;
- the heat exchanger is disconnected by hand from the remaining elements and removed from the wall, the water is drained from it;
- at the same time connect a hose to the pipe that supplies water to the column to avoid leaks;
- using a bulb, syringe or watering can, the resulting solution is poured into the heat exchanger pipes;
- Now the heat exchanger body is lowered into a deep basin with the same mixture and left in this state for several hours or overnight.
After this, the part must be rinsed well under running water, connected back to the column (optionally, the column of the Ariston FAST R ONM model) and then start the device. Pressurized water will remove all scale, leaving the pipes perfectly clean.
Nuance : It’s easy to check the effectiveness of your work - just look at the color of the water: if it is transparent, then all the scale has come out.
Anyone who dreams of a new device will be interested in reading: Replacing an old gas water heater with a new one: 5 important points
How to clean a geyser from scale
Flushing the gas water heater can be carried out using a special device - an electric cleaner (scale and rust converter). It is connected by wires that are wound around the incoming pipe of the heater at a distance of 15 cm. The procedure is possible due to magnetic pulses that destroy scale.
Fundamentally: in addition to cleaning pipes from formations, the device softens the water. This helps prevent their occurrence.
If there is no ability to use special equipment, they resort to “chemical” methods. In other words, they use substances and mixtures that can damage or break down scale.
Methods for descaling a water heater
When purchasing a gas water heater, users must find out how to clean the gas water heater from scale and carbon deposits. This is a simple procedure that any water heater owner will have to repeat periodically.
You can clean the gas column using the following methods:
- with a complete disassembly of the device;
- flushing the circuit without removing it;
- cleaning from soot and clogging of the working individual elements of the device: igniter, nozzle, wire, water unit.
If the gas water heater has not been cleaned for a long time, the heat exchanger is clogged with scale, and the flame turns yellow, you will have to completely disassemble the device and thoroughly clean all contaminated elements.
Preventive and scheduled flushing (if carried out regularly) can be performed without removing the water heater elements.
If parts of the gas burner device are clogged, you will have to remove them and clean them separately. The water unit is flushed if problems occur.
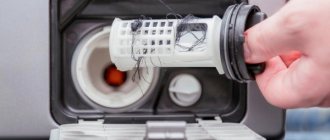
How to clean and how to rinse the filter
There are special products on sale for cleaning speakers, but many are accustomed to using improvised materials, which are not always suitable for this purpose. You can highlight the more popular and more effective means:
- hydrochloric acid (for copper tanks);
- lemon;
- vinegar 9%.
A solution is prepared from 100 citric acid in 500 ml of water. Cleaning liquid with vinegar is made in a ratio of 1:5. When using special products, you should read the instructions for making the solution on the packaging and act according to it. To clean the filter you need:
- Turn off the water tap located under the device.
- Disassemble the column: remove the casing, some parts (depending on the model). To work, you need a water unit, it must be accessible.
- Place a container under the threaded connection for water that will flow after it is separated. Unscrew the union nut on the left side of the water inlet.
- The filter looks like a mesh. You need to take it out, wash it, dry it a little and put it back. You can treat the filter with regular running water, but if there are calcium deposits on it, you need to use lemon juice.
READ How to Cut Tiles with a Tile Cutter Video
Tip: to enhance the effect of citric acid, warm the liquid slightly before use.
Preventing scale formation
Obviously, scale primarily forms in the heat exchanger. It is important to warn her - if the radiator becomes clogged, this will lead to damage to the device.
Water hardness depends on the region. In the northern regions it is less, but gradually increases towards the south. Residents of regions with hard water should pay attention to softeners. They are installed at the entrance of pipes to a house or apartment. This is useful not only for the column, but in general for devices that have a heating element.
If the water situation is not so severe, then such radical measures are not required. It is enough to install special filters.
You can flush the system with formic or phosphoric acid. With this treatment, a properly prepared solution is very important: for 1 mm of scale there is 1% acid. However, the total concentration should not exceed 10%. Stronger solutions may damage surfaces.
Advice: to ensure that the column lasts as long as possible, carry out preventive maintenance from the very beginning of using the device or from the moment of service. The optimal frequency of the procedure is at least once a year.
How to remove soot from a heat exchanger
We wrote above where the thermal exchanger is located; before servicing, it is better to remove it from the unit, having previously turned off the gas and water, and opened the tap for supplying hot water (the one located near the flow-through heater). Then, using a gas or open-end wrench, loosen the nut securing the tube to the water unit, unscrew it a little (a couple of turns will be enough). The contents must be allowed to flow out through the mixer, which is left open.
How to clean the heat exchanger of a geyser further:
- Unscrew a couple of union nuts and dismantle the assembly.
- Disassemble other elements, parts that interfere with simple dismantling. Their number depends on the specific model and design features of the column. In some cases it is necessary to remove the smoke exhaust diffuser, in others - the ignition group, in others - overheating and draft sensors. You may have to remove all the parts.
- Cover the burner nozzles with a rag to prevent soot from getting into them.
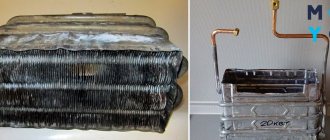
- Take the heat exchanger to the bathroom, carefully clean it with a long-bristled brush to remove all the soot, wash and dry it.
- Return the unit to its place and reassemble the unit in the reverse order described above.
Do not forget to install new seal rings at the pipe connections. Cleaning a geyser is not difficult; most of the time is spent on assembly and disassembly. Work should be done strictly according to the rules. If you are not convinced that you will do everything because it is necessary, call a specialist.
Needed advice. If the installation is clogged, you have already removed the heat exchanger, it makes sense to immediately wash and clean the gas water heater from scale. The service will be more effective and will not take much unnecessary time.
Before starting the unit, it is necessary to check it for tightness. To do this, open the water supply tap and wait until the heat exchanger is filled from the open mixing tap. Later, the supply is closed again, and the unit is inspected to determine the degree of permeability of its connections. If there are no serious problems the gas valve is re-opened, and the device is started for testing in standard operating mode.
Use liquid for flushing and softening connections during maintenance at your discretion. Chemistry simplifies the work, but it is not necessary to use it.
Flushing helps not only from carbon deposits, but also from dust.
Full disassembly service
Do not be afraid to disassemble the water heating installation, the procedure is not that complicated. You will need the most common tools - screwdrivers, pliers, standard wrenches. What to do before starting work:
- Close the taps of the cold water, hot water and gas supply pipelines. Unplug the turbocharged dispenser from the outlet.
- Substituting the container, unscrew the union nuts (American) on the connection of the water pipes. Disconnect the connections from the unit without losing the rubber gaskets.
- For convenience, it is recommended to remove the gas heater from the wall. It is not easy to disassemble and clean a unit that is hung too high or installed in a narrow niche.
- To dismantle the water heater, disconnect the gas line and the chimney pipe. Remove the unit from the hooks.
Lay the hot water column on a horizontal surface and proceed to further work, the order of which is outlined in our instructions.
How to remove the heat exchanger and column burner
We will show the disassembly sequence using the example of a cheap Chinese Novatek water heater. We present step-by-step instructions with photos:
- Remove the control handles mounted on the front panel. Unscrew 2 screws (or 2 plastic clips) and remove the device casing.
- The next step is to remove the smoke collector. To do this, disconnect the wires from the draft sensor and unscrew the screws holding the diffuser box.
- Disconnect the heat exchanger tube from the water unit by disassembling the connection with the union nut. The second pipe must be freed from the lock washer, pressed with 2 screws.
- Disconnect the burner from the gas valve by unscrewing the 2 screws on the flange. Having moved the radiator upward, carefully remove the burner device (pull towards you) and move it to the side.
- Unscrew all screws connecting the heat exchanger to the rear panel of the water heating unit.
- Pull out the radiator completely and remove the burner, disconnecting the wires along with the ignition electrodes.
Note. While removing the heat exchanger, disconnect the wires from the temperature sensor.
Disassembly of geysers from other manufacturers may differ, but not fundamentally. The order of work remains unchanged. Let's list some important points:
- in a chimneyless turbo column, the fan will have to be removed;
- in units of the Italian brands Ariston (Ariston) and some others, the pipes are connected not with nuts, but with self-clamps;
- If the water heater is equipped with an igniter, then before removing the burner it is necessary to disconnect the gas tube connected to the wick.
Important! Be careful not to lose any rubber or other gaskets discovered during disassembly. Before assembling and installing the column, it is advisable to replace these seals with new ones.
Our expert plumber will demonstrate the above process in detail in his video:
Flushing procedure
This operation is very simple compared to disassembly - cleaning the gas water heater begins by immersing the heat exchanger in a container with washing liquid. The procedure is as follows:
- Take a bucket or deep basin, fill it with water and prepare a cleaning solution according to the recipe on the package. The concentration of citric acid is 50-70 grams per 1 liter of liquid.
- Immerse the heat exchanger in the container with the radiator down and the pipes up.
- Using a watering can, fill the coil with detergent. Rinse it periodically by adding new solution.
- Flush the heat exchanger until clean liquid comes out of the tubes without scale flakes. Then run tap water through the coil to remove any remaining product or impurities.
Advice. Using citric acid, heat the solution to a temperature of 50-60 °C. The reaction will be more intense and end faster.
The removed burner can be cleaned from the outside and purged or washed with a solution of citric acid (no more than 50 grams per liter of water). Finally, rinse the element with running water, blow with compressed air and dry thoroughly. Do not ignore other parts of the gas water heater - the mesh filter, smoke collector and combustion chamber, remove soot and other contaminants from them.
After washing and drying, put the heat exchanger back in place, connect the burner and follow the remaining steps to reassemble the water heater. It is important to achieve tight connections: when installing old gaskets, treat them with high-temperature sealant. Check the joints for tightness using water pressure (4-6 bar).
It wouldn’t hurt to blow out the inside of the burner with compressed air at a pressure of 4-6 bar
For reference. The duration of washing depends on the thickness of the scale layer inside the column heat exchanger and ranges from 2-3 hours (prevention) to 2 days.
How to clean a radiator
You will do a better job if you completely remove the radiator from the unit. Many will say that washing the device by removing the heat exchanger is unnecessary manipulation. But by doing this, you reduce the risk of damage to the unit. To avoid mistakes, act one by one:
- Turn off the gas and water. Open the hot tap closest to it.
- Unscrew both union nuts. Depending on the model, you will have to disassemble other elements of the column; cover the burners with a cloth to protect them from soot. When finished, carefully remove the assembly.
- Place it in a comfortable place, for example, in a bathtub, covering it with something beforehand so as not to destroy the enamel.
- Further cleaning the heat exchanger does not cause problems. The radiator is cleaned of soot manually using a brush and detergent. In order to remove scale, pour in a special solution and leave for the required time. Then rinse under running water and dry thoroughly.
- Reassemble in reverse order, replacing the O-rings at the pipe connections. Before starting up the column, check it for density.
- Turn on the water. Because the mixer tap remains open, the heat exchanger fills up. Turn off the water and inspect the connections for leaks. If everything is normal, you can resume the gas supply and inspect the device in operating mode.
Tip: spray nuts that are difficult to unscrew with a product to soften hard dirt, for example “VD-40”.
Here you will learn:
The prerequisites for contamination of a flow-through water heating device are related to its functions and operating principle:
- Flowing water supply. The column heats the water flowing through its heat exchanger, which brings with it mineral inclusions. As a result, clogging deposits settle on the walls of the heat exchanger and pipes of the device and evenly increase.
- Gas burner burning. If gas combustion is poor (see prerequisites below), carbon deposits and soot appear. The latter clogs the fins of the heat exchanger and the chimney, further worsening the combustion of gas fuel and slowing down the heating of water.
- Low quality tap water. Due to the hardness of tap water, when it is heated, salts are released from the composition, which are deposited in the form of scale inside the pipes and heat exchanger. The thicker the layer of scale, the narrower the lumen of the pipe and the worse it allows water to pass through.
In addition to magnesium and calcium salts dissolved in water, it contains mechanical impurities from rusting pipes. They are also involved in the gradual growth of the pipe channel in the heat exchanger along with scale.
As for soot, its active formation is facilitated by high pressure on the burner, weak chimney draft (low height, cracks, lack of thermal insulation, etc.), lack of supply air (PVC windows are sealed, but there is no supply valve).
Soot deposition is also facilitated by the introduction of forced exhaust in a room with a working water heater (causes a lack of oxygen), dustiness of the room (dust enters the burner, which is why real gas combustion does not occur).
Filters and magnetic traps, precise settings of the burner and air draft will slow down the process of column clogging, but will not completely eliminate it
Since scale formation occurs better when the water is heated above 60°C, some owners of German water heaters set the burner to a low temperature. But as a result of this, the working cavities of the heat exchanger gradually become overgrown with a green coating from condensate.
Ultimately, the removal of flue gases is exacerbated, which contributes to the accelerated formation of soot. A heat exchanger clogged with soot does not heat water at all well - soot is a good heat insulator.
How to flush a speaker radiator?
In most cases, scale accumulates in the radiator. Therefore, it is most advisable to start cleaning it first.
It is important to note right away that this can be done in one of two ways. Each of them gives excellent results
Therefore, the choice is yours.
Method No. 1: cleaning with special means
You can remove scale from the geyser that has accumulated in the radiator using special cleaning agents (for example, silit or another that quickly removes scale). In addition to them, to carry out such work you will need the following:
The anti-scale solution should remain in the heat exchanger for several hours.
- garden sprayer;
- two clamps;
- PVC hose;
- bucket;
- cork;
- screwdrivers;
- spanners.
So, the first thing you need to do is turn off the gas.
Then you will need to tighten the tap of the incoming water pipe. Then you need to immediately place a bucket under the entrance from the gas water heater, since water will come out from there. Next, you need to plug the spout of the faucet in the bathroom or kitchen with a stopper and turn on the tap through which cold water flows. At this time, it will begin to flow in the opposite direction and go through the column, thereby flushing the radiator. Here you need to be careful and not remove the bucket; you should wait until the water from the column begins to come out without any impurities of mechanical particles.
At the next stage, you need to take a garden sprayer, and then unscrew the cap from it, from which you need to cut off the end that has side holes. Then put a PVC hose on the sprayer and secure it with a clamp. Be sure to make sure it is held securely. Next, you need to take the other end of the plastic hose and connect it to the pipe that goes into the gas water heater. Here you also need to use a clamp for fixation. Now take water and descaling agent (refer to the instructions for the quantity) and mix them in a spray container. Then the cap is screwed onto it, the tap responsible for supplying hot water is closed, and about a third of the prepared liquid in the spray container is poured into the radiator of the geyser. The rest will need to be added gradually, in about 5 doses with an interval of 3-4 minutes. In this case, before each injection of such liquid, it will be necessary to gradually release the pressure in the pipe. To do this, you need to slightly open the tap that supplies hot water.
Method No. 2: cleaning with cardboard cards
If you do not have the opportunity to purchase a special descaling cleaner, then the second option is ideal for you. After all, here you only need to use cardboard cards that you can cut with your own hands. So, to clean the speaker radiator using this method, you will need the following:
A solution of citric acid or vinegar is suitable for cleaning the heat exchanger.
- cardboard;
- scissors;
- screwdrivers;
- spanners.
You need to start cleaning the radiator with preparatory work. First the gas supply is cut off, and then the water supply. After this, the protective cover is removed and the casing is removed using appropriate tools. Then it will be easy to see the radiator of the geyser and that it is clogged with scale and fumes. To start mechanically cleaning it, you will need to take cardboard and cut it into strips of 10x1 cm. Prepare them in large quantities at once, as they very quickly lose their elasticity, and you have to use new ones.
When the cardboard strips are ready, you can directly begin to clean the radiator, namely its honeycombs. You need to insert cardboard strips into them one by one and use them to pull out accumulated dirt.
It is important to clean all the radiator cells, and from each of them you need to remove fumes and scale until the holes are completely clean. Typically this process takes about 35-50 minutes.
But the result will be excellent - the geyser will heat up quickly.
It is important to note that to clean the radiator it is better to use these methods one by one, that is, for the first time, do the work according to the first scheme, and a few months later - according to the second, then it will be possible to remove scale as efficiently as possible and at the same time get rid of soot, the presence of which also has a bad effect on the efficiency of the column
How to remove and clean the igniter
Evidence of contamination of the ignition tube: the igniter flame spontaneously extinguishes; a weak tongue of flame moves upward without moving towards the burner due to insufficient gas pressure (if the pressure of the main or bottled gas has weakened, then the igniter is not at fault).
READ How to Turn on a Bosch Electric Oven
Cleaning the igniter will stabilize the ignition, prevent popping noises and the formation of soot on the heat exchanger grilles
Pay attention: before you start cleaning a clogged igniter of a Bosch gas water heater, be sure to double-check that the gas tap of the device is closed!
Necessary tools: a flat-head (minus) screwdriver or thin pliers with curved “lips” (duckbills). The ignition tube should be removed quite carefully, without pushing through the heat exchanger jacket.
The procedure for dismantling the water heater igniter:
- Top end. It is necessary to pull upward the bracket that holds the flared edge of the ignition tube at the end of the burner. Unclench the bracket a little, then move it upward with duckbill pliers or pry it up with a screwdriver until it is completely removed;
- Bottom end. It is necessary to press the edges of the bracket securing the igniter;
- Removing the igniter. Having freed the ends of the tube, all that remains is to lift it up and remove it in a “pull” motion.
To clean the cavity of the ignition tube, you will need a piece of not very stiff wire on which a piece of lint-free cloth (for example, a microfiber cloth) is clamped. We stretch a homemade “brush” inside the tube, then tap it a little and blow it through.
The igniter tube is made of aluminum and is quite easy to dent. Therefore, cleaning, and especially tapping, must be done carefully, without unnecessary stress.
It is also necessary to clean the tungsten spring located on the underside of the tube. This will ensure quick ignition from the piezoelectric element. In the end, it is necessary to clean the nozzle at the lower connection point of the ignition tube and the electrode located in front of the upper outlet of the tube from carbon deposits. They should be wiped with microfiber or other lint-free cloth.
Installation of a cleaned igniter into the column is carried out in the reverse order of dismantling. If the cleaning is done perfectly, then the flame from the lit pilot tube will be practically invisible.
Cleaning the heat exchanger and main burner
To clean and rinse the heat exchange radiator, it is necessary to place it in a bathtub or other container of suitable size. To avoid scratching the bottom and walls of the bathtub bowl, you should first lay a cloth in it.
Using ordinary detergents, hot water and a long-bristled brush, wash off the soot from the inside and outside of the unit. Before reassembling it into the column, it needs to be dried.
If the burner is dirty with soot, it needs to be disassembled and cleaned. The fastenings of the burner sections (Venturi tubes) are bolted, they are easy to unscrew.
Professional cleaning of a dusty burner is carried out with compressed air, and at home - with a soft brush and a vacuum cleaner. In case of severe contamination, you can wash with soapy water and wipe with a lint-free cloth, then dry and reassemble the burner.
How to remove and clean the igniter?
Evidence of contamination of the ignition tube: the igniter flame spontaneously extinguishes; a weak tongue of flame rises up without moving towards the burner due to insufficient gas pressure (if the pressure of the main or bottled gas has weakened, then the igniter has nothing to do with it).
Cleaning the wick on a gas water heater
Please note: before you start cleaning a clogged igniter of a Bosch geyser, be sure to double-check that the gas tap of the device is closed!
Tools needed: flat-head (minus) screwdriver or thin pliers with curved “lips” (platypus). The ignition tube should be removed carefully, without pushing through the heat exchanger jacket.
The procedure for dismantling the water heater igniter:
- Top end. You need to pull up the bracket that holds the flared edge of the pilot tube at the end of the burner. Unclench the bracket slightly, then move it upward with duckbill pliers or pry it with a screwdriver until it is completely removed;
- Bottom end. It is necessary to press out the edges of the bracket securing the igniter ;
- Removing the igniter. Having freed the ends of the tube, all that remains is to lift it up and remove it in a “pull” motion.
To clean the cavity of the ignition tube, you will need a piece of not too stiff wire, on which a piece of lint-free cloth (for example, a microfiber cloth) is clamped. We stretch a homemade “brush” inside the tube, then lightly tap it and blow through it.
It is also necessary to clean the tungsten spring located on the underside of the tube. This will ensure quick ignition from the piezoelectric element. Finally, it is necessary to clean the nozzle at the lower connection point of the ignition tube and the electrode located in front of the upper outlet of the tube from carbon deposits. They should be wiped with microfiber or other lint-free cloth.
Installation of a cleaned igniter into the column is carried out in the reverse order of dismantling. If cleaning is done effectively, the flame from the lit pilot tube will be almost invisible.
Removing contaminants from combustion products
Soot, soot and other solid combustion products, although formed in such devices in small quantities, can still cause serious damage.
If you need to clean this part of the device, you need to remember the manufacturer's instructions again, especially if the warranty period has not yet expired. Some manufacturers require that such work be carried out only by professional gas fitters.
You can remove soot and soot from the surface of the heat exchanger using a regular stiff brush, but to clean the injectors you will need a metal wire
The easiest way is to clean the column radiator from combustion products. To do this, turn off the gas and remove the protective casing from the device. After this, the surface of the element is treated with a regular household vacuum cleaner.
If the gas in the column does not ignite, or burns unevenly and weakly, the injectors may be clogged. To clean them from accumulated layers of soot, use a thin wire or a brush with metal bristles.
Of course, in this case, you should turn off the gas and remove the casing. Cleaning must be done carefully so as not to damage the elements of the device.
When soot accumulates too quickly, it makes sense to think about the presence of other faults that provoke this situation. A common reason for this phenomenon is a leak at the joints of the gas tubes inside the column.
The gas water heater burner consists of narrow nozzles. If they are clogged with soot, the gas will flow unevenly and the water will heat up more slowly.
The gap may be so small that it is not possible to detect the leak by smell. If you suspect a malfunction of this type, apply a soapy solution to the connections and then apply gas to the device.
If the solution begins to bubble, you should stop work, turn off the gas and immediately call an experienced gas technician. Self-indulgence at this stage can be fatal.
The water pressure is normal, the soot has been removed, but the column still does not turn on? Now is the time to check your traction. Modern models usually have special sensors that detect the lack of draft and do not allow the device to be turned on, cutting off the gas supply to the ignition device.
To check, it is better to use strips of thin paper. The flame of a candle or lighter can be dangerous if the problem is caused by a gas leak.
If soot particles and other combustion products accumulate in the column too quickly, you need to find the malfunction that leads to this result
Having discovered weak traction, it is necessary to identify the cause of the situation. Usually it is enough to clean the chimney to restore normal operation of the appliance. If this does not help, you should consult with a gas equipment engineer; there may be flaws made during the installation of the chimney structure.
How to remove the casing of a Bosch water heater?
The decorative and protective casing of the speaker is easy to remove:
- you need to unfasten the round adjustment knobs by pulling them towards you;
- move the rectangular gas adjustment knob to the body cavity (the “ignition” position). Please note that not every Bosch water heater model has such a handle;
- Using a Phillips screwdriver, unscrew the two self-tapping screws securing the casing to the column frame. They are located at the bottom, on the sides of the device.
All that remains is to carefully push the lower part of the water heater casing towards you with both hands. Then lift up, remove completely and set aside. Now you can visually assess the contamination of the device and determine the scale of cleaning work.
How to clean a Bosch geyser with your own hands: care guide, valuable tips
Poor water heater performance interferes with normal life, doesn't it? The water barely flows or takes a long time to heat up, the burner slightly smolders or soot falls... You need to somehow fix it, find a repairman, negotiate on prices and terms. Why spend money if you can easily clean the heater yourself?
We will tell you how to clean a Bosch geyser with your own hands without contacting a gas specialist. To completely disassemble and clean the device, a “home” set of tools is sufficient. You will learn everything about dismantling the working units of the column, the rules for cleaning its burner, heat exchanger and chimney from the article we have proposed.
Results
You can clean the geyser yourself - the main thing is to follow the basic rules. You can descale the radiator with your own hands, replace the old filter in the gas water heater, restore the functionality of the heat exchanger, and clean the nozzles. The main thing is to follow the instructions for assembling and disassembling the unit in order to avoid serious mistakes that could damage the device. Regular maintenance will prevent serious damage and significant costs in the future.
If you understand that you cannot solve the problem yourself, contact a specialist. You also need to remember that it is one thing to remove scale from a geyser formed from rusty water, or to clean a radiator, and another thing to solve specific problems associated with draft and so on. In the case of public utilities, who should clean the dispensers is the gas worker.
Signs of a clogged gas water heater
The need to clean a Bosch flow-through gas water heater is determined by a decrease in the performance of the device.
- the water heater simply does not start;
- it turns on, but does not work for long and turns off on its own, while there is no shortage of water or gas;
- the heater heats properly, but the water heats up noticeably worse than before;
- the water pressure at the outlet of the heating device is weaker than at the inlet to the heat exchanger;
- Frequent operation of the overheating sensor, although the water heater is operating under average load.
Ignition jet is clogged. It is impossible or difficult to ignite the column if the igniter nozzle is clogged, which is why the device ignites the fuel with a delay - with a characteristic pop. A sign that the igniter is dirty is a weak yellow wick flame, although it should be blue.
Soot in the chimney. If the burner flares up but goes out almost immediately after ignition, the smoke duct of the water heater is dirty. The permeability of the chimney is significantly reduced due to soot and soot deposits that have accumulated over the years of using the dispenser. However, the chimney of water heaters in apartments is more often contaminated with flying debris.
Weak air flow. For natural draft, even a small gas water heater requires supply air. And modern homes are equipped with airtight window and interior door units.
READ Chainsaw Bosch Ake
The problem of insufficient draft can be solved by ventilation valves built into window frames, wall inlets, as well as ventilation grilles in interior doors.
Scale in the heat exchanger. Insufficient heating of water in a flow-through gas heater causes a reduced flow area of the heat exchanger pipe caused by a layer of scale. And the more scale builds up, the lower the water pressure after heating in the column against the background of normal pressure at the inlet to the heating device.
Overgrowing of the heat exchanger with soot. The largest amount of soot accumulates in the central part of the finned heat exchanger, transferring heat to flowing water and contributing to overheating of the side sections of the heat exchanger block.
Uneven heating of the heat exchanger causes rapid response of the overheating sensor. Most often, contamination of the fins with soot develops together with a clogged chimney.
Symptoms of malfunctions
The following signs indicate that the column is clogged:
- The burner does not light well and a loud bang may be heard;
- The heater starts, but the burner goes out almost immediately;
- Soot is pouring out from under the casing below;
- The unit operates at maximum capacity, but the water barely heats up.
Recommendations on how to clean the heat exchanger of a geyser or igniter will be different, so you need to immediately understand what and where exactly the problem is. So cotton in the chamber indicates that excess gas is accumulating before ignition.
In this case, look for instructions on how to clean the igniter, which is responsible for the timely ignition of fuel. If the flame is very weak and has a pronounced yellow color, the nozzle is clogged. The ignition unit in most models can be easily disconnected from the main burner, and then calmly remove all debris.
The draft and overheating sensors are triggered by the accumulation of excessive amounts of soot. It is concentrated between the fins of the heat exchanger. At the same time, the cross-section of the gas-air path decreases, and operating temperatures increase. In this case, you need a liquid to clean the heat exchanger of the geyser from soot.
If flakes literally fall out from under the decorative apron, you should clean the gas water heater immediately.
If cleaning the gas water heater heat exchanger does not give the required results, check the main burner. Soot can clog its nozzles, and again, proper heating is not produced. The gas column burner and the heat exchanger are closely connected, so it is advisable to carry out preventive maintenance of both units at the same time.
The heat exchanger of the geyser must be cleaned of scale in order to restore the normal flow area. Any deposits on the walls reduce it and negatively affect the functionality of the device.
“Overgrowing” of the internal pipe passages is indicated by a decrease in water pressure at the outlet of the device at normal inlet pressure. The salts in tap water cannot be removed anywhere - and it is they that lead to clogging of the pipe passages. Over time, as a result of their natural deposition, the walls become clogged, and the plaque becomes very thick and durable. In this case, cleaning the geyser heat exchanger using the flushing method helps.
Let's summarize when maintenance needs to be done (and the sooner the better):
- The device quickly goes out during operation or does not turn on at all. First check the gas supply - if there is no problem, make sure there is sufficient water pressure. When the pressure is also stable, test the ignition element. If there is a thick layer of burning and soot, it will not work normally until the contaminants are removed. The solution to the problem is cleaning the burner.
- Constant activation of the thermal protection of the device - in order to prevent the equipment from overheating, it is equipped with a heat sensor. This sensor signals critical temperature increases and warns the owner about equipment malfunctions. When the sensor is triggered too often, it makes sense to clean the pipes and burner.
- Thermal protection is triggered - a sensor in the column is provided to ensure that the equipment does not overheat and, accordingly, does not fail prematurely. It signals an increase in current indicators above critical levels. If the sensor triggers frequently, check the pipes - scale most likely has accumulated there. Since scale has good thermal insulation properties, the device overheats and turns off.
- The productivity of the device has decreased significantly for unknown reasons - for example, the water began to heat up slowly, and the pressure dropped sharply. It is necessary to test the heat exchanger for the presence of scale and remove all deposits from the working parts of the device.
We have figured out the causes and signs of blockages, now let’s see how to clean a gas water heater with your own hands, and what is needed for this.
Cleaning the heat exchanger of a Bosch geyser
If, after removing the water heater casing and inspecting the heat exchange unit, soot contamination is found, it will require dismantling and complete washing. A smoked heat exchanger should be cleaned by removing it from the gas water heater.
The first step is to close the shut-off valves of the water and gas supply to the heating column. If you intend to completely remove the device and dismantle the heat exchanger, placing the column on the table (this will be more convenient) - disconnect the supply gas hose, water supply inlet and outlet, then remove the device from the mounts.
However, there is no need to remove the entire water heater; you can remove the radiator of the heat exchange module at the installation site of the device. Let's consider this maintenance option in detail.
Descaling process
To eliminate deposits of magnesium and calcium salts (scale) in the heat exchange radiator pipe, you will need to remove it and prepare it for washing with an acid-containing solution. Please note that soot removal must be carried out before descaling.
Do not try to peel off or dislodge the scale inside the copper tube of the heat exchanger! Firstly, this is an almost useless activity, because... the bulk of mineral deposits deep in the pipe will be inaccessible for cleaning. Secondly, scratching the thin walls of the tube will weaken its strength and cause deformation.
The following means will help remove scale from the column:
No other means like Coca-Cola or homemade solutions based on active acids (hydrochloric, nitric, sulfuric, etc.) can be used to remove scale - soda will have no effect, and acidic solutions can damage the tube.
It is necessary to turn the heat exchanger over with the radiator plates down and the tube inlet and outlet up, insert a funnel into the tube and pour in the prepared cleaning solution. Chemical descaling will take several hours, so it is more convenient to fill the heat exchange radiator with the solution from evening until morning.
a column that has been regularly used for several years has not been descaled before, then the solution cleaner needs to be changed two or three times until completely cleaned. Otherwise, although the scale layer will be reduced, it will not be completely eliminated.
After waiting the period necessary for the destruction of scale deposits (more than 4 hours), you need to pour out the cleaning agent and rinse the tube with a large volume of clean water. During the flushing process, it is important to remove all fragments of sludge that have separated from the pipe walls.
The following article will introduce you to the reasons for water overheating by a water heater and how to eliminate the problem. All independent home craftsmen should read it.
Option for cleaning the water intake unit
This unit has a mesh filter that prevents large pieces of rust and sediment from clogging the tubes. It is important to check the tension of the membrane - this part automatically ensures the flow of gas when the water tap is turned on.
You must follow this algorithm:
- Remove the assembly from the device.
- Unscrew the screw part and open the housing.
- Clean the filter by placing it under a strong stream of water.
- Now it's time to check the membrane. The bulge indicates the expiration date - it is better to replace it with a silicone version.
- All that remains is to close the cover in the water intake unit by tightening the screws. This way the membrane will stretch evenly.
So, if it is necessary to clean the gas column, two important aspects must be taken into account: in terms of gas, you can only clean the injector jets yourself. For other cases, specialist intervention is required. But you can work on the plumbing component yourself. It is only important to follow the rules and recommendations given by us.
What pollutes a Bosch geyser?
The reasons for contamination of a flow-through water heating device are related to its functions and operating principle:
- Flowing water supply. The column heats the water flowing through its heat exchanger, which brings with it mineral inclusions. As a result, clogging deposits settle on the walls of the heat exchanger and pipes of the device and gradually increase.
- Gas burner burning. In case of incomplete combustion of gas (see reasons below), carbon deposits and soot are formed. The latter clogs the fins of the heat exchanger and the chimney, further impairing the combustion of gas fuel and slowing down the heating of water.
- Low quality tap water. Due to the hardness of tap water, when it is heated, salts are released from the composition, which are deposited in the form of scale inside the pipes and heat exchanger. The thicker the layer of scale, the narrower the lumen of the pipe and the worse it passes water.
In addition to magnesium and calcium salts dissolved in water, it contains mechanical impurities from rusting pipes. They also participate in the gradual growth of the pipe channel in the heat exchanger together with scale.
gaz34.ru Why does the wick go out on a Bosch or Junkers gas water heater?
As for soot, its active formation is facilitated by increased pressure on the burner, weak chimney draft (low height, cracks, lack of thermal insulation, etc.), lack of supply air (PVC windows are sealed, but there is no supply valve).
Soot deposition is also facilitated by the use of forced exhaust in a room with a working water heater (causes a lack of oxygen), dustiness of the room (dust enters the burner, due to which complete combustion of the gas does not occur).
Since scale formation is more intense when water is heated above 60 o C, some owners of German water heaters set the burner heating temperature to low. However, as a result of this, the working cavities of the heat exchanger gradually become overgrown with a greenish coating from condensate.
As a result, the removal of flue gases deteriorates, which contributes to the accelerated formation of soot. A heat exchanger clogged with soot heats water very poorly - soot is a good heat insulator.
Geyser Bosch WR 10,13,15. 2P
Ignition is done manually using a built-in piezoelectric element. The column has a constantly burning pilot light .
My name is Mikhail Valerianovich Strokin.
I recently had a problem that you helped me solve. I lived in the country all summer, and when I returned to the city apartment, I discovered that the ELECTROLUX speaker did not turn on. She had been resting all summer, and now she refused to turn on. I called and called the experts. So they took it all apart for me, cleaned it and it started working again.
Sources:
https://remont-system.ru/kotly/kak-pochistit-gazovuyu-kolonku-Bosch-svoimi-rukami https://sovet-ingenera.com/otoplenie/vodonagrevatel/kak-pochistit-gazovuyu-kolonku-Bosch-svoimi -rukami.html https://remont-kolonok-Bosch.ru/cistka.html
Cleaning the heat exchanger without dismantling
There is also a way to clean the heat exchanger without completely dismantling it. To do this, you must first remove the casing from the device and disconnect the water supply pipe from the heat exchanger. The inlet copper tube of the coil should be slightly shifted to make it easier to work with.
“Antinscale” is considered a very effective and safe means for removing scale from the heat exchanger of a gas water heater, although other household products can also be used
A hose is put on the outlet pipe. Then you need to open the tap and drain a little water, about a liter, to free the coil from liquid. If it is possible to clarify the capacity of the heat exchanger in the technical passport of the geyser, then it is recommended to drain exactly the same amount of water or a little more from the system.
To clean the column using this method, it is better to take Antiscale powder, which is diluted with hot water before use. It doesn’t hurt to take care to protect your skin and eyes from accidental exposure to the composition, since it contains hydrochloric acid.
Now you need to insert a funnel into the inlet pipe and pour Antiscale into the heat exchanger. It should be remembered that when pouring quickly, a reaction may begin inside, which will lead to the ejection of the dangerous solution in the opposite direction. Therefore, you need to pour the composition in small portions and in a thin stream.
If a gas leak is discovered during the cleaning of the column, you need to immediately shut off the pipe and call the experts from the gas industry
The heat exchanger filled with solution should be left for about two hours. To speed up the cleaning process, you can turn on the igniter (it is not necessary to turn off the gas for this cleaning method). When the process is over, you should open the tap and drain the water with the sludge dissolved in it from the column.
If a lot of contaminants come out and the jet shows good pressure, cleaning can be considered satisfactory. If not, you need to carry out the procedure again, but when using Antiscale, such a need usually does not arise.
This cleaning method is recommended to be carried out using just such a cleaner. The use of vinegar or citric acid in this case can have a bad effect on the condition of the aluminum gearbox.