Let's reveal the secret of how to quickly and correctly clean a laptop keyboard from dust and dirt at home. We will tell you about the most effective means of how and with what you can clean the keyboard of a laptop and computer from spilled liquid (if it has been spilled with juice, beer, water, wine or tea, etc.), dust, debris and dirt.
Who among us doesn’t like to eat next to the computer while passing the time watching our favorite TV series or news feed? However, this behavior almost always leads to one result - that the keyboard becomes clogged and will have to be cleaned. Although it is worth saying that even if you have never eaten next to your laptop in your life, it will still need timely cleaning. It is not at all necessary to go to a workshop for such a trifle; you just need to know how to clean a laptop keyboard at home.
External cleaning
External cleaning is the easiest option for cleaning a laptop keyboard. It is quite enough if your keyboard works normally and the reasons for cleaning are rather preventive. This is done quite simply.
- First you need to disconnect the keyboard from the computer. If we are talking about a laptop, you need to turn it off and then remove the battery. Only after this can you start cleaning.
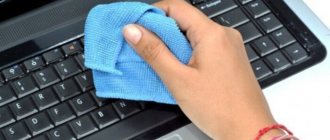
- You should start by wiping the keys. This is done with a regular cloth (it can be dry, or it can be barely damp). First, wipe the top of the keys, and then pay attention to their end part. There's quite a bit of dirt that accumulates there, so be diligent but careful or you risk breaking the keyboard.
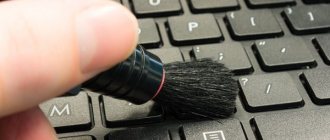
- After this, you need to clean the space between the keys from dust. It is recommended to do this with a special brush for cleaning the keyboard, but a regular soft paint brush or toothbrush will do just fine. Also, don't forget about the space under the keys, that's where most of the dirt is. When cleaning, it would be useful, if possible, to place the keyboard perpendicular to the surface on which you are cleaning, then all the crumbs and dust will fall down and not get clogged under the adjacent keys.
The steps described above should be sufficient for preventative cleaning. But, of course, due to the nuances of the keyboard design, you will not be able to clean it completely. Most likely, most of the dirt will remain where you can't reach with a brush. Fortunately, there is another option for cleaning your keyboard without disassembling it.
Reviews
Keyboard cleaning slime
The slime spreads well across the keyboard
I am the owner of a laptop with a black keyboard. This is the only way dust settles on it, even though I wipe it regularly. Plus, the cat sometimes likes to sit on the keyboard or shake its fur nearby. And no one has canceled eating cookies over the laptop. In general, a decent amount of dirt accumulates between the keys. This thing has become my real must-have.
Skyfall
https://irecommend.ru/content/u-vas-chernaya-klaviatura-na-nei-vechno-skaplivaetsya-pyl-musor-i-sherst-domashnikh-lyubimts
Vacuum cleaner
The vacuum cleaner is connected to a USB connector
It really sucks dust and cleans the keyboard. The set includes two attachments: one brush, the second rubber pad. I used both, the rubber one sucks up dust better. You can verify that it is actually sucking something in by placing your finger against the holes. I also saw dust on the filter when I took it apart. I recommend buying it because it is cheap and does the job. Well, you can also cheer yourself up with such a toy!
Dar1988
https://irecommend.ru/content/prikolnyi-pylesos-dlya-klaviatury
Vacuuming
The next option for cleaning a laptop keyboard at home is to use a vacuum cleaner to clean the keyboard. Such vacuum cleaners are also quite often sold in stores. In fact, this method is not much different from the option with a can of compressed air, except that the dirt will not fly around and certainly will not get deeper into the system.
If you cannot find a special vacuum cleaner, then you can use a mini vacuum cleaner to clean the car interior or even a regular low-power household vacuum cleaner. But be sure to switch it to the lowest power setting, otherwise you risk ripping the keys out of the keyboard or otherwise damaging it.
Checking the loop
In the case where no amount of cleaning restores the functionality of the keyboard, it is worth checking the condition of its cable . To do this you will have to disassemble part of the laptop. You should look on the Internet to find out how to do this for your model. Access to the cable is usually easy; all you need to do is remove the entire bottom cover. On some models, you will have to lift the main system board.
The condition of the plume is carefully assessed. There may be creases and cracks on it. In this case, the part will need to be replaced, that is, take the laptop to a service center. When the cable is visually intact, it is worth servicing its contacts. To do this, the element is carefully pulled out of the connector. The contact pads are cleaned with alcohol and then thoroughly wiped with an eraser.
Cleaning with alcohol
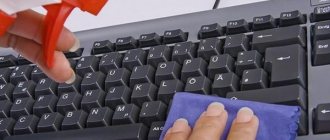
Cleaning the keyboard with isopropyl alcohol is a fairly effective procedure for getting rid of dirt, drips, stains and other contaminants of a similar nature (which a vacuum cleaner or brush cannot handle). However, it, in turn, is practically useless against dust and crumbs, and therefore it is recommended to combine cleaning with alcohol with one of the previous methods.
Cleaning your keyboard with alcohol is quite easy. Most often, cotton swabs are used for this purpose. You just need to blot them a little in alcohol, and then wipe the surface of the keys and the space between them. For convenience, you can pour a little alcohol into the cap of a plastic bottle.
The only caveat is that it is not recommended to use ethyl alcohol for cleaning. It won't harm your keyboard, but it can easily remove all the paint and stickers from the keys. Use isopropyl alcohol.
How to prevent pollution
Read the tips and tricks in the article - “Instructions on how to clean your laptop from dust.”
You can prevent some laptop problems by taking the following precautions:
- Don't eat or drink near your laptop.
- Work in an area where there is less dust.
- Do not clean the keys with alcohol as it may erase the signatures on some types of keys.
If contamination is inevitable, which may be due to the specifics of your work, it makes sense to use one of the protective measures, for example, a silicone membrane for the keyboard.
Silicone membrane for keyboard
They can be either transparent or repeating the contours of the keyboard of the individual model for which they were created. Using it will protect your keyboard from liquids, dirt and dust. This is especially true for families with small children and when working in a dusty room or outdoors.
Removing the buttons
To deep clean your keyboard, you may need to remove the keys from the keyboard and then clean everything inside. This should be done if, after carrying out all the procedures described above, some of the keys still do not work, stick, or a crunching sound is heard when you press them. The process of removing the keys is quite simple and straightforward.
- To begin with, it is recommended to take a photo of the keyboard so that when you start putting it back together, you will not have any difficulties.
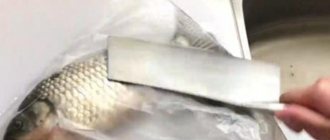
- After this, you can begin to remove the keys. To do this, you need to pick up the key with some sharp and thin object (a knife or plastic card will do) from one of the corners, and then carefully start moving it to another corner, then to the third and fourth, until you hear a characteristic click and the key comes off . In this case, you need to be as careful as possible and under no circumstances put pressure on the keys.
- It should also be noted that the key will not always be completely disconnected after this. On many keyboard models (for example, island keyboards from Acer, Asus or HP), the keys may be raised, but will remain connected to the keyboard with special jumpers. You can carefully detach them too, or continue cleaning if you feel that the space that has opened is enough.
Once you have disconnected all the keys, you can start cleaning. Be prepared to be surprised by the amount of dirt under the keys. In general, you don’t have to disassemble the entire keyboard, but only disconnect the stuck keys and the keys next to them. But it would still be better to remove all the dirt. It definitely won’t be superfluous.
When is it necessary to disassemble?
For effective cleaning, it is better to remove the keyboard
The need for this arises when liquid gets on the keyboard. And also before deep cleaning. There are several signs that help determine the need for disassembly: the device heats up over a short period of use, as well as slowdowns in applications and operating systems. Spontaneous shutdown of the laptop indicates excessive heating of the processor due to contamination. In such cases, you need to disassemble the device and carry out a deep cleaning.
What to do if liquid is spilled on the keyboard
Let's say it so happens that the laptop keyboard is flooded with juice, beer, water, wine or tea. What to do in such a situation? First of all, don't panic. The first step, of course, is to remove the container and get rid of the spilled liquid. This can be done with a napkin, rag, toilet paper or sponge (just blot, do not rub).
Then you need to disconnect the laptop from the power supply and remove the battery (if you can’t get the battery, at least just turn off the device). You need to do everything quickly and clearly, because if you hesitate, you risk losing not only your keyboard, but also your entire laptop.
After this, you can more thoroughly and slowly clean the flooded laptop keyboard. You need to act carefully and ensure that as little liquid as possible flows under the keys. After this, you can dry the laptop with a hairdryer (do not forget about cold air). Dried liquid residues can be removed with alcohol.
If you think that liquid has leaked inside the keyboard, proceed to fix it immediately. First of all, remove the keys where the liquid came into contact. If the liquid has not yet dried, carefully wipe it away. Be sure to dry everything thoroughly with a hairdryer. You also need to treat all sides of the keys under which liquid has got in, otherwise they will begin to jam and make a characteristic cracking noise when pressed.
When the main consequences of the incident have been eliminated, you need to check the key contacts. As a result of contact with liquid, they may oxidize. If this is the case, then you cannot do it on your own and will have to turn to a specialist.
What can't you do?
It may seem that the easiest option is to wash the keyboard with water. You shouldn’t do this, because electronics are afraid of liquids. You can only rinse the keys of an already disassembled device under running water. In addition, a number of rules should be followed:
- Do not wipe the keyboard with cloths dampened with plain water. There is a high probability of liquid droplets getting inside.
- Do not use aggressive chemicals or abrasive powders.
- Do not use hard brushes or sharp objects such as needles or toothpicks.
- It is also undesirable to use terry rags - they leave fluff on the surface, which will quickly attract other debris.
- Do not pick under the buttons too actively - there is a danger of damaging fragile elements.
Technology loves to be treated with care. Be careful and attentive when cleaning.
A few recommendations
It makes sense that regular maintenance of your input device will extend its life. A few tips will help you avoid breakdowns:
- Don't eat at the computer. A bad habit affects not only the condition of the device, but also digestion.
- To help the washed parts dry faster, use a hairdryer or place it near a heat source, but do not place it on a radiator - the plastic will most likely melt.
- If water accidentally gets into the keyboard, immediately unplug the device, turn it over and shake it. Then wipe with a dry cloth and set aside for a day until completely dry.
- If you forgot to take a photo of the keyboard, you can find an on-screen version of it through the Start menu.
- When blow drying, use cold air blasts.
- Cotton wool or rice will help speed up drying. They absorb moisture well. Be sure to remove all grains of rice before starting work (with a vacuum cleaner).
That's all the secrets to cleaning your keyboard. It is easier to maintain order than to restore order, so it is better to avoid the extreme stage of contamination.
Tips for care and use
Cleaning equipment is quite difficult for the average user. To avoid having to do general cleaning, follow simple rules of care and use:
- Try not to eat or drink while on the computer. One careless move can cause serious damage to your equipment.
- Maintain your keyboard periodically. Take half an hour to clean it with cleaning wipes or an alcohol-soaked cotton wool. Of course, this must be done with the power off.
- Shake out small debris regularly.
- Wash your hands before using the computer to avoid grease stains, which accumulate on the surface and collect dirt.
- Don't hit the keys too hard as they may become loose.
Compliance with operating rules will save the life of your computer or laptop for a long time. Handle your equipment with care, and it will become your best assistant in business.
Why is it important to clean your laptop keyboard regularly?
When you neglect to clean your laptop keyboard, it risks premature failure. In addition, dust and debris from the keys get inside, and this can lead to the following problems:
- malfunctions in the ventilation system (if the radiator is dusty), and as a result, the laptop often turns off by itself due to overheating;
- “sinking” of the keys, and if moisture gets in – damage to the keyboard as a whole;
- damage to the “stuffing” of the laptop and various breakdowns.
It is important to clean your keyboard in a timely manner, otherwise you will have to periodically contact specialists due to breakdowns of your equipment. https://www.youtube.com/embed/rNZUoHWsGkY