Whether you take long showers and scrub your hands like a surgeon every time you get ready to sit down at your keyboard, the simple truth is that over time, your keyboard will get dirty. Items like hair, dead skin cells and other things that are not part of the keyboard will accumulate under your keys, and the keys themselves will also become sticky (due to the accumulation of sweat and other skin oils) after prolonged use.
Therefore, it is a good idea to clean your keyboard from time to time. How often you need to clean it will depend on your environment and a variety of other factors, but I like to give my board a thorough cleaning at least once a year. This is how I do it.
Note. This method is recommended for most consumer keyboards and their keys. If your keyboard contains any special or non-standard materials, it is best to do some research online first.
What you need:
- Keyboard key remover
- Several cotton swabs
- A container of warm (not hot) water and soap
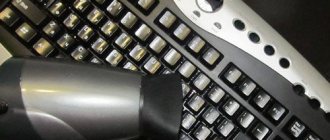
- Vacuum cleaner (handheld or regular, both will do)
- Towel
- Cleaning cloth/microfiber cloth
Preparation
First things first: disable your keyboard.
I always take my keyboard to another room where there is more space. You can do all this at your desk, but I wouldn't bother with water and all that dust while I'm sitting in front of my precious gaming equipment.
Gather all your tools (it's always good to be prepared) and get out your key puller. These things often come standard with most keyboards, and they're not expensive at all, so you shouldn't have a hard time getting your hands on one.
Take a photo of your keyboard if it's a custom or obscure layout, or make sure you can find the layout online. You don't want to end up with a completely clean keyboard with the wrong keys.
Caring for your mechanical keyboard
Hi all! My name is Lera and I work at Geekboards. Today I decided to share with you how I and our guys from GB take care of our and your claves. If you want an extensive guide on how to deep clean your keyboard, go here.
Let's start with the fact that the keyboard really needs care to maintain its service life and original appearance. Dust, hair, crumbs - all this accumulates under the keycaps and inside the case, thereby gradually clogging not only the plate and board, but also the switches themselves. Most often this is the cause of double clicks and sticking.
Here is an example of a regular cleaning client:
Today, together with you, I will clean my keyboard. Her condition is quite neglected (not for the faint of heart :D)
I think everyone has a vacuum cleaner, a rag/napkin, any detergent and, of course, water in their arsenal. And if everything is done perfectly, then you can add distilled water and a puller to the list. This speeds up the work a little, I’ll explain why in the process.
First, unplug the keyboard, this is very important. One unfortunate drop of water can shorten the life and kill the clavus.
Remove all keycaps using a puller. If it is not there, then simply pry them off with improvised means, even with a plastic card. But the puller greatly speeds up the process, it’s better to get this magical thing.
You can wash them in different ways. The most successful way, in my opinion, is to soak them in a container of water and throw denture cleaning tablets in there. Yes, yes, exactly them. You can buy it at any pharmacy, I most often use “Protefix”. They leave no residue and really clean. Soapy water makes keycaps sticky and with unpleasant streaks, so after washing they need to be rinsed with water several times. It takes longer and is not worthwhile for routine care. And from the tablets, most of the dirt will fall off on its own and you don’t need to wash anything off. But at the moment I have neither one nor the other, so I put it in regular tap water. It will cope with dust. Let it float for 15 minutes.
Tap water most often leaves white streaks on keycaps, because... it has all sorts of impurities. If you bathe your mouthguards in distilled water, there will be no streaks.
If you don’t want to bother, just wipe each tray individually with a cloth. But it's a little longer.
There is one caveat: if dirt has become embedded in the keycap, it should be cleaned separately with soap or any detergent. Just pour the product onto the sponge/brush and clean it, then rinse with water. I have blue Tai-hao caps - they are rubberized ABS plastic, they get very dirty, so I definitely clean them extra. Toothbrush + fairies, a couple of minutes and you're done.
While the mouth guards are freshening, let's work on the plate and body.
We take a vacuum cleaner, put on a small attachment with a brush (if you don’t have one, you don’t have to put it on) and start cleaning the plate. If you don’t have a vacuum cleaner, but you have a can of compressed air, you can use it. There is an option to check your lungs and simply blow out all the debris. It's not as effective, but it will do. The disadvantages of using the last two methods are the subsequent removal of debris from the table, cabinet, floor, etc. Everything will just fall apart 
If you have alcohol lying around at home (from 60% or at least vodka), then you can drip each switch, 2-3 drops are enough. This is necessary so that the dirt that has penetrated into the switch is cleaned out a little. This especially helps if you have double clicks or minor sticking. Be sure to click all the switches after digging in order to have an effect.
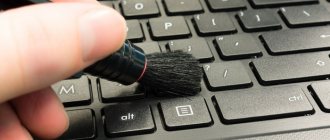
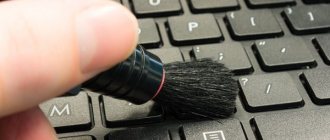
Wipe the plate with a damp cotton swab or toothbrush. I do this with the same brush, it perfectly removes stuck dirt and collects cat hair stuck in the switches (pet owners will definitely understand). I moistened the brush with technical alcohol.
Also, don't forget about the body. Everything is the same: water, a rag/sponge and detergent, if necessary.
After all the procedures, the mouthguards must be dried perfectly so that water does not accidentally get into the switch itself. Place them on a napkin and leave to dry. If you place them on the battery or direct a fan at them, drying will go much faster.
Personally, I just wiped it with a cloth and “blown out” all the water from the back of the mouth guards. It takes longer, but is more familiar.
We put the dried mouthguards on the keyboard and rejoice at the result. Everything is elementary and simple. The main thing is not to forget that most often keyboards break due to dirt.
If there are stains that cannot be removed with detergent, you can try wiping with alcohol, but there are exceptions: ABS plastic, body/mouth guards, plate. PBT plastic with impurities, body/burls, plate. You can erase the top layer and it will be very ugly. Therefore, if in doubt, don’t take the risk. Or dilute the alcohol well with water.
And now a little advertising. We have ]preventative keyboard cleaning[/anchor]. In general, we do the same thing, but for money. If you are very lazy, then come to us
Cleaning the Keycaps
I collect my "extra key set" in a separate small box.
Use a key remover and start removing the keys. Keycaps are very easy to remove, so it should be a quick and easy process. Just pull up and they should come loose.
You will find that some of the large keys (Space, Enter, ...) do not release, this is because they are located on the stabilizers. If you don't know how to remove them, it's best to just leave them in place. You can easily clean several stabilizer buttons by hand.
Once your buttons are removed, it's time to assess the damage. If there is a lot of accumulated oil on the lids, I personally give them a quick wipe with a cleaning cloth to get rid of the more stubborn bits of dirt before submerging them in a bowl of soapy water. If they are not very dirty, you can either simply clean them with a napkin or throw them straight into the container.
Once the buttons are in the container, I recommend leaving them in there for at least a couple of hours to give the soap time to do its job. If you're just using a cleaning cloth, at this point you can lay the buttons out on a towel to dry.
How to remove and install a key and clean a laptop keyboard
- Unplug your keyboard.
- If disaster strikes your laptop, turn it over and remove the battery. Remember - it will be easier to restore data on the disk than to buy a new device.
- Turn the keyboard upside down and shake vigorously so that the liquid flows out and does not penetrate deep into the case.
- Blot any remaining liquid with a towel.
Important! The number of clicks when fastening corresponds to the number of grooves. If there are fewer clicks or the key is not fastened, there may be an error in the fastening and it is better to double-check everything.
Cleaning the board and keyboard
By removing the keycaps, you can see how much dirt has collected under your keyboard over time. Take a vacuum cleaner and simply place it over your keyboard, sucking up larger pieces of dirt and debris.
There is no need to try to move the vacuum cleaner between the switches as this may damage them.
After the initial cleaning cycle, take cotton swabs and lightly walk along the “paths” between the switches to pick up small particles. Don't try to stuff cotton swabs into the switches themselves.
If you're now happy with how the keyboard base looks, you can leave it as is. If there is still too much debris, you can make another pass with the vacuum cleaner. Repeat this process until you are satisfied.
After cleaning the board, I usually turn the keyboard upside down and lightly tap the back side to remove the last of the small particles.
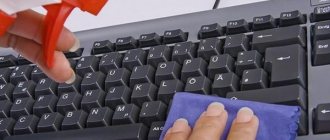
Now it's time to clean the rest of the keyboard. Take a damp cleaning cloth and wipe down the entire keyboard (not the circuit board where the switches are - that's already cleaned and you don't want to get the switches wet), paying particular attention to the areas where your fingers rest/hands usually rest, as these are often the dirtiest areas .
You can also lightly go around the bottom of the keyboard, but since there's not much action to be taken here, there's really no need to do a very thorough cleaning there.
Spills
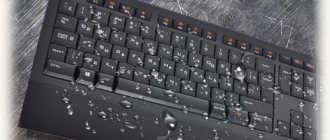
Spills are a particular problem - sticky and destructive, causing short circuits. Water is not too dangerous if the keyboard is soaked in it. However, other drinks such as beer or sweet, sour drinks may be detrimental. There's no guarantee that you'll be able to get your keyboard back, but there are a few things you can do if one does.
- First, don't flip or tilt your keyboard. Further spillage inside is critical.
- Remove the keycaps and immediately assess the extent and quantity of the spill.
- If the spill seems localized or localized to one area, or the switches appear to be unstained, you can clean the affected areas with alcohol and cotton swabs, or simply follow the deep cleaning guide above.
- Once your keyboard is clean and dry, reconnect it to your computer and test it.
Let's finish
Leave your keyboard somewhere at room temperature to dry. You can cover the empty button spaces if you are in a dusty room if you don't want that part to quickly become dusty again. Now all that's left to do is wait for everything to dry before putting the keyboard back together.
If you decide to put the buttons in soapy water, it is extremely important that you take your time and that they dry thoroughly after you take them out of this “bath” after a few hours.
I usually lay them one side down on a towel, turn them over after a couple of hours, and repeat this process until they are completely dry.
Cleaning the keyboard after exposure to liquid
If we are talking about the need to clean the keyboard after liquid has come into contact with it, be it tea, cola or plain water, you should follow slightly different rules to prevent possible damage. Read more about them in the manual below.
Read more: What to do with a liquid-filled keyboard
We are glad that we were able to help you solve the problem. In addition to this article, there are 12,625 more instructions on the site. Add the Lumpics.ru website to your bookmarks (CTRL+D) and we will definitely be useful to you. Thank the author and share the article on social networks.
Describe what didn't work for you. Our specialists will try to answer as quickly as possible.
Bottom line
Cleaning your keyboard isn't the most fun thing in the world, but the feeling you get when you use that brand new keyboard will more than make up for the rather tedious cleaning process.
Your gaming equipment, like any other type of equipment, needs to be properly maintained to get the most out of it, so be sure to clean your items from time to time.
Enjoy your clean mechanical keyboard!
Author of the publication
offline 4 hours
Preparatory actions
Before you start cleaning your keyboard, you need to prepare for this process so that you don’t miss anything during it and don’t look for missing tools. All you need is a few simple aids, some of which can be replaced or even dispensed with.
- Look at the packaging of your keyboard or remember where you put the ring that came with it. It is necessary to pry off the caps and remove them. This makes it much easier to clean all parts of the device, even in cases where it is not completely disassembled. You can remove keycaps with your hands, but you need to do this carefully, and this procedure will take a little longer.
- You will need a special brush or any other brush whose bristles are suitable for cleaning a mechanical keyboard from dust and foreign objects. Ideally, purchase a special brush, but you can easily replace it with any other similar one you have at home.
- You will also need a lint-free cloth. This could be, for example, microfiber. This tool is also not necessary, but with its help it will be much easier to remove dust from the surface or the board itself if the keyboard is also disassembled.
About additional devices that may be useful during cleaning. It will be discussed further. They will be good helpers, but they are rarely used and it is quite possible to do without them, so they are not included in the list above.
How to clean your keyboard
- You just need to dry the information input device using a hairdryer, or place it in the sun (under a hot lamp) to dry it on its own;
- You need to start disassembling the device and try to remove all the water from the keyboard using manual methods. This method also helps out if the hairdryer does not dry the keyboard.
If the fastening element is still broken, you should not immediately run to the workshop - you can fix it yourself. You can do it this way:
Folk remedies Recipes for masks At home Hair loss in women How to stimulate growth Causes of hair loss Hair loss in men Review of vitamins Helpful tips
What to do if liquid spills
- Attach the buttons in place. You need to start with the big keys. First attach Shift, Spacebar and Enter. Then you need to replace all the other keys. To attach the button to the base, you need to press it lightly. A click indicates that the button has returned to its place.
Once every few months, deep cleaning of the periphery is necessary. In addition, it is needed if liquid has entered the periphery. Before the procedure, we recommend taking a photo of the laptop with the keys installed. Then assembly will be easier. Next you need to do the following manipulations:
How I found my ideal hair growth product
Hello dear! I want to share with you my solution to the sensitive problem of hair loss . The problems are very serious, at least for me. I would never have thought that this misfortune would touch me, especially at the age of 29 (read more...)
How to clean a laptop or computer keyboard. 12 proven methods | Blog Comfy
- Compressed air cylinder. Compressed air perfectly blows out small particles under the keys. Some say that it can be replaced with a medical bulb or a vacuum cleaner. In the first case, you will spend forever cleaning the mechanics, and in the second, you risk getting sucked into the keys.
- Cotton buds. Choose sticks with the narrowest tip possible. You can find specialized sticks in electronics stores; they fit perfectly between the keys.
- Microfiber cloth.
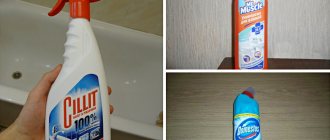
- Cleaning liquid. Ideally, you should buy one of the special solutions for equipment. Under no circumstances should you use aggressive cleaning agents containing acetone, various solvents, etc. Products containing isopropyl alcohol (or a solution of isopropyl alcohol at a concentration of 90−99%) work well.
- A stiff brush to brush away crumbs.
Such a board most often consists of a three-layer mechanism. At the same time, its 3 layers are attached to each other in different places. It’s not worth separating these layers because with your actions you can simply break it. To remove water, you need to carefully wipe the surfaces of each of the three board elements on each side with a soft cloth.
Cleaning by type of contamination
There are several ways to clean a mechanical keyboard. Choosing the right one depends on how dirty the device is. In some cases, a simple surface treatment is sufficient, but if the keys stick or dirt accumulates between the buttons, you will need to completely disassemble and thoroughly clean the device inside.
Can I wash my keyboard with water? It depends on its type. There are keyboard models that can be washed; the case in them is protected from liquids getting inside. Such devices can withstand wet cleaning, and the corresponding mark is on the packaging and in the instructions. Most simple models cannot be washed at all.
Do you like guys with long hair?
Not really
Lightweight (no disassembly)
For minor contamination and as a preventative measure, use surface cleaning, which does not require disassembling the device.
- A table or other flat surface on which work will be carried out is covered with a rag, film or newspaper.
- The device disconnected from the computer is placed in a prepared place, turned over and slightly shaken so that the debris that has accumulated in the cracks flies out.
- Use a car or a special small vacuum cleaner to go over the area where the buttons are located to pull dust out of the cracks.
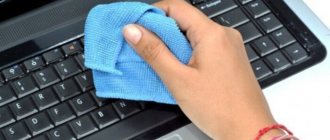
- With a well-wrung out cloth, wipe all surfaces, washing away fingerprints and other contaminants.
If you don’t have a vacuum cleaner, you can try to remove debris and dust that has clogged up inside with a cotton swab, toothpick or toothbrush.
Important! You can connect the device back to the computer only after it has dried.
Average (with partial disassembly)
A dirty keyboard with stains, grease marks, and residue on the buttons and body needs more thorough cleaning. In this case, the device is also not disassembled, but alcohol is used to remove contaminants from the surfaces.
First, they act as during preventive cleaning: turn over, lightly shake, vacuum or clean out clogged dust with a brush. Afterwards, moisten a cotton pad with alcohol or vodka and wipe the soiled areas. You can also use special cleaning wipes for computer equipment. Then leave until completely dry.
Note! Before wiping the buttons, you need to make sure that alcohol will not erase the markings on them. To do this, apply a cotton pad soaked in the solution to one key and try to gently rub it. If the paint remains in place, begin processing.
5 ways: how to clean the keyboard, how to make slime to clean the keyboard, how to disassemble the keyboard
The keyboard is one of the most important tools when working with a computer or laptop. However, it is she who constantly suffers from spilled liquid or food particles that get inside.
Expert opinion
Ekaterina Korneva, expert in the field of care, cleanliness and beauty
I will help you understand all the intricacies.
A dirty keyboard threatens your immune system, since dust and dirt are an ideal environment for germs to multiply. When cleaning the area under the keys, use the same products as when working on the surface of the buttons. Spilled water on a mechanical keyboard If you have any questions, please contact me, I will be happy to answer!
Assembling the laptop after drying
As already mentioned, the final drying time should be about a day, after which you can begin assembling the components.
Some people don’t wait and start assembling the laptop literally an hour or two after disassembling it. This is clearly not worth doing, because instead of the question of what to do if the laptop keyboard is flooded, the problem will arise regarding how to get new spare parts. Yes, yes, corrosion and burnout have not been canceled.
If the drying time is observed, then there is a good chance that the laptop will work as before. First, all the equipment is connected (keyboard, memory sticks, hard drive, cooler, etc.), after which the back cover is put in place.
Now you can connect the battery and start the laptop. And hope that all operations are done correctly, and the equipment will “come to life.”
Extracting the “Shift”, “Ctrl” and similar keys
How to remove keys from the keyboard: button design, step by step
At the top right of the photo there is another small board with the main controller. In most cases, there are still a few bolts in this part. They need to be unscrewed. Then, we take the board and carefully pull it out.
Expert opinion
Ekaterina Korneva, expert in the field of care, cleanliness and beauty
I will help you understand all the intricacies.
It is quite possible that water will be on rubber buttons, keys and other elements of the front surface of the device. This recommendation is difficult to follow, of course, who doesn’t like to eat while working or watching a movie. How to clean the keyboard on a laptop - the best cleaning methods For any questions, please contact me, I will be happy to answer!
Cleaning contacts and cable
- Do not attempt to remove dirt by rinsing the keyboard with running water. Liquids must not get into the device.
- Before removing the keys, you need to remember their location so that there are no difficulties during assembly.
- The removed buttons must be placed on a napkin and ensure that they do not get lost.
- Cleaning should be done regularly, even if the device is operating normally, to prevent the formation of old dirt.
- You should avoid eating at the computer. Food particles can get into the gaps between the keys, and spilled drinks can damage the electronics.
A data input device, like other elements of a computer, when liquid penetrates inside its case, ceases to function completely, or it begins to malfunction. But, despite this, a modern keyboard (even a simple one), when exposed to water, passes this test without any special consequences (in most cases).