Did you know that toilet paper is a valuable item in the crafters' arsenal? After holidays and celebrations, all sorts of bottles and jars always remain in the house......but think before you throw them away. They are perfect as a subject for creativity.
Today we will look at master classes on decoupage of bottles with toilet paper - these handmade things will fit into the interior and will find their place on the shelves or will be given to friends.
At the first stage, the ability to do everything absolutely well, clearly, accurately is not at all important; here you just need to be fired up with the desire to create.
Bottle decor in treasure style
For marine decor of the bottle, prepare:
- PVA glue
- dry sponge
- sewing zipper
- spray paint (brown)
- hot melt adhesive (or “Moment”, “Elephant” type)
- coins
- seashells (2–3 pieces)
- decorative algae
- chain
- beads
- shiny lace.
First of all, we prepare the container for work, clean it of labels, grease, and dust. It is better to cover the surface of the table with oilcloth, which can later be cleaned of glue.
Decoration with cereals
The container can be decorated with cereals and pasta.
To do this, the surface must be wiped with alcohol to degrease it and increase adhesion.
DIY wall panels: tips for making from cork, plaster, branches, plaster, beads + video instructions- Wall mirrors in the bedroom: rules for ideal placement according to Feng Shui
How to make a shelf with your own hands - diagrams, drawings, design and features of use in the interior (105 photos)
The entire surface of the bottle must be coated with glue.
Then the cereals are laid in layers from the bottom of the bottle to the very top (for example, peas first, then beans, continue with rice and add buckwheat last). Sometimes cereals are added.
Cereals are used to decorate the bottle, and it in turn becomes a decoration for the kitchen.
Vine
To decorate in the form of a bunch of grapes you will need:
- toilet paper
- ice cream sticks
- hot melt glue and PVA
- foamiran
- acrylic paint, varnish
We carry out the work in stages:
- We tear the material into small pieces (about the size of a napkin) and apply it to the bottle. Using a brush dipped in glue, fix it to the product. So we glue the bottle, including the neck, and then dry it for 24 hours.
- We paste ice cream sticks over the bottom of the bottle in the form of a fence.
- We twist two thin, dense tubes from a piece of newspaper and glue them horizontally over a fence made of sticks.
- We roll small pieces of toilet paper into balls with wet hands and place them on the glue, imitating a bunch of grapes. Each ball is once again treated with glue on top.
- We cut out a grape leaf from foamiran, draw the veins with a pencil and glue it to the bottle. We apply hot glue to the leaf veins and individual sections of the product in the form of grape tendrils.
- Let it dry, then paint the bottle completely with acrylic paint.
- Apply a little white paint to a fabric napkin, dip a cotton swab in it and paint the protruding areas of the product.
Then we mix white paint with green and tint the leaf, with purple paint we tint the berries. Finally, we coat the bottle with acrylic varnish and get a simply magical result!
Different ideas: what happens
For such a craft, as a rule, you take a bottle of an unusual shape. Most often these are containers of expensive branded alcohol. It is interesting in itself, and after decoration it turns out to be a real masterpiece, but only if the decoupage is done well.
There are many ways to give a bottle a new look. Having appeared at the end of the seventeenth century, this technique of decorating objects has been improved. Today, these types of decoupage are widely represented in needlework.
- Volumetric (creating 3D images from scrap materials).
- Classic (applying a picture directly to an object).
- Artistic (creating a single full-fledged canvas using different effects).
- Reverse (decorating glass from the reverse side).
- Decopatch (work using patchwork style).
Today there are several ways to decorate a bottle with your own hands. This means decorating with toilet paper, tights, napkins, semolina, and various types of paper.
Decor using foamiran
For work: foamiran, acrylic paint, varnish, toilet paper, PVA glue. If you don’t have foamiran, you can use thick cardboard.
We cover the vessel with toilet paper and apply glue on top again. We cut the foamiran into uneven pieces and glue them to the bottle.
We paint it with acrylic, add white color along the top of the protruding parts, apply varnish on top and decorate with an accessory. Ready!
Decoupage bottles with crumpled paper
There are many options for decoupage with crumpled paper, it all depends on your imagination. We will look at two of them. In both cases, we will need the simplest things that are found in every home: toilet paper, PVA glue, sponge, acrylic paint.
By the way, if you don’t have acrylic paint, you can use gouache or watercolor, but then you will definitely need to cover the composition with acrylic varnish.
Option one
The paper should be torn randomly, without clear, even edges. As a result of the fact that PVA glue forms a hard texture after drying, the craft will be very durable.
We apply a double layer of paper soaked in glue to the product, creating small wrinkles. We make the entire vessel in this way.
After the background is finished, you can decorate the sides, for example, make a decorative flower, a bird, or simply lay out an abstraction:
- Apply glue to the place where the decoration will be
- We twist the paper into tubes and place them on the background of the bottle with the desired design.
To emphasize the resulting texture, paint the top layer. We varnish the product to ensure its moisture resistance.
Option two
This time we will simulate rain. We measure a piece of toilet paper according to the height of the bottle with a small margin. Place the product on a stand and coat it with glue.
Starting from the neck, glue the paper to the bottle, slightly bevelling it to the side. When gluing, we form relief folds. After the container is finished, we take hold of its bottom, fixing each part that has not been glued.
After the product has completely dried, we begin painting. First we paint with one color of acrylic (choose which one you like), then paint with white with an almost dry brush along the protruding folds. Then we coat it with varnish.
This is how easily decoupage is done with crumpled paper, resulting in a wonderful product that can decorate any interior.
This method can be used to decorate bottles, glasses, vases and many other tableware. This can be thematic decoupage: March 8, February 23, New Year, wedding.
Antique and modern
Art does not stand still. Ways to cover a bottle with paper are added every year. Hobbyists even create 3D compositions. And some people prefer the classics. It’s probably not a matter of adherence to one style or another, but a desire to bring something truly unique to your home or office interior.
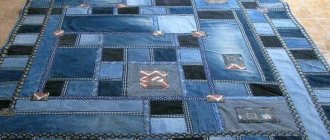
Pirate treasure
It is logical to decorate this craft in an antique style. Instead of paper, you can (but not necessarily) take burlap, stockings or tights. It is advisable to choose a darker varnish - this will make it easier to make the bottle more ancient.
To go for the treasure, you need:
- Soak the selected piece of fabric in PVA.
- Wrap the vessel in burlap or thread it inside a stocking or half of tights.
- Wrinkle the fabric a little, but without much enthusiasm, so as not to complicate the placement of pictures.
- Stick or draw a compass, sailboat, or map of Treasure Island.
- Draw a couple of sea tattoos: anchor, mermaid.
- At the bottom of the composition, stick several images of ancient coins (they can also be drawn).
- “Scatter” a few shells and fish, pieces of twine spread at the ends between the coins. The shells need to be held until they are securely fixed to the material.
- Torn newspaper inserts will look good, in the lines of which words related to treasure hunting will be guessed.
- Apply the varnish by applying a sponge with varying pressure or with a rough brush. This way you can achieve the effect of unevenness and the appearance of cracks. If they seem not enough, add them with sharp movements of a sharp object (knife, fork).
- When the varnish has dried, apply a second coat, only this time carefully.
- Plug the neck with yellow or gray paper, which also needs to be patched. Another option is to seal with sealing wax or sealing wax. Scratch a beautiful monogram on the “seal” or make an impression.
For greater effect, in the center of the composition before the second stage of varnishing, you can place your own photo, designed in a graphic editor in a pirate style. If a natural ready-made photo is used, then even atheists should behave more carefully with it. You should not cut off your copy of an arm or leg.
Wide world of hobbies
The container can not only be aged, but also modernized. For this purpose, pictures and objects that reflect our days are used. A central pattern is also desirable here. It may be a larger version of some image of the main theme.
Modernity can be passed through the world of your own fantasies, desires, hobbies:
- Stock up on unnecessary color magazines (you can download pictures from the Internet, but the effect will not be the same).
- Cut out photos and illustrations that fit the given topic. Let them be of different sizes. Approximate topics: sports or pop stars, cars, airplanes, beauties on the beaches.
- Cover the vessel with clippings in a random manner. Drawings can overlap each other and overlap at the edges.
- At the joints (but not at every one - this would be too much) the cut-outs should be supplemented with rhinestones, old SIM cards, images of electronic displays and banknotes.
The result will be a mini-map of desires in the original format. Theoretically, it can be manufactured in compliance with all established zones. But simply as a unique piece of furniture, the craft will be appropriate.
An interesting craft in a modern style can be made by pouring different bright colors inside. No need to shake the bottle, spilling the contents. On the contrary, you should calmly roll it in your hands until the colors are randomly mixed. This is an example of a unique interior decor.
Patterned decoupage
You will need:
- acrylic paint, varnish
- PVA glue
- toilet paper
- rhinestones
Apply a random design with acrylic paint to the cleaned, degreased surface of the bottle. Let it dry. We tear the toilet paper into pieces with uneven edges and glue them to the design, creating raised wrinkles. Leave until completely dry. Then we paint the dried paper with acrylic and decorate individual areas with rhinestones. We finish the work with varnish.
There is also an interesting version of the patterned composition.
We make the base using the decorative method using crumpled paper. We try to make folds as small in size and as large in number as possible, imitating a tree trunk.
On a completely dry base, draw the image with hot glue and then paint with acrylic.
You can apply silver pigment to the protruding areas, and to prevent it from crumbling, coat the product with varnish.
Decorating with salt crystals
Decorating with multi-colored salt is based on the use of crystals, which were combined and painted in different colors with paints, then heated in the oven at a temperature of 100 ° C for 60 minutes.
Dried and multi-colored salt is softened with a fork or mortar, then carefully sifted.
Different colors of salt create an unusual, beautiful decor. A large number of shades will make the bottle an interior decoration with a twist. Pour multi-colored salt through a watering can; the colors should not mix, but alternate right up to the neck.
The container is closed with a stopper. You can also add decor on the outside: ribbon, beads.
Scenery
Often people, as soon as they hear the word “landscape”, give up on the idea. However, you shouldn’t immediately think that landscape is complicated. In fact, everything is much simpler than it seems.
We take as a basis toilet paper glued to the container with random folds. Then, after drying, we sketch the drawing with a simple pencil.
The design can be anything - a tree, birds, animals, fish, fruits. It may be just one tree, but believe me, this decor will look more than decent.
We twist flagella of different thicknesses and glue them to the sketch of the drawing. If this is a tree trunk, the flagella will be thicker, the branches will be of medium thickness, grass and bushes may be made of thin and long strands.
Would you like a rowan branch? Roll small balls with wet hands and form a bunch of them. Don't forget to cover the workpieces with glue.
After drying, all that remains is to color the resulting drawing. By the way, it’s better to paint the landscape with your finger - this way you can avoid clear boundaries between colors.
Paper fairy tale
The very word “decoupage” came to Russia back in imperial times from the country of the Gauls, along with the fashion for everything French, including the language itself. The technique of the craft was borrowed by Europeans from China, where its history is lost in the darkness of centuries. In Europe, it quickly spread not only in France, but also in Germany, Spain, and Russia.
Russian birch
It all started with poor Chinese peasants who at least somehow tried to decorate their poor home. Nowadays, even more than wealthy people do not shy away from creating an original interior using improvised means. Creative workshops for children, focused on the art of decoration, have also appeared.
The simplest master class on decoupage bottles with toilet paper:
- Coat the bottle with glue. This can be done in parts, otherwise you will have to hold the base with your finger, pressing on the neck.
- Cover with paper at random, pinching small wrinkles.
- If you have multi-colored consumables, then at the same stage you can create a color background (blue sky, green grass).
- In the event that you only have one roll at your disposal or you decide to use large quantities of paint, there is no point in forming tones yet.
- Let the paper dry. You can even leave the craft until the next evening - this craft doesn’t like those in a hurry.
- Use a soft pencil or felt-tip pen to draw the contours of the birch tree. No special care is needed here.
- Mark the sun at the top. Here you can safely draw rays, because this is not a naturalistic picture, but a game, an invention. Scatter a couple of birds and clouds across the sky.
- At the bottom, outline grass, a few flowers, a mushroom family, and a hedgehog.
- Then there are several options of varying complexity: using thick paints to create a landscape drawing; Glue each line with rolled paper tubes moistened with glue; Model individual figures from paper.
- The most interesting effect is obtained by gluing the contours with tubes of different thicknesses (it is clear that the tree trunk, branches and grass differ in format) and then coloring them.
- After gluing the images, the craft should dry again.
- Now the draft needs to be colored. It's better to start with the background, large interior spaces. It is more convenient to go from top to bottom. There is no point in saving paint: the thicker it is, the more textured the painting will be.
- Once again, let the product dry and then coat it with varnish. In this case, a clear or beige varnish is suitable.
- If it’s the right season, then the craft should be decorated up to the neck with birch earrings.
Any varnish can both highlight the details of a craft and hide its flaws, but also vice versa. Even if something stood out (or disappeared) not as planned, it is always easy to explain the stroke by the subtlety and originality of the author's plan.
flower composition
Gluing bottles with napkins gives a similar option. The technique is almost the same. The differences begin if the composition is created on the basis of napkins with drawings. The style is determined by the theme of the pictures themselves.
A flower arrangement would look good:
- Apply paint to the prepared base. You need to start from the neck. For a spring meadow, blue, green, and light green tones are useful.
- There is no need to wait for final drying. Pieces of napkins with designs can be attached directly to the paint (but it is safer to use glue).
- Pictures can be arranged in one line or in a checkerboard pattern.
- When gluing, it is better to smooth the drawings from the center to the edges. This removes air and straightens out wrinkles. Even if the horizontal or vertical order is slightly disrupted, nothing terrible will happen.
- You can attract attention by not only making one floral background, but by highlighting the center of the composition. To do this, you need to select a larger image, which is additionally decorated with a frame made of tubes.
- Next, using bright colors, you should use a brush to frame the entire ornament, as well as its individual parts.
- After drying, coat the surface with varnish.
Any paper will do, even old newspapers. It’s just not very comfortable to work with them due to the presence of printing ink.
Before coating the craft with varnish, it can be decorated with sparkles and thin lace. The work will become brighter. This option is suitable for New Year's holidays. If the composition itself is more important, you shouldn’t make it sparkle.