Master class on tulle flowers
Making airy, light flowers with your own hands is not at all difficult. For this flower you will need:
- a piece of tulle;
- scissors;
- needle and thread.
The fabric is folded into a tight roll approximately 1-1.5 cm thick. Carefully cut out a multi-layer droplet from it. This is what it looks like.
The droplet should produce many transparent petals. 40 pieces are selected for work. First, take one of the petals and, after threading a needle and thread through it, secure a knot on it. Next, use a stitch “forward needle” to fix the second petal, slightly shifting it to the first.
In exactly the same way, sew all 40 droplets one after another. The result is a kind of “ribbon” of parts.
Next they begin to assemble the middle. To do this, the first 3-5 petals are placed in a bag and stitched with thread at the base. Then proceed to the next row, which should be slightly higher (literally 1-2 mm) than the middle. It is also secured with thread.
In this way, the entire flower is attached row by row. Each next row should protrude slightly above the previous one. When they reach the last two or three rows, each of the petals is fixed separately with a thread, having previously given them a cup-shaped shape.
The result is a neat flower that looks like a rose. You can decorate a dress with this flower, attach it to the base of a brooch, or fix it on a hat or handbag.
Tulle and satin fabric
Instructions:
- Draw a flower with 8 petals on a piece of paper, as in picture 1.
- Place satin and tulle together in several layers.
- Attach the paper blank to the layers of fabric with a pin and cut out the parts.
- Fold the tulle and satin fabric in pairs (picture 2).
- Take one pair and roll it three times (picture 3).
- Cut out a circle of fleece and glue all the blanks onto it on top of each other (picture 4).
- Wrap the last piece several times and glue it inside the flower (picture 5).
Now all that remains is to place the finished fleece flower on the headband or elastic band.
Step-by-step creation of a bow for a hairpin
DIY tulle flowers master class is a frequent request on a popular hosting with video. The essence of such numerous videos comes down to one thing: fabric is wrapped around a piece of cardboard in the shape of a donut , then cut along the perimeter and tied with a rope or hemmed with thread.
If you need to create a voluminous decoration, then do not skimp on the fabric; however, you can always make a couple of test copies from cardboard donuts of different diameters before deciding on the size of the intended finished product.
A minimalistic version of the hairpin involves cutting tulle fabric in circles and folding it into segments. The next step is sewing it to the base, so you get the effect of hydrangea flower petals. For realism, you can sew a bead or something like a stamen into the core of the flower.
Spectacular hairpin
The use of tulle flowers with your own hands is very diverse, all kinds of headbands, headbands and decorative elements. One of the interesting options can be called a lovely bow on the head; this idea will fit perfectly into the image of a young lady preparing for a prom or just an everyday outfit for an educational institution. To start creating a future masterpiece, you will need to make certain preparations, including the following components:
- Main material.
- Special glue gun and refill for it.
- Spectacular stasis.
- Sharp scissors.
- Small tweezers.
- Satin ribbon.
- Cardboard mold.
How to make a bow on your head
You can make a lot of things from tulle. For example, you can make your own bow for Malvina, a headband or headband with a flower, a hairpin, decorative elements, or a simple bow for a girl, which will be discussed step by step in this lesson.
For work you will need the following materials:
White tulle with a 15 cm splint.- Moment glue and glue gun.
- Colored or plain rhinestones.
- Lighter.
- Scissors.
- Tweezers.
- Satin ribbon blanks 5x5 cm and 5x2 cm. It is best to choose the color to match the bow - white.
- A round felt base with a diameter of 3-4 cm. You can take a cardboard blank, as in this case.
First you need to create the petals of the flower bow. They are made from tulle squares 7.5x7.5 cm. There should be 25 such squares. Each petal is formed from two such square blanks by placing one on top of the other. At the initial stage it looks like this.
Let the first layer of the product be the top square, and the bottom the second. Next, the two-layer base is bent so that the lower corner of the second layer falls between the upper corner and the upper right corner of the first. This is how it should turn out in the end.
Having carefully examined the resulting piece of the craft, they look for the topmost tip and place the tooth closest to the fold line and the right edge of the product on it. You can also mentally imagine how the original workpiece is folded three times. Then the desired result can be obtained after the first bend. The photo below shows the result of the work.
Wonderful seven-flowered flower
The original head hat in the form of a fairy-tale flower is similar in its creation to how to make a tulle bow on the head. This version of the evening headdress will be enthusiastically accepted at graduations, social events, and charity balls. A multi-layer cut cardboard bagel made of fabric of several colors, even using the entire rainbow gamut, will add optimism and allow you to stand out in the audience.
Do-it-yourself tulle decorations, created with love, can become excellent decorations for a family celebration or children's party, and they will also decorate the photo zone for guests of the feast who wish to capture happy moments.
The efforts spent on this decor will more than pay off with the delight of visitors.
Crafts made from tulle are accessible to even a first-grader who has barely learned how to handle fabric and scissors, let alone mature individuals with developed aesthetic perception, because for them creating fancy shapes from the most delicate tulle will be a tremendous pleasure.
Even in ancient times, flowers were used to decorate rooms, festive clothes, and hairstyles. And it doesn’t matter at all whether they were fresh flowers or artificial ones made by a skilled craftsman. The result was always beauty and high festive mood. Modern craftswomen create amazingly beautiful flowers with their own hands from a variety of fabrics, threads, wool, corrugated paper, foamiran, polymer clay, cold porcelain and other materials. Let us also try to create a delicate fantasy flower from tulle with our own hands, using the step-by-step master class “Flower from tulle. Beauty with your own hands."
We will prepare everything you need for work
Before we begin creating a future flower, let’s prepare all the necessary tools and materials for the job:
- It is advisable to choose tulle in two shades, but you can get by with one color;
- thin colored paper of different colors;
- sharp scissors;
- durable cotton threads;
- and definitely a good mood.
Step-by-step guide to action
- We cut colored paper and tulle into 6 rectangles of the same size, 2 of which will be made of tulle, and the remaining 4 from thin colored paper. We will try to make our first flower from rectangles with sides of 25 cm and 40 cm. In the future, we will be able to work with blanks of other sizes. Then it will be possible to get, depending on your desire, larger or very miniature flowers.
- Stack all the rectangles. There should be tulle blanks on top, and paper ones underneath. By the way, if you have paper or tulle of different shades, then the darker ones should be lower than the light ones. Carefully begin to fold the stacked parts into an “accordion”, trying to make the folds at the same distance of approximately 2 cm.
- The finished accordion must be bent exactly in the middle and, at the bend, pulled tightly several times with cotton thread, tying it tightly with a strong double knot. We are not in a hurry to cut off the remaining long ends of the thread; they may still be needed if you need to assemble the finished products into a garland, attach a flower to a base for a brooch, a gift box or a hat. We form pointed petals by cutting off the corners on each fold of the accordion with scissors. We try to cut so that the petals are approximately the same.
- All that remains is to form a three-dimensional flower, and for this we need to straighten our product. First we work with one half of the future flower, and then with the second. We start with tulle. We carefully lift each layer of it up in turn.
- After this, we lift the petals of the paper layers. Both tulle and paper are rigid enough to hold the shape of the petals. So quite quickly and without much effort we end up with a surprisingly delicate three-dimensional flower in our hands.
A beautiful fantasy tulle flower is ready. Making such beauty was not at all difficult. However, the proposed master class is by no means something permanent and final. It serves only as an initial basis for the use of your limitless imagination. You can vary to your taste not only the size of the flower being created, but also the color scheme and materials. If desired, you can exclude paper and use only tulle of different shades or combine it with lace inserts. The resulting flowers can not only become a brooch on a dress, decorate a hairpin or hairband. They will help transform gift wrapping and even be used to create an original interior topiary.
To create this decoration, it is not necessary to buy expensive tools or materials; it is enough to purchase a piece of fabric. A tulle flower is a wonderful decoration that can be easily made by anyone, even a novice craftsman. An unusual flower can be used to decorate anything - a bouquet, a dress, a hairpin; it can be attached to a handbag or a headband, and the accessory will become truly unique. And all you need is a little tulle, thread, scissors and a little imagination. This master class provides step-by-step instructions with photos on how you can make an original decoration yourself.
MATERIALS
- Tulle (6 cm by 110 cm)
- Part of a hidden snake 25 cm long
- Round beads
By threading the edge of the snake, which has no teeth, onto the needle, I formed a flower.
After that, I decided to decorate its middle with round beads, stringing beads three at a time.
Then I folded the tulle in a large number of layers (about 30) and cut out the petals in this shape.
Folding the bases of the petals overlapping each other, I sewed them onto the back of the flower in a circle.
The more petals, the more magnificent the flower will be, and their size can be determined visually, depending on the size of the middle of the snake. As a result, I got this charming flower. Thanks to the tulle petals, it looks very airy.
The second part of the cut snake was also not left idle. I made another flower from it, but it is a little simpler. His skirt is made similarly to a snake flower. The tulle is folded in half and gathered on the side of the open cuts.
This is how you can use leftover material that was not needed while working on the main thing. I did it spontaneously, but if someone liked these flowers, then you will select the necessary materials specifically.
Now you know how to make a flower from tulle and a snake with your own hands. These flowers decorate any product from clothing to hats and shoes.
I hope that this lesson will be useful to you and if you accidentally end up with unnecessary secret snakes in your hands, you will know what to do with them.
Always be beautiful and charming!
Subscribe to the news to keep abreast of all the interesting things!
Find out even more interesting things:
Kanzashi brooches as a fashion accessory
Brooches are a unique accessory that will decorate and add sophistication to any outfit. They practically never go out of fashion and some people, despite trends, ...
How to make decorative flowers from chiffon with your own hands
Fans of accessories and decorations know that artificial flowers are very popular now. They can be made from a variety of materials. How to make decorative...
For thousands of years, flowers have been the main and desired decoration of the home. Flowers always act as the main or additional gift at holidays and celebrations. In modern times, the durability and practical side of gifts are increasingly more valuable and important. It is for this reason that some people have completely stopped giving and buying fresh flowers. We offer to learn how to create an unusual and beautiful flower from tulle with your own hands. Such an unusual and original flower bud can be presented as a souvenir to a loved one or used as an elegant decoration and accessory.
To fully understand the process of forming flowers from tulle, it is worth having an idea of the characteristics of the material used. Tulle fabric is a very thin material, reminiscent of a cobweb, but at the same time very dense. Tulle is a nylon mesh that does not tear from tension and stretching.
There are several types of tulle. Its types depend on the density and size of the cells in the tissue. Therefore, we can distinguish soft tulle, hard and medium hard tulle.
Tulle can also have small sparkles and come in a variety of prints. There is a wide variety of colors and textures.
We offer you a detailed master class on the process of making an unusual flower from tulle. As a result of the proposed manipulations, you can create a lush and elegant flower that can be used to decorate a headband.
So, prepare all the materials and tools necessary to create a flower:
- tulle of the selected color and shades;
- thin paper;
- sharp scissors;
- threads;
- decorative elements: beads, rhinestones, seed beads.
After preparing everything you need, start making a tulle flower with your own hands.
First, you need to cut two rectangles of the same size from nylon fabric using scissors. To make a large flower, you can use dimensions of forty by twenty-five centimeters. To form flowers on a smaller headband, make the dimensions two or three times smaller than those suggested above. Then cut out four rectangles of the same size from thin paper.
To form a colorful and bright product, use colorful, colored pieces of tulle and plain multi-colored paper.
Then fold the cut pieces so that the nylon fabric is on top and the paper blanks are on the bottom.
Bend the accordion-fold structure in half and secure the center with a thread. Now shape the edges of the flower petals using scissors.
Now you need to carefully and carefully straighten all the layers of nylon material, then the paper layers of the flower. Give your flower the shape of a bud.
There is another way to make flowers from tulle. For this method, you can use leftover fabric, or cut narrow strips from a whole piece of nylon fabric. Wrap each piece around your hand and carefully remove it. Tie in the middle of the structure using thread or ribbon. Cut the ends with scissors and fluff them up. The result was a bow made of delicate tulle. To make a flower you will need two such blanks. They need to be sewn together crosswise. Decorate the core with bright beads or sparkling beads.
The tulle material holds its shape very well, so it is very convenient and pleasant to work with. It is better to sew the parts together, since the glue does not stick them together well. If you want to make a flower applique, then use tulle and felt. By showing your imagination and using the most ordinary materials, you can make a beautiful bouquet for your mother or grandmother. A handmade gift from a child is much more valuable than expensive souvenirs and jewelry.
Further manipulations
The resulting base for the tulle hairpin must be bent so that the corner of the first layer intersects with the second. Now the uppermost tip is visually determined, from which the workpiece begins to be folded three times. Thanks to the video master classes, you can consider in detail all the unclear points and identify your mistakes and shortcomings, if any.
At the next stage, the structure is bent again, as a result of such manipulations, a multilayer triangular petal should be formed. It is important to ensure that all components made in its likeness do not differ from each other.
DIY tulle flowers
Even in ancient times, flowers were used to decorate rooms, festive clothes, and hairstyles. And it doesn’t matter at all whether they were fresh flowers or artificial ones made by a skilled craftsman. The result was always beauty and high festive mood. Modern craftswomen create amazingly beautiful flowers with their own hands from a variety of fabrics, threads, wool, corrugated paper, foamiran, polymer clay, cold porcelain and other materials. Let us also try to create a delicate fantasy flower from tulle with our own hands, using the step-by-step master class “Flower from tulle. Beauty with your own hands."
We will prepare everything you need for work
Before we begin creating a future flower, let’s prepare all the necessary tools and materials for the job:
- It is advisable to choose tulle in two shades, but you can get by with one color;
- thin colored paper of different colors;
- sharp scissors;
- durable cotton threads;
- and definitely a good mood.
Step-by-step guide to action
- We cut colored paper and tulle into 6 rectangles of the same size, 2 of which will be made of tulle, and the remaining 4 from thin colored paper. We will try to make our first flower from rectangles with sides of 25 cm and 40 cm. In the future, we will be able to work with blanks of other sizes. Then it will be possible to get, depending on your desire, larger or very miniature flowers.
- Stack all the rectangles. There should be tulle blanks on top, and paper ones underneath. By the way, if you have paper or tulle of different shades, then the darker ones should be lower than the light ones. Carefully begin to fold the stacked parts into an “accordion”, trying to make the folds at the same distance of approximately 2 cm.
- The finished accordion must be bent exactly in the middle and, at the bend, pulled tightly several times with cotton thread, tying it tightly with a strong double knot. We are not in a hurry to cut off the remaining long ends of the thread; they may still be needed if you need to assemble the finished products into a garland, attach a flower to a base for a brooch, a gift box or a hat. We form pointed petals by cutting off the corners on each fold of the accordion with scissors. We try to cut so that the petals are approximately the same.
- All that remains is to form a three-dimensional flower, and for this we need to straighten our product. First we work with one half of the future flower, and then with the second. We start with tulle. We carefully lift each layer of it up in turn.
- After this, we lift the petals of the paper layers. Both tulle and paper are rigid enough to hold the shape of the petals. So quite quickly and without much effort we end up with a surprisingly delicate three-dimensional flower in our hands.
A beautiful fantasy tulle flower is ready. Making such beauty was not at all difficult. However, the proposed master class is by no means something permanent and final. It serves only as an initial basis for the use of your limitless imagination. You can vary to your taste not only the size of the flower being created, but also the color scheme and materials. If desired, you can exclude paper and use only tulle of different shades or combine it with lace inserts. The resulting flowers can not only become a brooch on a dress, decorate a hairpin or hairband. They will help transform gift wrapping and even be used to create an original interior topiary.
Holiday decor
A tulle flower will help you decorate your home for the occasion; a master class on how to make it is available to everyone. Buds suspended from the ceiling look very elegant and stylish. They can be created from tulle, paper, napkins and fabric.
What you will need to make such an unusual decoration:
- Threads.
- Fatin.
- Scissors.
- Stapler.
The manufacturing process is very simple. Many round parts of different diameters are cut from tulle. Then, several pieces at a time, to make the flower lush, connect the elements with a stapler in the middle. Straighten each layer with your hands, attach a rope and hang it from the ceiling at different levels.
This decoration is perfect for creating decorations for a birthday. In pink for girls, in blue for boys.
A selection of thematic videos for the article
At the end of the article, we offer you a selection of thematic videos. In the materials presented you will find detailed information about the processes and techniques for making flowers from tulle. We hope you find them useful. Enjoy watching and exploring!
To create this decoration, it is not necessary to buy expensive tools or materials; it is enough to purchase a piece of fabric. A tulle flower is a wonderful decoration that can be easily made by anyone, even a novice craftsman. An unusual flower can be used to decorate anything - a bouquet, a dress, a hairpin; it can be attached to a handbag or a headband, and the accessory will become truly unique. And all you need is a little tulle, thread, scissors and a little imagination. This master class provides step-by-step instructions with photos on how you can make an original decoration yourself.
Progress
We thread the snake onto the needle with the side where there are no teeth and form a flower.
Then we string beads, 3 pcs. at a time.
Then we fold the material in layers and cut out the petals.
We overlap the petals and sew them on the back side in a circle.
The volume and splendor of the flower will depend on the length and number of petals; the more there are, the more magnificent and larger the flower will be.
Let's use the second part of the snake to make another simple, cute flower.
Using this photo pattern, you can make flowers from any other materials you like.
These are the cute flowers we made from tulle.
Simple tulle flower
You can make beautiful accessories with your own hands. Hair ties decorated with flowers look very gentle. To make it you will need:
- a piece of satin ribbon 20 cm;
- tulle;
- scrunchy;
- needle, thread, scissors;
- big bead.
How to make a flower from tulle:
- The satin ribbon is folded in half and the middle is sewn together.
- 6 round parts are cut out of tulle and joined together, tightening the thread, in the shape of a flower.
- The core is decorated with a large bead.
- A piece of satin ribbon is sewn to the hair tie, and then a tulle flower.
This decoration can be used to create hairstyles for school or for the holidays.
Same method, different flower
If we take the method outlined above for making tulle flowers as a basis, but add more work, you will get a wonderful craft.
How to make a flower from tulle with your own hands? The instructions are simple:
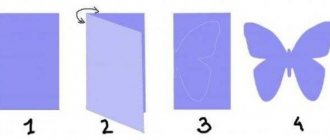
- Cut the material into equal squares (picture 1).
- Fold each piece twice to form a diamond shape and connect the layers with a needle-pin (picture 2).
- Cut out a circle of fleece that matches the color of the tulle and mark its center (picture 3).
- Sew each diamond with the top with a fold to the center of the round piece (picture 4). You need to go in a circle, gradually filling the base with tulle blanks.
- When all the tulle blanks are sewn on, decorate the middle with beads or starases (picture 5).
- Take the headband and attach the base circle to it. Sew its edges so that the flower wraps around the headband (picture 6).
The air accessory is ready!
Headband decoration
If you are thinking about how to make a tulle bow on your head for a headband, just start by folding the fabric in half. Folding in several layers is acceptable. Tie the resulting rectangle in the middle with a tourniquet or ribbon, cut the connected edges of the rectangle with sharp scissors. The resulting cute bow can be sewn manually to the finished base for the headband, or you can use superglue or a special glue gun.
It is permissible to decorate the center of the bow with lace, a button, or a brooch, but the edges of the finished product can be either overcast or left in their original form, and can also be delicately ruffled with the appropriate cuts of scissors.
You can sew beads and glass beads around the perimeter of the decoration to add shine to the finished decoration.
Pompom flower
This flower can be used not only as a decoration for an elastic band, but also for any other accessories or decor - they are often used to decorate holiday rooms.
For this you will need:
- tulle;
- thick cardboard;
- ribbon or strong thread;
- scissors.
First of all, you need to make two identical round blanks from cardboard. The size of the future pompom will depend on the diameter of the workpiece. You need to make holes in the center of the blanks. After this procedure, you should get two identical “donuts” made of cardboard.
The blanks are folded together, while hiding a ribbon or strong thread between them. It will be needed to pull the future pompom. Tulle needs to be cut into long strips. The optimal width of the ribbon varies from five to seven centimeters, depending on the desired size of the pompom. You can use two or more colors of ribbon, winding them alternately. Pom-poms made from tulle in all colors of the rainbow look very original.
Once the tulle strips are wound, you need to carefully cut the tulle along the edges of the donut. Next, you need to pull out the edges of the ribbon or thread, after which the pompom is pulled together in the middle. The cardboard blanks are removed, after which you need to straighten and fluff the finished pompom.
Thus, by connecting several pompoms together, you can get a wonderful holiday garland. Regular large pompoms can be used to decorate the room.
Small pom-poms are perfect for a variety of purposes - they can decorate a little schoolgirl’s hairstyle or party shoes, or they can be used for original decoration of pastry chef’s masterpieces and table settings.
Lush flower
This is also a very simple and quick way to create a head decoration.
For this you will need:
- tulle;
- scissors;
- scrunchy.
Tulle must be cut into strips of equal length. The more stripes and the longer they are, the more magnificent the flower will be. After cutting, all the tulle strips are folded together. The strips are wound around the connected fingers of the left hand. The resulting tulle “ring” is carefully removed.
Using a thread or a thin strip of tulle, tie the resulting tulle ring to the elastic band. The ring must be tied in the middle.
The ring is cut on both sides. Fluff the resulting tulle flower thoroughly.
To make the flower even brighter, don’t be afraid to experiment and use strips of tulle of different colors.
Volumetric flower
Tulle flowers made using this method are most conveniently used as decoration for a room or clothing.
You can get such a craft using the same method as many pom-poms.
First of all, you will need to take a sheet of cardboard. Draw two identical circles on it with a small hole in the center. Cut a long strip of tulle. Connect the two circles together and begin to wrap the diameter of the workpieces with material. The tulle does not need to be smoothed, try to have a lot of folds. Then the flower will eventually turn out lush and voluminous.
When you have wrapped the entire piece, secure the end of the tulle with a drop of glue from a glue gun. Move the material a little and insert the scissor blade between the cardboard blanks. Cut the tulle. Move the pieces apart a little and tie the tulle in that place with a ribbon or thick thread.
Now you can remove the cardboard blanks. They can be used to make other flowers of similar size. By the way, the purpose of the tulle depends on the length of the ribbon with which the tulle is tied. If it is short, then such a flower is used as a decoration for a dress or decorative items and accessories. And if it is long, then the craft can be hung from the cornice or ceiling.
Making a lush flower in five steps
How to make a flower from tulle on your head with your own hands? Very simple. The procedure is as follows:
- You will need a piece of tulle (you can use several colors), scissors and a hair tie.
- Cut several strips of tulle of equal length. The more there are and the longer they are, the more magnificent the flower will be.
- Connect the strips together.
- Connect the fingers of your left hand together and wrap the tulle blanks around them.
- Remove the tulle ring from your hand.
- Place a hair elastic on one side and tie a thread or thin strip of tulle perpendicular to the ring to connect all the parts.
- Cut the ring on both sides.
- Fluff the flower well.
All is ready!
By the way, such a tulle flower for your head can be made with a headband. Just instead of an elastic band, place a hoop on the workpiece and also tie it with a thread.
For a gift
Most people, when thinking about a present, increasingly give preference to durable souvenirs, whether it is a ball of tulle or a flower does not matter, living plants will soon wither, and the craft can decorate the house or clothes for many years. Don’t forget that the creator puts a piece of himself into every handmade work; for some, such gifts can become a real talisman.
Note!
How to make candles with your own hands: instructions for making wax, gel, scented, homemade decorative candles with a wick
What you can make from foamiran with your own hands: we create flowers, Christmas tree decorations, snowflakes, three-dimensional paintings (photo + video)
- DIY glass crafts: what can be made from glass bottles, liquid glass, broken glass (photo + video)
Flower with beads or rhinestones
For this flower, you can use leftover fabric from sewing a tutu skirt. It will make a wonderful decoration in the same style for clothing or a headband. You can glue the flower to the brooch base and decorate your blouse.
Let us describe step by step the process of its creation.
You will need:
- Fatin;
- Threads to match;
- Felt circle for the base;
- Scissors;
- Glue (hotmelt adhesive or moment crystal);
- Center decoration: beads or rhinestones.
Progress:
- Cut the tulle into squares of the same size.
- Take one square and fold it with a corner to form a sharp petal.
- Sew it to the felt base. You can also use glue, but sewn petals will stick better.
- Do the same with all the other squares. Make sure that the petals are evenly spaced in a circle. Don’t let the threads scare you at their very sight - they will be decorated later. It’s better to make not one layer (circle), but two or three: it will turn out more magnificent. Sew each of the petals of the new layer between the petals of the previous one.
- Cut out five or six circles from tulle of the same or contrasting color according to the size of the center. They are needed to hide the seams. Carefully, using small stitches, at a short distance from the edge, sew them to the middle of the flower.
- Glue or sew a large rhinestone (bead) in the center of the flower. You can stick a scattering of small adhesive rhinestones on the petals in any order.
IMPORTANT TO KNOW: How and with what to wear a culotte skirt
Flat version
This method is the simplest and fastest, it is ideal if you do not need lush tulle flowers. This flower is perfect to decorate a hairpin, dress or card.
You will need:
- tulle;
- scissors;
- round template made of cardboard or paper;
- needle and thread;
- glue gun;
- beads or rhinestones.
Using the template, you need five tulle circles. For convenience, you can fold a piece of fabric into five layers and cut it once. Four blanks need to be folded in half three times. The resulting slices must be sewn to the middle of the fifth circle.
To hide the thread, the middle of the tulle flower is decorated with beads or a glue gun and rhinestones.
Making such a flower does not take much time, so anyone can quickly make an original decoration for their accessory or dress. This flower is also perfect for scrapbooking or handmade photo albums.
Tulle flower with cone-shaped petals
To make a flower you only need scissors and a needle and thread. And, of course, tulle, one or more matching shades.
- Fold the tulle into several layers and secure it with a few stitches in the middle.
- Cut a circle of the required diameter with the center at the point where the layers join.
- Make several slits from the edge to the center of the circle, not cutting a little to the very middle. The number of slots will correspond to the number of petals.
- Now wrap each layer of tulle into a cone. These will be the petals.
- Sew a bead into the middle of the resulting flower.
This simple and quick flower can be used to decorate a little girl's hairpin or headband.
Very easy way
If you don't want lush tulle flowers, there is a way to make flat flowers.
To do this, draw a circle on a piece of paper and cut it out. Then fold a piece of tulle into five layers and pin the paper circle with needles and pins. Cut out the pieces. Fold four circles in half three times. Sew the resulting slices to the middle of the fifth circle. The thread can be hidden by gluing several rhinestones on top with a glue gun.
This flower can be glued to a card, hairpin or dress.