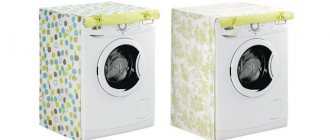
The ironing board cover, depending on the intensity of its use, sooner or later not only has to be washed, but also changed. Over time and high temperatures, the fabric of the cover becomes completely unusable and in order to “refresh” the appearance of the ironing board, a new cover is definitely needed. If you have a sewing machine, then it is not difficult to sew a new cover with an elastic band stitched around the edge. There is another way to secure it to the ironing board, for example, insert a rope into the hem and tighten it. This cover is usually used for a metal ironing board or a board with a mesh surface that comes with a steam iron. But for an ironing board with a wooden tabletop, it is not necessary to sew a new cover. The surface of the board can be tightened using a stapler. This method is especially convenient to use for those who do not have a sewing machine. The studio technologist offers you two ways to quickly and easily make a cover for your ironing board with your own hands.
Video on how to sew a cover for an ironing board.
The easiest way to replace your ironing board cover
It is not necessary to sew a cover for the ironing board. You can simply re-tighten a board with a wooden tabletop by securing the fabric with furniture clips. But first you need to remove the old cover along with the insulation gasket, since when wet it will quickly contaminate the new cover, especially if it is made of white fabric.
If you leave the old gasket, and especially if you do not remove the worn fabric upholstery of the board, then it is advisable to use colored fabric for sewing or reupholstering the cover. Cotton fabric, such as calico, is ideal for the cover, but mixed lightweight fabrics can also be used. The main thing is that they do not fade or spoil light-colored items during ironing. By the way, experienced tailors, when ironing light-colored items, throw a clean white cloth over the board.
Do I need to change the substrate?
Replacing the lining located between the board itself and the fabric may be necessary in the following cases:
- If it became deformed or torn during the process of removing the old fabric.
- If the insulation is old, dirty and stains the laundry when ironing.
- If during use it has become leaky, resulting in the surface of the board becoming uneven.
To make the lining, any insulating material is suitable - foam rubber, synthetic winterizer or batting. You can also use felt or cut a lining from an old flannelette blanket.
How much fabric and batting will be needed for the cover?
To reupholster the ironing board tabletop you need to buy 0.6 meters of cotton fabric and the same amount of insulation. It is advisable to use white (bleached) calico for the cover, and light batting for the lining. The width of the fabric and batting must be at least 150 cm. 300 rubles is enough to purchase these materials. Another thing is to buy a furniture stapler, the price of which is at least 400 rubles, but it will be needed quite rarely. However, a stapler can be useful not only for reupholstering an ironing board. If your home has upholstered furniture, the upholstery of which also needs to be “refreshed,” then these costs will be justified. Instead of sewing covers for chairs, it will be much more convenient and easier to just pull them over. The stapler will also be indispensable when replacing the upholstery of an office or computer chair. However, if you do not need to buy a stapler, you can use small postal nails instead of paper clips. Just do not drive the nails completely into the board, but bend them.
Useful tips
Just in case, you can read the tips before choosing each type of coating.
- When buying universal covers, there is one main rule - the lining must be at least 2 millimeters thick. Otherwise, there is a possibility that when ironing, the surface of the board will be imprinted on the clothes.
- A cotton cape must contain at least 50% natural ingredients. This information is on the label. Do not choose a product with a provocative and bright ornament; when exposed to high temperatures, it can leave a mark on the linen.
- The Teflon coating should consist of three components that are glued together - the Fibretex base.
- The foam cover should be at least 3 millimeters thick. The ideal, of course, would be 5 millimeters plus felt as a backing.
- The best option in terms of price-quality ratio would be a non-stick cover. There is one important rule - such a cover must contain a special impregnation.
The information presented will be useful to you and will help you make your choice. Now choosing a suitable case for you will not be difficult.
For information on how to choose a cover for your ironing board, see below.
How to secure and stretch the cover fabric
Regardless of how you attach the edge of the cover to the tabletop (paper clips or nails), you need to stretch the fabric according to a certain pattern. First, secure the back of the cover with three paper clips, then pull the fabric up at the front and place the paper clip in the center. From the center (to the left and right), alternately pull the fabric and secure it with paper clips or nails. Please note that this is only a preliminary fixation of the fabric. Finally fasten the fabric, with a tightening, and add folds at the corners and roundings, it will be possible after fixing the side sections. The sides must be secured in a mirror image. Two or three paper clips in the center on one side, the same number on the opposite side, etc.
By stretching the fabric in this way, the cover will not have folds or skewed areas. As for the pattern, the diagram shows only approximate allowances. They may need to be adjusted or cut for your board. But you will only determine this experimentally when you nail the fabric, since some areas may stretch, while others, on the contrary, may tighten. By the way, do not over-tighten the fabric, the main thing is that folds do not form. Before nailing, turn the hem inward by 3-4 cm, more or less if possible.
A few finishing touches
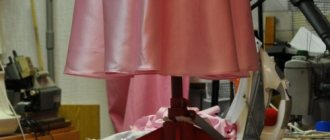
I thought that I would use the old cord from the previous case, but it turned out that it was not quite long and did not fit the new case. Then I decided to use a new lace. Its length was 35 centimeters.
Attach the end of the lace to a pin. We insert it into the channel and begin to thread the cord, making accordions out of fabric. We reach the end and remove the lace from the pin.
Dropping a wedding ring somewhere makes people feel like they've lost themselves
“The Matrix” returns: filming of the long-awaited sequel will start in July
Two friends dressed up as buoys to swim, fined 135 euros
Hold the ends of the cord and straighten the cover so that it is flat.
Place the lining on the board. If you think it will move, you can sew it to the metal base using thread and a needle. I did this all the way to the pointed end - it was easy to do because of the open lattice.
Now we put on the new cover. We tie the rope.
I used special straps for the ironing board for safety so that the structure does not move. I found out about them only at the very end of the work process and immediately bought them. They were very cheap.
All is ready. Now you can use the ironing board. If you burn through the case again, you can easily replace it. After all, we already know how to do it.
Step-by-step instruction
- piece of cotton fabric - 1.5 m on 40 Washing machine;
- foam rubber or batting 80 wide Washing machine.
We adhere to the following procedure:
— Turning the board over, remove the staples holding the fabric
A sharp and short knife is suitable for the job, but you need to act very carefully
— We throw away the old foam rubber, but we will need the upholstery material. We place it on new fabric and trace it along the contour to make a blank.
— Add 3 Washing machines (to the thickness of a more reliable seal) and cut out the part. The edges do not need to be processed, since they will not be visible in the future.
— Fold the foam rubber in half, cut out the layer. If you use thin batting, roll it up in several layers and stitch around the perimeter.
— We place the lining on the fabric, and place an inverted board on top.
— We bend the material inward and secure it with a bracket approximately in the middle of the board.
— We continue to move around the perimeter. Fixing the upholstery can be difficult; you will need to make an effort or resort to male help. When the staple does not go in completely, it is knocked out with a hammer.
— We process the corners: to prevent the material from puffing up, we carefully cut off the excess fabric, not forgetting to leave room for a hem. We form neat folds and secure the upholstery.
All that remains is to tighten up the loose screws and, if desired, give the legs a fresh coat of paint. The item won’t become new, but it will be able to return to its presentability: we’ll get an ironing board that’s a pleasure to work on!
Nikolaeva Svetlana for the magazine “With Your Hands”
Category: Comfort with your own hands | Tags: Useful tips
How to sew a cover for an ironing board
Many modern ironing boards use lightweight metal alloys instead of pressed wood. And the tabletops of ironing systems generally consist of a mesh stretched in a metal frame. Some models even have a fan installed at the bottom, creating air flow from below. This provides additional drying of the fabric during ironing, creates a vacuum (sticking) or, on the contrary, “lifts” the fabric above the board. For such ironing boards, you only need a cover; you won’t be able to tighten it with a stapler.
If you have a sewing machine and at least a little experience working with it, then you can sew a cover for an ironing board in literally an hour. The consumption of fabric with a width of 150 cm is the same as for the banner - 60 cm. As a rule, you do not have to change the insulation, since such boards have a special structure and need to be preserved. This is especially important for an ironing board with bottom air supply.
Turn the board upside down and use chalk to trace the outline of the board along the wrong side of the fabric. Then add 5-7 cm, maximum 10 cm (in a circle), remove the board and the pattern is ready. You can “disassemble” the old cover, iron the hem, and then the pattern will be much more accurate, but this is too troublesome and time-consuming. Moreover, a cover for an ironing board is not a cover for a sofa or chair. Any inaccuracies will be “hidden” at the bottom of the tabletop. All that remains is to decide how to process the edge of the cover so that it does not slide off the board during ironing and at the same time is taut “like a string.”
Choosing a mount
There are two ways to attach (put on) the cover to the ironing board:
Most cases are made with an elastic band, but if you really want, you can also find them with a cord. Covers with elastic fastening are very convenient to use, as they simply stretch and attach to the edges of the ironing board. However, this mount will not work if your board has an attached iron stand. If the stand is detachable, it can also be used with an elastic band.
There will be no such problems with lacing; it will fit in any case. Allows you to adjust the tension of the cover.
How to tighten the ironing board cover
The easiest way to tighten the cover on the board top is with a string inserted into the hem. The width of the hem should be at least 2cm, otherwise the cord may “slow down”. The hem can be done in different ways, for example, overcast the edge of the cover and fold it in one layer, or make a double hem, just like for a window curtain. Instead of a cord, you can insert a linen elastic band, then you will not need to loosen the cord when removing the cover to wash it. The elastic band can also be stitched along the edge of the cover. Just buy a hard rubber band, because if a needle punctures, the rubber band will weaken and will not tighten the cover well on the tabletop. It is best to adjust the elastic using a wide zigzag stitch with almost the maximum stitch length.
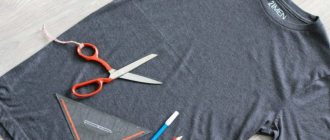
Materials for work
So, we have decided on the fabric for the top layer and backing, and now we need to prepare for the process of making the cover. To work you will need:
- Scissors.
- Long ruler or tailor's centimeter.
- A piece of sharpened chalk or soap, or a tailor's pencil specially designed for marking.
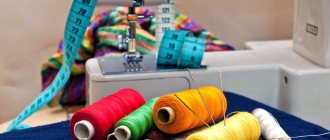
- Sewing machine.
- Tailor's pin.
- Threads in the color of the selected material.
- Elastic band or long braid.
- Small round nose pliers.