There are several methods for hemming the bottom of a dress, both by hand and by machine. Many housewives do not dare to do this themselves for fear of ruining the product. Of course, this process is quite responsible - one wrong move and the dress can be ruined forever. But it is not always possible to seek professional help.
Today we will talk about what edge finishing methods can be used for different types of fabric and how to hem a dress at home, even if you don’t have a sewing machine.
Necessary equipment
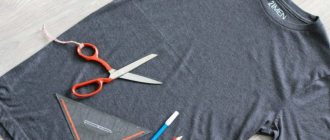
To ensure that the process of hemming clothes does not cause difficulties, you first need to prepare the necessary equipment. Agree, it is much easier to work when you have all the necessary tools at hand. So, you will need:
- sewing thread;
- sharp scissors;
- sewing needle;
- pins;
- ruler or pattern;
- chalk or a piece of soap;
- thimble;
- iron.
When choosing tools, focus on the fabric. The thickness of the sewing thread and needle should correspond to the density of the fabric. For silk and satin, use threads with the same composition. For thick, woolen or suit clothes - thicker ones. The same applies to needles: for denser fabrics, choose a tool with the appropriate diameter; for delicate, light fabrics, choose the thinnest ones.
Chalk or soap is needed to measure seam and cut lines. For convenience, make the ends sharp, so you can measure a thin line.
When sewing by hand, especially if the fabric is thick, use a thimble to protect your fingers from injury from the needle.
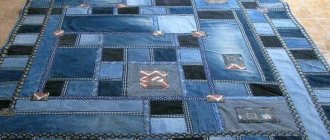
Knitted jersey: what is it?
Knitwear is a knitted fabric, the structure of which is formed by intertwined loops. Knitwear is most often created from wool or cotton threads. Sometimes the fabric contains synthetic and artificial fibers.
Such clothes are a great addition to the look during the cold season, especially in winter. It does not restrict movement, is comfortable to wear, pleasant to the touch, and gives comfort and coziness. In addition, knitted jersey is practical, beautiful in appearance, and inexpensive.
How to cut the hem of a dress correctly
Before you start sewing the bottom of the dress, you need to trim it correctly. The cut piece of fabric should fit the excess length. To do this, follow these steps:
- Prepare the dress: iron it well, it should not be wrinkled.
- Put on the product and shoes.
- Decide on the length you want.
- Measure the length from the floor to the bottom of the dress, mark this place with chalk.
- Remove the product and turn it inside out.
- From the marked place, draw a line along the edge of the hem;
- Use scissors to trim off excess fabric.
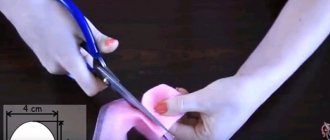
First, you measure the required length of the dress. Then mark a thin line around the hem of the dress, retreat 3-4 cm from this line for the hem. If the seam is without a hem, then measure the length in accordance with the selected seam. It is better if someone helps you in this process - this way you can most accurately measure the excess length.
Some craftswomen use a special template. You can make it yourself. It helps you quickly and effortlessly measure the required distance.
Before cutting your dress, decide which stitch you will use. Otherwise, there is a risk of cutting off excess or, on the contrary, you will have to cut off several times.
Lengthening and shortening the pattern | Blog
I measured S the other day. She continues to grow and I was curious to know her size now that she is five. She is a very long and skinny baby, so I was not surprised to learn that she has a size 3 waist, chest and hips and a size 5 height.
Most likely, you are faced with a similar problem. You're ready to sew for your child (or yourself), but the size of the body the garment will be worn on is different from the size chart on the pattern envelope.
Don't worry. It's easy to make changes to the pattern to accommodate these differences. I've put together a little tutorial to show you how to do this.
Choosing the right welding location
First, assemble all the pieces you want to lengthen or shorten. It's important to make the same changes to all the matching pieces, so make sure you have pieces for the front and back of the garment.
Generally, the best place to lengthen or shorten a dress or shirt is midway between the bottom of the armhole and the hem. For pants or a skirt, the best place is midway between the rise/crotch and the hem.
Here are some illustrations showing (with a horizontal line) the recommended lengthening/shortening locations for some of our patterns.
Sailboat Top Sleeve: Extend halfway between armpits and hem Sandbox Pants: Extend halfway between instep/crotch and hem Tea Party Sundress: Extend skirt halfway between top hem and hem
By adding or subtracting length in the middle of the piece, you won't affect the hem or overall silhouette as much as if you added to the bottom of the piece. However, use common sense here. Depending on the style, you may want to choose a slightly different weld location.
I prefer to lengthen or shorten at the notch (when the notch is available) so that I can be sure to place matching or opposing pieces in the same place. For example, on the Sundress for tea drinking, I lengthened the lower of the double slits. Don't forget to do this for all parts involved: front and back!
Once you have chosen the location where you will make the seam, draw a line on the pattern at that location. The line should be perpendicular to the grain (or fold) line at the point where you want to lengthen or shorten the piece. Remember: Draw this line in the same place on all pattern pieces that you will be changing.
Then, starting with one piece, cut the pattern along your line to separate it into two separate pieces.
For lengthening
To increase the length of the pattern, attach a strip of paper under one of the two pieces and draw a grain line (or fold line) across the strip of paper as shown in the picture below.
Draw a line parallel to the cut edge of the pattern and mark the length you want to add. For S, I usually add one to two inches, but it's a good idea to refer to the finished garment measurement chart on the back of the pattern envelope so you know how long the original pattern will be when it's finished. This will help you decide how much to add or subtract from a portion.
Glue the other pattern piece to the drawn line. Be sure to match the extended grain line, even if the sides of the pattern don't match.
Finally, draw the edges of the pattern onto the strip of paper you inserted. You will need to draw a straight line or a curve. If the edge is straight, simply connect the two sides of the original pattern piece with a line. If the edge is curved, you may need to blend the edge by subtracting a little from one line and adding to the other. Use your eye to widen the curve so it looks blended with the rest of the edge of the pattern, like in this illustration.
To shorten
To shorten a pattern, fold the pattern piece over itself to remove any excess length and glue the pieces together, again maintaining the grain structure or fold line.
Redraw the sides, blending any curved lines to create a continuous curve, as you would with an elongated piece.
Sandbox Pants: Overlap the cut line to shorten
. Again, be sure to make the same adjustments for all pattern pieces, both front and back. There's nothing worse than forgetting to add length to a piece of the pattern.
similar positions
.
Processing without bending
The option of processing the edge of the product without hemming looks good on thin fabrics such as silk, chiffon, satin, satin. Its convenience is that you don’t have to leave room for a hem; just cut off the excess fabric and immediately hem it. But the downside is that you can’t do it manually. This procedure can be performed using an overlocker, a sewing machine or a special edging.
Using an overlocker
Using this method you can beautifully hem the edge of a dress. The threads can be chosen to match the product or in a different color. If you don’t have such a tool, you can use a simple machine and set the zigzag function.
- Prepare the dress by measuring and cutting off excess length.
- The cut edge should be smooth and without protruding threads.
- Work evenly along the edge.
- Iron.
If you use a zigzag stitch, then step back 1-2 cm from the edge, stitch, and then cut off the excess fabric. But for this it is necessary that the scissors be very sharp, and when cutting, do not touch the thread of the stitching.
Using bias tape
Bias tape is a thin strip that is sewn to the edge and hides the cut. This method is well suited for fabrics whose threads fray along the edges. This method is also good for treating sleeves and collar areas. The color of the edging is selected at will; it can match the color of the dress, or it can be a tone lighter or darker.
When using bias tape, there is no need to leave room for a hem; cut to the required length of the product.
- Turn the product inside out and place it on a flat surface.
- Place the top side of the bias tape against the edge and pin it in place; you can baste it by hand.
- Turn the dress right side out. You should have it so that on the front side of the item the bias tape looks out on the wrong side.
- Fold the edge of the ribbon and iron it.
- Fold it to the edge of the dress and stitch, moving along the hem line of the ribbon.
- Remove the pins and iron again.
The stitch should lie 1 mm from the hem of the bias tape, and not from the edge of the hem of the product.
More details in this video:
see also
Every girl from childhood begins to mentally draw her wedding dress! In it she is the most magnificent and irresistible! The Ladies Atelier will help make your dream come true! Sewing a wedding dress of any complexity for you! Feel like a queen!
Girls! Your appearance should be shocking and impressive! After all, you are the best! Especially for you, dear ones, tailoring an exclusive and unique prom dress! Welcome!
Warm and soft, comfortable and gentle. All this about knitted clothes. Every woman in her soul envies craftswomen who know how to knit. In the Ladies' Atelier of Elena Trufanova you can order absolutely any knitted product, regardless of style and complexity.
Source
Processing with hem
The hem finish with a turn-up fits almost all types of fabric. The width of the hem will depend on the density of the fabric. For dense ones you can indent 3-4 cm, for thin ones - 1-3 cm.
Blind stitch seam
The meaning of this line is that the seam is not visible from the front side. To do it on a machine, you need to use a special foot. You can buy it at a sewing store or where everything for needlework is available.
- Measure the required length on the product.
- Draw a line with chalk and retreat 3-4 cm from it.
- Draw a line along the edge along the mark and cut the fabric.
- Finish the cut edge with an overlock or zigzag stitch.
- Divide the remaining width for the hem in half, bending it so that the processed edge protrudes 5 mm from the front side.
- Iron and machine stitch.
More details can be found in the video:
Moscow seam
This seam looks beautiful and neat on thin fabrics. But to do it you need to have skills. The hem ranges from 2 to 5 mm, the thinner the better. You need to choose a line of 1-2 mm.
- Set the seam to 1-2 mm on the machine.
- Make a hem up to 5 mm.
- Sew as close to the edge as possible.
- Cut off the excess fabric from the hem with sharp scissors, it is better to use small ones.
Double hem
Double folding is quite easy and does not require special skills. All you need is a sewing machine, and you will be guaranteed a beautiful hem. Of course, you can perform this action manually, but it is quite labor-intensive. The seam should lie flat and the distance should be the same.
Instructions:
- Measure the required length.
- Step back from the mark 3-4 cm for the hem.
- Mark with chalk and draw a line along the marks. Cut the edge straight.
- Divide the width of the hem in half.
- Fold once and iron.
- Make a second hem, secure with needles and iron again.
- Select a seam of 2-3 mm and stitch evenly from the wrong side.
The hem can be made single by finishing the edge with an overlock or zigzag stitch. Then the width of the hem should be 1.5-2 cm. Process the cut line, make one hem and stitch.
How to hem a dress by hand
If you don’t have a typewriter, then don’t rush to get upset. There are several methods that can be done manually. And at the same time the product will look neat and beautiful.
Using adhesive tape
This method is quite easy and good because it can be used when there is neither an overlocker nor a sewing machine. Adhesive tape, or as it is also called “gossamer”, is a thin tape with an adhesive base. When heated, the glue melts, which allows you to connect the fabric together. However, this method has several disadvantages:
- not suitable for thin fabrics and flared items;
- If ironed too hard, the fabric may be damaged;
- After frequent washing, the glue dries out and quickly comes away from the fabric.
Instructions:
- From the desired length, measure 3-4 cm for hem. Trim off any excess fabric.
- Make a hem, secure with a needle or thread, and iron.
- Remove the pins and straighten the hem.
- Take the adhesive tape as a whole or divide it into small pieces (remember that the width of the tape should match the width of the hem).
- Place the web on the hem and close it.
- Iron gently with steam, holding the tape for 2-3 seconds until the glue begins to melt.
- Make sure that the ribbon does not extend beyond the fabric, otherwise it will ruin the dress.
Video:
"Blind stitch" by hand
Use this method on thick fabrics. Choose a thin thread that matches the color of the fabric. Also, sew with one thread so that the seam lies neatly and is not noticeable.
- Prepare the dress, leaving 3-4 cm for the hem.
- Make a hem and secure with thread or pins. Iron.
- Turn the edge inside out.
- Insert the needle behind the hem, grabbing a couple of threads.
- Make the next stitch at the hem itself.
- Repeat this until the very end.
Make sure that the thread is not too tight, and grab no more than 1-2 threads, then the seam will be invisible.
What simple dress style should a beginner seamstress choose?
It’s easier to start sewing with models based on a rectangle. Dresses vary in silhouette, waist, top and bottom cut, skirt and materials.
The most popular and easy-to-execute styles made from a rectangular cut include:
- Oversized models in which only the neck and sleeves are modeled. This style is used to visually reduce the volume of the figure (when selecting plain fabrics with muted shades) or to hide figure flaws. Suitable for both overweight and thin women.
- Bright outfits. There is a rule according to which bright prints should only be used on simple styles. This allows novice craftsmen to sew interesting and unique dresses by selecting different fabric patterns or combining them.
- Tunic dresses. They are created by sewing together two rectangular pieces of fabric. The main thing is to choose the right fabric; tunics look best when sewn from thin suede fabric. Suitable for women of any size.