Provence is an elegant and touching style that allows you to create a cozy atmosphere of a country house even in a city apartment. The main advantage of the French country style for the modern, ever-busy person is that you don’t need to look for and buy special expensive furniture to decorate your home. It’s easy to give French charm to almost any item, be it your grandmother’s Soviet chest of drawers or a chair from a chain store, with minimal time and money, using staining, painting or decoupage.
The advantages of decorating furniture in the Provence style with your own hands are obvious.
- Budgeting. Painting furniture in the Provence style can be easily done using scrap materials and inexpensive paints.
- Individual design . You can use any color combinations and artistic elements you like to perfectly fit the furniture into your interior.
- Unlimited possibilities . Furniture painting in the Provence style can be updated an infinite number of times, each time receiving a new design item. The design can be selected to match the decor of the room.
Tools and materials
To work on restoring furniture we will need:
- Spatulas for removing old finishes.
- Grinding machine with a set of abrasive blades.
The angle attachment on the sander is very convenient to use.
- A hand-held sanding block, with which we will process hard-to-reach areas.
- Brushes for applying primer.
- A set of painting tools: brushes for fine work, rollers or sprayers for treating large areas.
Note! The furniture will need to be disassembled, so a screwdriver and a screwdriver with attachments will also come in handy.
As for materials, it is advisable to purchase:
- Paints for processing wooden products or OSB/chipboard panels. Alkyd enamels are best suited, but water-dispersed compositions based on liquid acrylic can also be used.
White enamel for woodwork
- Materials for protecting metal parts from corrosion. Zinga electrically conductive paint will do a good job of this task.
- Specialized mixtures (fire-retardant paints for metal Polistil, waterproof pigments, bactericidal impregnations, etc.). A set of materials from this category must be compiled individually, focusing on the conditions under which the furniture will be used.
- Primers for wood.
- Removers for old paint based on organic solvents.
- Furniture putty.
- Protective and tinting varnishes.
- Materials with which decoration will be carried out.
In principle, if you approach the matter thoroughly, the price of the set will approximately correspond to the cost of a new product. So it makes sense to restore only furniture that will serve you for many more years. It’s not worth spending energy on a full restoration of “disposable” sets.
Why impregnate and paint the lining?
How to paint lining indoors
The fibrous texture of wood retains heat well, absorbs noise and breathes. Insects and rodents love to live in it. Natural material absorbs moisture, creating conditions for the development of fungal pores. When wet, it swells, changing its size.
Dry wood is not afraid of temperature changes. But it fades and darkens from the sun's rays. The main enemy of wood is fire. Indoors, stoves and fireplaces are lined with stone, preventing them from touching the wood.
To preserve all the qualities of the wood and protect it from damaging factors, the lining is impregnated and painted. Created for this purpose:
Compositions can be mixed and combine several functions. Fire retardants and antistatic agents are applied to all surfaces of the board before work on the walls and ceiling is carried out. They can be used in turn and be part of the paint.
Restoration technique
Preparatory work
Anyone can learn to paint furniture with their own hands, since there is nothing complicated in the painting process. But properly preparing the base for painting is an entire art, and therefore it is worth dwelling on this issue in as much detail as possible.
We carry out the preparation work as follows:
- We disassemble the product, remembering or writing down what was attached where. We put all the bolts, nuts and screws separately.
- We remove everything that can be removed from the parts - moldings, handles, locks, hinges. We will restore metal products separately, removing rust and repolishing them.
- We inspect the wooden parts, paying special attention to the condition of the front surfaces.
We sand small parts as shown in the photo.
- If necessary, remove the layer of old paint by heating it with a hairdryer or pre-treating it with removers. We do the same with old varnish.
Advice! By heating, you can remove not only paint, but also plastic, and even veneer.
- If the surface condition is satisfactory, then sand the part using medium-grit sandpaper. Our task is to reveal all defects and remove the top layer of paint and varnish material.
- Flat areas can be sanded, but a sanding sponge is best for high spots and low spots.
- After the initial sanding, we take wood putty and smooth out all the defects. We also fill cracks and cracks with putty, paying special attention to the ends of the facades and walls.
Eliminating defects with putty
- Let the putty dry (the instructions should contain information about the technology and drying time). After this, we perform final grinding using a fine abrasive. We collect the dust formed during the sanding process with a vacuum cleaner or a damp sponge.
The final stage of preparation is primer. Apply the primer with a wide brush, in two passes with mandatory intermediate drying. (See also the article Priming walls for putty: features.)
Coloring
The process of painting furniture is quite simple:
- First, we test the composition in a small area. It is advisable to choose a part that, after installation, will face the wall.
- If the testing was successful, apply the paint with a roller or spray to all surfaces.
Apply a base coat from a spray bottle
Advice! You can use polyethylene or masking tape to protect areas from paint. The second option is also convenient because such tape does not leave marks on surfaces.
- After the first layer has dried, we evaluate the quality of the surface. If necessary, we sand areas with defects or apply putty.
- Apply a second coat of paint, trying to fill all the gaps in the base coat. After this, we dry the part and then varnish it.
- If you plan to paint in two colors, then before varnishing, remove the masking tape, re-glue it to the required places and repeat the operations.
Advice! First we apply lighter shades, and then darker ones: this way the paint lying on top will not show through.
- Instead of regular varnishing, you can also decorate the product in a variety of ways. We will talk about some of them in the next section.
Decoration technologies
Plain furniture fronts look quite attractive, but still somewhat boring.
Stage 3. Rub with paraffin
Do you remember how in childhood, before painting with watercolors, you ran candle stubs across the paper and got beautiful patterns? It turned out that you can work with wooden objects in the same way. We rubbed paraffin on those parts of the product that should be beautifully shabby: edges, corners. Later, the paints of the next layers will come off more readily from these places.
Conclusion
Information on how to repaint old furniture and how to decorate it will be useful to almost everyone. This work is not labor-intensive, but still there are quite enough nuances that affect the quality of the finished product. So you should at least read the tips above, as well as study the video in this article: then you will be able to work much more fruitfully.
If the furniture has lost its attractiveness or is tired of its appearance, then this is not a reason to get rid of it, because everything can be easily fixed by repainting.
Drywall is one of the best modern materials for finishing ceiling surfaces, allowing you to realize the most fantastic ones.
Sometimes functional interior items are suitable in practical terms, but their appearance ceases to be pleasant and loses its former aesthetic value.
Materials for preserving wood in the bathhouse
Painted lining in the interior
I built a sauna in an apartment located in a high-rise building. The processing of the lining was done in the same way as in a bathhouse at the dacha. Now I was helping my friend.
Deciduous wood is selected for the bath. It does not contain resins and has low thermal conductivity. The boards must be impregnated with antistatic agent before covering the walls. Particular attention is paid to the ends. Vadik and I made the markings and cut out the lining. We soaked everything with a special composition containing a fire retardant and an antiseptic.
When the sheathing was completed, we went over the stain. It will additionally protect the wood. We completed the painting with three thin layers of aqualac.
Source
How to artificially age furniture with your own hands
Tips and interesting master classes on artificially aging wooden furniture with your own hands
If you are a fan of noble antiquity, and you have long dreamed of transforming your old furniture, this material is for you. To make antique furniture with your own hands, you don’t need to be a professional, you just need to have the desire and a simple set of tools and materials.
Techniques for artificially aging surfaces and creating abrasions are designed to imitate noble antiquity on modern furniture in different styles. Using current trends and fashionable color combinations will give modern furniture an antique or vintage look.
Stage 5. Continue painting
When applying layer after layer of paint, it is important to stop in time. Usually three to five layers are more than enough, but I, succumbing to the not very appropriate love for minimalism on this day, completely limited myself to two. But in my free moments I had time to look at what the other participants in the master class were creating. It was interesting to see how some of the girls - apparently not consciously - created frames exactly in the colors of their clothes. Someone hid many bright layers under a dark top one - and it was precisely these frames that ended up being the most “Provençal”.
Methods for aging furniture
To obtain various types of aging, you can use acrylic paint, bitumen varnish, various waxes, and dry pigments. Most often, abrasions occur on the edges and corners of tables, chairs, cabinet doors, drawer handles, textured parts, etc.
On furniture made in industrial conditions, imitation of scuffs and other aging effects are produced using photo printing. Don't count on such an impeccable result - your work is manual.
Do-it-yourself aging of furniture will not look natural if it is too correct.
By artificially aging a piece of furniture, you can create scuffs, imitate sun-bleached paint or patina, or a touch of antiquity.
There are several ways and techniques to obtain one or another aging effect. The most common means will help you achieve the desired result.
Stage 4. Add putty
Putty is a wonderful thing. Not only can it cover up dents from self-tapping screws, extra cracks, etc. It can also create volume and texture, achieve relief and the effect that a dozen layers of thick paint have already been applied to the item. It was at this stage that we realized why we needed aprons and medical gloves (as well as shoe covers): the easiest way to apply putty turned out to be with our fingers, so even the most careful ones would not remain clean.
Patination technique for wooden furniture
Patination is the process of imparting an exquisite antiquity to furniture, metal or plaster parts in various ways. To create a patina on furniture, it is necessary to unevenly apply dark acrylic paint, bitumen varnish or dark wax to the surface.
Follow these step-by-step instructions to patina your furniture yourself:
First, apply a layer of acrylic paint of the selected base color to the primed surface. Let the surface dry. Then, using a dry brush technique, apply some umber in horizontal stripes.
Take a small amount of bitumen varnish and, using a bristle flange brush, apply horizontal stripes with light pressure. Let dry. The drying time for bitumen varnish is recommended by the manufacturer.
- Using a bristle brush and some white acrylic paint, draw vertical lines across the entire surface of the piece. Let the surface dry.
Follow this step-by-step tutorial on how to patina furniture surfaces to create “old paint marks.” As a result, the surface looks aged.
There are several patination techniques. It all depends on what brush you choose to work with.
One of the simple techniques for patinaing furniture is to pull the brush in different directions. For this technique, good results can be achieved by using a synthetic or bristle paint brush.
By drawing the brush you can get uniform horizontal or vertical lines. Have no doubt, these lines will look very impressive on absolutely any wooden furniture, and you will be satisfied with the result.
Aging to renew: restoration of Provence furniture
Buying artificially aged furniture is not difficult: the supply generated by demand has suggested a profitable niche to manufacturers. There is another option, thanks to the advice of experts from the WESTWING shopping club, existing furniture is transformed: Provence is accessible even to a novice designer.
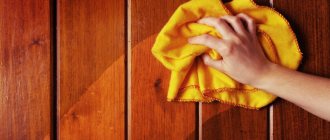
Wooden furniture primarily requires improvement.
. Old varnish or paint is removed from it with sandpaper, after which the surface is thoroughly degreased. The abundance of tinting varnishes on sale solves the problem of color selection. The provincial atmosphere is characterized by slightly reddish tones of wood: rowan, oak, apple tree. They will go well with red petals, which are popular in floral motifs. This kind of aging of Provence furniture will only take a couple of days, since with good ventilation the varnish dries in a matter of hours.
Painting furniture is no more labor-intensive process, but the color needs to be mixed for all prepared surfaces in advance, because even experienced craftsmen rarely manage to get a perfectly identical tone a second time. In extreme cases, the mixed paint should be enough to cover all external surfaces; for internal surfaces, slight discrepancy is not critical. Decoupage of furniture or simple stencil painting will be the most appropriate decoration.
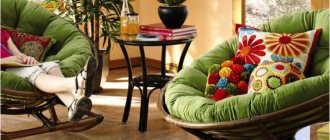
Psychologists say that Provence in the interior is not only fashionable, but also useful. Soothing, gentle tones have a positive effect on sleep quality and reduce anxiety. A romantic setting promotes the expression of the most tender feelings. Provencal style - a corner of France in your own apartment.
Shabby chic table: step by step instructions
In order to make a shabby chic table, you will need the following tools and materials:
Follow the step-by-step instructions to create scuff marks on a dark-colored table by painting it white:
Decorate the dried surface with painting.
The shabby chic style in the master class that you are invited to take is perfect for transforming old furniture. Just keep in mind that using decorative candles to rub the surface may cause them to crumble - and the result will not be beautiful scuff marks.
Stage 1. Apply the base layer
On each table there were four containers of paint. First, pans with two bright colors, second, a gray color to tone them down, and finally a base color, white or gray. That's where we started.
A quick way to age furniture: master class
To quickly achieve the effect of aging furniture, use the dry brush technique. This decorative technique creates a worn-out effect on the surface of the furniture. You will need a dry bristle brush and a small amount of acrylic paint.
The brush is the main secret of this technique. The brush should be a paint brush with long, uneven bristles.
This technique works well for furniture with flat surfaces. When decorating large surfaces, use a medium-sized brush.
It will not be difficult for you to age furniture by following a master class that clearly demonstrates all stages of work:
Depending on the color combinations, you can get either a patina or a burnt-out effect, which will be an excellent finish for new furniture and help update old ones.
Experiment with pastels and darker shades. Close colors and only slightly different shades may work best, but interesting results can be achieved with contrasting colors.
Painting using the dry brush technique with silver or gold acrylic paint will look elegant on a black surface.
Tired of the sun: characteristic colors of the Provence style
The color scheme of the Provençal interior is defined by designers as pastel with bright accents. Mostly these are shades of blue and lilac, symbolizing sea waves and blooming lavender. Slightly less common are sandy yellow and bleached terracotta. This is a tribute to the sandy beaches and hundred-year-old forests. Greenery is required, but it does not scream, but only modestly reminds of itself with the shades of foliage scorched by the hot sun. All this fits into the white motif that runs through the entire idea. Selecting colors to reupholster or paint pieces of furniture is not difficult: this is one single color added to white in different concentrations. One could call this color scheme boring if it weren’t for the color “highlights”:
- juicy lilac thoughts carelessly thrown on top of a rough linen bedspread;
- bright peonies in a simple clay vase;
- a spectacular additional curtain, slightly released from under the thick curtain;
- knitted bedside rug.
The patterns of southern France are unobtrusive and unpretentious: stripes, small floral motifs, lace and blurry checks. At the same time, the elements do not overload the overall background, but only slightly emphasize it.
How to make aged furniture (with photos)
One of the accessible and very effective ways to age furniture with your own hands is to create scuffs. What and how to make them - read below.
We paint the surface of the furniture loosely so that the bottom layer of paint is visible - this is the easiest way to create scuffs. The best result will be achieved if the paint color contrasts with the color of the furniture surface.
Another way to achieve scuff marks is to use a combination of different colors when painting, as well as waxing and artificial scraping.
For this method you will need wax sticks or paraffin candles. Paraffin candles should be simple, domestically produced, unpainted.
Scuffs are made on the surface of the furniture, decorating it and creating the patina of time.
Look at the photos of aged furniture to see how well it fits into various residential interiors:
Stage 2. Dry
Before applying each new layer of paint, the previous one must be thoroughly dried. It’s better to let the paint dry in natural conditions, fortunately, this takes 10-20 minutes, but we needed to work as quickly as possible, so everyone was asked to take hair dryers with them, and there was a uniform hum in the colorful Apollo photo studio where we worked .
Decor of Soviet furniture. How to get an ergonomic Provence style wardrobe in two days Bookmark 12
Who among us does not dream of a cozy, warm and stylish bedroom? I will probably be the first on the list of those who dream of a bright paradise for relaxation: with a book, a favorite movie, a blanket and cocoa. But, unfortunately, not everyone has the opportunity to have a separate bedroom, make repairs and buy furniture in the style they like.
Provence in interior design is the style of the province of France. It is distinguished by its special charm and coziness thanks to the abundance of light shades, interesting combinations (for example, a combination of light and dark wood), the use of “dusty” shades, aged wood and “patchwork” textiles. For me, this style is one of my favorites, because light furniture is what a person who grew up among the dark furniture of his parents’ “Khrushchev” apartments can dream of.
I think that almost everyone has this rich Soviet heritage: a huge dark brown wall, wardrobes, tables, chests of drawers, sideboards and dressing table. In general, hello from the 90s! Of course, such furniture has long gone out of fashion. It overloads the space, hardly fits into the interior, is “standard” (that is, the same for everyone), takes up a lot of space and is almost always inconvenient to use. But don't rush to throw away these long-livers. Let's look at the reason why you shouldn't get rid of Soviet furniture so soon.
Features of Provence style
The Provence style, which originated in the south of France, is distinguished by its maximum proximity to nature, naturalness, and elegant simplicity. Therefore, wood products and various forged parts are used to furnish the room.
All interior items are painted in soft, muted, pastel colors (white, cream, brown, lavender, light green, blue) and undergo an artificial aging process. The Provence style is characterized by the absence of bright colors; paintings are applied to the facades and side walls of furniture, which can be floral (flowers, fruits) or primitive.
Products should not be perfected, because the distinctive features of the French provincial style are:
- Antique effect. Scuffs on furniture, cracks, chips, faded paint - these are traces of time that give the interior a residential, cozy look and create a warm atmosphere. Therefore, decorating interior items in the Provence style involves artificial aging.
- Hand made effect. Handmade furniture gives your home a special charm. Therefore, rough processing of the edges of products and minor defects when applying painting only enhance the expected effect.
This style is characterized by smooth, rounded lines: curved legs of tables and chairs, rounded corners of cabinets and chests of drawers, ornate floral patterns. The furniture is made of wood and decorated with forged elements, as well as fittings made of bronze, copper, and brass. Plastic panels, chrome parts and other modern elements are not used.
Why can old furniture still be useful?
High quality
The main argument is the quality of Soviet furniture, which, in conditions of shortage, was designed to last for centuries. Please note that the market is now flooded with inexpensive chipboard furniture. At its core, chipboard is sawdust glued together with highly toxic glue. This material has a detrimental effect on health, is a carcinogen, and, of course, cannot be called environmentally friendly. Soviet furniture can also be made from chipboard, but it will be much stronger and more stable than modern budget furniture. In addition, over time it emits much less harmful substances. Sometimes it’s worth thinking, if at the moment there is no money for furniture made of solid wood, is it worth changing the awl for soap?
Keeps history
Furniture carries the history of the family. It once belonged to my grandmother, then it stood in my parents’ apartment. This drawer always contained old albums with black and white photographs of relatives, and here stood my grandmother’s dinnerware. Or maybe you, folding back the horizontal door of the wall, did your homework on it, like at a table, or enthusiastically drew. Why not leave a memory of your family?
Saves money
Today, especially in times of crisis, purchasing high-quality furniture can hit the family budget hard. Even furniture made from the now popular chipboard will cost a penny. For example, a new cabinet made of chipboard will cost at least 8-10 thousand rubles. And if you want a wardrobe with a mirror or a wardrobe, the price increases to at least 15 thousand. But it is quite possible to decorate your favorite wardrobe or wall yourself in any style and it will cost you only 1000 rubles.
Easy to decorate
My husband and I spent 1,000 rubles on decorating a cabinet in the Provence style, and another 700 on increasing its ergonomics. You can add mirrors to the decor of the cabinet (made according to your measurements), use the effect of “old” wood (craquelure) or decor using decoupage .
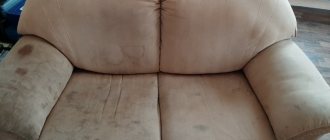
Before decorating, our closet looked like this and was a rather dull picture.
Finishing lining in bedrooms and living rooms
Lining in the interior of the apartment
Vadik was interested in how to paint the boards in the bedroom and what materials to use in the nursery. Various compounds are used on wood for interior work:
Oil enamels are the cheapest and come in a wide variety of colors. They cannot be used in children's rooms or bedrooms. They create a durable film that repels water. At the same time, they do not allow air to pass through, have a strong poisonous odor and fade in the sun.
To paint lining in a certain color, it is better to use acrylate dyes for interior work. They are odorless and have average fire resistance. The walls breathe beneath them.
The most expensive scuba tank is environmentally friendly and durable. It consists of natural plant and animal materials. It is based on:
Aqualak is environmentally friendly, does not emit harmful substances and preserves wood well. Its disadvantage is rapid erasure and low strength. This is an ideal option for finishing a wooden ceiling. With an acrylic base, it is suitable for treating wood indoors. It is transparent; if necessary, pigments are added to it to obtain color.
Attention! All paints and varnishes for wood should be constantly stirred during finishing work.
Steps to remodel an old cabinet
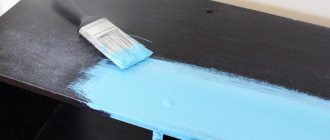
Painting
Our cabinet was not varnished, so we immediately started painting (if the cabinet is varnished, it needs to be degreased). We used 2kg of acrylic semi-gloss super white enamel for exterior and interior use.
Why did we choose acrylic?
- Dries quickly (3 hours - partial drying, 8 hours - complete drying)
- Does not have an unpleasant odor
- Good for beginners.
Repainting
After drying, the cabinet was painted one more time. For my “Provence” corner, I chose the main colors: white and blue (country blue). Using a small pot of acrylic paint (love2art, color 30: country-blue) and white acrylic, I covered the space of rectangles with a mixture of these colors.
Painting the rims
After the second coat had dried, we coated the cabinet again. After complete drying, we began painting the rims. The color of the rims is country blue. We decided not to remove the rims, and in order not to spoil the already dried paint, we stuck masking tape around the rims. When the work was completed, we installed the original handles, which began to look much more interesting. To fix the paint on the cabinet, it can be varnished.
Making side shelves
Our Provence wardrobe is located next to the bed, so we decided to add side shelves to the wardrobe. Shelves are a convenient solution for placing a lamp, books that we are currently reading, candles and decorative elements. For the shelves we used a wooden multi-level structure from IKEA “Albert”. It is easy to disassemble and assemble, has clear instructions and costs only 700 rubles.
We also painted this structure one layer white and attached it to the cabinet using a corner and self-tapping screws from the kit.
Final touches
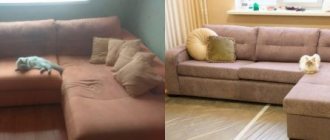
After we finished transforming our closet, we added a little coziness: a floor lamp, pillows, candles and a Provence-style “patchwork” bedspread.
It’s amazing how an old wardrobe, worn out over the years, has been transformed, which, just by looking at it, you wanted to throw away! Now it fits perfectly into our sleeping area!
How to paint lining indoors and emphasize the style of the interior
Environmentally friendly lining is used for cladding walls and ceilings. It is the main element of the interior in ethno and eco styles. If you want to preserve the unique pattern of natural lines or make the walls inside smooth and original in color, you will need to impregnate and paint the lining. Transparent varnish will highlight the sunny shade of pine and create a unique mood of the south of France - Provence style. Brushing will age the wood and make the pattern convex.
Result
My husband and I have plans to transform the space on a budget:
- thick linen curtains around the bed
- drawers for things and bedding in the bed without a removable mechanism (material - wooden fruit boxes and old dresser handles).
There is nothing more enjoyable than transforming a space with your own hands and to your taste. The main thing is not to be afraid of a limited budget or space. Repairs, children and a new life can be put off endlessly; there will always be no time. But I am sincerely confident that under any means and circumstances you can make something unusual, something that you like!
Stage 5. Working with a sponge
To create the effect of wear and layers of paint showing through from under each other, you don’t have to use sandpaper - you can simply apply the paint with a sponge.
Provence walls: some design options for rooms for various purposes
The Provence style has a large number of fans, not only from the French, but also from residents of a large number of other European countries. Interiors designed in French country style attract with their sophistication, practicality, simplicity and elegance. This design demonstrates not only the excellent taste of the owners, but also their desire to get closer to the atmosphere typical of the houses of the French provinces of the 19th century.
In this review we will talk about possible wall design options and try to find out which of them are the most successful. We will also understand the features inherent in the style and consider some tips that may be useful when planning and implementing interior ideas.
So, Provence walls: what can they be?
Steel wool treatment - creating a realistic patina
Metallic or steel wool can help you create an antique look with deeper scuffs and marks from years gone by. Steel wool can be purchased at any hardware store and is inexpensive. The primary stage of preparation is not much different from the previous method. We remove shelves, handles, decorative elements, remove the old coating using fine-grained sandpaper.
Article on the topic: Do-it-yourself doll furniture made from ice cream sticks
Steel wool is available at any hardware store.
Then apply the paint of the desired tone and let it dry slightly. We take steel wool and intensively rub the surface until the desired degree of abrasion is obtained. After polishing, black streaks will remain on the painted wood. They look rough this way. To smooth out abrasions, go over the surface with a damp cloth, wiping off any excess. Then take a dry cloth and wipe the furniture. We also recommend painting the handles with a layer of paint, treating them with steel wool, and then polishing them with a dry rag. The final stage of work is coating with matte varnish.