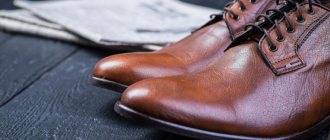
We've all experienced a situation where a crack has formed on our favorite pair of shoes. The question arises, how to glue the sole of a shoe at home. To do this, you will need to select some materials, study the procedure and completely follow the instructions.
When walking, it is the sole that suffers the most, so it wears out faster. Over time, cracks and holes form on the sole of the shoe, which are difficult to eliminate. You may need your everyday boots tomorrow, so you need to know how to seal your shoes at home. First of all, you will need to choose glue.
Ideally, it is better to contact a specialist if the sole of your shoes is cracked. They will be able to quickly fix everything in the shortest possible time. In order for the work to turn out beautiful and of high quality, it is necessary to choose the right adhesive depending on the characteristics.
What should I use to glue the sole?
If you do not want to ruin your shoes, it is recommended to select a special adhesive. Usually the packaging contains a corresponding mark. You can choose one of the following options:
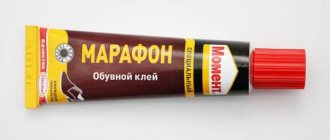
- "Moment Marathon". The substance is intended specifically to repair broken soles. It is characterized by high resistance to humidity and other adverse weather conditions. Can be used in hot or severe frost. For some types of manufacturing materials, use is not recommended. This list is on the packaging, so please read it carefully before purchasing. Quite easy to use. You can wear the boots within 24 hours after gluing them.
- "Desmokol." Used for shoe repair. Helps against burst soles. More suitable for synthetic materials and suede. Sold only in specialized stores. Used in practice by professional workers.
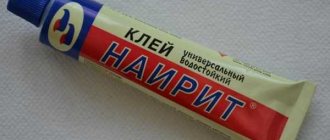
- "Shoemaker" or "Nairit". The composition uses natural materials that provide high adhesive properties. Makes it possible to easily glue a broken shoe sole. Can be used for gluing the inside of boots, as well as small cracks. It is recommended to leave the work for several days to dry completely. Otherwise, rapid re-breakage is possible.
- Epoxy resin. Is a powerful adhesive. It has a high density, which is suitable for boots that are actively used every day in aggressive conditions. It will take several days for the damp surface to dry completely. After this, the shoes can be worn at your usual pace.
- Bonikol or Kenda Farben. Industrial imported products that are used in professional crafts. Suitable for problem areas, gluing heels, soles, socks, insoles. One of the best options for how to seal shoe soles at home.
Caution must be exercised when using the materials listed. Keep products away from open flames as they are explosive. It is also advisable to keep children away from the composition due to its high toxicity.
Preparation for the process
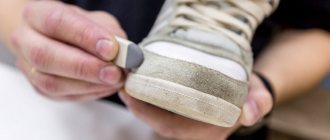
Before proceeding to work on sealing the hole in the sole, the shoes must be thoroughly washed and all dirt must be completely removed . Let's move on to the degreasing procedure. To do this, apply acetone or gasoline to a cotton pad and wipe the sole. Afterwards the boots need to be dried.
Experts recommend drying boots naturally without heating devices. If the hole is through, carefully remove the insole. Once the shoes are cleaned and dried, you can begin repairing them.
Which adhesive is not recommended to be used?
The substances listed in the previous section are the best options for gluing shoes yourself. There is also a group of products that are not recommended to be used if cracks have formed on the sole of your shoes. Do not buy these products:
- Super glue. A fairly hard material that roughly fixes and deforms the sole. Repairing the sole with such material is not recommended, as you will completely ruin the shoe.
- Ceiling tile adhesive. Can handle rubber and leather. This will leave traces that will be difficult to remove with improvised means.
- PVA. It is not stable. It is not recommended to seal a crack in your shoes, as it will immediately fall apart.
Other types of glue:
- An excellent adhesive option is American Seamgrip glue. It is used to seal rubber boats. If you manage to purchase it, you won’t have to part with your favorite pair of sneakers. This is the only type of glue that can completely solve the problem of holes in a polyurethane or rubber sole.
- Imported epoxy adhesives like Done Deal are much better than domestic adhesives, but you can’t promise durability for sneakers when using it.
How to glue the sole at home using improvised means?
After choosing the glue, you can try one of the ways to repair the sole of your shoe if it has burst. To do this, you need to carefully follow the instructions and follow the technology. Otherwise, you will not be able to achieve the result. Follow the algorithm:
- Clean your winter shoes from dirt and dry everything thoroughly so that no wet marks remain.
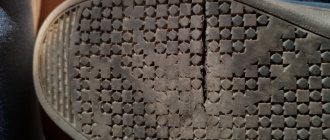
- Inspect the work surface for integrity. If the leather on the sole is cracked in several places, it is recommended to completely tear it off and glue it back. Also consider the surface texture. This is very important as the procedure will be different for different types.
- Clean the surface from any remaining old adhesive. Treat with alcohol to degrease the surface.
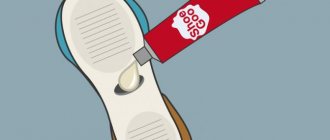
- Take something to seal the sole with. Apply to surface according to package directions. The adhesive layer should not exceed a few millimeters.
- Wait a few minutes for the surface to set. Press the sole down so that there are no untreated areas.
- Now leave the shoes under high pressure. To prevent it from deforming, place pieces of newspaper inside. You can use clothespins to secure the seam. Do this carefully so as not to damage the leather on your boots.
This is a cold technology for gluing winter shoes. The hot methodology is as follows - you need to heat the adhesive and carefully press the surface of the shoe. After this, you can wear your favorite pair of shoes after a few days.
Recommendations for sole repair
Before starting work, the sole must be cleaned, dried and degreased. For degreasing, use a special solution, gasoline or acetone. After processing, the product is dried again.
Select the load so that the shoes do not become deformed. An L-shaped block with additional weight is ideal. Keep the product under pressure for at least ten hours.
The adhesive is applied up to three mm thick, then left for ten minutes and only then the parts are glued together. Choose only high-quality and proven glue. A suitable option would be classic Moment glue, a product with polyurethane or epoxy sealant. You can also use special rubber shoe glue or shoe glue.
According to experts, polyurethane glue will be the best solution due to its strength and elasticity. It provides a secure fit and can repair any type of shoe. In any case, these are toxic compounds, so ensure safety when working. If the product gets into your nose or eyes, immediately rinse your mucous membranes with running water.
Be careful when working, as the adhesive composition can damage the material of the products, especially if they are suede boots, leather or patent leather shoes. The glue is quite difficult to wash off. Now let's figure out what to do if the soles of your shoes crack.
How to glue the sole of sneakers?
Sports shoes are subject to a lot of pressure. While running or walking, the sole of a shoe can easily burst or a sock can come off. Therefore, it is necessary to know the sole repair procedure.
What to do with holes?
On sports shoes, the sole is very soft and sensitive, so it can easily break in half. If there is a large hole, you will need to fill it with glue. To ensure surface integrity, it is recommended to use special construction tape. It allows you to maintain the original shape of the product.
For gluing it is best to use a specialized sealant. It allows for the highest gluing density, which extends the service life of the product. Moreover, the cost of such compositions is much more expensive than conventional glue.
What to do with cracked socks?
Socks are the part of sneakers that deteriorate the fastest, as they are subject to a lot of pressure. If you urgently need a working method on how to seal the soles of sneakers, you first need to treat the working surface. Use alcohol to get rid of fat. Apply the patch, glue it and leave the shoes until all the glue has dried.
What to do with voids in shoes?
In winter, problems with shoes often arise due to unfavorable weather conditions. Let's try to figure out how to restore it. Winter boots most often have a porous surface, so you will need to fill the voids or completely replace the insole. Remove fats from the surface with alcohol and treat with glue.
Sports shoes - how to repair?
If the training process in the gym has yielded results not only in the form of better physical shape, but also broken shoes, you still won’t have to give up your favorite pair of sneakers.
Of all the domestic adhesives, it is best to use epoxy, which is specifically designed to solve the problem of repairing sneakers with your own hands. Its cost is quite low, and its application will be simple:
- Thoroughly clean all the edges of the hole in your sole and then degrease it with a solvent.
- Once everything is dry, carefully apply properly diluted epoxy glue.
Important! Keep in mind that this mixture is very toxic. Therefore, be extremely careful when repairing the soles of sneakers with your own hands.
- If the hole is large enough, it would be a good idea to put a mesh in it, which is made of fiberglass, it is called serpyanka.
- While the glue dries, it is better to cover the area of the hole that appears on the outside with masking tape so that the sole remains completely flat.
How to prevent damage
To prevent this problem from occurring, follow these rules:
- buy shoes whose lower parts have good performance characteristics;
- when choosing it, consider the weather conditions in which you will walk in it;
- do not neglect the rules of care;
- Whenever possible, avoid stepping on sharp objects lying on the roads.
For this purpose, people recommend immediately lubricating the base with glycerin, wax or castor oil.
How to repair heels
To repair heels on sneakers, you need to get rid of the old tread, tearing it off the sole, cutting it in places where it is impossible to separate the element manually. To simplify the task, you can treat problem areas with a solvent.
After removing the tread, the contour of the sole is transferred to thick paper or cardboard and the erased edges are completed. Having drawn the outline, the pattern is cut out of paper and used to create a new blank. You can make the sole from a rubber mat, which is sold in hardware stores. It is impractical to partially restore the sole, so if the heel of the sneakers is damaged, the base is completely changed.
When gluing the sole to the main part of a sports shoe, you need to thoroughly clean the surface. Otherwise, the gluing procedure does not differ from the standard one.
How to repair the top
The features of repairing the upper part of the sneakers directly depend on the material used. If shoes are made of suede, natural or artificial leather, then the material wears out over time and cracks at break points. To restore the appearance, patches made of thin and elastic material can be glued or sewn onto cracked and cracked areas. Before applying patches, the old material is torn off.
The use of patches on the upper part of the sneakers ruins the original appearance of the shoes, so it is better to prevent cracks from occurring. To maintain shoes in good condition, natural leather should be periodically lubricated with cream, and suede should be cleaned with a dry, stiff brush, trying to lift the pile. To clean the upper part of your sneakers from dirt, you should use a damp cloth rather than washing your shoes under running water.
Combination top repair
On sneakers with a combined upper made of synthetic material with foam padding or natural and artificial suede, the fabric most often damaged is in the toe area, where the shoe comes into contact with the toes. On the outside, this area can be protected by a rubber insert around which there is a mesh, which is typical for running models of sneakers.
If there is minor damage to the front of the shoe, a patch can be sewn on. If there are large holes, you need to prop up the seams, adjust the size and shape of a piece of durable nylon fabric and sew it in place.
How to work with Dismacol glue correctly?
Desmokol shoe adhesive must be applied to both surfaces that will stick to each other. After application, it should be left for 5-10 minutes to dry completely. If the mixture is absorbed into the structure of the material, it must be applied a second time and again wait 2-3 minutes.
Interesting materials:
How to set sound to Xiaomi notifications? How to build stairs to the second floor in Sims 4? How to construct a triangle using a side and two adjacent angles? How to spend Yandex money bonuses? How to spend Kari's birthday bonuses? How to spend Alfa Bank Cashback? How to spend gems? How to rotate the screen on a Samsung tablet? How to hang tulle without hooks? How to reapply self tanner?
What to do if there is a hole in the heel of your shoe?
In order to remove the hole in the heel of the sole you will need tape, epoxy glue, hardener:
- wash the shoes, remove any debris that has gotten into the crack in the heel, dry the shoe;
- mix epoxy glue with hardener;
- pour the mixture into the hole and seal it with tape;
- put the shoes in their normal condition and leave them for a day;
- After 24 hours, remove the tape and smooth the surface of the heel with sandpaper.
For this method it is better to use masking tape.