Rubber boots and shoes made of EVA are worn not only by fishermen, hunters and tourists, but also by ordinary city residents. Due to its waterproofness, the material has gained popularity, however, punctures, cuts and other damage occur with it much more often than with any other shoes.
A puncture can be caused by stepping on a branch or protruding piece of ice. Experienced users of EVA shoes know that they should always carry a repair kit special for this material. This article will tell you how to seal rubber boots, as well as PVC and EVA boots at home.
How to seal leather boots?
How to seal shoes
- thoroughly clean the repair area;
- remove threads, remaining glue and degrease (alcohol, acetone);
- apply glue following its instructions for use;
- Carefully press the areas to be glued together (for this it is better to place the load inside);
- stand for at least 20 hours.
Interesting materials:
How to connect Beats headphones to Android? How to connect iPhone 7 headphones to a computer? How to connect JBL headphones to PS4? How to connect headphones to Honor Magic Watch 2? How to connect headphones to iPhone 7? How to connect headphones to a laptop Wireless? How to connect Sennheiser headphones? How to connect Sony headphones via NFC? How to connect Sony WH 1000XM3 headphones? How to connect a navigator to a tablet?
What do you need for work?
To repair boots made of EVA material, it is necessary to prepare a repair kit consisting of two patches and an adhesive composition.
The patch is cut from any durable, waterproof material.
Additionally you will need:
- degreaser;
- rags to remove excess adhesive mixture protruding beyond the edges of the patch;
- a piece of fabric;
- 2 bags.
To repair PVC shoes, in addition to patches and glue, you need:
- fine-grained sandpaper;
- degreaser;
- a rag to remove traces of glue along the edges of the patches;
- hairdryer
To protect the skin of your hands from the influence of glue, all work is carried out with rubber gloves.
Preparing boots
- Before filling the hole, dirt must be removed from the damaged area, washed and dried.
- A patch is prepared separately; it can be cut from old fishing boots, waders or tires.
- The reverse side of the patches is carefully rubbed with sandpaper or a file to improve the adhesion of the glue to the surface.
- The surface of the shoes is degreased with acetone or another solvent.
- The adhesive mixture is selected. It is better to use products that indicate that they are intended for gluing shoes or rubber.
First study the instructions on the glue packaging.
Glue selection
To restore the integrity of their boots, some people, without hesitation, buy adhesives like “Momenta” and other universal compounds. In fact, many of them are not suitable for rubber and can even ruin the material. Superglues, despite their water resistance, have low elasticity, so when using boots, the adhesive seam will quickly collapse.
A worthwhile result can only be achieved with the help of special glue for rubber, PVC, EVA, which provides a reliable sealing effect. You can find such products in stores for fishermen and motorists. They eliminate the hole, protect the shoes in the future, and prevent the appearance of new defects in areas susceptible to them.
Desmokol and Nairit, containing artificial rubbers and urethane resins, are considered good adhesives for shoes. They are quite elastic, have high adhesion to most shoe materials, and are even suitable for repairing soles. Of the “Moments”, only “Moment Marathon” is suitable for work, which includes special additives and is capable of sealing any defects in rubber products. There is also “Liquid Patch” glue on sale, ideal for PVC: it eats into the structure of the material, tightly merging with it, forming a single whole. When using this glue there is no need to use patches.
How to seal EVA winter fishing boots? The best choice would be the glue of the same name (“EVA Shoe Glue”) in a white tube, its price is about 130 rubles. The product is useful for emergency repair of boots when fishing or hunting. Main characteristics of the composition:
- microporous structure of the adhesive joint after drying, which does not release heat even at sub-zero temperatures,
- water resistance, possibility of direct contact with moisture,
- easy to clean, not susceptible to clogging with dirt,
- yellowish color, which disappears after drying (the seam will be transparent and invisible),
- no spreading, fairly thick texture,
- the ability to tightly glue punctures, tears, damage along folds, on the sides and corners,
- long service life,
- economical consumption.
The glue has a disadvantage - it cannot be used to repair PVC boots or other products made of polyvinyl chloride. It will also not be possible to attach a PVC patch to EVA using this glue; it will not stick.
Rules for working with EVA
Only glue based on the same material will qualitatively repair products made from EVA (“foam”, foam rubber, as it is called), since it impregnates the porous structure and merges with it. A patch is not needed for small or medium-sized damage. It will be enough to apply glue and the crack will close. For large tears, it is better to purchase a new pair of boots. You need to wear gloves when working with glue. The product must not be used until the glue has completely dried.
The sequence of work is as follows:
- clean the puncture area with sandpaper so that it becomes rough (if a patch is used, clean it too; glue will not stick to a glossy surface),
- compress the area of damage to the product so that the edge of the puncture comes out, so the quality of the seam will be higher (it is better to do this with your hand immersed inside the boot),
- apply glue to the defect, join its edges or apply a patch coated with glue,
- It is better to glue serious tears with two patches - on the inside and outside,
- Place a piece of clean cloth on top of the defect area, place a weight,
- if there are two patches, first place a hard object inside the boot to press the first patch, then fix the glued outer element.
Most adhesives require curing for 24 hours - this is how long it takes for polymerization to occur and the product to be ready for use again.
How to seal boots
For shoes made of ethylene vinyl acetate, a special EVA glue is used.
- The resulting adhesive seam does not allow moisture and direct flow of water to pass through;
- the composition does not spread during gluing;
- after application, the mixture acquires a yellowish tint, but over time it becomes completely transparent;
- due to the long service life of the composition, shoes will not leak for a long time;
- since the product is spread in a thin layer, it will last for a long time;
- period of use – 2 years.
For EVA, you can also use the universal composition “Moment”.
These products are not suitable for PVC. Repair kits are sold for rubber boots. They are convenient to use for quick repairs while fishing or hunting. The kit includes glue and a transparent patch film. After gluing the patch, the adhesive seam dries in no more than an hour. Hunters and fishermen often use the KU-3105 repair kit.
How to repair shoes at home: cold and hot method
Understanding the details of the question of how to repair a hole in a sole, anyone interested in common methods for solving the problem will notice two effective approaches to implementing the idea.
The cold method requires a minimum of skills in working with the material; before applying the mixture, the joints are cleaned, after which you will need to press the two parts tightly, liberally lubricating the crack of the boots with a fixing liquid.
The hot method will be relevant for working with too hard soles, the composition is applied to the damaged surface and heated with a hairdryer, even a cosmetic copy will do, you don’t have to look for a construction model.
It is important not to overheat the layer, otherwise it will lose its qualities; 30 seconds is often enough, but before performing manipulations you should read the instructions from the glue manufacturer.
Do-it-yourself sports shoe repair: sealing the sole of sneakers
There is no need to panic, thinking about how to repair your favorite thing that fits perfectly on your foot and does not restrict movement.
Sports models are exposed to stress every day, so when performing the method, you should be as careful as possible and complete all the steps efficiently, so that the first time you step on the treadmill or into the gym, the soles of your sneakers do not have to be repaired again.
Dirt and debris are completely cleared from the problem area, after which the surface should be degreased with solvent or white spirit. When working with large holes, the cracked sole will have to be pre-reinforced with fiberglass mesh.
Upon completion of these stages, you can proceed to filling the space; construction tape is glued over the layer of fixing liquid; it will make the outer side more even and prevent the mixture from spreading.
What shoe glue to use to seal a hole in a sneaker
When thinking about how to restore the model and how to seal the sole, it is important to give preference only to proven brands of fixing mixture, otherwise the result of the work will upset the master.
Among the products that are popular among professional shoemakers are the following product samples:
- EVA.
- Desmocol.
- Super Moment (second).
- Kenda Farben SAR 306.
To repair a cracked sole at home on sports sneakers, it is better not to skimp on buying glue, because the reliability and durability of the installed patch depends on this component of the repair.
How to repair a hole in the sole of winter boots
If you look at the element in cross-section, each craftsman will notice one important feature: in the structure of the component of seasonal shoes there are voids, similar to honeycombs, that need to be filled.
Without such additional actions it is impossible to talk about high-quality restoration; these places can be filled quite well with small pieces of rubber, after which the area can be filled with a fixing mixture of the most liquid form.
Often the insole also has to be changed; it simply gets pressed in, especially on the heel, and walking becomes very unpleasant. While waiting for complete polymerization, the item is placed under a press; if there is no vice, you can press the area with the leg of a table or cabinet.
Leather boots: how to restore a broken sole
Models of this type usually cost the owner a tidy sum, so people are in no hurry to throw them away, but rather wonder what to do and how to seal the problem area. Liquid leather copes well with the problem if the sole has cracked and touched the top layer of material.
You need to work with the product according to the instructions, and also devote sufficient time to leveling the applied layer.
The torn, cracked or burst area is coated with an ear stick; if necessary, you can use a thin brush to help; there is no need to rush, it is important to lubricate all sides, then press them tightly, leaving them under pressure for a certain time.
We repair the soles of rubber boots
In such models, you need to create a sealed and durable base, otherwise water will penetrate inside the product and your feet will get wet.
To achieve a better result, you can use step-by-step instructions that look like this:
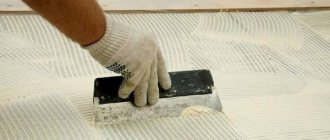
- The surface is thoroughly cleaned of dirt and degreased with specialized compounds.
- A matte texture is created using fine sandpaper.
- Coat both parts with glue and wait 5 minutes.
- After time, another layer of the fixing mixture is applied and the gap is tightly compressed.
Most often, complete polymerization takes at least 24 hours; there is no need to check the reliability of the grip or disturb the boots so that the rubber sticks well to each other.
If you follow this sequence when repairing shoe soles, the item will last for many more years and will reliably protect the owner’s feet from moisture even in heavy rain.
How to restore the adhesive fastening of a sneaker using a patch
The process is quite painstaking, but even beginners who have seen the sole burst or the material come off for the first time can realize their plans.
To achieve a positive result, it is difficult to do without an overlay; this auxiliary element will fit onto the sole and the main frame of the sneaker, thereby creating a reliable connection between the two parts.
All areas are thoroughly wiped with acetone or white spirit; without degreasing, the glue will not be absorbed so well into the structure of the material, and adhesion between the planes will certainly suffer.
A lot depends on the strength of the initial compression; you need to squeeze the repair site very tightly, and then leave it in that position for several hours. Over time, the load will need to be reduced so as not to deform the model; sneakers can quickly bend and become uncomfortable during subsequent wear.
How to glue the soles of shoes
Women's models with high wedges are much more difficult to restore, but manipulation is still possible.
It is important not to spoil the appearance of the shoes with smudges or damage; all excess squeezed out mixture is wiped off in a timely manner before the composition sets and penetrates into the structure of the base material.
Accuracy at each stage will not hurt, initially the problem area is cleaned of dirt and dust, all kinds of threads or pieces of foam rubber are cut off with a sharp knife.
To fix a torn heel, you should buy glue based on rubber or polyurethane; such product samples are popular with professional shoemakers.
The adhesive is spread with a brush after degreasing the surfaces; after leveling the element, you need to place the model under pressure not exceeding the standard weight of a person so that the heel does not simply break from excessive load.
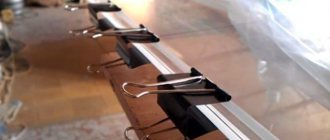
Step-by-step sealing of boots
After preparing the shoes for repair and identifying the location of the damage, you will need to treat the defective area with sandpaper. With its help, a rough and porous surface will be created that will better bond with the adhesive. After degreasing, glue is applied. According to the instructions, complete polymerization occurs within a day, but in critical situations the product can be used after 2 hours.
If the damage is large, a patch can be applied. To increase strength, it is recommended to apply it on both sides. It is recommended to additionally secure the patch while it dries. A clean napkin is placed on it, and a weight is placed on top. This fixation will prevent the patch from moving, which can occur before the glue begins to harden.
Advantages and disadvantages of EVA material
| Advantages | Flaws |
| Easy. This quality has attracted manufacturers of children's models. | Excessively susceptible to punctures and cuts from sharp objects. Any wire or glass may leave a defect on the product. |
| Ecologically pure. Does not pollute the environment. A product made from this material is safe not only for adults, but also for children. | Weak anti-slip ability. However, this problem can be easily resolved with the help of a ribbed sole. |
| Lasting. Wear-resistant, defects appear only as a result of punctures or cuts. | |
| Elastic. The appearance of damage on the folds of shoes is a fairly rare occurrence. | |
| Elastic. This property is indispensable in the manufacture of orthopedic models. With the help of the “memory effect”, your feet will be comfortable and comfortable in products made from EVA material. | |
| Does not absorb odors. | |
| Water resistant. It prevents your feet from getting wet, and using boots made from this material you are less likely to catch a cold. | |
| Hygienic. Prevents the spread of bacteria and fungi. | |
| Hypoallergenic. An important property is provided by the use of EVA material in the manufacture of shoes for medical personnel, as well as for small children. | |
| Resistant to solvents. Does not deteriorate with frequent washing and exposure to various oils. |
Sealing rubber boots
To repair ordinary rubber boots, you can use one of the popular techniques.
Anglers method
Special rubber adhesives are sold in stores for fishermen. They are ideal for repairing rubber products, including those in contact with water. Exact instructions are always included with the glue and must be strictly followed. Usually, the surface must first be carefully sanded, then degreased with acetone. A patch is glued only if there is a large defect, and small cracks are filled with glue without a patch. The drying time must be observed without shortening, otherwise the adhesive joint will not be able to gain the necessary strength.
Cyclists method
Bicycle enthusiasts often have a special repair kit available, which includes glue, a patch, a brush for applying the product, and sandpaper. These devices are suitable not only for repairing a broken bicycle tube, but also for sealing torn boots. The technology will be similar:
- sanding,
- degreasing with acetone,
- cutting the patch according to the size of the defect (plus 1 cm allowance on each side),
- uniform application of glue to the surface and patch,
- applying a patch,
- fixation,
- wait until the glue dries.
Some adhesives allow you to use products after just a couple of hours. Although, to improve the quality of adhesion, it is better to wait a day, so the adhesive seam will be stronger and more durable.
Automotive method
Sometimes shoes, boots made of rubber or EVA crack at the bends. In such a prominent place, the patch will not look aesthetically pleasing and will ruin the appearance of the shoes. For a more accurate repair, you should purchase an automotive adhesive-sealant, polyurethane or epoxy compound and apply it without applying a patch. The easiest way is to buy a transparent composition; it will not be noticeable on the product at all. The “Crazy Hands” car glue from Done Deal, which is sold in any auto store, has proven itself to be excellent. It firmly holds the gluing area, protects the shoes from moisture getting inside, and due to its elasticity it does not collapse when the material is further bent.
Hot method
To perform hot gluing, you will need a vulcanizer and a piece of raw rubber. Despite the complexity, the quality of the repair will be at a high level, the patch will stick tightly. Raw rubber is soaked in gasoline for 10 minutes, laid on the defect, and pressed with a vulcanizer press. The device is turned on for half an hour, then turned off. After complete cooling, the press is removed and the product will be ready for use.
Features of gluing soles
The most difficult repairs will occur if the sole is damaged. Of course, you can simply repair a crack, a puncture, or fill it with glue, but the quality of the bond will be low, as will the durability. This “patch” is enough for 1-2 outings in wet weather. You can also carry out repairs in another way:
- take a piece of nylon,
- insert material into the crack,
- heat the soldering iron and solder the crack.
If you seal the defect in this way, the sole will last longer, but it is unlikely that you will be able to wear the boots for even one season. It is better to pre-treat the puncture on a sharpening machine to make the area smoother. Afterwards, you need to degrease the sole, fill the hole with epoxy glue from the outside and inside. After a day, an insole should be placed inside the boot, and the shoes can be used.
In order for repaired boots to serve for a long time, it is important to properly care for them in the future. Shoes should be washed and dried after returning from the street, and periodically treated with a water-glycerin solution. Drying should be done away from the radiator so that the boots do not become deformed. It is better to store them out of season in the box in which they were sold, stuffed with newspapers - this way the pair will retain their shape and attractive appearance.
SAR can help you
Experts believe that to glue EVA mats you will need a one-component SAR adhesive composition consisting of the following components:
- polychloroprene rubber;
- alkylphenol-formaldehyde resins;
- modifier;
- vulcanizer;
- ethyl acetate;
- gasoline solvent.
This way you can glue not only two pieces of EVA, but also glue leather, rubber, metal, plastic, PVC to the mat.
After applying glue, the seam will turn yellow or light brown. He is not afraid of frost, heat and can repel water.
Sole repair
- First, the sole area is processed on a sharpening machine; it should become completely smooth.
- For the sole, a patch will not give a long-term result, because the patch will quickly wear out while walking. The sole can only be sealed with sealant or liquid patch.
- The smoothed surface is cleaned and degreased.
- The sealant is injected into the cut (or puncture) and applied twice over the damage.
You can place a small piece of nylon into the crack on the sole and heat it thoroughly with a soldering iron. This repair is enough for 2-3 uses of shoes.
Sealing PVC boots
- The damaged area is sanded and degreased.
- Glue is applied to the cut and the underside of the patch after 15 minutes. re-application is done.
- After 30 min. After the second layer, the glue is heated with a hair dryer.
- A patch is applied to the damaged area, heated by a hairdryer, both on the outside of the boot and inside it.
- The patch on the shoe must be held for at least 5 minutes, from the inside the patch is pressed with a rag wrapped in a bag.
- A load wrapped in a bag is placed on top of the taped boot. You can use shoes 24 hours after repair or after the time specified in the instructions for the glue.
Preparation
When working with quick-drying glue, it is better to prepare in advance everything you need to repair shoes.
You will need:
- degreasing agent;
- fine grain sandpaper;
- glue (its choice is described below);
- household or construction hair dryer;
- patch made of waterproof material;
- cloth, rags to remove excess glue.
Before starting repairs, you should wash your boots well and dry them. After this, degrease the surface to be sealed. This can be done with any alcohol-containing product, for example, perfume, cologne or vodka. If alcohol-containing products are not at hand, you can remove the fat layer using detergent.
There are ready-made repair kits for rubber products on sale, however, if you have any suitable glue on hand, you can do without them.
Sealing EVA boots
- The cut area is compressed so that the porous EVA base protrudes out.
- Apply glue to the damaged area.
- 5 minutes after applying the first layer, the glue is applied a second time.
- Another 5 minutes later. The edges of the cut are joined end to end and compressed tightly.
- The glue is applied thinly each time so as not to reduce the quality of the gluing.
- Complete hardening of the seam will occur within a day.
There is no need to use patches to repair minor cuts on EVA shoes.
Pros and cons of EVA
Positive aspects of use:
- Seam resistance to moisture and water. After restoration, the shoes can be easily washed under running water, and there is no need to worry about leakage.
- Reliably glues even in inconvenient places.
- When exposed to temperatures, the seam does not lose its properties and does not crack.
- The viscous consistency prevents the substance from spreading during repairs.
- The seam is not noticeable after drying.
- Availability.
- Economical. Manufacturers recommend applying a thin layer. The quality of gluing cannot be increased by the thickness of the layer.
- Hypoallergenic, the seam does not absorb foreign odors, and dirt is easily washed off.
The nuances of repairing shoes with voids
The unique honeycombs can wear off over time, and it is this exposure that often leads to significant damage, moisture on the feet and dust. Before applying a patch or filling the space with pieces of polyurethane, as well as pieces of rubber, the surface must be trimmed with a knife.
Such manipulations will protect the foot from excessive load, as well as bevel to one of the problem sides, and the repaired model, although it will become a little lower, will look more presentable.
Before using one of the solvents, you need to find out the composition of the sole; ignoring such measures, the master, without knowing it, is capable of causing irreparable harm to the product; foam versions are easily burned through with potent reagents.
Types of rubber for boots
In order to choose what to seal your rubber boots with, you need to know what material the boots are made of. For example, EVA glue is not suitable for PVC boots.
Now the most commonly used materials for boots are:
- PVC (polyvinyl chloride);
- EVA (ethylene vinyl acetate).
Foamed polyurethane and silicone are also used, “classic” rubber boots are now difficult to find on sale. The manufacturer must indicate the material of the boots; in extreme cases, you can consult the seller.
For EVA boots, the best glue is made from the same ethylene vinyl acetate, for PVC - polyurethane glue, and for rubber - glue containing rubber.