The computer keyboard is one of the most loaded parts of the computer. In the modern rhythm of life, users spend a lot of time at the computer: eating, working, sometimes even sleeping. And, naturally, a large amount of debris accumulates in the keyboard over time; this is dust and crumbs. The longer the keyboard is not cleaned, the more dirt accumulates both on the keys themselves and in the space, under and between them.
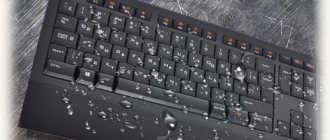
Liquid spilled on the keyboard is a whole story. If, with gradual contamination, you have time to search the Internet and find out how to properly clean a computer keyboard at home, then in the event that tea or coffee is spilled on the keyboard, you must act quickly, without delay, otherwise the keyboard will not be able to be saved.
The first step to cleaning a computer keyboard at home is to unplug it; if it is a wireless keyboard, then it is enough to remove the batteries from it.
Conventionally, cleaning can be divided into three types: easy - superficial cleaning, moderate cleaning, and complete cleaning.
Easy cleaning
When you are not eating at the computer, there are no animals in the room, from which small lint collects in the space under the keys. And cleaning the computer keyboard is carried out regularly; in this case, in fact, it is not necessary to disassemble the keyboard (provided, of course, that it works properly). Let's figure out what we need for cleaning.
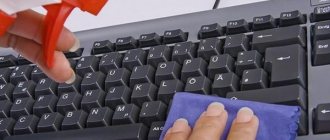
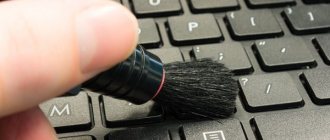
For such cleaning, it is enough to arm yourself with a specially cleaning cloth for your computer, or a damp cloth, ear sticks, a vacuum cleaner, a hair dryer, and a can of compressed air.
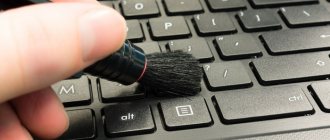
1. To clean the keyboard at home with a hairdryer, you need to blow out all the dust and crumbs from the keyboard as much as possible, using cold air mode. If you have a compressed air cylinder, it is more convenient to use it.
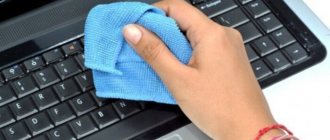
2. Use a vacuum cleaner to collect everything that could not be removed with a hairdryer, then wipe the surface of the keys with a damp cloth.
3. In hard-to-reach places in the corners of the keys, ear sticks soaked in alcohol can remove the deposits of fatty deposits from the hands, which inevitably appear over time during active work at the computer.
If it is slightly dirty, it is not necessary to use any additional products; surface cleaning without disassembling it is enough.
Method 3. “General cleaning”
Usually this is the case when it is easier to buy a new keyboard than to bother with the old one. However, if the keyboard is expensive and of high quality, and you don’t mind spending time on caring for it, this method will be very relevant. It is also suitable for cleaning a new keyboard that has had something sticky spilled on it.
So, we disconnect the keyboard from the computer, turn it over and carefully unscrew all the screws that secure the upper part to the lower part. The lower part is easy enough to wipe off dust, but the upper part will have to be tinkered with. Remove all the keys after photographing their location. Wash the keys separately - in a washing machine or in a bag under running water. Then wash the bottom of the keyboard under the tap, using a brush to remove any dirt. Dry everything thoroughly with a blow dryer and put the keyboard back together.
But what if you have a laptop? Use the first method - it is the most secure for the entire device. If we are talking about deep contamination - for example, tea or soda spilled on the keyboard - it is better to seek help from professionals.
Cleaning with partial disassembly of the keyboard
How to clean a keyboard if it is heavily soiled, if the computer keyboard has not been cleaned for a long time, and the computer keyboard itself is regularly bombarded with crumbs from sandwiches, cookies, cigarette ashes, and particles of animal lint? In this case, you need to partially disassemble the computer keyboard.
1. As in the first case, any cleaning should begin no earlier than the keyboard is completely de-energized. 2. Using a nail file, table knife or screwdriver, you need to pry the key from one edge, it should jump out of its socket with a characteristic clicking sound, you don’t need to put a lot of effort, the keys, in principle, should be easy to remove.
3. Before dismantling the keys, you should find a photo of your keyboard online, or take a photo with a camera or phone, so that during assembly you don’t get confused about where to insert which keys. 4. The keys themselves should be washed: how and with what detergents is used is not important. Just before use, make sure that the cleaning agent does not harm the stability of the paint on one key, so as not to accidentally wash off all the symbols. 5. After all the keys have been removed, washed and dried while waiting for assembly, we will begin cleaning the platform itself, here it is the same, everything depends on the amount of dirt.
You can use a vacuum cleaner, ear swabs, cotton pads, and alcohol. It is necessary to thoroughly clean the entire surface of the plastic container with mounts for the keys from dirt. Then we proceed to assembly, checking the photo of the keyboard, return the keys to their place, installing them in place, you should hear a characteristic click, indicating that the key is installed correctly. 7. Some keys have stabilizing springs; you need to carefully install these keys so that the curved edges of these springs fall into special grooves; these springs prevent large keys like the spacebar or Enter from warping. And when you press them anywhere, they work evenly.
What about cleaning laptop keys?
Try to pay special attention to the long keys - spacebar, Shift, Enter (in some models Backspace and CapsLock). As a rule, such keys are attached with a metal clip, which means removing them and then reattaching them will be a little more difficult.
Important:
If you are not sure that you can remove the keys, it is better not to touch them. Moreover, on some laptops these keys are made in such a way that they cannot be removed at all.
Before disassembling the keys, carefully inspect the mounting location. It is worth going carefully over the joints with a flannel cloth or a damp cloth.
To remove such keys, you need to use a thin knife blade, a file, or long nails.
* Slide the blade under the corner of the key and carefully move to the other corner. Be very careful as the parts are made of plastic and can break easily.
You can first remove and insert one key to better understand how the mechanism works.
Complete keyboard cleaning
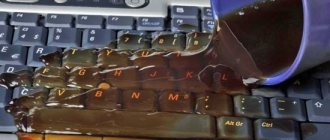
Many users spilled some drinks on the keyboard. How can you work without your favorite cup of tea, or play your favorite toy without beer? With awkward or sudden movements, the contents of the previously tasty or healthy drink end up on the keyboard.
There is little pleasant, but everything can be fixed, and quite easily, you just have to use either the on-screen keyboard for at least a day, or connect another, spare one, if anyone has one. How to clean a computer keyboard with heavy dirt or spilled liquids.
1. Disconnect the keyboard from the network. 2. Unscrew all the screws on the back cover; depending on the modification, there may be a different number of them. 3. The keys still need to be removed; how to do this is described in detail in the previous paragraph, so there is no point in writing the same steps again.
4. Using a plastic card or mediator, if available, around the perimeter of the case, release all the retaining clips and remove the back and front keyboard covers. 5. You need to disconnect the circuit board before cleaning the keyboard. If liquid is spilled, you need to remove moisture with a swab dipped in distilled water from the contact board, then wipe with alcohol, since to remove moisture, all layers need to be separated, but not torn, and they cannot be folded until completely dry; you can hang the board on a clothesline to dry . 6. Inspect for damage or darkening on the film; this may indicate a broken contact, as a result of which some keys will not work. 7. All parts of the keyboard should be assembled no earlier than they are completely dry.
Deep cleaning
A deep cleaning will be required to remove any serious dirt or dried liquid. To be able to clean the inner surface of the device, you need to disassemble it, and studying the instructions will help you do this correctly.
Cleaning procedure:
- Use a Phillips screwdriver to unscrew the screws that secure the keyboard elements.
- To remove the top part with the buttons, pry it off with a knife in one corner. Remove carefully so as not to break the fasteners.
- Remove the removable keys and soak them in warm water, an antiseptic or soap solution. Soaking will remove traces of sebum, dust and other impurities.
- Use an old toothbrush to clean the main parts and then the buttons.
- If the keys cannot be removed, remove the board, lighting elements and wires, and then rinse the device with warm running water.
- After cleaning, dry the device thoroughly so that not a drop of water remains. Assemble the structure, tighten the screws and connect the device to the PC.
Before removing and washing the buttons, take a photo of the layout. This will make assembly easier and help avoid confusing the keys
How to clean your keyboard
Sometimes it happens that you have to wash the keyboard, in the literal sense of the word. Not separately and in parts, but almost entirely. This applies to non-separable computer keyboards, where when you remove the back cover and top panel with buttons, it turns out that the contact board is enclosed on both sides in a protective casing consisting of two metal plates, riveted along the entire perimeter with plastic terminals at high temperatures.
We removed everything that could be removed and then either break it to get to the board or wash it entirely. Ideally, this should be done in distilled water, but in my practice, after a solid portion of sweet coffee on such a keyboard, when distilled water was not at hand, I actually had to wash it in a basin with detergent, and then rinse it for a long time in running water . But such an impromptu does not happen often, fortunately, and on average I clean the keyboard once, disassembling it completely every six months and weekly with a damp cloth and a vacuum cleaner.
After such a shower, the non-removable keyboard needs to be dried for at least 3 days in a warm place. Then assembling and connecting the keyboard as described above is not difficult.
How dirty is your keyboard?
Soap and water, to put it mildly, are not entirely suitable
for electronic devices, which is why we probably forget to clean them, or maybe it’s all about laziness.
According to
2012
study , a typical desk contains 400 times more bacteria than a toilet seat. Honestly, the toilet seat is one of the cleanest places in terms of the number of microorganisms.
Dr. Chuck Gerba, a professor of microbiology at the University of Arizona, said there are a lot of things in our home that are much dirtier than the toilet seat.
A 2006 study conducted by researchers at Northwestern Memorial Hospital
, showed that two very dangerous and drug-resistant bacteria (Enterococcus faecium and Staphylococcus aureus) can survive on keyboards for up to 24 hours. In addition, there is such a dangerous bacterium as Pseudomonas aeruginosa, which can survive on the keyboard for an hour.
What to do?
Obviously, the first thing you need to do is wash your hands with soap before and after using the keyboard, which also applies to the laptop.
In
a study conducted in 2012, microbiologists analyzed university computers
and came to the conclusion that public computers, or rather keyboards and mice, must be disinfected at least once a week, and preferably every day.
Details
How to wash your computer keyboard at home
If you do not eat food at the computer, and if there are no animals in the room with it, small fluff will get into the keys. If you regularly clean the keyboard, then it will not be necessary to disassemble it, provided that it works well.
How can I clean my keyboard? To clean the keyboard you will need the following tools:
— a special cleaning cloth for the computer (you can use a damp cloth instead);
- vacuum cleaner;
- cotton buds;
- hair dryer;
- compressed air cylinder.
Cleaning process:
- To clean your keyboard at home using a hairdryer, you need to turn it on to cold air and blow out all the crumbs and dust. If you have a can of compressed air, it is better to use it.
- Use a vacuum cleaner to collect everything that could not be blown out with a hairdryer. After this, the surface of the keys should be wiped with a damp cloth.
- The remaining contaminated areas that are difficult to reach should be cleaned using cotton swabs soaked in alcohol. In this way, the corners of the keys are cleaned, on which plaque from fatty deposits from the hands accumulates. It occurs in any case if you use the computer actively.
REFERENCE! If there is little contamination, then there is no need to use any additional means. Just superficial cleaning is enough, without disassembling the keyboard.
Do-it-yourself keyboard cleaning with partial disassembly
This method is suitable if the keyboard has not been cleaned for a long time, and crumbs from bread and cookies, cigarette ash, and animal hair constantly fall on it. Then the keyboard needs to be disassembled.
- First, the keyboard must be completely disconnected.
- Now you need to pry the key off on one side using a knife, nail file or screwdriver. In this case, the key should jump off the socket, accompanied by a characteristic clicking sound. This happens easily, so you don’t need to put in too much effort.
- Before you start disassembling the keyboard, you need to take a photo of the location of the keys or find a photo on the Internet with the same keyboard. This is necessary to understand where to insert the keys after cleaning.
- How to clean the buttons on your keyboard
The keys now need to be washed using detergent.
REFERENCE! Before using any product, you should first test it on one key so as not to accidentally wash off the paint.
- After removing all the keys and washing them, you need to leave them to dry and start cleaning the platform itself. To do this, you can use a vacuum cleaner, cotton pads, cotton swabs, and alcohol. It is necessary to thoroughly clean the entire platform from dust and dirt.
- Now you can start assembling, looking at the photos and returning all the keys to their places. In this case, a characteristic click should be heard, which will signal that the key is inserted correctly.
- Some buttons have stabilizing springs; the keys must be inserted especially carefully.
Cleaning the keyboard completely
It was not uncommon for people to spill some kind of drink on the keyboard. After all, they often drink coffee or tea at the computer. If you make an awkward move, the drink may end up on the keyboard. Of course, it’s not very pleasant, but this can be fixed, although you won’t be able to use the keyboard for about a day.
Cleaning the keyboard with heavy dirt or spilled liquids
- The keyboard must be unplugged.
- Now you need to unscrew all the screws on the back cover, of which there may be different numbers depending on the model.
- All keys also need to be removed according to the scheme described above.
- Using a plastic card or a mediator, you need to unclip all the retaining clips and remove the back and front covers of the keyboard.
- Before cleaning the keyboard, you should disconnect the circuit board. If liquid is spilled, it must be removed using a swab soaked in distilled water from the contact board. After this, you need to wipe it with alcohol, since to get rid of moisture you need to separate all the layers without tearing it. They cannot be folded until completely dry; to do this, they can be hung on a clothesline.
- Check the film for any darkening or damage; this may indicate poor contact, which will cause some keys to not work.
- Before assembling the keyboard, you must first dry all parts of the keyboard.
How to clean your keyboard
Sometimes your keyboard needs to be washed. And not in separate parts, but almost completely. This may need to be done with non-separable keyboards, in which the contact board is enclosed on all sides in a protective casing, which becomes visible after removing the back and top panels from it. The protective casing consists of two metal plates, which are riveted around the entire perimeter with plastic terminals at high temperature.
After removing everything possible, you realize that you can then either break it or wash it completely. It is best to do this in distilled water. If it is not there, then the keyboard can be washed in a basin with some detergent added, and then rinsed in running water. It’s better, of course, not to let this happen and clean the keyboard at least once every six months, disassembling it completely.
REFERENCE! In addition, once a week it should be wiped with a damp cloth and the dust should be blown out with a vacuum cleaner.
After such a shower, you need to dry the non-removable keyboard for at least three days in a warm place. Then the keyboard needs to be assembled and connected, which should not be difficult.
How to clean the panel with buttons: clean the contacts on the keyboard of a netbook or laptop
You should not turn on the equipment without making a diagnosis. The laptop may be working. But liquid that has not completely dried can cause oxidation of the contacts. The motherboard very quickly absorbs excess moisture. As a result, the equipment may break down.
- If you want to clean your own laptop, then you will have to take the equipment and keyboard apart. If liquid hasn't gotten under the buttons, that's great. You only have to wash the stuck buttons using a detergent and dry them. If water has penetrated under the buttons and onto the motherboard, then look at it under a magnifying glass.
- If you notice darkened areas, then you will have to resolder. If there is plaque, you need to clean the board with a soft brush, then with alcohol. After this, rinse with distilled water.
Cleaning contacts
- Contacts that have oxidized can be easily cleaned with an eraser. Dry the board thoroughly. If deposits are everywhere, then wash the board completely. Remove all important elements in advance: memory, battery, processor. Wash the remaining elements with a toothbrush, soaking it in hot water.
- Wash the parts very carefully and quickly to avoid getting water on the connectors. Then blot the board and dry it for several days.
- Above we have described to you all the methods that allow you to clean and rinse the keyboard of your PC or laptop. Try to treat such equipment with care. Wash your keyboard and clean it regularly.
Never eat or drink drinks near equipment. If you take just 5 minutes away from your own PC, you will forever get rid of problems that can affect the keyboard and the entire computer system.
Cleaning Up Spills
Even ordinary water can damage the keyboard. Tea, coffee, alcohol and other drinks are even more aggressive. In such a situation, it is important to act as quickly as possible so that water and impurities do not have time to dissolve the tracks. To clean, you need to do the following:
- Disable the keyboard.
- Turn the devices over with the keys facing down to allow the liquid to flow out.
- Remove any moisture from the cabinet using a cloth, paper towels, or paper.
- Disassemble the housing and dry it from moisture. You can use a hairdryer for drying.
- After drying, assemble the device.
Often, after moisture gets in, the keyboard stops working completely or partially. This usually occurs due to damage to the conductive paths. They can be restored using conductive glue or varnish, but due to the complexity of the procedure, this repair method is advisable only when expensive models are damaged.
Bonus cleaning - rubbing the switch with alcohol
These actions often help against double-clicks or can generally revive the switch: 0. Turn off the keyboard! 1. Remove the keycap and hold down the switch. 2. Drop a few drops of vodka, alcohol or other alcohol-containing liquid inside. Distilled water is also fine, but you will need to dry it well. 3. Develop by pressing quickly for 10-15 seconds.
If you don’t have time to reproduce the entire procedure or you’re simply afraid that something might go wrong, we can arrange delivery and do the repairs ourselves. Link to deep cleaning performed by us.
Why do you need to clean computer and laptop buttons?
Expert opinion
Irina Kovtun
Before you try to clean the keyboard on your laptop or PC, it doesn’t hurt to figure out why it’s needed. At first glance, the answer is obvious: to clean the keys from visible dirt and give your computer equipment a neat look.
In fact, with constant contact of fingers with buttons, a favorable environment for the proliferation of pathogenic microorganisms is formed on their surface. After working at such a keyboard, people often take food with dirty hands and put it into their mouth along with bacteria. Therefore, the main goal of the hygiene procedure is to take care of your own health and the well-being of your loved ones.
We disassemble the case
If you don’t have the basic skill of parsing complex structures, then type “Keyboard name + disassembling” into Google/YouTube. The keyboard must be divided into keycaps, a case, a plate (a plate under the switches) and a PCB board.
Example with our Leopold analysis:
An example with Googled text parsing of Asus Flare
An example of successful and unsuccessful keyboard parsing: