The most common causes of laptop failure include spilling a drink on the keyboard. It is with this problem that many laptop owners turn to workshops. The very fact of filling is a big nuisance, but with timely and decisive action you can avoid expensive repairs and the mandatory replacement of components. We suggest considering the general rules of first aid for an electronic device in case of liquid contact.
What is the method of purging a flooded gadget with air, what are some tips for reducing the cost of possible repairs and whether it is possible to completely restore a laptop in the event of a breakdown - about everything in order.
Order professional laptop repair in Moscow or sell it for spare parts! Free diagnostics and courier service. Urgent repairs. Guarantee. Inexpensive! Call! Tel.: +7 (903) 729-32-48 or write to us by email: [email protected]
Order
general information
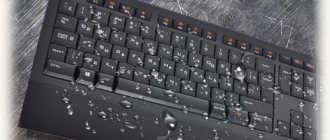
Every laptop owner understands the danger of water, juice, wine or any other liquid getting on its surface. However, soon cups of coffee appear near the laptop, and users turn drinking tea at the laptop into a daily ritual. As a result, attentiveness becomes dull, and at some point the drink ends up on the body. An unpleasant moment, which is retribution for the loss of vigilance.
According to statistics, the contents of every 200th glass that is raised over the device ends up not in the mouth, but on the laptop. This applies not only to alcoholic drinks such as beer, vodka, ale, but also to plain water, juice and first courses.
Statistics on the number of spilled drinks are conditional and determined by various factors. Without a doubt, if there are animals in the house or a 3-year-old child who wanders around the apartment all day long with a bottle of juice, the likelihood of the laptop flooding will be much higher.
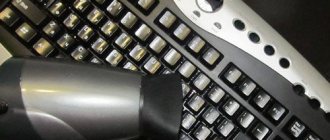
Removing the keys
The keys from the most problematic area are removed first. The key mainly consists of two parts. This is a platform and an elevator. In some cases, there is also a spring element. Each action must be checked against the instructions.
Removal is carried out in stages:
— Take a thin screwdriver. The screwdriver used to open the latches may well work.
— You need to insert the tool from the bottom of the key and remove the pad.
“Then we need to remove all the elevators.” The same removal technology as with platforms is suitable for this.
IMPORTANT! Please note that before removing the buttons, it makes a lot of sense to take a photo of them. You can also fix the location of the buttons in some other way. Without this, you are at great risk. In the sense that you can perform the assembly incorrectly.
What was spilled is an important point
It is important to consider what was spilled on the keyboard.
It is important to consider that not all liquids that end up on the surface of a laptop lead to damage. According to the parameters of potential danger, they are divided into the following groups:
- Aggressive.
- Weakly aggressive.
There is a simple principle: the more salts and sugar are present in the composition, the more aggressive it is. Therefore, the first category includes running water, tea without sugar and other similar drinks.
Slightly aggressive substances in small volumes and with short-term exposure do not pose a particular danger. If resuscitation is carried out in time, the motherboard and other important components of the device will remain in good working order. As for drinks containing sugar (coffee, tea, Coca-Cola, etc.), they often cause laptop failure. And kvass, salty mineral water or wine can “kill” a laptop computer in a few minutes.
The effectiveness of future repairs will depend on the amount of liquid that gets onto the working surfaces, its composition and the duration of contact.
The first actions of a laptop user when a non-aggressive liquid is spilled in an amount of up to 20-30 ml
What the user needs to do first
The algorithm for the first steps to care for a laptop comes down to the following actions:
- You need to immediately, without any pause or hesitation, disconnect the laptop from the power supply by removing the charging unit from the device connector. When such a problem occurs, you don’t need to think about how to properly disable the operating system or check unsaved files, much less turn to thematic forums for help. The first task is to save the equipment. Text documents and other files can be recovered in most cases, but repairing a laptop that has been exposed to water for a long time is much more difficult.
- Next, you should turn off the laptop if it did not turn off on its own after contact with water or the previous step. To do this, you need to remove the battery and connected peripheral devices (drives, mouse, keyboard). You should also remove the hard drive from the drive.
- After removing the back cover, you need to turn the laptop over with the keyboard down so that the water droplets drain off. The main thing is to avoid getting moisture on the display matrix. The remaining particles should be wiped off with a napkin or soft cloth. You should let the device stand in this state with the lid open for several hours. It is better to place it on a heated windowsill and wait for the case and keyboard to dry completely. The process may take 1-2 days.
Do not try to turn on a flooded device even if proper drying has been carried out
You cannot turn on the laptop.
It is strictly forbidden to start the laptop after the initial drying. According to statistics, 80% of users who encounter such a problem make a fatal mistake by connecting an “under-dried” or insufficiently tested electronic device to the power supply. This approach is extremely dangerous, since the remaining spilled liquid can cause a short circuit and damage the system. The main task is to eliminate unpleasant consequences and minimize risks.
If the laptop is not filled with a large amount of non-aggressive liquid, and all stages of resuscitation measures are completed successfully, most likely after drying it will continue to work as before. But even at this point there are pitfalls.
A common misconception: if the device starts up after drying and works correctly, then problems will no longer arise.
However, in practice, unpleasant incidents often occur. Upon visual inspection, there may be no traces of moisture on the keyboard and case, but this does not guarantee that liquid has not managed to penetrate inside. Prolonged contact with internal components will result in serious failure. The poured composition goes the following way: keys, joints between the case and the keyboard - the motherboard. When interacting with conductive parts, the destruction process starts within a few seconds.
Some laptop manufacturers provide a special protective film under the device case. If it is absent, corrosion processes will gradually affect metal elements.
The situation is aggravated by the following factors:
- Motherboard components quickly become saturated with liquid.
- The rate of corrosion progression increases as the board heats up.
- Corrosion processes occur faster when there is a potential difference between tracks located nearby.
To avoid disastrous consequences, you need to perform a series of diagnostic actions before drying, without turning on the laptop.
How to check if there is moisture under the keyboard
How to check for moisture under the keyboard
To determine if there is moisture under the keyboard, you will need to disassemble the device. The algorithm for dismantling the case differs for different laptop models. It is important to remove the keyboard slowly and carefully after removing the small latches using a straight screwdriver.
If there is no moisture under the housing, this is good news.
To clean sticky buttons of a dismantled part, you need to use regular hot water and a detergent without abrasive particles. It takes up to 24 hours for the keyboard to dry before reinstalling it on the laptop.
If no mistakes were made at this stage, the keys will work properly for several years.
If you find traces of moisture under the keyboard case and on the motherboard, you can proceed according to the following scenarios:
- Contact professionals from the service center for help.
- Try to eliminate the unpleasant situation with your own hands.
We invite you to familiarize yourself with the algorithm of actions for self-reanimation of computer equipment.
After dismantling the case, diagnostics of the motherboard should be performed under a magnifying glass. Particular attention should be paid to blackening at solder points and plaque. If there are blackened areas, and you know how to work with a soldering station, you need to re-solder them.
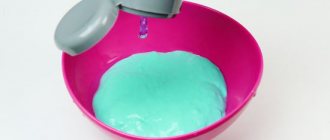
For local lesions, you need to clean them with a soft toothbrush, alcohol and distilled liquid. Next, you should thoroughly dry the board. A soft eraser can be used to remove traces of oxidation on the contact elements.
Deformed and blackened areas need to be resoldered. If there is plaque on the entire surface, and local cleaning is impossible, you should try the option of global washing of the board. To do this, you need to remove all unaffected parts (coin-cell battery, chipset, Wi-Fi module, etc.), remove the remaining thermal paste and clean the interior from dust and other contaminants.
At the next stage, you need to briefly “soak” the board in a weak soap solution and carefully brush it with a toothbrush. Next, you need to rinse the part with clean hot water, heated to a temperature of 50 degrees Celsius.
When washing, it is worth considering that the internal chips and textolite love to absorb liquid. They need to be washed for 4-5 minutes, applying a detergent without abrasive particles. It is allowed to use neutral baby soap. Soap and remove the board carefully, avoiding contact with the connectors.
After washing off the soap solution, you need to inspect the board for damage. Remaining stains should be washed again. Having completed a kind of “water bath”, you need to shake the treated board, wipe it with a lint-free cloth and dry it for 24 hours.
After the specified time has passed, it remains to make sure that there are no traces of spilled liquid and install the part in its original place. The contact pads are additionally cleaned with an eraser and treated with an alcohol-containing solution.
Content
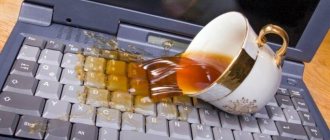
Where is your laptop now - on the desktop or the dining table next to a mug of tea, on a beach lounger, or maybe even in the bathroom? We all know how dangerous and insidious liquid is for equipment, but many people ignore safety rules. Until the first time. And so, we drink coffee while working on the laptop, cola while watching a TV series, and eat soup over the keyboard. And suddenly this “first time” happens.
What do their hapless owners drown laptops with? Service center employees could tell you a lot about such incidents, since liquid spilled on a laptop is one of the most common reasons for calling for repairs. So, how to provide “first aid” to a flooded laptop?
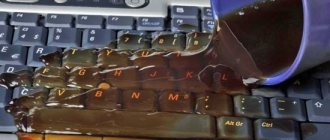
Corrosive liquid spilled on laptop
What to do if your laptop is flooded with aggressive liquid
If your laptop computer is exposed to particularly aggressive compounds, and their volumes are quite large, you will need to carry out a comprehensive flushing of the device immediately after turning off the power supply, removing the battery and drying for 2 days.
In such a scenario, it is necessary to dismantle the case as quickly as possible, conduct a visual inspection of the internal parts, wash and dry them, adhering to the sequence of actions mentioned above. The greatest danger to the device are drinks such as Coca-Cola and Pepsi, coffee, wine, etc.
Ignoring professional recommendations can lead to such an outcome that after a few days the laptop will no longer be repairable.
If cats or dogs live in your house, be attentive to any strong odors coming from the laptop. It is possible that during your absence your pet managed to go to the toilet on the keyboard.
Preventive measures
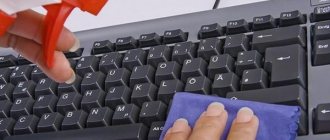
If liquid containing honey, sugar or similar substances is spilled on the keyboard, then additional actions are necessary. Water evaporates completely and without a trace, but, for example, coffee and tea in any case leave a sticky substance. And here ordinary drying will not help. If you don't clean your keyboard, the keys may become stuck or break completely. Therefore, cleaning in this case is mandatory.
To remove the sticky substance, you can use an alcohol solution after disassembling the device and disconnecting all its elements.
The keyboard can only be connected after drying. It should be noted that the external input device dries faster. If we talk about a laptop, then you need to dry not only the keys, but also all the existing boards.
Keyboard resuscitation
How to resuscitate a keyboard
If a flooded motherboard needs resoldering, then in the case of a keyboard you can do without such a procedure. When in contact with plain drinking water, it is enough to dry the keys. If more aggressive compounds come into contact with the surface, you will need to rinse the keyboard with hot distilled water and dry the board so that no traces of moisture or stains remain on it. It is important to thoroughly shake off any remaining liquid and dry the device as described above.
During the cold season, it is better to dry the component using radiators or any other suitable methods. Aggressive liquid can damage the keyboard contacts, so for cleaning it is better to dismantle the keys and fasteners, rinse them thoroughly and dry them.
In order to put the keyboard back together without difficulty, it is better to photograph the position of the keys before the planned disassembly. If only individual keys fail, and not the entire module, it is allowed to perform local washing followed by drying of the removed keys and their fasteners.
After completing the assembly and receiving a positive result from resuscitation, you can start the laptop. At this stage, you will need to check its stability and perform simple stress tests. You should also evaluate the serviceability of individual parts and each button.
Laptop models from certain manufacturers (Samsung, Dell, HP, Lenovo, etc.) often have water-soluble jumpers. If you wash them, the keyboard will not work. This problem can be determined during diagnostics of the laptop at a service center, where contact of the liquid with internal parts is confirmed. The only way out is to replace the board.
Direct washing steps
Cleaning a laptop keyboard is not an easy task. In the sense that you need to strictly adhere to a sequence that does not worsen the situation:
— Remove visible traces of spilled liquid using prepared materials.
— The board must dry. This will take at least a couple of hours. Please note that you should not dry the keyboard elements on heating devices.
— If the tracks are damaged, it can be seen even with the naked eye. However, it is better to do testing with a special device.
— Using conductive paints, restore areas that are damaged. Since the contacts are new, they need time to dry. An hour and a half is enough for this.
Read also: Hair mask with coconut oil
— Next, we assemble the keyboard. We follow the reverse order. Press the elevator buttons until you hear a click.
IMPORTANT! Please note that buttons such as “space” or “enter” may have not only ordinary plastic latches, but also metal fasteners. Make sure they are placed correctly.
When the cable is attached, you need to check the functionality of the device. They do this in a simple notepad. But you can also use special programs. They are easy to find on the global network. If everything is in order, then we completely assemble the laptop.