Using a washing machine you can not only get crystal clean, but also fragrant soft linen. To do this, you need to use a special product - conditioner. But to achieve the desired result, it is important to know how to use it correctly.
If you have just purchased a washing machine and are in the process of learning its basic functions, you should immediately learn how to use the rinse aid correctly. Our recommendations will help you understand this issue.
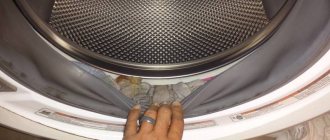
Where is the rinse aid dispenser located?
Most often, in the machine, the place where the detergents for the washing itself and for conditioning during washing are placed is a tray on the left side. Less often, the manufacturer installs it on the right. If the washing machine is designed for loading through a hatch that opens upward (vertical loading), then the tray is installed from the inside on the lid. The tray itself is divided into three compartments, different in width, and sometimes can be highlighted in different colors.
- For washing powder (marked P or B). This compartment is the deepest; all washing substances go here.
- For soaking (marking I or A). The compartment is smaller in size compared to the first one; detergents for pre-washing or soaking are poured here
- For conditioning (marking – flower). This compartment is the smallest in depth and size. It is made so that the water in the conditioner compartment of the washing machine does not wash it out during washing.
Adviсe
Some tips for using mouthwash:
- It is necessary to monitor the dose of conditioner. You should not exceed its norm. This may lead to allergies or other side effects. There are special markings in the compartment so that the user knows the maximum permissible level of the product.
- After finishing the wash, the detergent compartments should be rinsed thoroughly and dried.
You will find a lot of useful and important information on how to properly use Samsung washing machines in this section.
Water appears when the unit is operating
If the water in the drum of the machine does not drain completely or does not drain at all, the problem lies in the breakdown of parts of the SMA drain system.
The drain filter is clogged
Situation: . To fix the problem, you first need to check the drain and its filter.
, which is located near the floor under a closed lid. The most common cause of such stagnation of water is clogging. Follow the instructions:
- Manually drain the water from the hose - otherwise there is a risk of spilling all the water onto the floor.
- Unscrew the filter and rinse with running water.
- Examine the pump, which is located behind the filter: you need to turn on the “drain” mode and see if the pump blades are spinning.
- If the pump is also clogged with dirt and the movement of the blades is difficult, clean it.
- Reinstall the filter and restart the drain program. If everything worked, then the reason was that the drain was dirty.
Broken pump
If no dirt is found when disassembling the filter and inspecting the pump, the breakdown may be more serious. If the washing machine still tries to get rid of the liquid, and at the same time makes unnecessary noise, then it’s probably time to overhaul the pump. How to check if the pump is working? If the drain pump blades (impeller) do not move during the drain mode, this clearly indicates its malfunction.
It is impossible to repair the pump yourself; you must call a specialist. In 90% of cases, the problem is solved by replacing the broken part with a new one. You can buy a new pump either independently or rely on the service center specialists. They will tell you where to buy a pump that is suitable for your SMA model.
Valve replacement
If the valve is faulty, then replacing it is indispensable. Doing it yourself is not difficult, although it is troublesome. First, you need to purchase a similar copy, using the serial number of the washing machine as a guide, and then we proceed to dismantling and installation. The instructions on what to do and in what order are as follows:
- We disconnect the machine from the electricity and turn off the tap on the water supply.
- We find the valve, for which we unscrew the two screws holding the top cover and remove the panel. Sometimes you need to move the cover away from you to release the latches. Owners of machines with vertical loading need to remove the corresponding side wall (we are guided by the place where the inlet hose is connected).
- We free the part from the wiring and pipes. To do this, loosen the reusable clamps with pliers or cut off the disposable ones. Don't forget to purchase replacement fixing rings in advance.
- We disconnect the valve from the body by releasing the latches or unscrewing the retaining screws.
- Carefully remove the part by turning it slightly clockwise.
Next, if necessary, we diagnose the condition of the cable and nozzle and repair the water supply mechanism or immediately install a new valve. In any case, installation is carried out in the reverse order: insert it into the groove with a turn, connect the wires and hoses, secure it with clamps and close the panel. All that remains is to start any washing mode and check whether the air conditioner is taken in.
Appearance of the device
Candy Smart Pro CSO4 106T1/2-07 is a front-loading washing machine in a classic white body with compact overall dimensions.
Most of the front surface is occupied by the hatch, which is a fairly massive round disk. The edging is made of white plastic, the window itself is made of transparent glass, without darkening. Thanks to the fairly large size of the window, the user has the opportunity to view almost the entire drum, which allows him to observe the washing process at any time. To make it easier to open the door, there is a special plastic handle with a fairly tight spring. To close the door, you need to press it quite firmly against the body of the washing machine until you hear a characteristic click, which signals that it is locked. The door is equipped with a very flexible silicone cuff around the perimeter for better sealing.
The inside of the washing machine, its drum, has fairly large overall dimensions, is made of stainless steel, and has a unique Shiatsu coating, which was developed by Candy engineers and is designed to improve the quality of washing items made from various materials. The estimated capacity of the drum is 6 kg of laundry.
In the upper part, on the left, there is a tray for detergents, on which there is brief information about the device, a little to the right there is a device control panel with an LED display and touch control buttons. On the right there is a round rotary shuttle, which is responsible for switching washing modes (program selection). By the way, initially the user has 9 quick programs available, including a unique 49″ washing mode. On the right are the most commonly used standard washing modes. Switching between modes is smooth, very clear and informative. There is a sound accompaniment for switching operating modes. Moreover, each mode has LED support, the display is bright, all icons are visible even in bright light.
For ease of use, the powder tray is equipped with a limiter that prevents it from falling out of the washing machine body when pulled out; it has three compartments for detergent: for pre-wash, for main wash and a compartment for rinse aid.
In the lower left corner there is a plastic hinged flap, behind which a cleaning filter is hidden. It opens with little effort and closes with a click. The filter housing has small overall dimensions; the filter itself is designed to retain large dirt and small items (socks, buttons, coins, etc.) inside the device. It is recommended to clean the filter regularly.
The upper surface of the washing machine is covered with a plastic cover and has a flat, smooth surface. It is great for use as a shelf.
The side ends have small stamped stiffening ribs, but in general they are devoid of any control elements or design.
On the back surface there is traditionally a connector for connecting a water supply hose (160 cm), a network cable (145 cm) with a European plug, and a non-removable drain hose is located here. I'm glad that there are no protruding elements on the back surface, which allows you to install the washing machine almost flush to the wall.
On the bottom surface there are four height-adjustable legs with a lock nut; the legs themselves are equipped with a rubber anti-slip nozzle. The manufacturer recommends installing a polystyrene gasket on the bottom surface. The nozzle should protect the housing from accidental splashes from below.
Overall, the Candy Smart Pro CSO4 106T1/2-07 washing machine looks quite elegant and not bulky. The device is really narrow, there are no strongly protruding elements in it. The white case collects less stains from water, it is not easily soiled, does not collect dust, and moreover, the white color eats up space. Using glass in the hatch is also a practical solution (although it slightly increases the cost of the device), because it is not as susceptible to mechanical stress than plastic. The build quality is at a decent level, all the gaps are even, the parts are in their place, all the edges are well machined and painted.
Preventing blockages
The following preventive measures will help prevent blockages:
- Do not allow foreign objects to enter the drum. All pockets must be checked in advance, loose buttons must be sewn on, etc.
- Washing items stained with technical oils is not advisable, since substances partially washed off from the fabric are deposited on the components of the washing machine.
- Washing items with long, loose pile and a lot of pilling can lead to clogs.
- For washing in an automatic machine, you must choose only those detergents that are intended for this purpose. Using regular soap shavings, for example, can cause detergent to stick and cause a clog.
- From time to time, at least once a week, washing should be done at a high temperature of 60°C.
- Using water softeners will prevent the formation of strong limescale in hard tap water.
- It is advisable to clean with vinegar or citric acid once every 2-3 months.
- The drum should not be used as a place to store dirty items. Laundry baskets are suitable for these purposes.
- Already washed clothes should not be kept in the drum for a long time.
When to add conditioner
Softener added to the washing machine is always used in the final part of the washing process. But most housewives pour it at the same time as other household chemicals. The design allows this to be done, because household chemicals enter the drum in a strict order. Therefore, the antistatic agent is supplied last.
If you don't know how to use rinse aid and didn't add it at the beginning of the wash, you can add it at the end. In this case, you do not need to drain the water and remove the laundry from the drum. Simply pour in the required amount of antistatic agent, then turn on the extra rinse mode.
It is possible that it is not possible to pour the softener into the appropriate tray in the cuvette. In this case, it can be added directly to the drum. To make it happen:
- First, wait until the machine finishes the main wash program.
- After it drains the water, carefully open the loading hatch and pour in the softener.
- Make sure that the rinse aid does not get on the laundry. For convenience, you can take a container with holes. It will gradually distribute the antistatic agent inside the drum.
Where do you put gel capsules or laundry tablets?
Not so long ago, laundry detergent compositions in the form of capsules or tablets appeared on the household chemicals market. The capsule, as a rule, contains the product in the form of a gel, while the tablet is a compressed powder that gradually, layer by layer, dissolves during the washing process.
Laundry capsules and tablets are placed in the drum along with the laundry. If you put them in a tray, they will not have time to dissolve completely while the laundry is being washed and the quality of cleaning will significantly decrease.
To ensure that your washing machine serves you for a long time and also cleans your laundry efficiently, follow the rules of its operation and you will free up a lot of time while your assistant deals with stains and dirt on things.
How to calculate the optimal amount of detergent
After prolonged use, the washing machine begins to leave some of the unselected powder from the loading tray compartment. The problem is due to the nozzle and water supply hose being clogged with solid deposits or rust. Not removing all the powder impairs the quality of the wash. The problem is solved by pouring detergent directly into the drum onto the laundry before starting washing. Manufacturers of household appliances do not recommend direct powder filling in the following cases:
- When washing dark and colored clothes, the concentrated granules will dissolve in one place. Light spots that have eaten away the paint will appear on the laundry. Some of the clothes will generally remain dirty. Liquid detergents will be immediately absorbed into the area of dry clothing. Stains are 100% guaranteed, and most of the laundry will remain unwashed.
- To avoid stains, housewives pour the powder into an empty drum and then load the laundry. Through the holes, the detergent enters the tank, where it dissolves when water is supplied. However, when starting any washing program, the machine first pumps out the remaining old liquid with a pump. Some of the powder goes down the drain along with dirty water. The result of further washing will be negative.
- You cannot pour powder inside the drum if the washing mode is based on the gradual withdrawal of detergent from the tray cell.
However, if the powder intake from the dispenser is poor, you should not refuse to wash delicate and dark items. The detergent is placed inside the drum, but after pouring it inside a special container.
The price of containers is low. You can buy several of them for different types of detergents. Additionally, special rubber balls for washing are thrown inside the drum. Spikes on the surface of the balls help to better get rid of stubborn dirt.
The range of household chemicals stores is wide and varied, and counters with laundry detergents are full of a huge number of bright boxes and bottles. How to figure this out? The main types of washing compositions can be distinguished:
- powders (intended for main wash);
- compositions in the form of liquids (washing gel, rinse aid, stain remover and fabric softener);
- tablets and capsules (contain concentrated compressed laundry detergent or gel).
Whatever product you use, pay attention to the amount of foam formed. If there is too much of it, this indicates that the dose of the substance has been exceeded and needs to be adjusted
Typically, these recommendations can be found on the packaging of the powder or gel.
If you are using the delayed or prewash cycle, do not use liquid detergent as it may harden.
When washing, use detergents intended for a specific type of clothing:
- universal for all types of fabric;
- for delicate fabrics;
- gels for all types of fabric or just for wool.
For white items, use a general purpose powder bleach product.
Do not leave liquid product in the tray for too long as it may harden. This leads to clogs, ineffective rinsing and unpleasant odors.
Let's try to calculate how much household chemicals are needed for effective washing.
First, read the information on the packaging of household chemicals. In addition, many manufacturers equip SMS with measuring cups. Usually it is written on the packaging that to wash 1 kg of laundry you need to pour at least 225 g of powder.
But as practice shows, for high-quality washing you need much less SMS. So, for 1 kg of slightly contaminated items, 25 g of SMS (one tablespoon) will be enough. If your items have stubborn stains, use 2 tablespoons.
If you prefer to use capsules, then 1 piece is enough for high-quality stain removal.
When using gel-like products, it is recommended to take no more than 1 tablespoon of SMS per cycle.
Where is the rinse aid compartment usually located?
Each front-loading washing machine, for example, from Bosch, is equipped with a retractable tray for detergents with three compartments, and they differ in shape, size and even location relative to each other. Their purpose is as follows:
- compartment for adding bleach and powders intended for soaking laundry. It is small and is usually designated by the letter A or the Roman numeral I;
- compartment for powder used for the main wash. This compartment is designated by the letter B or number II. It is the largest and is used constantly, since washing powder is poured into it in any mode;
- air conditioning compartment. This is the narrowest compartment, since the rinse aid is a concentrated product and you need to pour only a little, literally a third of the cap. The fact that this is a compartment for fabric softener can be determined by the image in the form of a flower next to it - in models from this compartment is always designated this way. It may have a blue color, or it may be simply white. This compartment can also be equipped with a removable tray, but this option is not present in models from every company.
It is worth noting that the flower is not the only icon to designate the compartment intended for the air conditioner in the washing machine. In Lg models, this compartment may be marked with an asterisk.
When the optional assembly of a particular model does not provide a third compartment dedicated to conditioner, it can be poured directly into the drum, but only after the main wash cycle has completed.
To do this, you need to select the no-rinse mode, open the door at the end of the wash and send a cap with a small amount of conditioner to the laundry.
It is not recommended to pour it directly onto wet things - stains and streaks may remain on the clothes.
Among the models of washing machines, there are some that, when you first get acquainted with them, you can easily get confused in deciding where to pour the air conditioner. Here are some of them:
- On the ELECTROLUX EWW51486HW model, the rinse aid compartment is the far right compartment in the chemical tray. It looks unusual, since you need to pour the product through the hole covering the lid compartment.
- Top-loading washing machines can also be confusing, and the Bosch WOT24455O model can cause confusion, since the detergent container is located right on the lid, and the fabric softener compartment is in the middle.
- The machines are equipped with a tray in which the conditioner compartment is located on the right, while the product is poured into a small hole in the middle of it.
- Samsungecobubble is also capable of surprising the average person with an unusual type of container for detergents. It has only two compartments, the right one is blue and is divided into two additional compartments. The compartment that is closer when opening the tray is designed to fill in the rinse aid.
- Some top-loading models have four compartments in a container located under the lid. The one on the right is for rinse aid.
- Siemens washing machines are very practical in this regard, since the compartments for air conditioner and bleach are covered with lids. At the same time, the compartments on top are marked with a flower and a bottle, respectively.
If you follow basic logic, it will not be difficult to determine which container to pour the conditioner into.
It is worth noting that each washing machine model has a maximum permissible level of liquid rinse aid.
Upon completion of washing, the tray must be removed and washed so that the holes through which powders and liquids are supplied are not clogged with their residues.
That's all the recommendations on where to pour the rinse aid when washing.
It is difficult to confuse the compartments in the tray, even if there are no markings - they all have different sizes - just remember that the smallest compartment is intended for the air conditioner.
We suggest you read: Follow the instructions, or where to fill the air conditioner in a Samsung washing machine
There is no need to be afraid that the product will get into the laundry at the very beginning of the wash - a working washing machine uses the conditioner as intended and on time. The rinse aid compartment will not empty until the main wash cycle has finished.
Whether to use air conditioner for a washing machine or not is everyone’s choice. There are special liquids for wool and delicate fabrics, there are hypoallergenic rinses for children's laundry, and there are also concentrates. In any case, it doesn’t hurt to know where to add fabric softener, because you need to be on familiar terms with your home appliances.
Read the instructions
Each washing machine comes with a manual that contains information about where to add or fill in which product. If the instructions are lost, they can be found on the Internet, where there are manuals for almost all existing models of washing machines. Typically, the relevant information is included in a separate section of the manual, and is very easy to find.
It also happens that the machine is old, and it is impossible to find instructions for it. In this case, you can contact the manufacturer (every company that produces household appliances has a website on the Internet with contact information). But usually this is not required - the desired tray is easy to find on your own.
The video shows how the tray cells are located in one of the washing machine models:
When to add conditioner
Softener added to the washing machine is always used in the final part of the washing process. But most housewives pour it at the same time as other household chemicals. The design allows this to be done, because household chemicals enter the drum in a strict order. Therefore, the antistatic agent is supplied last.
If you don't know how to use rinse aid and didn't add it at the beginning of the wash, you can add it at the end. In this case, you do not need to drain the water and remove the laundry from the drum. Simply pour in the required amount of antistatic agent, then turn on the extra rinse mode.
It is possible that it is not possible to pour the softener into the appropriate tray in the cuvette. In this case, it can be added directly to the drum. To make it happen:
- First, wait until the machine finishes the main wash program.
- After it drains the water, carefully open the loading hatch and pour in the softener.
- Make sure that the rinse aid does not get on the laundry. For convenience, you can take a container with holes. It will gradually distribute the antistatic agent inside the drum.
Typical breakdowns in which the washing machine does not pick up the air conditioner
Below are the main malfunctions of washing machines in which the fabric softener will remain in the dispenser tray
Please note that in most cases, eliminating them requires qualifications and the appropriate tools - that is, calling a washing machine repairman!
| The water inlet valve is faulty. If the valve fails, water may either not be drawn in at all (in this case, the washing cycle will not start and the machine will report an error), or it will flow under insufficient pressure - if the membrane does not open completely. The water supply valve needs to be replaced. | From 1000 rub. |
| The rinse aid is not washed out at all, and water is drawn in at normal speed. Perhaps the powder also remains untouched. | From 1200 rub. |
*Attention! This price includes only the work of the master, and does not include the cost of consumables. The final price, including repair work and components, will become known after diagnosing the washing machine.
**Diagnostics are carried out free of charge, however, if you refuse repairs, you will need to pay 400 rubles for a specialist visit.
As you can see, the reasons why the washing machine does not pick up the air conditioner are not so “scary” and expensive to eliminate. However, you definitely shouldn’t let things take their course if you notice the first signs of a malfunction. Unfortunately, breakdowns do not go away on their own, but over time they only become more serious. For example, a faulty water supply valve can “last” in a semi-working state for some time, but most likely after a couple of washes it will fail completely. In this case, the water will not be collected at all and the washing will definitely have to be postponed until another day. So if the washer starts sending out the first “bells”, don’t delay: contact the professionals. After all, diagnostics and “treatment” at the earliest stage of a malfunction will help maintain the functionality of your unit for many years!
Even if you discover a problem late at night or on a weekend, call us!
7 (495) 215 – 14 – 41
7 (903) 722 – 17 – 03
RemBytTech specialists work for you 7 days a week from 8 am to 10 pm.
And we are always ready to advise you both over the phone and in person – as part of diagnosing your washing machine.
Read more:
If the fabric softener is still in its compartment in the detergent container at the end of the wash cycle, it may be because the washing machine is canceling the program before it has time to fill the fabric softener into the drum. If this occurs, you should notice certain error signals (illuminating lights or rotating knobs) or other messages appear on the display confirming that the program has been cancelled.
If this does not happen, and the washing machine goes through the entire wash cycle, including rinsing, then the cause may be a broken water valve that allows fabric softener to enter the washing machine. This is an extremely rare case of breakdowns, because these valves are occupied during the washing process for an extremely short time - no more than a few minutes each wash, and therefore they last quite a long time and very rarely wear out.
In addition, some washing machine models (such as Indesit, Whirlpool and Hoover) do not use a separate valve at all to allow fabric softener to flow inside the machine. Instead, these models are usually equipped with a special bypass hole that directs water from the main valve to fill the air conditioning compartment as soon as the program indicates the need for this action. If this is the case, then there is a special lever system in the machine, which is driven by moving the handle of the program selection lever, and then, using a special mechanism, directs the water. It is likely that this passage hole could become clogged or cracked, resulting in water simply not being able to get into the fabric conditioner compartment.
If you have every reason to suspect such an outcome, then make sure that the valve allowing the air conditioner to pass through is firmly secured. Because if the problem is simply in the supply of cold water, then the washing machine will face this problem immediately at the beginning of the wash when filling with cold water to rinse the clothes.
Thus, if the fabric softener is still in place after the wash is completed, and the washing machine has not interrupted the process in any way, you need to monitor how much water can really get into the softener compartment, perhaps some of the outlet holes are simply clogged and need to be cleaned.
Turn on the system in heating mode
When operating a split system, try not to use the random method, study the Instructions, because there are many models on the market and each manufacturer of this product tries to add its own twist to the simple rules of operation.
We will try to describe several options for setting the air conditioner to heat and bringing it to the state we need.
# Option one
There should be a “MODE” button on the remote control. It can be located under the cover. If you still find it, click on it until you see the “sun” icon or the inscription “HEAT”.
On this remote control, the “MODE” key we need is clearly visible, with which you can switch the operating modes of the air conditioner
Using the “+” and “-” buttons, we will select a temperature regime at which we will feel comfortable. Do not forget that for all actions that you perform, the remote control must be directed towards the device, which will receive signals sent to it and respond to them with emitted sound.
You can perform all the specified settings on the remote control, and then direct it to the air conditioner by pressing the “ON” button. The desired changes must occur within five minutes.
When switching on to heating mode, the fan in the indoor unit will not turn on immediately.
# Option two
You took a good look at your remote control, but you didn’t find the “MODE” key either on it or under the cover. But you see the icons “droplet”, “fan”, “snowflake” and “sun”. We need “sunshine”, and we choose it.
In this diagram of the remote control for the HITACHI air conditioner, pictograms in the form of a sun, a snowflake and a droplet (+) are clearly visible.
We set the temperature so that it is higher than what is already in the room. For example, if you currently have +18°C, set it to +25°C so that the difference is felt immediately. Again, we make sure that the signal is received by the system. With a wireless remote control, the response will be a sound, with a wired one, a light will light up on the front of the unit.
After about five minutes you should feel the result of your adjustment.
# Option three
There are no keys on the remote control labeled “MODE” or “HEAT”. There is also no “sun” icon, although “fan”, “snowflake” and, possibly, “droplet” are present.
This indicates that your model is not designed to heat a room. Don't demand from her what she can't give you.
# Option four
The desired mode can be set directly on the air conditioner. To do this, turn on the device by pressing the power button. Let's find the "MODE" mode selection key, with which we set the operating mode we need.
We press this key until the “HEAT” we need appears. As a rule, this function will be the fifth after automatic mode, cooling, drying and ventilation.
Now we will need a remote control to set the desired temperature. With its help, you can order the desired rotation speed of the device’s fan.
Pay attention to the operating temperature range, which is probably indicated in the form of a plate for your specific model in the Instructions. Please follow these manufacturer's recommendations to enjoy a properly functioning split system for as long as possible.
# Option five (sad)
It doesn’t matter when the system does not provide heating for the simple reason that it is not included in the list of its functions. But this is certainly an inexpensive model that will honestly delight you on hot summer days. It is much worse when you purchased an expensive model and know for sure that it simply must work for heating, but you cannot start the process.
At the same time, you performed all the necessary operations in full accordance with the Instructions, which you still had to look into, but the result was not obtained not only after the five promised minutes, but even after an hour. Checking the batteries in the remote control did not clarify the situation: they turned out to be serviceable.
Well, you have to repair your air conditioner. Perhaps the cause of the breakdown was improper installation of the device, which should only be performed by people who know what and how it will work subsequently. Now, if you don’t want to completely destroy the device, disconnect it from the power source and look for a repairman. Further operation of the device is not yet possible.
Cleaning the tray
To remove dirt and powder residues, it is recommended to periodically clean the tray. Without removing the tray, cleaning can be done by pouring citric acid into each compartment and running the machine for a full wash cycle. Not only the compartments will be cleaned, but also the insides of the machine.
If they are already heavily soiled, it is recommended to remove the tray and clean it separately. Typically, the locking tab is located in the conditioner cell, and when pressed, the cell is easily removed. But there are other fixation options.
The removed tray should be placed in hot water and washed with a brush. In this case, it is necessary to remove the cover from the air conditioner cell and clean it separately.
You can fill the cuvette with vinegar, add soda and leave for 15-20 minutes, then wipe off any remaining plaque and dirt with a brush.
For regular cleaning, after each wash, it is enough to rinse the compartments under running hot water.
Source
The washing machine does not wash out the conditioner - possible malfunctions
The problem with poor flushing of the rinse aid is due to insufficient pressure due to a broken inlet valve or clogged powder receiver nozzles.
Malfunction of the water supply valve - from RUB 1,400*
The machine does not flush out the rinse aid when the intake valve, which opens when voltage is applied to it, has failed. This is how water is poured into the washing machine. Depending on the design of the valve and the type of malfunction, the washing machine behaves differently. There are four types of breakdowns.
- The solenoid valve coil has burnt out. Because of this, when voltage is applied to the valve, the membrane does not open and water does not flow into the machine. Usually the breakdown appears at the beginning of the wash, and the machine not only does not wash out the conditioner, but also does not collect water. Sometimes the unit fails while the machine is filling the rinse tank. The product remains in the compartment because the SMA stops.
- The valve diaphragm opens partially. If the diaphragm mechanism becomes stuck, the valve does not open completely. Water flows slowly and for a long time. The pressure is too weak, so the conditioner is poorly washed out of the compartment.
- In a two-section valve divided into “pre-wash and main wash,” the section responsible for collecting water in the pre-wash has failed. With this design, the air conditioner is flushed only with two sections operating simultaneously. If the pre-wash water supply section fails, then when the rinse supply is set, a stream of water enters the powder compartment, and the rinse aid in the tray remains untouched.
- In a two-section valve with sections divided into “wash and rinse”, the section responsible for collecting water for rinsing has failed. In this case, the water for the rinse cycle does not enter the machine, and the washing machine not only stops taking up the rinse aid, but also does not rinse the laundry.
HOW TO FIX
In all cases, the water supply valve must be replaced.
Tray nozzles are clogged - from RUB 1,500*
HOW TO FIX
To clean the nozzles from limescale, you need to disassemble the powder receptacle, remove the panel with the nozzles and soak it in a citric acid solution for several hours. Citric acid will dissolve the lime, and the water pressure will be restored when washing off the detergents.
If the powder receiver is heavily soiled, you can replace it with a new one. The part is easy to buy at home appliance spare parts stores.
*Prices are indicated only for specialist work, new parts are paid additionally.
Don't know why there is rinse aid left in the washing machine? Call Wash Man! We will find out the reason, if necessary, we will make repairs within 24 hours after the application, we will give a guarantee on work and spare parts for two years.
We wish your equipment health!
Source
Softener composition
The main components of the rinse aid are cationic surfactants that cover the item with a protective film and give an antistatic effect.
The silicone in the product makes the texture of the fabric elastic and soft, and increases paint fastness. Depending on the formula used and the combination of components in the product, silicone gives the fibers of the material different properties: the ability to repel moisture (hydrophobicity) or absorb it.
The conditioner contains thickeners and flavorings
Among the potentially dangerous components that you should pay attention to when purchasing a product are:
Should the powder be completely washed off?
If you have calculated the dosage correctly (recommendations are usually indicated in the operating instructions for the washing machine), then ideally the powder should disappear from the feeder by the end of the wash, with the exception of a small amount of product that may accumulate in the corner of the container.
Related article: Features of installing a corner bathtub
Powder may remain in the feeder if you have added significantly more powder than required for a given wash cycle. In addition, low-quality detergents, which slowly dissolve in water, are poorly washed out of the feeder. If you notice that the powder clumps and sticks to the sides of the container, this is most likely the reason.
Thus, before disassembling the washing machine in search of a faulty spare part, make sure that the issue is not an excessive quantity or inadequate quality of laundry detergents.
Causes of the problem and how to fix it
Cause
What happened?
What to do?
The washing powder dispenser compartments are mixed up. The detergent is loaded into a compartment of the container that is not used in the selected wash program (for example, in the compartment that is used for pre-soaking). Carefully read the description of this wash program in the user manual; study the design of the washing powder feeder. Weak water pressure in the pipes. Water pressure may change as a result of maintenance work or if the water shut-off valve is not fully open. Check the pressure by opening the cold water supply tap; if the pressure is weak, make sure that water flows freely into the pipes, then contact the housing office. The inlet filter is clogged. The inlet filter is clogged with small debris, detergent residues or pieces of lime. Disconnect the inlet hose from the machine, immediately behind it you will find a metal mesh - this is the filter ; carefully remove it and clean it with a brush under running water. Fill valve malfunction. The fill valve responsible for supplying water to the washing powder dispenser has failed. Check the functionality of the fill valve using a multimeter; if it is faulty, it must be replaced (more on this in the article “The washing machine draws water when it is turned off”) Faulty nozzle The nozzle through which water enters the washing powder dispenser may become clogged due to too hard or dirty water; in addition, the cable that regulates the injector may be damaged. Repair and cleaning of injectors is carried out in service centers; You can also call a repairman to your home
Related article: Why it is forbidden to open windows when wallpapering
Another problem that prevents the normal release of fabric softener from the container is a clog in the drainage compartment. For information on what should be done in this case, see the following video.
Atlant machine program table: description and notation
The designation of each mode is on the control panel of the Atlant machine. It is not difficult to determine which program is which, since the panel displays names instead of icons. A description of each mode can be found in the operating instructions.
In the table below we describe the main and special functions of the Atlant washing machine.
Basic modes in the Atlant car
| Name | Description | The approximate time* |
| Cotton | Long-term washing of cotton fabrics at high temperatures. The program execution time depends on the SMA model. The spin takes place at maximum speed. | 90-150 minutes. |
| Synthetics | Suitable for caring for synthetic fabrics at a temperature of 60 degrees. | about 110 minutes. |
| Hand or delicate wash | The solution for items that require hand washing only. Suitable for thin and delicate fabrics: silk, cashmere, organza, wool. The drum rotates slowly, so the clothes do not deform or roll down. | 55-60 minutes. |
| Pre-mode | Includes the main wash, before which the laundry is soaked. This approach helps remove even old stains. | about 30 minutes. |
| Intensive wash | Long-term mode - performed at high temperatures up to 95 degrees. The laundry is subjected to mechanical stress, due to which dirt is removed. Maximum spin. | about 120 minutes. |
| Quick or Express wash | Wash in slightly warm water 30-40 degrees. Suitable for lightly soiled laundry. | 15-40 minutes. |
| Kids' things | The mode is designed for washing children's clothes. Use a large amount of water to thoroughly rinse the powder out of the fabric. | about 140 minutes. |
| Spin | The spin can be turned off or the required number of revolutions can be set. | about 5 minutes. |
| Rinsing | After the main program, you can select an additional rinse to remove detergent. | 15-30 minutes. |
*The table lists approximate indicators; To find out the exact washing time, check the instructions for your model.
Additional functions
| Name | Description |
| Sportswear | This function is useful for clothes made of membrane fabrics that need to be refreshed after sports. You can also wash sports shoes. |
| Fuzzy Logic | The smart system independently estimates the amount of laundry and correlates the required consumption of powder, water and electricity. Allows you to spend 25% less resources. |
| Combi wash | Don't like sorting laundry? Then this mode is for you. Allows you to simultaneously care for any clothing. But fabrics that fade are still best put aside. |
| Night mode | A long-term program starts overnight. It works silently, without beeps or spinning. |
| Biophase | Involves the use of special powders with enzymes. The mode allows you to wash stains of biological origin: wine, blood, juice, chocolate, grass. |
| Easy ironing | Set this mode to wash gently, with plenty of water and minimal spin. The output items are slightly damp and less wrinkled, which allows them to be quickly ironed. |
| Half load | If you need to wash clothes, but there is not enough for a full load, choose this function. This way you will save on water and electricity consumption. |
Remote control
- Turning on/off the air conditioner;
- Setting the operating mode;
- Temperature adjustment;
- Setting the ventilation speed;
- Turning on/off the intensive operating mode, in which cooling/heating occurs faster;
- Adjustment of blinds located in the wall block. With the help of blinds you can change the direction of air flow;
- Setting the timer;
- Time adjustment when setting the timer;
- Turn on/off the timer;
- Turn on/off night mode;
- Turn on/off ventilation mode;
- Room temperature display;
- Enable/disable plasma air purification;
- Setting the horizontal air direction;
- Reset all settings;
- Switching keyboard controls - to select the function indicated in blue;
- Turn on/off air conditioner self-cleaning. The function is useful, but it has never replaced full disinfection;
- Setting up the heater operation;
- Adjusting the brightness of the display on the wall unit.