Vacuum vacuum cleaners are equipped with electric motors, which are cooled by air flow passing through filters. Along with the air, fine construction or household dust enters the unit, wearing out the rubbing and rotating units. To replace ball bearings or clean the collector, you need to know how to disassemble a Samsung vacuum cleaner and how to remove the motor rotor.
Step-by-step instructions for disassembling the engine
The next step in repairing a Samsung vacuum cleaner is to inspect and repair the device’s motor.
To repair the motor of a Samsung vacuum cleaner, you first need to disassemble it. This is done as follows: Using a screwdriver, unscrew the two side bolts located at the top of the case. Turn the body a little and look at the engine. If you try to remove it, you will find that the coil is preventing you from doing so.
Carefully free the engine from its wires and disconnect all connectors. Carefully remove the coil wires so that the coil itself remains on the body, and remove the motor. After the engine is removed, you need to repeat the cleaning again. Now you need to remove the sealing rubber. To do this, you need to unscrew the two side bolts. Using a screwdriver, the two halves of the engine housing are separated. Next, the engine itself is removed from the plastic housing. Look at the top of the engine
You will see rolling. They need to be bent in the opposite direction. Then a screwdriver is stuck into any gap. Both halves are separated from each other. This way the turbine is freed from the housing. Using a 12mm socket, the bolt is unscrewed. What is important: the thread is left-handed, so when removing the bolt, it must be turned clockwise. In this case, the engine stator must be jammed with small wooden blocks. The entire structure must be supported. Now you can remove the turbine. Remove the washer and unscrew the two bolts. At the bottom you will find four more screws that need to be removed. Next you need to remove the brushes, after unscrewing all the bolts. We knock out the anchor. We insert the key into the hole and knock on it with a hammer. The engine will pop out. Pay attention to the bearings. If they are in good condition, they can be coated with oil. We take out the boot with tweezers. If the bearing rotates with a rustling sound and remains dry, it needs to be cleaned and lubricated. You can use carburetor cleaner to clean it.
Reassemble the vacuum cleaner in reverse order.
Watch the video below on how to disassemble a vacuum cleaner:
If desired, you can even rewind the stator of the vacuum cleaner motor. See the video below for how to rewind the vacuum cleaner motor:
How to disassemble the motor in a Samsung vacuum cleaner?
Sometimes you have to disassemble not only the body of the dust collection device, but also the “heart” of the vacuum cleaner in order to understand the reason for the malfunction of the device or breakdown. You can also do this yourself, using the same tools.
Procedure:
- Unscrew the motor bolts located on the top.
- You can remove the device only by completely freeing it from the wires attached around the perimeter. To do this, carefully disconnect the connectors.
- Disconnect the rubber o-ring that is located on the bottom of the motor and is secured with bolts.
- Please note that the motor housing consists of two halves. To disassemble it, use a flathead screwdriver. Carefully inserting a screwdriver into the gap, you need to slowly walk around the perimeter, prying up the upper half. After such manipulations, you can remove the motor itself, which is located in a small plastic container.
- Using a flathead screwdriver, remove the motor cover in a similar manner.
- Using a socket, disconnect the turbine.
- Unscrew the two screws and the screws located at the ends on the brushes.
- Now the last step remains - remove the anchor from the engine.
Dry and wet cleaning of “internals” from dust
Often the cause of a suspicious hum of a vacuum cleaner and an unpleasant odor is the accumulation of dust inside it. It is better to remove dust using “dry” methods so as not to damage the fragile electronic filling and not to disrupt the function of the conductive paths on the board. A small soft brush is suitable for cleaning. You can also use a room fan. If dust and dirt cannot be removed “dry”, after moisture has entered, all parts must be dried as quickly as possible. Plastic elements can be washed under running water. They should be put back together only after they are completely dry.
The drum and cable are easy to dry clean, as is the plastic motor housing. If the casing cannot be cleaned without using water, make sure that it does not touch the electrical circuit. You can use another vacuum cleaner with a suitable attachment as a dry cleaning tool. This is exactly how dust is removed from motor collector plates and windings. Strong air pressure cleans the board and its small parts well – even with heavy dirt.
There is a smell during operation
The cause of such a breakdown may be the hose (this is a common case for Samsung): dirt and debris often gets stuck between the turns of the corrugation, which over time begins to emit an unpleasant odor. Rinse the hose thoroughly with a stream of water, preferably under pressure and using detergent. After this, be sure to dry the corrugation thoroughly before using it again.
Another source of unpleasant odor can be the belt. Check its tension, tighten it if necessary or replace it with a new one. The smell of burnt rubber will disappear.
Trouble-shooting
Sometimes it happens that a vacuum cleaner suddenly stops performing its main function. Everything seems to work, but dust is not sucked in. In this case, first of all, you need to remove and inspect the filters. If the filters are clogged with dust, they need to be cleaned. If cleaning does not work, the filters need to be replaced. Before replacing, you need to turn on the vacuum cleaner without filters and make sure that the suction power is at the proper level. If it is still small, you will have to inspect the impeller. It may happen that it is completely clogged with small debris.
At the same time, check the condition of the brushes and commutator of the engine. Worn brushes need to be replaced and the commutator cleaned. The tightness of the hoses may also be compromised, especially in the places where they are attached to the nozzles.
You need to pay attention to this too
The next common problem is that the vacuum cleaner does not turn on. There are three main reasons for this:
- fuse blown;
- break in the network cable;
- There is a fault in the switch.
The fuse has already been mentioned, but to check other faults you will need an ordinary tester. With its help, you can easily ring the wires and locate the break point. Then a soldering iron is connected to the case and the problem is eliminated.
This happens when the vacuum cleaner is used for a long time. No repairs are required here. After cooling, the operation of the vacuum cleaner will be restored automatically.
If during operation the vacuum cleaner vibrates or you hear squealing or grinding noises, this means that there is a problem with the bearings. They need to be lubricated, and it is best to replace them immediately. The presence of sharp sounds in the bearing assembly indicates that its service life has expired.
And the last trouble is that the power wire is not tightened. Repair in this case is also not very difficult. Here the problem may most likely be in the spring. You need to get to the winding drum and inspect it. The spring may be weakened or, conversely, tightened. If everything is fine here, then you will have to remove the drum and unwind the wire from it (or vice versa, rewind it). This will adjust the tension force of the drum.
During inspection, it is necessary to check the functionality of the pressure roller. Vacuum cleaners of any brand are not immune to such a malfunction when the engine speed is no longer regulated. In this case, the problem must be looked for in the electronic control unit. It is simply not recommended to repair it yourself.
The process of disassembling and repairing a Samsung vacuum cleaner is not very difficult. It can be done independently with minimal knowledge of electrical engineering and the ability to handle plumbing tools.
The vacuum cleaner does not pick up small debris
- The parts of a Samsung dust collection device are cleaned mainly with a soft brush and a dry cloth.
- Some elements, such as a plastic case, filters, and a garbage container can be treated with soapy water and clean running water.
As you can see, disassembling a Samsung vacuum cleaner is not particularly difficult. The main thing is to find all the connecting bolts and unscrew them, otherwise you risk damaging the plastic elements. But sometimes it’s still not worth doing repairs or cleaning the dust collection unit yourself, but turning to a specialist for help. Then they will definitely disassemble and assemble the device correctly and clean it thoroughly.
How to disassemble a vacuum cleaner?
If you are planning to disassemble your vacuum cleaner, most likely you are worried about the noise of the motor or the breakdown of some part of the vacuum cleaner. Next, we will look at how to disassemble a vacuum cleaner, what you will need for this, and how to proceed so as not to damage the internal parts of the vacuum cleaner.
We will consider disassembly using the example of the Samsung 1600W vacuum cleaner.
In this case, repairing a Samsung vacuum cleaner with your own hands will involve a thorough inspection of the brush. Make sure it is low enough to contact the floor - if it is not, pull it out all the way. Inspect the brush itself - the bristles are probably too worn out and will need to be replaced.
Turn on the vacuum cleaner and inspect the brush in working condition - if it does not spin or rotates weakly, you will have to work hard. In the first case, the bearings are probably jammed. Disassemble it and check whether threads or hair are wound around the ends, remove them. In the second case, the brush belt may become loose - disassemble it and replace the part with one suitable for your model.
What kind of malfunctions can there be?
The vacuum cleaner engine is a fairly reliable element, and this applies to even the simplest and cheapest, and the malfunctions of all types of motors are approximately the same:
- a high level of contamination, due to which the contacts do not transmit current to the rotor or interfere with its movement;
- displacement of the impeller, which makes it impossible to operate;
- loosening of the screw - it happens that the sealant and nut come off due to high vibration, which leads to loosening of the insides of the motor, preventing it from working fully or working at all;
- wear of the bearings - the shaft does not rotate, but stands in one place, the bearing needs to be replaced;
- wear of electric brushes - replacement is required;
- winding damage;
- The signal does not come from the power button.
Motor bearing and its location
Each of these breakdowns can be easily fixed at home if you have all the tools and devices described above. The biggest difficulty in replacement is the bearings, as they require almost complete disassembly of the motor and the presence of a special removal device.
Go
Troubleshooting
When operating a Samsung vacuum cleaner with clogged filters, dust is not sucked in. A few minutes after it starts (from 1 to 15), the power is automatically reduced. In this case, if there is automatic safety equipment, the emergency thermostat will turn it off, and if it is absent, the device will burn out. Typical signs of clogged vacuum cleaner filters are poor draft, strong hum and heating. Before you begin disassembling the device, you should check all the filters, replace them if necessary or clean them (certain types need to be washed) and refill them.
If you cannot remove dirt, you need to remove these elements and turn on the vacuum cleaner without them to make sure that the suction strength is normal. If it is small, you will need to clean the impeller of accumulated small debris, and then check the condition of the turbo brush and engine commutator. Unusable brushes must be replaced, and the commutator will need to be cleaned with fine sandpaper N0 or N00.
If the vacuum cleaner is used for a long time, the fuse may blow and the device will not turn on. In this case, it should be inspected and replaced before starting. The next common failure is a broken network cable. The vacuum cleaner will not work if it has a faulty switch. To identify this defect, you will need an ordinary wire tester to determine the location of its break. First you need to make sure that the temperature sensor in the vacuum cleaner has not tripped, which could forcefully cut off the power to the engine. You can eliminate such a malfunction using a soldering iron in a few minutes. The vacuum cleaner will cool down and turn on automatically.
If during operation the device begins to vibrate, make unpleasant cutting sounds, or grind, this means that the bearings should be lubricated or replaced with new ones. Such signs indicate wear of parts.
Also, the power wire may not retract. This occurs due to the weakening of the spring in the winding drum or the tightening of the cord. To fix the problem, you need to remove the drum, inspect it and solve the problem by rewinding the cord. If the pressure roller does not work, you must contact a specialist. Reassembling the vacuum cleaner is done in the reverse order.
Why so much?
If you look at the nameplates of the old “Rockets”, “Jupiters” and similar ones “from there”, you will find that the old ones consumed 350-450 W from the network, while modern vacuum cleaners take 1200-2000 W each. The machinations of the damned bourgeoisie after the collapse of the USSR? No, everything is fair here, the matter is completely different.
More than 30 years ago, doctors noticed that hotel maids, theater cleaners and other people who constantly use vacuum cleaners developed silicosis almost as often as miners. It turned out that ordinary dust in the dust collector is crushed, releasing very harmful particles 1-10 microns in size (microns).
Vacuum cleaners began to be made with 2-3-stage air purification, but blowing microfilters required additional motor power. And buyers all wanted vacuum cleaners to become quieter, lighter and smaller. That is, the more powerful motor had to be made more compact and equipped with a less efficient, low-noise fan.
Dusty air is no less harmful to a powerful small-sized electric motor than microdust to human lungs. As a result, all modern vacuum cleaners, without exception, are built according to a scheme with full-flow cooling of the motor with purified air. If an old vacuum cleaner with a clogged bag simply did not pull well, then a modern one with clogged filters will switch to reduced power a few minutes after starting, or will be turned off by the emergency thermostat, or will burn out if there is no automatic protection (the cheapest) or it is turned off (there are such craftsmen) .
What to check first
Some of the problems that caused the device to fail can be fixed by owners themselves, without the help of specialists.
Is the socket working?
First of all, check that the outlet is working properly:
- Plug in another household appliance and see if it works. It is best to turn on a small lamp or table lamp - if the socket is working, the lamp will immediately light up.
- Try plugging the vacuum cleaner into a different outlet and see if it works there.
Is the bag too full?
Quite often, the vacuum cleaner does not turn on because the garbage container is full. When the dust bin is completely clogged, air passes through it more heavily and the suction power decreases. The load on the electric motor increases, and eventually it will overheat, shut down, or fail.
Modern models are equipped with an indicator that signals when the bag is full. If there is no such “red light”, listen to the sound of the engine: when it is working for wear, you can hear an increasing hum. Often the unit starts to “stink”.
If the bag is not overfilled in time, the engine will overheat. Electronics or a thermal relay can track this moment and turn off the engine itself - then just empty the bag and let the car cool down. If there are no sensors, the motor will burn out and the equipment will have to be repaired.
Have large objects gotten into the hose?
Debris stuck in the hose will lead to a drop in suction power, and as a result, overheating and engine failure. Usually the culprit is large objects (rags, children's toys) that got inside the sleeve or telescopic tube and could not move into the dust collector. But sometimes small objects also get stuck - for example, a toothpick stands across the channel, catches other debris and forms a plug.
Is the engine protection filter dirty?
The motor protection filter, located immediately behind the garbage bag, is subject to regular contamination. Small dust particles seep through the dust collector and settle on the filter: as a result, the passage of air becomes difficult and the engine heats up again.
Is the cable or plug broken?
The cable of the vacuum cleaner is constantly in motion during cleaning - the cable clings to corners, gets under furniture, and the unit itself often runs over it. All this negatively affects the integrity of the cable.
- Check the cable. Sometimes the damage can be determined by torn insulation, but often the metal strands are damaged internally, and the insulation does not cause suspicion. Open the case and find the place where the cord connects to the electrical board. Plug the cable into the outlet, take a multimeter and measure the voltage at the connection point. If there is no current, the problem is either the cable or the plug.
- Replace the plug or its parts. If the plug is removable, open it and look for burnt contacts or other defects. Simply cut off the permanent plug from the wire and replace it with a new one.
If the other plug does not give a positive result, then the final cause is in the cord - replace the whole thing.
How long did the equipment work?
If the vacuum cleaner stalls, check how long the equipment was running before. It is possible that after a long cleaning it simply overheated, and the electronics turned off the motor to cool it down. Wait a while (at least 20-30 minutes) and your assistant will be ready to work again.
Is there a burning smell?
If during cleaning you smell a burning smell, then most likely the armature or stator winding has burned out. In this case, you cannot do without qualified repairs - you will have to replace the burnt part, and in some cases the entire engine.
Sometimes they suggest rewinding the armature and stator windings; we recommend looking at the economic feasibility. Most often, a new assembled module will be cheaper.
Vacuum cleaner device
The vast majority of vacuum cleaner models are built according to 3 design types:
- With a dry dust bag;
- With aquafilter (with air-water mist filter);
- With non-replaceable cyclone dust collector.
Design of household vacuum cleaners with a dry dust bag, with an aquafilter and with a cyclone
Any of the vacuum cleaners of these types can be equipped with attachments (brushes) for wet and dry cleaning. Nozzles have their own characteristic malfunctions, which we will also deal with further.
With a bag
In a vacuum cleaner with a dry dust collector (on the left in the figure), the air passes first through the dust bag, then through the fine filter and the fan motor compartment. T. called. The HEPA filter traps particles with a size of about 1 micron. The HEPA filter only works under pressure, and dust particles less than 3-5 microns do not affect the operation and durability of the motor, so the HEPA filter is placed after the fan motor, which in this case also works as a compressor.
Vacuum cleaners with a dry dust collector are the least prone to breakdowns, but their main drawback is disposable filters. The dust collector is made of propylene or silicone fiber and cannot be regenerated - once the bag is full, throw it away and replace it with a new one. If you try to clean it, rinse it, or sew a fabric one from an old vacuum cleaner onto the old neck, the formation of microdust increases so much that the thin and HEPA filters instantly become clogged. If you “cheat” them in a similar way, it soon turns out that engine repair is necessary, expensive and/or complicated.
The fine filter and HEPA filter also cannot be restored, but in some cases this is still possible, see below. A characteristic sign of clogged filters is that the vacuum cleaner does not pull well, makes a loud noise (without clanging or rattling), and gets hot. If there is automation, 1-15 minutes after switching on it switches to reduced power or stops. Eg.
Read more: Do-it-yourself sand filter for a pool, the best homemade products
, over 65% of calls to warranty service for inexpensive LG vacuum cleaners regarding such a “breakdown” are caused by a clogged HEPA filter. The user is shown where it is printed in small print that this is a non-warranty case and is explained in a friendly manner how much to pay. Meanwhile, replacing the filter in an LG vacuum cleaner is a completely nonsense matter, see next. video.
Possible faults
- Impeller displacement.
- Loose or falling out mounting screws.
- Wear of rotor bearings.
- Wear of electric brushes.
- Damage to the motor winding.
- Heavy pollution.
Almost all of these faults can be fixed at home, if you have ingenuity and the necessary replacement parts. You may only encounter difficulties when replacing worn out bearings, since this requires a special puller. And at the same time, you need to try not to damage the motor shaft in the threaded end part.
Well, if the winding of the electric motor or its armature is damaged, then we are generally powerless to do anything except simply replace it entirely with a similar one from another vacuum cleaner.
Conclusion
The instructions presented above will help in a force majeure situation when it is not possible to call a professional. If you went, for example, to the country, then disassembling a Samsung vacuum cleaner will become a serious test for the uninitiated. If you are in a large city, you should not neglect the services of craftsmen, even in order to save money. Not every craftsman will be able to disassemble and reassemble an electric motor without consequences. Is it worth experimenting with expensive equipment if you don't have an engineering background? Make decisions based on experience and common sense.
Required Tools
The set of tools needed will depend on the type and model of Samsung vacuum cleaner. When disassembling and repairing, preventing or cleaning the device, as well as its individual elements, you cannot do without the following devices:
- Phillips and slotted screwdrivers - their sizes are selected in accordance with the type and depth of the screws;
- pliers;
- a stationery knife, or better yet a professional construction knife;
- lubricant;
- electrical insulating tape;
- electrical tester.
The type of work performed will largely influence the choice of tools. For example, to clean the surface of a suction hose before gluing cracks, you will need sandpaper and a degreaser (acetone, solvent). It is convenient to remove dirt on the shaft of the vacuum cleaner brushes with scissors, but to remove blockages you will have to use a long, stiff wire. For gluing cracks or chips on the body, universal super glue is suitable, but for moving parts, such as a hose, a more elastic adhesive material is needed.
The unit does not turn on at all
If you plug the unit into a power outlet and nothing happens, then repairing a Samsung vacuum cleaner (with your own hands, of course) should begin with a thorough inspection of the electrical part of the device. First, make sure that the outlet itself is working - to do this, plug in another device that is known to be working. If everything is in order, inspect the vacuum cleaner cord, look for scuffs, cracks, breaks or other damage.
Read more: Do-it-yourself Abyssinian well technology for constructing a needle well
If all of the above actions do not produce results, it means that the brushes are to blame or the motor has burned out. This part of the repair already falls into the more complex category.
Electric motor repair
If you decide to restore the old electric motor, lubricate or change the bearings, perform a complete disassembly.
First, unscrew the screws with a screwdriver and remove the impeller casing. Use a socket wrench to unscrew the nut. In most engines it has a left-hand thread. The impeller is pryed from opposite sides with two screwdrivers, trying to remove it from the anchor.
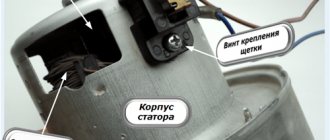
Unscrew the tightening screws on the body and remove the brushes. The motor will split into two parts: one will contain a stator with a copper winding, and the other half will come out with an armature and bearings.
All parts are carefully wiped off dust with a dry cloth or brush. Use a puller to remove the bearings and install new ones. If necessary, lubricants are pushed into the seat with the balls and separator. Assembly occurs in the reverse order of installing new brushes.
Disassembling the case
Disassembly of the case can be complete or incomplete. It all depends on defining the end goal. If routine cleaning, filter removal, and other superficial maintenance are performed, disassembly is considered incomplete. When you need to get to the electrical part of the unit, they only resort to complete disassembly of the housing using figured screwdrivers and keys.
Even a working vacuum cleaner needs complete disassembly once a year. Any filter is not capable of retaining dust 100%. Small particles accumulate on the fan impeller and inside the motor and must be removed.
Disassembly of the case is done in the following order:
- The electrical cable of the vacuum cleaner is disconnected from the network. First, all removable parts are dismantled: filters, covers, and the hose is unscrewed. Some vacuum cleaners are designed in such a way that some of the working attachments are stored in a special compartment inside the body. They all need to be pulled out.
- Vacuum cleaner bodies are similar in design, but each manufacturer hides hidden screws inside the handles, under covers and other elements. Additionally, the halves can be fastened with hidden latches. During disassembly, all fastener locations must be found, otherwise the housing can be broken.
- The removed screws are laid out to the side. If they differ in length or diameter, then each hardware is placed on a piece of paper and signed so as not to be confused.
- After unscrewing the screws, begin to separate the housing. They try to move the halves together using their hands. If it is not possible to separate the latches, a plastic strip is pushed between the halves of the case. You cannot disconnect it with a screwdriver because it may split the plastic.
- Once all the latches are in place, the top housing can be easily removed. The internal filling of the vacuum cleaner will be on display.
Diagnostics
Before you take on repairing a Samsung vacuum cleaner with your own hands, you need to try to determine what exactly is broken. Correct diagnosis is very important, because the speed and cost of repairs directly depends on it. The design of the vacuum cleaner is quite simple, so before paying money to the technician, you can try to fix the problem yourself.
It should be noted that the breakdown is not always associated with such a malfunction can be determined by the sound of the operating unit. If the vacuum cleaner hums, whistles, makes intermittent sounds and throws out dust, you are most likely out of luck - the engine is “covered”. But it happens, for example, that the vacuum cleaner seems to be working, but the garbage is not pulled out well - then, most likely, the hose or filters are to blame. Let's take a closer look at some of the common problems with this very useful home assistant.
Weak "pull"
As we have already found out, if the vacuum cleaner does not suck in dust well, then you will most likely have to repair the vacuum cleaner hose (you have a Samsung or a product of a different brand - it doesn’t matter). First of all, make sure that nothing is stuck in it - foreign objects caught in the hose greatly reduce traction
Simply put, look into the hose and remove the clog.
If you are sure that the hose is not clogged, carefully inspect it and check the integrity of the corrugation. Very often, housewives are too lazy to bend down to move the unit from place to place, and they simply drag it around the room “by the tail.” This causes gaps to appear between the turns of the corrugation, resulting in reduced traction. If you find a gap, take electrical tape and wrap the gap tightly in several layers. Such repairs, of course, will not be enough for a long time, and over time the hose will still have to be replaced, but it will still serve you for some time.
If everything is fine with the hose, check all the filters and the garbage bag - they may be very dirty. Clean the filters thoroughly and replace the bag with a new one. Also, do not forget to check the position of the power regulator - it may be out of order. Return it to the desired position.
Prevention
There will be no need to repair anything if you take good care of the unit. Clean the turbo brush regularly and wash the dust container. Change bags periodically. By the way, if the brush has become unusable, it can be purchased at the store. A spare part costs under a thousand rubles - it’s not a cheap pleasure.
Error e4 in a Samsung washing machine
Fortunately, you don't have to change turbo brushes every day. Debris accumulates on the pile, it must be removed - this is quite enough for many years of use. If you still need a large-scale disassembly, study the video that we prepared especially for you.
Case disassembly
The upper part of the body is secured with self-tapping screws. Unscrew them with a screwdriver and screwdriver to remove the cover. If you are removing the dust container, also unscrew the screws underneath it.
The main part of the case is held on by self-tapping screws or special latches. After removal, access to the motherboard opens. If you are sure that the board is operating normally, move it aside to avoid damage during diagnostics and repairs. To do this, disconnect its connectors and unscrew the screw in the central part.
Next to the engine there is a check valve - a small button that can be pulled out quite simply. The valve is needed to stop the engine if it becomes clogged due to strong suction force. Without a valve, the electric motor may burn out.
To access the engine itself, remove the bolted casing and rubber surrounds. There may also be protective pads made of foam rubber or felt next to the motor. They secure the position of the engine and do not allow it to touch the walls of the casing.
Required Tools
The set of tools needed will depend on the type and model of Samsung vacuum cleaner. When disassembling and repairing, preventing or cleaning the device, as well as its individual elements, you cannot do without the following devices:
- Phillips and slotted screwdrivers - their sizes are selected in accordance with the type and depth of the screws;
- pliers;
- a stationery knife, or better yet a professional construction knife;
- lubricant;
- electrical insulating tape;
- electrical tester.
The type of work performed will largely influence the choice of tools. For example, to clean the surface of a suction hose before gluing cracks, you will need sandpaper and a degreaser (acetone, solvent). It is convenient to remove dirt on the shaft of the vacuum cleaner brushes with scissors, but to remove blockages you will have to use a long, stiff wire. For gluing cracks or chips on the body, universal super glue is suitable, but for moving parts, such as a hose, a more elastic adhesive material is needed.
Step-by-step disassembly sequence
Here we will tell you how to get to the vacuum cleaner motor and consider the disassembly process in more detail.
Disconnect the hose and disassemble the housing
As a rule, you need to use a long Phillips screwdriver to unscrew the four bolts holding the two halves of the case together. Sometimes you will have to remove some overhead elements, for example, a turbine. The main thing is not to damage anything and unscrew all the bolts before separating the body parts.
Removing the motor
Before removing the motor, disconnect the power terminals and other electronics.
Removing the engine cover
The lid is seamed around the entire perimeter. To remove it, gently press out the seam with pliers. When exposed to light impacts, the cover should separate from the main body.
We take out the brushes by unscrewing the holding screws
As a rule, the brushes are pressed to the rotor by small springs - if you unscrew the clamps, the springs can fly out in an unknown direction.
Check the carbon brushes for wear: they should fit evenly and tightly to the motor commutator and be of sufficient thickness. The thickness must be compared with the depth of the grooves into which they are inserted on the engine, having previously measured it with a caliper.
Some motors do not have brushes at all: these are brushless motors with an asynchronous motor and a squirrel cage rotor. They are rare, but if you do not find brushes on your vacuum cleaner, do not be surprised and continue disassembling.
Unscrew the rotor mounting nut
To remove the fastener, first spray it with WD-40 or similar. Then make clamping bars in place of the brushes so that the commutator (the part of the engine between them) does not turn when unwinding. The size and shape are the same as the brushes, but slightly longer so that the bars protrude from the body.
Clamp the manifold with blocks using a vice or clamp. After this, the nut can be easily unscrewed clockwise with a wrench.
Disassembling the air pump wheel
The procedure greatly depends on the brand of the model and, as a rule, does not cause difficulties. The main task is to free the working shaft of the electric motor. Look carefully at how the working tool is mounted on the shaft, to see if it has additional fastenings in the form of screws or cotter pins. Carefully remove everything and remove. As a rule, there are friction washers on the shaft along with the wheel, which also need to be treated with WD-40.
We carefully inspect the rotor, stator and bearings for damage
If the bearings are worn out, the guide mounts often become loose due to vibration. Check - if everything is in order, move on. If a bearing fails, do not try to repair it: take it for repair or replace it with a new one. In specialized stores, sellers will 100% find an analogue, the main thing is not to throw away the part that has fallen apart.
The windings or their insulation may be damaged—scuffs or burnt insulating varnish are visible. Ideally, you would test the winding with a multimeter (more on this below).
Disassemble the engine further so that the armature can be rewound. If everything is fine with the windings and only the bearing is broken, try assembling the device and turning it on after replacing the bearing.
If there are no obvious burn marks on the winding, it may be intact and there is no need to rewind. But if there are abrasions with a metallic sheen of copper, it is better to be safe.
If the bearings are damaged: how to remove them
In a good way, a special puller is needed here, but the bearing races can be removed from the shaft using a screwdriver and a hammer. The main thing is to do everything carefully and take your time: the impacts on the bearing races should not be too hard.
If the windings are damaged: how to disassemble the armature
To disassemble the anchor, you need to rewind the motor. It is very difficult to rewind at home, so we recommend that you take the part to professionals.
Let's summarize the instructions with another example in the video: