How to prevent pressure switch failure
Blockages of the pressure tube, damage to the surface of hoses and valves, overheating and burning of sensor contacts are the main types of failure of the pressure switch.
The source of these problems is the dirt accumulating inside the machine. Also, to avoid machine breakdown, you should pay attention to the following points:
- Do not allow the washing machine to idle. Before starting the wash, the machine must fill the tank with water.
- The optimal temperature for washing is no higher than 45 degrees. This is enough for high-quality washing of clothes.
A pressure switch is necessary for the entire SMA system. When it fails, it deprives you of the ability to wash, and can lead to various breakdowns. Replacing the pressure switch in an automatic washing machine is a troublesome, but not complicated process.
Pay attention to the behavior of your machine, and you will be able to notice a malfunction in time
Diagnostics and setup
- unplugging the power cord from the outlet;
- dismantling the top panel by removing two small screws located on the back wall and moving the panel back and forth;
- detection of a pressure switch, which is located on one of the body walls;
- removing the connector, freeing the screw, pulling the hanging sensor out of the car;
- unscrewing the clamp and removing the device with pliers.
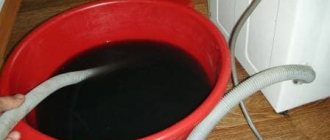
After the device is removed from the washing machine, it is connected to a small pipe. After this, you need to blow into it to see if there is a clicking sound inside the sensor when the pressure changes. If there are no clicks, then the pressure switch is considered to be working. To check the serviceability of the water level sensor using a hardware method, namely a multimeter, you will need to perform the following measures:
- preparing a device for determining resistance;
- placing the probe on the contacts that correspond to the electrical circuit of the pressure switch;
- the formation of pressure in the air tube until a certain relay contact is activated.
If there is no change in the resistance value when the contact is activated, then the water level sensor should be changed. If all of the above checks have shown that the mechanism is in good condition, then it would not be superfluous to carry out an additional check. The procedure is carried out by attaching a tube to the sensor and assessing it for leaks.
It is possible to set up and adjust the mechanism at home if the liquid level in the drum is not suitable for the user. The volume of liquid can be made larger or smaller by adjusting the trigger force of the sensor. Before starting the adjustment procedure, you will need to disconnect the unit from the power supply. To do this, remove the top cover and also disconnect the connector from the relay.
The required screw that controls the primary force is usually located in the central part of the relay housing. This part is usually made for a Phillips screwdriver, as well as an asterisk. It is worth adjusting the sensor when the tank is empty. The process is carried out in stages with intermediate, visual checks of the water level:
- turn the key - assembly;
- connection - testing, etc.
It is recommended to turn the screw only half a turn at a time and no more. It is worth checking, changing, and adjusting the pressure switch only if you have at least basic basic knowledge of the theory. If you have no experience in this process, then it is better to entrust the procedure to a professional.
How to adjust?
You can adjust the pressure switch yourself, the main thing is to act slowly, strictly following a certain sequence of actions:
- We press out the fixing bolts and release the wiring connected to the sensor.
- We find screws next to the terminals (they are the ones that attract or loosen the contacts of the pressure switch).
- We clean the sealant from the screws.
Next begins the most important stage - adjustment. The goal is to record the water level in the tank at a certain moment when the sensor is triggered, and adjust the device to optimal operating parameters.
Since only professional craftsmen have special devices for setting the pressure switch, self-adjustment at home will be carried out using the tracking method:
carefully turn the first screw half a turn, start the fastest wash program;- we evaluate the result - if the amount of water in the tank has increased in comparison with previous measurements, then the adjustment is being made in the right direction;
- repeat the steps with the second screw;
- We finish the adjustment process - if necessary, tighten the screw another half turn, cover it with sealant, and return the sensor to its original place.
If, as a result of the first scrolling, the water in the tank has become even less than it was at the very beginning, the screw is turned one turn in the opposite direction.
Each scrolling is accompanied by starting the machine for a quick wash and analyzing the filling of the tank with water. Considering that the relay contact travel is very small, it is recommended to turn the screw no more than half a turn at a time .
Testing and setting up the sensor
Before you start repairing your “home assistant”, find the receipts and see if the washing machine is under warranty. If the deadline has not passed and you are entitled to free diagnostics, it is better to contact the service center specialists. It should be remembered that if you open the machine body yourself, you can’t hope for warranty service in the future.
If the warranty card is no longer valid, you can proceed with diagnostics. First you need to remove the sensor from the housing. The algorithm of actions will be as follows:
- de-energize the SMA by unplugging the power cord from the outlet;
- turn off the tap responsible for the water supply;
- Unscrew the two bolts securing the top panel of the machine;
- remove the “cover” of the unit;
- find the pressure switch - it has the shape of a washer;
- Unscrew the bolt securing the relay in the housing, remove the connector;
- loosen the clamp and remove the sensor from the machine.
Before adjusting the device, you need to check whether it is working properly. For diagnostics, you will need a rubber tube of the same diameter as on the pressure switch. Having taken out the level sensor, put the prepared tube on its inlet fitting. Then blow into it - the working pressure switch will make 1-3 characteristic clicks. If the device is silent, it means that the contacts do not work and the relay is faulty.
Then inspect the level sensor. You need to make sure that it is not deformed and that there are no traces of burning on the surface. Also check the hose for blockages; sometimes the cavity becomes clogged with dust. If the tube is clogged, clear it or rinse it with warm water.
Hardware diagnostics of the pressure switch is more accurate. To test the device, set the device to resistance measurement mode and attach the multimeter probes to the pressure switch terminals. To activate the contacts, it is necessary to create pressure in the tube.
If the values on the multimeter display remain unchanged when the relay contacts are activated, you will have to replace the pressure switch. If the numbers on the screen change, we can talk about the serviceability of the sensor. Then, perhaps, it will be enough to simply adjust the existing device.
The level sensor is configured manually. Adjustment will be advisable in cases where too little or, on the contrary, too much water is poured into the tank during washing. The amount of liquid collected by the washing machine can be reduced or increased - to do this, you need to set the response force of the pressure switch.
First you need to turn off the power to the machine. Next, remove the top panel of the case, find the pressure switch and disconnect the connector. The relay has three adjusting screws, one of which needs to be tightened. The bolt with which adjustment is made is usually located in the central part.
To tighten the screw, you will need a Phillips screwdriver or a special wrench. The process is carried out in stages - it is necessary to evaluate the intermediate results of adjusting the pressure switch. So, you should turn the bolt half a turn, then assemble the machine body and start a test “idle” wash. If the desired effect is not achieved, you still need to turn the screw.
To set up a pressure switch, you need to have minimal basic knowledge of the internal structure of a washing machine. If you do not have even the slightest idea how a level sensor functions, it is better to invite a specialist to do the work. Otherwise, you can harm the “home assistant” even more.
Interesting:
- How does the pressure switch of a washing machine work?
- Miele dishwasher errors
- Washing machine connection - review
- Checking the pressure switch of the Indesit washing machine
- Error codes for AEG washing machines
- How to adjust the pressure switch of a washing machine
Reader comments
Share your opinion - leave a comment
Options of pressure switches, principle of operation, consequences of malfunction
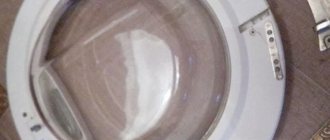
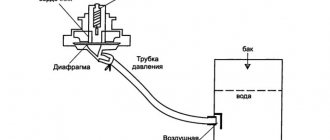
To find out where this sensor is located in the washing machine, you will have to remove the top cover of the unit. The pressure switch looks like a flat corrugated washer, to which wires are connected on both sides, and at the end there is a plastic tube. There are washing machines with an oval sensor that has only two contacts - a wire and a tube.
The sensor is essentially a pneumatic relay, which is triggered by air pressure created in a tube connected to the tank of the washing unit. The water flowing into the drum creates a certain pressure, the air begins to press harder on the relay membrane, which closes or opens the contacts, allowing current to pass through the wiring and transmit the necessary command to the control unit.
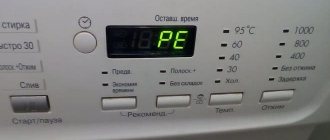
If there is no signal to start the operation, or there is a lack of continuity in the circuit, the control unit stops the program, sending an alarm signal to the display panel. Eg:
- LG gives PE signal;
- SMA Ariston and Indesit signal with codes F04 and F05, respectively;
- SMA from Bosch will tell you about the problem with code F26;
- Electrolux has several versions for this case - E11 - E 12; E21 – E22;
- Kandy – F03.
If the water control sensor begins to work incorrectly, certain malfunctions may appear in the future:
- water will overflow in the tank, the device will constantly draw and drain liquid;
- there will be insufficient water for washing, which will deteriorate the quality of the washing machine;
- the water after washing will not drain completely; after spinning, the laundry will remain damp;
- the program will start without water, after which the water heating element will overheat and fail.
How to check the pressure switch yourself
The above deviations in the operation of the washing machine may be the result of a malfunction of other parts, so you need to check the functionality of the pressure switch before installing a new one. To do this, it must be removed from the machine. Where is the water level sensor located in the washing machine? In order to find and check the pressure switch, you must perform the following steps:
- Having unscrewed two bolts from the back of the washing machine, you should remove the top cover of the machine with a shift back;
- on the side wall, find the pressure switch secured with screws, disconnect from it the connector with wires and the hose connected to the fitting using a clamp;
- Unscrew the fastening bolts and remove the block.
Carefully inspect it and the tube for external damage or blockages. If necessary, clean the tube and fitting. The outer lamellas on the connector must be clean without traces of oxidation. If there is dirt or corrosion, they should be cleaned. The functionality check must be carried out in the following order:
- Place a small hose on the fitting and, holding the block to your ear, blow into the hose. When the sensor contact is triggered, a clear click should be heard.
- Depending on the design of the block and the number of contact groups, the number of clicks when blowing the hose can be one, two or three. The absence of clicks indicates a malfunction of the device.
- You can verify that the contacts operate reliably using an ohmmeter by connecting it to the corresponding sockets on the input connector of the unit. When the contacts are closed and opened, the readings of the device will change sharply. The electrical diagram of the connections of the contact groups of the pressure switch can be found in the operating instructions for the washing machine.
The washing machine does not drain water - what to do?
Checking for serviceability
If you suspect that the water level sensor is not functioning, do not rush to immediately replace it with a new one. First, check whether the pressure switch is actually faulty. To do this, remove the part from the machine, previously disconnected from the network. Usually this sensor is located on the side wall of the device closer to its top. So your first action should be to detach the top cover.
After unscrewing the bolts that hold it in place, slide the cover away from you and remove it. The sensor is secured with 1-2 bolts, which you will have to unscrew. You also need to disconnect the contacts and hose from the pressure switch by unscrewing its clamp using pliers.
After this, we check the sensor using a hose about 10 centimeters long, the diameter of which should be the same as that of the tube removed from the pressure switch. Place one end of this hose on the inlet fitting, and blow on the other end, applying the pressure switch to your ear. You should hear several clicks (one to three depending on your washing machine) indicating that the sensor is working. If there is silence inside the pressure switch, it means it is not working.
You can also use a multimeter to check the conductivity. For a working pressure switch, it will change as the air pressure increases.
You can clearly see the process of checking the pressure switch for functionality in the following video.
What factors may indicate a breakdown?
Blockages in the pressure tube, damage to the surface of hoses and valves, overheating and burning of sensor contacts are the main types of failure of the pressure switch. The source of these problems is the dirt accumulating inside the machine.
Also, to avoid machine breakdown, you should pay attention to the following points:
- Do not allow the washing machine to idle. Before starting the wash, the machine must fill the tank with water.
- The optimal temperature for washing is no higher than 45 degrees. This is enough for high-quality washing of clothes.
A pressure switch is necessary for the entire SMA system. When it fails, it deprives you of the ability to wash, and can lead to various breakdowns. Replacing the pressure switch in an automatic washing machine is a troublesome, but not complicated process.
Pay attention to the behavior of your machine, and you will be able to notice a malfunction in time
The following symptoms indicate that a washing machine malfunction may be caused by a problem with the pressure switch:
- Water did not fill the tank, but the machine started washing. The consequence of such a situation is usually the heating element burns out, since the heater must operate in water.
- There is not enough water in the tank.
- The machine overflowed with water.
- The wash is over, but the water still remains in the tank, so after spinning, you take the wet clothes out of the machine.
- The rinse cycle does not start.
- You smell a burning smell coming from the tank.
Principle of operation
The operating principle of the pressure switch is based on reading oscillations that are converted into electronic signals. When water is pumped inside the washing tub of a machine, it creates powerful air vibrations that can be measured. These same vibrations reach the pressure switch core through the hose, pushing away the diaphragm and causing it to hit the central magnet of the device. As a result of the impacts, a pulse is generated that pushes the core into the adjusting screw and thereby sends data to the connected controller through the contacts. The electronic pressure switch thus receives up-to-date information about the extent to which the tank is filled with water.
The controller can determine the volume of filling the central container with water by the type of vibrations emitted. The higher they are, the fewer obstacles inside the washing machine for the propagation of sound waves and the lower the water level. Otherwise, when there is a lot of liquid, it begins to absorb any vibrations, which makes it clear to the computer circuit that there is not enough water and it is not recommended to start washing. When the oscillation frequency drops to the minimum specified by the setting, a corresponding signal is sent to the board through the adjusting screw and the machine stops drawing water through the hose.
At the same time, the factory settings for sensors vary from brand to brand, since they are set by manufacturers at the assembly stage and after that do not attract attention until a breakdown or technical diagnosis occurs. However, over time, due to numerous vibrations along the membrane and core, its height is lost, and the transmission of data on the degree of filling with water becomes less accurate, until the operation stops completely. To return it to operation, you need to disassemble the washing machine, which you can do yourself or entrust to a specialist.
Pressostat adjustment
In order for the pressure switch of a Siemens or dn s14 Samsung washing machine to react to the filling level of the tank correctly, the manufacturer initially adjusts the pressure switch. Usually this is enough and the adjustment of the machine water level sensor is not done again.
There are times when not enough water is poured into the tank or not all of it is drained. To fix the problem, you need to know how to check the water level sensor in a washing machine. If everything is fine with the controller, there is no damage, the likely reason is that the factory settings have been lost.
Then you can adjust the pressure switch of your home washing machine yourself. The device has special screws that need to be tightened using regular pliers.
Operating rules
In order for the washing machine to serve for a long time and effectively wash clothes, it is necessary to correctly follow its operating modes. Since the pressure switch is the most vulnerable part and breaks more often than others, the following recommendations will help maintain the longevity of the equipment:
- The machine must not be used idle . Before starting the wash, the drum is filled at least halfway. If it is empty, the pressure switch will quickly break.
- Washing should be done in warm water. It is necessary to set the temperature in advance to avoid damage to parts due to strong cooling.
AdviceAny laundry should be washed at a water temperature of no more than 45 degrees. In this case, you cannot set the water to zero temperature, so as not to damage the relay.
- It is important to clean the drain regularly . To ensure that water drains well from the tank, you need to clean the drain hose once a month.
- Do not leave equipment plugged in while it is not working . When voltage surges occur, parts inside the drum can break (how to repair a washing machine drum?). The relay is the most vulnerable in this regard.
You can replace the pressure switch in a washing machine yourself. Sometimes it is enough to repair it. If this is not possible, then you need to contact specialists.
Diagnostics and setup
- unplugging the power cord from the outlet;
- dismantling the top panel by removing two small screws located on the back wall and moving the panel back and forth;
- detection of a pressure switch, which is located on one of the body walls;
- removing the connector, freeing the screw, pulling the hanging sensor out of the car;
- unscrewing the clamp and removing the device with pliers.
After the device is removed from the washing machine, it is connected to a small pipe. After this, you need to blow into it to see if there is a clicking sound inside the sensor when the pressure changes. If there are no clicks, then the pressure switch is considered to be working. To check the serviceability of the water level sensor using a hardware method, namely a multimeter, you will need to perform the following measures:
- preparing a device for determining resistance;
- placing the probe on the contacts that correspond to the electrical circuit of the pressure switch;
- the formation of pressure in the air tube until a certain relay contact is activated.
If there is no change in the resistance value when the contact is activated, then the water level sensor should be changed. If all of the above checks have shown that the mechanism is in good condition, then it would not be superfluous to carry out an additional check. The procedure is carried out by attaching a tube to the sensor and assessing it for leaks.
It is possible to set up and adjust the mechanism at home if the liquid level in the drum is not suitable for the user. The volume of liquid can be made larger or smaller by adjusting the trigger force of the sensor. Before starting the adjustment procedure, you will need to disconnect the unit from the power supply. To do this, remove the top cover and also disconnect the connector from the relay.
The required screw that controls the primary force is usually located in the central part of the relay housing. This part is usually made for a Phillips screwdriver, as well as an asterisk. It is worth adjusting the sensor when the tank is empty. The process is carried out in stages with intermediate, visual checks of the water level:
- turn the key - assembly;
- connection - testing, etc.
It is recommended to turn the screw only half a turn at a time and no more. It is worth checking, changing, and adjusting the pressure switch only if you have at least basic basic knowledge of the theory. If you have no experience in this process, then it is better to entrust the procedure to a professional.
Sensor Test Guide
Before trying to check the pressure switch on a Bosch Maxx 4 (or Samsung) washing machine using a tester or improvised means, you should weigh the validity of this action. If the washing machine is under warranty, unauthorized interference with the operation of the unit will be grounds for refusal of warranty service by the seller or manufacturer.
Sequencing:
- Unplug the power cord from the outlet.
- Remove the top panel by removing the two small screws located on the back wall and sliding the panel back and up.
- Find a sensor cantilevered to one of the walls of the housing.
- Remove the connector, release the fastening (screw), and remove the sensor hanging from the tube from the machine.
- Using pliers, open the clamp on the supply tube and remove the device.
Water level switch
Before checking the adjustment of the device using tools, you can evaluate the overall performance of the sensor. To do this, you will need a piece of tube identical to the rubber tube of the relay. Having pulled the device out of the machine, you need to connect it to a short tube, blow strongly into it and determine whether the relay inside the device clicks in response to a change in pressure. If not, the sensor is faulty.
Symptoms of a problem
Sometimes it is quite difficult to determine the malfunction of a product, especially for people who do not understand technology. It is recommended that you familiarize yourself with the common signs that indicate a faulty pressure switch.
Stops drawing water into the tank
People who have their own washing machine often experience that liquid stops filling into the tank. There are several reasons for this problem:
- Problems with the valve responsible for supplying water. Liquid enters the system under tap pressure. The supply is opened using a special built-in valve, which begins to operate after a signal from the control module. If it is faulty, the liquid will not begin to flow.
- Control module failure. Due to a malfunction of this part, the valve does not receive a signal, and it does not begin to draw water.
- Blocker failure. He is responsible for blocking the hatch door. If the lock is faulty, the machine will not start working.
How to disassemble and repair a dishwasher with your own hands, instructions
However, the most common cause is considered to be a faulty pressure switch. If this product does not work, the machine will not be able to evaluate and will not begin to fill the tank.
Repeated cycles of water supply and drainage
Modern washing machines are equipped with an automatic liquid collection system. Not only valves, but also level switches are responsible for the flow of water. All these parts function using special commands coming from the control unit.
The control unit perceives this as a failure to comply with the command, and therefore it re-sends the signal to supply water. This results in the supply and drain cycles being repeated many times. Due to repetition of cycles, the washing time can increase significantly.
Reduced rinse and wash quality
Sometimes, after using a washing machine for a long time, the quality of rinsing and washing clothes gradually deteriorates. Many people attribute this to the use of inappropriate powders. However, there are other reasons why things begin to wash worse.
A common reason for poor washing quality is a faulty level switch. Due to the breakdown of this part, the washer cannot determine how much water is in the tank, and because of this, it often does not fill completely. This leads to the fact that the collected liquid is not enough to properly wash and rinse the washed items.
Water remains after finishing washing
There are times when, after completing work, some water remains inside the drum. This can happen because the pressure switch has failed and stopped functioning normally. If it does not work correctly, the control unit of the device will not receive a signal about the need to clean the tank. This will lead to the pumps not starting to work to pump out excess water.
However, there are other reasons for this problem:
- Pump filter clogged. Obstruction of liquid from the tank sometimes occurs due to a clogged filter. It will have to be cleaned for the drain to start working.
- There is a blockage inside the pipe. During the draining process, the waste liquid passes through the pipe. Experts advise cleaning it once a month to prevent it from becoming clogged.
Setting up the pressure switch
To set the optimal water flow when operating the washing machine, the pressure switch must be adjusted. The adjustment is usually performed by the manufacturer, but the same steps can be performed independently after replacing the sensor.
The pressure switch has adjusting screws that need to be turned half a turn. In this case, the washing machine should not be connected to the network, and the water should be turned off. After each turn, you should replace the cap and check the amount of liquid being poured. When the optimal level is reached, the adjustment can be completed. It is recommended to secure the screws with a sealing substance so that they do not turn randomly when wrung out.
Setting up the water level sensor
The pressure switch is adjusted to the required amount of liquid using two adjusting screws, one of which (central) is used to set the moment of connection of the contacts, and the second (peripheral) is intended to set the moment of their breaking.
There may be several contact groups or sensors depending on the operating modes and model of the washing machine. Programs of different washing modes can also use different amounts of liquid in the washing machine, for example, economical or gentle wash, in which the tank is half filled. Fine adjustment of the alarm is carried out by specialists at the factory, and the position of the adjusting screws is fixed with paint or varnish.
It is not recommended to change their position, as unbalancing the settings will cause disturbances in the established washing program. In order to properly configure the unit yourself, you need to know how much liquid the machine requires at each stage of all washing modes, and in accordance with this, set the moments for turning on and off the contact groups. For example, the pressure switch of a Bosch washing machine has three contact groups configured for full mode, economy mode and tank overflow. See also:
Washing machine jumps during spin cycle
Do-it-yourself manual adjustment
If the breakdown turns out to be minor, you don’t have to buy a new part, but simply manually adjust the old one. When setting up, adhere to the following recommendations:
- It is necessary to determine the optimal amount of water for the washing machine. For each model there is an optimal volume of liquid that is needed to complete the programs. Therefore, it is necessary to find out in advance how much water should be poured into the tank for washing and rinsing things.
- Configure. On the surface of the product there are adjustable screws that are adjusted depending on the required amount of liquid.
Procedure for replacing the pressure switch
Before changing the pressure switch of a dishwasher or washing machine, you need to check the equipment and make sure that it really does not work. You can check whether the pressure switch is working and which specific part has failed in several stages:
Completely disconnect the machine from communications, turning off the water supply, drainage and electricity; Place the washing machine or dishwasher on a moisture-absorbing cover (for liquid residues) so that you have access to the water tank; Next, remove the outer cover and, based on external signs, locate the water tank and water pressure sensor with a tube; Next, you need to carefully unfasten the tube and check it for blockages, then blow into it, listening to the sensor itself. If the device is working properly, after air is supplied inside, a characteristic click of the membrane should be heard (possibly with a short delay of 1-2 seconds)
If punctures are found on the hose or it is clogged, you can replace the hose without replacing the main element; The electrical circuit is checked using an Ohmmeter, which should show a gradual decrease in resistance on the contacts coming out of the pressure switch housing; If a click is not heard or the resistance remains unchanged, this means that the device is faulty and needs to be replaced.
The entire replacement process consists of carefully unscrewing the mounting bolts and dismantling the faulty device, in whose place a new one is installed. In this case, it is advisable to use a tool suitable for this - special Phillips screwdrivers and pliers, and also purchase the exact sensor model that was installed on your equipment.
Otherwise, it will not be possible to guarantee adequate operation of the entire system, which may lead to failure of its remaining elements.