Any washing machine breaks down over time. Units from the South Korean manufacturer Samsung are no exception. Replacing some parts requires almost complete disassembly of the device. In this article we will talk about how to disassemble a Samsung washing machine with your own hands.
Having the necessary tools, plumbing skills and experience in working with electrical engineering, you can fix some washing machine breakdowns yourself
Preparatory stage
Disassembling a washing unit is not as difficult as it seems at first glance, but first you should properly prepare for the upcoming repair. To do this you need:
- determine the location for the work;
- prepare tools and related materials;
- prepare the washing machine for disassembly.
The room for repairs should be spacious and well-lit; you will need a free section of the floor with an area of 2 x 2 m. It is recommended to cover its surface with newspapers or rags in advance so as not to get dirty during the repair process.
Next, you should stock up on the necessary equipment. To disassemble and repair the washing machine you will need:
- screwdriver (with a set of bits) or a set of Phillips screwdrivers;
- impact wrench;
- flat screwdriver;
- wrench and hex key (8 mm);
- pliers;
- pliers;
- multimeter;
- hammer;
- a set of colored markers;
- WD-40 lubricant;
- silicone sealant;
- CV joint lubrication;
- clean rag.
If you have to cut the tank, you will additionally need: a hacksaw with fine teeth, a drill, a long drill, a gun with sealant, self-tapping screws or bolts.
Disassembling a washing machine is easy when you have a full set of tools at hand
Remember that after repair and replacement of parts, the unit will need to be reassembled, so immediately record all stages of dismantling, using photos or videos, or at least write down the sequence of your actions. Then the installation process will go quickly and without complications.
If your washing machine has not yet expired, it is better to contact a service center for help in troubleshooting. If you replace parts yourself, you may subsequently be denied free warranty repairs.
All that remains is to prepare the washing machine itself for further disassembly. Follow these steps:
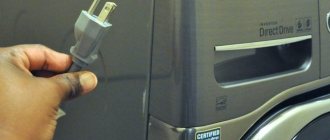
- de-energize the unit;
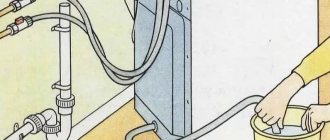
- disconnect the inlet and drain hoses from the water supply and sewerage systems, respectively;
- remove the drain filter and drain the remaining water (the filter can be cleaned at the same time);
- move the washing machine to the work site.
Please note that to disassemble and subsequently repair a Samsung washing machine (for example, models such as s821, wf-s861, s803j and wf6458n7w) you will need several hours. In addition, if it becomes necessary to remove the tank from the unit, outside help will not hurt.
Washing machine care
You need to take care of every thing. Same with the washing machine.
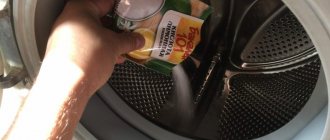
Use folk remedies to clean the “insides” of the washing machine.
Therefore, adhere to 5 basic rules:
- If the load is designed for 5 kg, there is no need to load it under the top, and you should not try more than 5.
- Before depositing items, check all items for small items. They can get stuck in the car and damage it. The tray for powders and gels is easily removable and should be washed periodically. After washing, leave the hatch open so that the machine is ventilated and no unpleasant odors are created there.
- Take time to care for external parts at least once every 7 days.
- It’s worth listening to the advertising and still buying a water softener. It will not only improve the quality of washing, but will also save the internal parts of the washing machine.
- The instruction manual should always be at hand and is worth reading. Manufacturers created it with the expectation of making it easier for you to care for your car.
Contact a specialist if your washing machine breaks down. There is no shame in giving your machine to a mechanic. But if you do the renovation yourself, stay safe and pay attention to detail.
Scheme
Before you start disassembling household appliances, it is a good idea to familiarize yourself with their structure. The general diagram of a Samsung washing machine will give you an idea of the structure of the unit, the location of its main parts and will help when making repairs.
Location of the main components of an automatic washing machine
The electrical diagram will be useful in checking the integrity of the wiring and the functionality of some components.
Circuit diagram of a Samsung washing machine
Take your time, understand the diagrams, and only then proceed directly to disassembly.
How to disassemble a Samsung washing machine
How to disassemble a washing machine without the help of a professional? You can carry out the above steps before working with the heating element.
Use the instructions to assemble and disassemble the washing machine.
Next, you can:
- Remove the cover at the bottom of the machine. There are located: a plug and a hose. The hose is needed for emergency drainage of water, and the drain is cleared through the plug.
- To unscrew the control circuit, you need to unscrew two screws and then unfasten the fastening latch.
- To remove the electrical module (on the inside of the control panel), you need to unscrew the 3 screws of the top fastening on the front panel.
- To remove the front panel, unscrew the 4 screws on the bottom panel.
- The tank is supported on the body by shock absorbers and springs.
- An electric motor is located under the tank.
The success of work largely depends on the proper organization of the workplace.
Preparatory stage
The convenience and high-quality disassembly of the washing machine will depend on good preparation.
Learn the safety precautions to begin repairing your washer.
Therefore, without skipping or “jumping” over each of the points, complete them like this:
- turn off the power.
- Drain the water from the tank and pipes.
- Prepare your tools.
- Select a location for renovation work. It should be well lit and free so that you can comfortably move around the equipment.
For repairs you will need a spacious, well-lit place.
To repair a Samsung washing machine with your own hands, you don’t need any special tools; you have everything at home. Arm yourself with:
- Screwdrivers;
- Pliers;
- Heads of different sizes;
- Small hammer.
Use special tools to disassemble the washing machine.
The only special item you can use is a WD-40 solution; it helps remove sealant, tightly tightened nuts and CV joints. Don't throw away your smartphone. It will be needed not only to spy on the next step in the work, but also to take photos.
Carefully disassemble the machine, remembering all stages of disassembly.
The photos will help you put the machine back together later.
Troubleshooting
Failures have different manifestation patterns. They are often shown on the display in the form of a special code, which is written at the beginning of the article. All machines can be divided into equipment with and without a display.
Self-disassembly of a Samsung washing machine requires precision in completing all steps.
Machines without a display indicate the problem by glowing lights.
- The lower temperature indicator and all washing mode lamps light up. Problem: water does not fill.
- The 2nd temperature indicator from the bottom and the same lights for all modes are on. Problem: no water draining.
- All the washing mode lights are on, as well as the two lower temperature lights. Problem: too much water.
- All the washing mode lights and either the 2 middle temperature lights, or the second from the top and the 2nd from the bottom are on. Problem: the water does not heat up.
- All washing mode lamps and one upper lamp with two lower temperature sensors are on. Problem: faulty buttons.
- All the wash mode lamps and the two upper temperature sensors came on. Problem: no signal from the temperature sensor.
Removing the drum from the washing machine is not difficult.
Based on knowledge of the codes, further actions can be determined.
Safety precautions
When working with any equipment, you must follow safety precautions. All work must begin with de-energizing the equipment.
It is also important to do all work with dry hands.
Follow safety precautions!
Disassembly
When the repair site, equipment and washing machine are prepared, you can begin to work.
The first step is to remove the top panel of the machine. On the back side of the unit, in the upper corners, there are two self-tapping screws on which the panel is attached. Unscrew them with a screwdriver (or screwdriver), lift the back of the cover, move it towards you and remove the panel.
Disassembling front-loading washing machines begins with removing the top panel
Then you need to remove the detergent tray . To do this, press the locking clip and pull out the container in the same way as you do for cleaning. Behind the powder tray there are fasteners that hold the control panel; By removing the tray, you can easily unscrew the bolts and disconnect the latches that secure it (usually one fastener is located under the tray and two more on the back of the panel). Carefully disconnect the control panel so as not to damage the wires leading from it into the mechanism. To prevent the part from interfering with further work, it is hung from the right side of the unit using a special hook or simply carefully placed on the top of the machine.
You can easily replace the pressure switch (water level sensor) yourself by removing the top panel of the washing machine
When disassembling the washing machine, carefully inspect all parts for damage. For example, quite often the water level sensor fails. It is easy to access the part if you remove the top cover of the unit: the sensor is located, as a rule, on the side wall of the machine, closer to the top, and is secured with 1-2 bolts. Unscrew the fasteners, disconnect the hose and contacts from the pressure switch (the hose is held in place with a clamp that needs to be unscrewed or pulled apart with pliers) and inspect them. If necessary, clean the contacts and remove blockages in the tube, and check the sensor itself with a multimeter.
Next you should remove the hatch cuff . Gently pry the rubber collar clamp (retaining ring) with a flathead screwdriver, pull lightly on it, and then move the screwdriver around the entire circle to release the ring. Remove the rubber cuff and place it in the drum. Proceed as carefully as possible so as not to damage the integrity of the rubber. Close the drum door tightly.
When removing the cuff, check its condition and clean it if necessary: mold often forms on it
Next, proceed to dismantling the bottom panel . In Samsung washing machines it is fixed with latches that need to be disconnected from the body. On newer models, the panel is secured with screws; They are easy to find and unscrew.
It's time to dismantle the front wall. How to remove the front panel of a Samsung washing machine? This is quite simple to do: you need to unscrew the screws that secure the front panel to the body of the car (they are located in the upper and lower corners, under the dashboard and above the lower panels). Next, you need to remove the front wall along with the loading hatch from the hooks/latches. First disconnect the wires of the locking lock.
Removing the back panel is even easier: unscrew the four screws and remove the part. Immediately disconnect all hoses that are attached to the machine tank: filler, drain, as well as from the pressure switch and powder tray.
Now you should disconnect the wires of the heating element and temperature sensor or, if necessary, completely remove the tubular heater (for replacement). It is usually located in the lower front part of the tank under the drum. Unscrew the nuts and remove the heating element from the socket. At this point you should also disconnect the motor wires and wiring. Be sure to take a photo of the pin locations so you can connect them correctly when reassembling. The terminals can be marked with colored markers.
During the disassembly process, do not be lazy to check the condition of the heating element and clean it of scale.
To get to the tank, you will have to remove the counterweights (balance stones); they are located at the top and bottom of the washing machine. Unscrew the mounting bolts and carefully remove the weights (they are quite heavy). When performing this work, an electric impact wrench will be useful, which will significantly speed up the process of removing fasteners.
Check the condition of the counterweights and its mounting bolts. Loose fastenings and destruction of stone are the causes of rattling, knocking and bouncing of the machine during the washing process
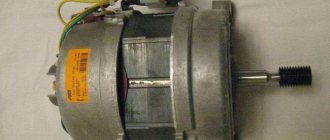
In order to remove the washing machine tub , you will need two pairs of hands. After removing the counterweights, disconnect the shock absorbers, and then, together with an assistant, carefully remove the tank from the springs and remove it from the unit. Then disconnect the motor from the tank, to do this, first remove the drive belt, then unscrew the motor fasteners. Finally, remove the pulley by removing the bolt in the middle.
The photo shows a disassembled washing machine tank
To replace the bearings on the drum, you need to disassemble the tank . The task will become more complicated if it turns out that your washing machine has a non-separable (soldered) tank. In this case, you will need to either completely change the part (which is not cheap) or saw it (the procedure can take several hours, and it is also quite painstaking work).
Do not cut the tank unless you are confident in your abilities. A car service mechanic can provide this service for a small fee.
Replacing the bearing assembly in washing machines with a collapsible tub (for example, in the Samsung Diamond 6 kg model) is much easier. The two halves of the tank are held together by coupling bolts and latches that need to be separated. To dismantle the bearing assembly, you can use a special automotive puller or carefully knock down the metal rings with a hammer and chisel. Then you should thoroughly clean the seat and install new bearings and oil seal.
Not all washing machine breakdowns can be fixed on your own. For global repairs, you will need the help of a professional and a special tool.
After replacing and repairing all elements of the device, reassemble the machine in the reverse order of dismantling. Notes, photographs and notes made with a colored marker will be useful to you.
Now you know how to disassemble a Samsung washing machine. Follow our recommendations, do not forget about the instructions, check the diagrams and record your actions. We hope that our article will be useful to you. Happy renovation!
Samsung washing machine device
Let's get acquainted with the structure of a washing machine using the example of the well-known Sensor Quick model. Main front elements of the model:
- removable front panel;
- distribution hopper for powder and special products;
- control Panel;
- electric valves;
- level relay;
- laundry tank;
- adjustable stand legs;
- drain pump with filter;
- drain hose;
- drain hose plug.
Rear elements:
- power cable;
- counterweights;
- tank suspension springs;
- shock absorber;
- engine;
- pulley with drive belt.
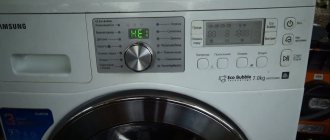
The control panel is a board with buttons and indications that turn on the washing mode, change the temperature, spin speed, washing time, and delay start. It is also possible to manually set all these parameters with the “Manual program setting” button. The display shows the current washing status and error codes.
What errors are found in programs?
We are talking about codes that appear on the dashboards of Samsung washing machines if something is wrong.
- E Occurs when water fills. This means that within 20 minutes it was not possible to reach the required level. Disabling and then turning on the unit should correct the error.
- E2 – often appears when draining. The reason is the main filter is clogged. It needs to be disassembled.
- E3 means there is too much water. Within 2 minutes, the liquid is drained automatically, the user does not need to take any action. No disassembly required.
- E4 – talks about too many things inside. The excess must be removed completely.
- E5 – when water heating in a Samsung washing machine does not work.
- E6 – problems with the heating element. We'll have to disassemble it.
- E7 – the water level sensor in the tank of the Samsung washing machine has become faulty.
- E8 – the water is not heated as it should be, according to the original program. Problems with the heating element often lead to similar problems. Disassembly will most likely be required.
- E9 – problems such as fluid leakage or drainage were recorded more than 4 times.
- D.E. DOOR – errors related to blocking. For example, due to the fact that the hatch cover does not close well enough. No disassembly required.
If the Samsung washing machine is installed in rooms with high humidity levels, the paint on the surface may deteriorate over time. The same applies to any metal parts. A dehumidifier is then installed in the room, or the Samsung washing machine is reinstalled in another place.
Humidity often causes the display to not work. It is recommended to dry the device if problems occur. If drying does not help, you just need to call a technician to service your Samsung washing machine.
How to remove the back wall of a Samsung washing machine
The need to remove the back wall of a Samsung washing machine may arise if you need to check the motor brushes, replace the drive belt, or, for example, inspect the pulley. Usually, it is not difficult to disassemble the body of the machine, but on Samsung models it is not possible to simply detach the panel. Let's figure out how to gain access to the parts located at the back, how to dismantle the back wall of the washing machine.
Is it possible to dismantle the back wall?
Most users do not encounter this problem - on many automatic machines, the back panel comes off very easily, as it is secured with standard bolts. Models of certain brands, for example, Indesit, have special technical hatches on the back; by removing them, you can gain access to the washer components.
Owners of Samsung models, quite rightly, may have a question: how to remove the back panel? The equipment does not have a separate wall on the back side; that part of the body is a monolith. To get to the belt or pulley, you will have to halve the housing. If you carefully examine the Samsung SMA, you can see a barely noticeable joint stretching through the middle of the side panels; this is where the body halves are fastened together. In case of urgent need to separate them, it is possible to remove the top cover, release the latches and halve the machine.
However, removing the back wall or dividing the case in half, in some cases, will simply be impractical. To replace the drive belt, it is not necessary to undertake a large-scale disassembly of the machine; it is enough to simply remove the top cover of the machine.
How to replace the belt?
Owners of belt-driven washing machines may encounter problems with the belt stretching or jumping off. In this case, in order to return the machine to functionality, you will have to replace the rubber band. Let's figure out how to do this with the least amount of effort if you can't just remove the back wall of the machine.
Before starting repairs, be sure to turn off the power to the washing machine. The algorithm for further actions will be as follows:
- remove the top cover of the case by unscrewing the two bolts securing it using a screwdriver or screwdriver;
- slightly tilt the washing machine in your direction, hold the machine with your foot or stomach. At the same time, remove the drive belt located near the rear wall from the pulley by hand. To make the task of removing the rubber band easier, you can open the CMA hatch and pull the drum towards you a little, thereby leaving more space at the back of the machine for manipulating the belt. The discarded rubber band must be pulled out from under the washer;
- take a new Samsung belt, tilt the machine towards you again and carefully insert the belt into its original place. First of all, the rubber band is pulled onto the engine pulley. You may not be able to put on the belt the first time, so it is better to have an assistant who can “peep” under the bottom of the machine and control how successful your attempts to tighten the elastic band on the engine are;
- Place the drive belt on the drum pulley. First, position it tensioned on one side of the wheel, after which it is enough to turn the drum by hand (through the hatch door), the pulley will spin and the belt will be pulled tightly into place.
If the rubber band is positioned crookedly on the wheel, you need to manually adjust its position on the electric motor pulley. Next, you need to check the operation of the equipment - turn on the machine and run the spin cycle in test mode; if the drum starts rotating without any problems, it means the belt was replaced correctly. Then you can put the top cover in place, fix it with self-tapping screws and use the SMA.
Share your opinion - leave a comment
Replacing an element
Once the drum is removed, you can begin installing the new part.
Algorithm of actions:
- Using a metal rod, gently tapping, we knock out the bearings from the outside and inside of the tank.
- We clean the shaft and seat from debris and dirt.
- Lubricate the seat and insert new bearings. To do this, they are carefully tapped along the outer edge through an insulating washer made of getinax (preserves parts from damage). We drive the bearing all the way (until the characteristic dull sound of the bearing hitting the side of the tank).
- Just like on the outside, we install bearings on the inside of the tank. Additionally, a new oil seal (pre-lubricated with silicone) is inserted on the inside above the bearing.
- We insert the new drum into the tank. The rod should fit into the bearing.
- We put the pulley ring on and secure it with a screw.
After installing the new drum, the two halves of the tank are connected (the edges are pre-lubricated with sealant) and tightened with fixing bolts and nuts.
Cuff
The hatch cuff is vulnerable to debris and plaque. As a rule, washing particles, lint and dirt settle in the lower part of the seal between the folds. To remove accumulated debris, you need to open the drum, pull back the rubber band and thoroughly clean all hard-to-reach places. For these purposes, use a dish sponge or soft cloth.
After the initial surface cleansing, we move on to the second stage: treatment with a cleaning agent. Apply white, vinegar or lemon solution to the sponge, and then go over the entire cuff. Then the door is closed for 30-40 minutes, during which the drug will complete the process: dissolve deposits and disinfect the gum from fungus. After half an hour, the drum is washed with clean water and wiped dry.
When cleaning the cuff, it is important to choose the right cleaning product. The use of caustic and overly aggressive acids is prohibited: these compounds damage rubber
Video
We invite you to watch a video on how to disassemble a Samsung washing machine at home.
About the author:
She graduated from the Institute of Tourism of the Federal Pedagogical University with a degree in Management, loves to travel and communicate with people. She is interested in psychology, enjoys dancing, and studies English. During the five years of maternity leave, I thoroughly mastered housekeeping, not forgetting about my own development. He skillfully uses words and can support a conversation on any topic thanks to his interest in different areas of life.
Found a mistake? Select it and click the buttons:
Ctrl + Enter
Interesting!
The first officially patented washing machine was made of wood and was a box with a frame, half filled with wooden balls. Laundry for washing and detergent were loaded inside and the frame was moved using a lever, which, in turn, made the balls move and grind the laundry.
Samsung washing machine device
Let's get acquainted with the structure of a washing machine using the example of the well-known Sensor Quick model. Main front elements of the model:
- removable front panel;
- distribution hopper for powder and special products;
- control Panel;
- electric valves;
- level relay;
- laundry tank;
- adjustable stand legs;
- drain pump with filter;
- drain hose;
- drain hose plug.
Rear elements:
- power cable;
- counterweights;
- tank suspension springs;
- shock absorber;
- engine;
- pulley with drive belt.
The control panel is a board with buttons and indications that turn on the washing mode, change the temperature, spin speed, washing time, and delay start. It is also possible to manually set all these parameters with the “Manual program setting” button. The display shows the current washing status and error codes.
What if the slats are worn out?
If checking the winding shows that it is working properly, proceed to checking the lamellas. If the lamella is so worn that it can be seen even without testing, then you don’t have to think about repairs - take the engine to scrap. But if the delamination in the lamellas is insignificant - fractions of millimeters - then there is a chance to save the motor. The lamellas are turned using a lathe and returned to their original dimensions. Only a professional turner can do this kind of work. It's inexpensive. After grooving, all that remains is to remove the chips and assemble the electric motor.
In 50% of cases, a faulty commutator motor cannot be repaired on your own - you need the help of a specialist or the repair is generally useless. Therefore, task number one is to correctly diagnose the cause, so as not to waste time and money on unnecessary repairs.
Disassembling the washing machine motor may be necessary in different positions, for example, to replace bearings or repair the manifold. In the case under consideration, there was a current leak from the brush holder to the housing.
Identifying broken bearings
It is not difficult to understand that the BoschMaxx 5 needs to replace the bearings. The washing machine will signal every wash about problems with the drum assembly. The very first and most obvious “symptom” is increased vibration of the body, which during spinning develops into a strong hum and “jumping”. At the same time, a roar and clanging sound is heard, reminiscent of metal balls rolling. In neglected situations, rusty liquid will leak out from under the machine. It will also be found on the pulley if you remove the back wall and carry out an inspection.
You can also check the condition of the bearing assembly using a “manual test”.
- We take hold of the edge of the drum.
- We pull the container forward and back, and then left and right.
- We evaluate the movement of the tank: if play is noticeable, the drum is loose, which means the bearings need to be replaced.
You cannot operate the washing machine with broken bearings. With each wash, the drum will become more loose and begin to hit the tank, destroying it and itself. All this will lead to an imbalance, the machine will begin to jump and gradually damage internal parts and mechanisms. The pulley will not be left out, which will make grooves on the outside and finally “break through” the drum cylinder. In this case, Bosch repairs will become several times more expensive.
Final Thoughts
Disassembling Samsung washing machines is a labor-intensive process that requires a responsible approach. The principle of disassembly is practically no different from different manufacturers, since the units themselves are designed approximately the same. Some differences in the procedure are typical only for Samsung washing machines with a vertical loading type. The main thing is to accurately remember the location of each of the parts while installation is underway. Then it will be easier to reassemble in the reverse order, following the manufacturer’s requirements. It is important to assess your own strengths in advance so that disassembly later does not turn out to be overwhelming.
Preparation
Disassembling a washing machine is not difficult if the owner of the device has minimal skills in electrical engineering and plumbing. In Samsung brand models, such as, for example, S821, WF-S861, S803J, WF6458N7W, it is easy to access the main mechanisms.
To disassemble and subsequently repair the washing machine, you need to choose a bright and spacious place where nothing will interfere with the work.
Whatever machine you are going to repair, first it is important to prepare a workplace and tools that will be useful during the disassembly process. Of course, you can get started with a few screwdrivers and wrenches. But if the machine requires a detailed inspection and subsequent repairs, it is better to prepare everything you need at once. So, you may need:
- hammer;
- wire cutters;
- screwdrivers (slotted and figured);
- open-end wrenches;
- heads (socket wrenches);
- pliers;
- hacksaw;
- pliers;
- mites;
- soldering iron
It is important to prepare auxiliary materials in advance - liquid for softening nut fasteners WD-40, silicone sealant and lubricant for hinge elements. It is convenient to have a clean rag on hand to wipe your hands or any remaining liquid from the machine. Experienced craftsmen advise beginners to photograph each stage of disassembling the unit to make it easier to reassemble the device after completion of the repair, therefore, you need to prepare a camera.
The preparation stage may not seem so important, but the result largely depends on the quality of its implementation.
“Half” the tank
Many people are concerned about how to remove the tank from the washing machine. First, you need to move the machine away from the wall in order to have free access to it from all sides and disconnect the equipment from communications. Further algorithm of actions:
- remove the top cover of the case;
- pull out the powder receptacle;
- Unscrew the bolts that hold the control panel;
- remove the “tidy” by disconnecting the wiring from it;
- remove the lower decorative trim panel;
- pull out the clamps holding the drum cuff;
- remove the rubber seal;
- Unscrew the bolts holding the UBL and remove the lock;
- unscrew the bolts securing the front wall of the case and remove the panel;
- remove the back wall;
- remove the drive belt;
- unhook from the tank all elements connected to it: sensors, pipes, wires, parts;
- Having dealt with the shock absorbers, remove the reservoir from the body.
The further progress of work will depend on what type of tank is installed on your automatic machine. If the tank is collapsible, to “halve” it, you only need to unscrew the screws holding the two parts together and release the plastic latches. It’s a completely different matter if the tank is “monolithic”.
There are several options for sawing a plastic tank. It could be:
- hacksaw for metal;
- Bulgarian;
- cut-off saw;
- renovator
First, you need to mark with a marker the boundary along which the cutting will take place. Some craftsmen advise cutting the tank half directly along the factory seam. In this case, the work can be easily done with a regular hacksaw.
Most craftsmen recommend sawing the tank from the top side so that in the future the load on the tank will be less. The “path” for sawing looks like the one shown in the figure.
In this case, it is more convenient to saw the tank using a cutting saw or renovator. Place a suitable attachment on the tool and get to work
It is important to wear safety glasses as hot plastic shavings may fly off the tank during disassembly.
Another advantage of a chop saw is the ability to cut curves. This may be necessary if there is some important structural element on your tank at the cut site that needs to be bypassed. For example, a stiffener.
If you have a renovator at home (a multifunctional tool with various attachments), you can use it to cut the tank. It is more powerful, so it will be easier to “half” the tank. There won't be as many plastic shavings flying around as you work.
To get the drum itself, you need to do some more work. Turn the tank over, place wooden blocks under it on both sides and remove the pulley. Next, apply WD-40 liquid to the place where the “drum wheel” is attached and let the mixture sit for 15-20 minutes. Using a drift and hammer, gently tap down the center so that the drum pops down from the mount. This way you can remove the drum from the tank of the automatic machine. Next, the worn parts are replaced and everything is reassembled in the reverse order. To hold the two parts of the tank together, you need a soldering iron and a hair dryer.
First, with a soldering iron, you need to “grab” the parts of the tank together on four sides so that the upper, sawn-off rim is fixed in place. To do this, one and a half to two centimeters of plastic are heated with a hairdryer, then the soft area is leveled with a soldering iron. This way the “halves” are securely fastened to each other.
Having soldered the entire seam, you can begin assembling the body of the automatic machine. Please note that sawn stiffeners must be restored as best as possible so as not to disrupt the normal operation of the machine. Having returned all the parts to their places, run a test wash and watch how the “home assistant” copes with the task.
Share your opinion - leave a comment