A washing machine is a piece of furniture in a kitchen or bathroom that is rarely moved and therefore disconnected from the water supply. However, there may be times when instructions on how to turn off the machine may be required. For example, the car has broken down and needs to be dismantled and transported to a service center, it has been decided to replace old equipment with new ones, renovations are planned in the room, or even the washing machine needs to be transported to a new place of residence. So, let's figure it out how to properly disconnect the water supply.
How to disconnect a washing machine from the water supply
Stationary placement of the washing machine in the bathroom or kitchen is quite justified. A heavy machine is connected to the network and communications, so you are unlikely to want to just move it.
However, in case of repair, moving, or purchasing a new SMA, you need to properly turn off the washing machine. After reading the article, you will understand how to do this correctly without compromising your equipment.
Sequencing
To disconnect yourself you may need:
- wrench;
- a straight or Phillips screwdriver to loosen the clamps.
Use WD-40 to work on rusted parts. This “liquid wrench” will help you quickly deal with rusty, soured parts.
How to disconnect a washing machine from the water supply? Let's tell you in more detail:
- Make sure the washing machine is not running, then unplug the machine. If the connection was via an extension cord, disconnect that too.
- Turn off the water supply. To do this, turn the shut-off valves all the way. They are usually located behind the MCA and attached to the wall.
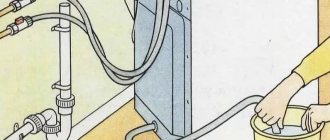
- Open the rear of the washing machine. If you do this yourself, alternately pull one corner and then the other. It’s easier to complete the task with two people, because you can simultaneously apply force and move the car. Make sure that the hoses are not strained and that premature disconnection does not occur.
- Remove the inlet hose. Use a wrench if it is secured with nuts and screwdrivers to remove the clamp in a clockwise direction.
- Place a container below to collect water and disconnect the hose from the MCA. Drain the remaining water, then disconnect the other end of the hose from the valve by turning clockwise.
- Disconnect the wire and hose, attach it to the wall of the automatic washing machine.
- Disconnect the drain hose from the washing machine and the sewer, draining the remaining water into a bucket. Then attach it to the SM wall using a bracket.
- Clean the freed pipes from dirt with a brush. Carefully secure any loose parts with duct tape to prevent them from getting damaged or lost when you transport the washer.
- Take care to secure the drum. It may be damaged during transportation, so use special bolts or pieces of foam for fastening.
- Gather all the parts in one place and pack them.
- Make sure there is no water left in the system. Otherwise, during shaking, water may enter the control unit, which will lead to its malfunction.
It is advisable to allow the washing machine and all its parts to dry before transporting. To do this, open the door hatch and leave the washing machine to stand for a day.
Now you know how to properly disconnect the washing machine from the water supply. Therefore, avoid unnecessary problems when rearranging or transporting.
Some tips
To make the process of dismantling the washing machine as simple and safe as possible, you need to do everything carefully, slowly and consistently. Avoid haste and initiative, and also pay attention to some tips.
- Before disconnecting the machine from communications, secure all fasteners and joints with a marker.
- If you photograph the sequence of actions, you can save time and nerves during reassembly.
- Cracked or worn hoses and cords must be replaced.
- It is difficult to dismantle the washing machine alone, since the machine weighs more than 50 kg and does not have ledges or handles that are easy to move.
- After dismantling, it is recommended to leave the unit with the door and tray open for 1-2 days so that the connections with the hoses have time to dry.
The most important thing is don’t put off preparing for your move until the last minute and don’t be too lazy to study the instructions that come with your washing machine. Each booklet contains detailed instructions for dismantling a specific model, taking into account the features of the machine and its technical characteristics. Then the process will be quick, easy and without flooded neighbors.
Source
Required Tools
You can disconnect the machine from the water supply without using tools at all. It all depends on the method of connecting the washing machine to the water supply, as well as on the type of inlet hose of the machine.
Installation and dismantling of the inlet hose is done by hand if there are plastic nuts and fittings at both ends. Plastic parts are fragile and need to be handled without tools.
This type of hose is more common than others. It is supplied complete with washing equipment. However, it is often changed to another.
Water drain options
If it is not possible to stop the work using the software buttons, and there is no point in starting the spin mode. For example, when a mobile phone or bank card is left in your jacket pocket, you need to act immediately, because further work can damage them. In this case, you need to use the emergency drain function.
Drain pipe
Emergency water drain
In the bottom right corner under the removable panel of the washing machine there is a drain tube. It is protected by a plug. Place a container at an angle into which the water will drain. The plug will need to be removed and the hose lowered into the reservoir.
If there is no tube, the water comes out directly. This must be provided for before you start draining, and stock up on a towel and a spare container. A basin or bucket wouldn't hurt.
Drain hose
The location of the drain hose depends on the design of the washing machine. Most often it is located at the bottom at the back, but in some brands, for example Bosch. This method cannot be used on such machines.
When located below, it must be disconnected from the sewer and the housing. Then place it in a container of sufficient size. When the bulk of the water has gone, you can throw the hose on the floor and collect the remainder with a rag.
I work in the household appliance repair industry. Extensive experience in restoring washing machines and dishwashers.
If there is no blockage, perhaps the easiest way.
Pipe branch
Draining water using a spigot is not the easiest option for the average user. Its blockage is the reason why the water does not drain.
Then the problem is solved by dismantling and cleaning the pipe. After this manipulation, drainage becomes possible. The process is quite complex and requires partial disassembly.
Therefore, it is better to use an alternative option.
Connection between tank and pump
Via pump filter
If the washing machine does not have the “Drain” function, and the “Spin” function cannot be used, you can urgently remove the water manually using the pump filter. It is located below the drum hatch. More details:
- It is necessary to stop the washing machine using the control functionality.
- Turn off the power supply by unplugging the plug from the outlet.
- Take a container with sides, for example a basin, and place it under the filter.
- Slowly unscrew the filter valve.
- Wait until the water drains into the container. If the tank is full, you will have to periodically stop the process to empty the container.
- Open the drum.
Important! After this, the program must be started again.
SMA drain pump filter concentrator
How to turn off the machine yourself?
Disconnecting the machine from the water supply is carried out as follows:
- Disconnect the washing equipment from the power supply. This cannot be done during the washing process.
- Next, turn off the water supply valve to the machine. This tap is usually located either behind the appliance or under the sink.
- Move the washer away from the wall. At this moment, you need to make sure that the tension in the hoses (drain and fill) is not too strong.
- Next, you need to lay rags on the floor and prepare a bucket for water.
- The hose nut should be unscrewed. This is done counterclockwise. Then disconnect the hose itself from the washer. Do not exert great force when working with the tool. Otherwise, the thread may be stripped or the nut may be damaged.
- Next, you need to drain the water from the hose into a bucket.
- In the same way, you need to unscrew the inlet hose from the pipe or tee. At this point, the disconnection of the inlet hose is completed.
It should be noted that complete dismantling of the machine does not end with disconnecting the inlet hose. To transport the washing machine, you must also disconnect the drain hose from the sewer pipe.
Carefully disconnect the drain hose from the sewer pipe and drain the remaining water into a bucket.
Types of ball valves
There are several types of ball cutters. Let's look at the main ones used to perform the process of connecting a washing machine at home.
Option #1 - pass-through
Such a mechanism has outlet holes on both sides, which allows you to shut off the water, dividing the branch into two parts. Devices belonging to this category can be installed on a separate pipe, which extends from a common riser to any piece of plumbing, or used for tapping.
Straight-through ball valves are often used to connect washing units, but they are also suitable for other plumbing devices, for example, they are often used to connect toilet tanks
Option #2 - tee (three-way)
As the name implies, such a device is equipped with three inputs and outputs. One of the holes is directly responsible for shutting off the water flow, the other two serve to combine all water supply outlets into a single system.
A three-way tap is often used to connect dishwashers or washing units to the water supply network. The use of this element allows you to provide autonomous water supply for several devices simultaneously
Such components, which can come in a variety of sizes, shapes and configurations, are typically used for tapping into water pipes, where they are often combined with other fixtures, such as a faucet. This function is not available to a conventional flow-through faucet due to its design.
Option #3 - corner
The design of this element corresponds to the features of the pass-through fitting. Using this tap, you can divide the outlet pipe into two independent branches located at right angles.
This element is most often used when installing toilets, but is also well suited for connecting non-standardly located washing machines.
An angle type ball shut-off valve can be used if it is necessary to connect the unit to a water pipe laid against a wall. In this case, it is extremely difficult to perform a direct retraction
The faucets of all categories include sealing rings, fixing nuts, as well as rotary handles, with the help of which the water is shut off and access to it. The last element is attached to the body of the part with a locking nut.
Shutdown algorithm
Now let's look at what order and what to do when you need to safely disconnect the washing machine from the water supply.
- We disconnect the washing machine from the network when the washing process is completed. This should not be done during washing.
- Turn off the water supply tap to the washing machine. As a rule, it is located behind the washing machine or under the sink if the machine is installed in the kitchen.
- We move the machine away from the wall or pull it out of the kitchen unit so that you can freely go behind the machine. In this case, the inlet and drain hoses should not be too tight.
- We take a bucket under the water and put rags on the floor in case water starts to flow.
- Disconnect the hose from the machine by unscrewing the nut counterclockwise.
When using the tool, do not apply excessive force, otherwise you may damage the nut and strip the threads.
- We tilt the hose into a bucket and drain the remaining water.
- Similarly, unscrew the hose from the tee or pipe. Removal of the inlet hose is complete.
- How to install a washing machine in the kitchen and bathroom
- How to place a washing machine in the bathroom
- Furniture for the washing machine in the bathroom
- How to connect a dishwasher to water supply and sewerage
- How to install a washing machine in the bathroom yourself
- Washing machine in the kitchen under the countertop
Dismantling the entire washing machine does not end with disconnecting the inlet hose. To be able to move the machine to another room or transport it, you must also disconnect the drain hose from the sewer. Of course, if the hose was simply thrown over the side of the bathtub, then practically nothing needs to be done here. But when connecting the drain hose to the sewer, it must be carefully disconnected . The drain hose is removed from the branch sewer pipe. The remaining water is poured into a bucket.
Transportation Tips
In order to transport the washing machine, it needs to be prepared. It is necessary to carefully wind up the power cord and secure it to the back wall with a clamp. If there is no such clamp, then you need to at least tie it. The inlet hose is dried and also secured to clamps on the rear wall of the machine . You can do the same with the drain hose, or you can clean it right away; a description of this work is in the article on Cleaning the hose of a washing machine.
If the hoses cannot be secured to the back cover, they must be wrapped in a rag and placed inside the machine. In addition, do not forget to check if there is any water left in the powder cuvette; wipe the cuvette hole with a dry cloth. You also need to drain the water and clean the drain filter at the same time.
Important! There should be no water left in the machine, because if it gets on the control module, it can burn when turned on.
After this, plugs are placed on the hose holes, and the tank is secured with shipping bolts. The machine itself can be packed in bubble cellophane, and it only needs to be transported vertically.
Thus, dismantling the inlet and drain hoses is quite easy. Even a woman can do this, but why would she do it if there is a strong man nearby? Take care of your equipment and be careful.
Interesting:
- Share your opinion - leave a comment
The final stage of installation
When the water is supplied and the correct drainage has been carried out, make sure that the actions are correct. Connecting the washing machine yourself and providing the conditions for its operation is a labor-intensive task, but doable if all the nuances are followed. One of them is choosing the right position.
To prevent the washing machine from vibrating during washing and spinning, we connect it and install it vertically, adjusting the position of the body using the legs. For this purpose, a construction standard is used.
It is placed on the lid and the height of the legs is measured, with the level bubble located in the center. The measure is laid parallel to the front side, gradually making a shift towards the back wall. The process is repeated with the level positioned on the sides of the body.
Disconnection from water supply
Depending on how the machine is connected to the water supply, you may need certain tools, most often an adjustable wrench, pliers, and screwdrivers of various types. Sometimes you can do without using them. The algorithm of actions when disconnecting the machine from the water supply is as follows:
- Make sure that the washing machine is not currently functioning and is disconnected from the power supply.
- It is necessary to turn off the water supply tap. If there is a connection to both a hot and a cold system, then both taps are closed. Usually they are located behind the washing machine or near the sink if the washing machine is located in the kitchen.
Removing the shipping bolts
Before performing the main work, the transportation bolts are removed - fasteners that ensure the safe movement of washing equipment to its destination. Their main function is to protect the equipment tank from damage during transportation.
In standard models there are only four of them. They are located at the back at an equidistant distance from each other.
To remove the fasteners you will need a wrench for unscrewing 10, 14 mm nuts and pliers. Each bolt has a pin. He comes out first. Afterwards, pliers are used to remove the entire bolt using the tack-and-turn method. These steps will help you quickly remove the shipping bolts. The remaining holes are plugged with plastic plugs.
How to move the washing machine
So, you know how to turn off the washing machine, and you have completed this job quite successfully. The unit is disconnected from the power supply and connecting hoses. Now a few words about how to move a car from place to place:
- Empty the bucket and wipe up any spilled water around the machine.
- Double check that all hoses and cords are disconnected from the machine.
- Once you have access to the water drain pipes, clean them thoroughly with a brush. Now, when the machine is disconnected from the water drain, is the time for this. After this, the holes from the hoses must be closed with plugs.
- Unplug the power cord. If it cannot be removed, then you need to attach it to the car using tape.
- It is advisable to remove and pack separately all the handles of the unit so as not to accidentally lose them during the move.
- The next step is to secure the drum. This will avoid damage and distortion during transportation. The drum is secured using special bolts, a piece of foam rubber, or by fastening the screws located in the rear of the unit.
- Packaging of disconnected spare parts. It is advisable to use special wrapping paper, bubble wrap or a regular towel as packaging material. It is advisable to transport parts inside the car, which will protect them from damage.
Important! If you are not going to move immediately, let the machine dry a little after the hoses have been disconnected - leave it for a day or two with the door open. This can play a decisive role when transporting the device. If water accidentally gets on the control module, the machine may fail when turned on.
Preparing the car for transportation
At the final stage, we go around the washing machine from all sides and check that there are no more connected wires or hoses. It is immediately recommended to take the time to clean the pipes at the place where the drain is disconnected, for which we take a brush and thoroughly clean out all the dirt that has accumulated during operation. We wipe the powder receptacle dry, look at the drain filter and inside the drum. Also don't forget:
- remove the power cord or place it in specially provided grooves, and for reliability, secure it with tape (then you won’t have to worry about accidentally disconnecting or damaging the plug);
- unscrew the handles from the washing machine body;
- close and seal the door and powder receptacle with tape;
- secure the drum by inserting a V-shaped piece of foam into the tank, filling it with laundry, using special bolts or tightening the screws provided on the back wall of the housing.
Important! It is better to study the user manual supplied with the machine and read which method is most suitable for the existing model.
We complete the preparation by wrapping all parts, hoses, handles and cords in rags or paper. It would be a good idea to pack the washing machine in a store-bought polystyrene foam frame and wrap it in cloth or cardboard. All that remains is to transport the machine to the planned location, avoiding tilting, shaking and jumping.
Why disconnect the SMA from the water supply: preparatory work
An automatic washing machine (AWA) is a piece of equipment that is installed for a long time and is rarely moved to another place. But there are still situations when you need to disconnect the washing machine from the communications. For example:
- You have started renovations in the premises.
- You buy new equipment.
- Are you planning to move?
- You will be carrying out repairs or cleaning of the unit.
If you decide to do the work yourself, prepare the necessary tools. They may vary depending on the type of fasteners and the material of the components.
Important! Plastic nuts are unscrewed by hand because they are a fragile material and tools can damage the mount.
For metal connections, prepare:
- pliers;
- wrench;
- slotted and Phillips screwdrivers.
If the fastener is stuck to the base, spray it with WD-40.
So, the tools are prepared, let's move on to the next stage.
How to disconnect a washing machine from the water supply?
A washing machine is a piece of furniture in a kitchen or bathroom that is rarely moved and therefore disconnected from the water supply. However, there may be times when instructions on how to turn off the machine may be required. For example, the car has broken down and needs to be dismantled and transported to a service center, it has been decided to replace old equipment with new ones, renovations are planned in the room, or even the washing machine needs to be transported to a new place of residence. So, let's figure it out how to properly disconnect the water supply.