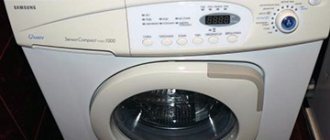
The material in the previous article talks about the consequences that can arise as a result of cleaning construction dust and debris with a regular household vacuum cleaner, even from such a brand as Samsung.
We recommend that you read it carefully. The consequences of such errors can be eliminated without disassembling the engine, when it remains intact.
However, it is likely that it has defects that require disassembly. Therefore, we continue to tell you how to repair a vacuum cleaner motor with your own hands and unscrew the armature fastening nut in three ways with a detailed explanation of them with diagrams, photographs and a video.
Based on local conditions, you can use any of them to perform routine repairs.
Vacuum cleaner motor design
General layout
This issue is discussed in more detail in the article on the commutator motor.
Here we should focus on the fact that inside a housing with a stator winding, a rotor rotates, mounted on a shaft axis with two bearings.
It contains:
- magnetic core;
- winding connected to the collector assembly with plates.
Electrical contact for the passage of current through the armature winding is created by brushes pressed against the plates by the force of a compressed spring.
The fan impeller always rotates in one direction. Therefore, to secure it, a threaded nut is used, screwed in the direction opposite to rotation. When the vacuum cleaner is operating, it is additionally fixed by inertia forces, but cannot be unscrewed.
The same principle is used in bicycle pedals: they use two types of threads in different directions: right and left winding for their side.
Disassembly sequence
To repair the electric motor of a vacuum cleaner, you must first:
- remove the brushes from the body;
- unscrew the fixing nut with the left-hand thread so as not to damage the windings on the stator and rotor and preserve the design of the commutator mechanism, leaving it in good condition;
- remove the armature and assess the condition of the bearings, conductors and windings.
I had to perform all these steps to disassemble the electric motor of a Samsung vacuum cleaner. I show them with photographs.
How to check the functionality of a node?
It is not difficult to check the motor removed from the vacuum cleaner body. First, connect the two-core cable to the terminals on the motor housing.
The cable is inserted into the socket. Sparks from a running motor are a sign that it is time to change the graphite brushes. If the engine does not start, then the cause of the malfunction must be sought in a broken winding.
To diagnose the rotor you will need a tester.
Algorithm of actions:
- We set the multimeter to the “Resistance” mode, measure the readings between the armature slats (we apply the probes to two adjacent plates).
The readings on each pair must match. If the resistance readings exceed the norm (up to 40 m) several times, a break has occurred. - We apply the probes to the armature body and lamellas. The infinity indicator means everything is in order, otherwise the engine requires immediate replacement.
It is strictly prohibited to connect a device with breakdowns to the engine housing to the electrical network. Life threatening!
Removing the brushes
Place a screwdriver on the fastening screw one by one and turn it out.
We carefully remove the brush by hand and inspect it.
Traces of soot with the formation of layers of graphite dust are visible to the naked eye.
The same picture is observed on the second brush. Traces of sparking are clearly visible on the end surface.
This allows us to conclude that an external inspection of the commutator and an electrical check of the condition of the rotor and stator windings are necessary.
This cannot be done through a closed engine casing: it requires disassembly and removal of the armature.
Trouble-shooting
Sometimes it happens that a vacuum cleaner suddenly stops performing its main function. Everything seems to work, but dust is not sucked in. In this case, first of all, you need to remove and inspect the filters. If the filters are clogged with dust, they need to be cleaned. If cleaning does not work, the filters need to be replaced. Before replacing, you need to turn on the vacuum cleaner without filters and make sure that the suction power is at the proper level. If it is still small, you will have to inspect the impeller. It may happen that it is completely clogged with small debris.
At the same time, check the condition of the brushes and commutator of the engine. Worn brushes need to be replaced and the commutator cleaned. The tightness of the hoses may also be compromised, especially in the places where they are attached to the nozzles.
You need to pay attention to this too
The next common problem is that the vacuum cleaner does not turn on. There are three main reasons for this:
- fuse blown;
- break in the network cable;
- There is a fault in the switch.
The fuse has already been mentioned, but to check other faults you will need an ordinary tester. With its help, you can easily ring the wires and locate the break point. Then a soldering iron is connected to the case and the problem is eliminated.
This happens when the vacuum cleaner is used for a long time. No repairs are required here. After cooling, the operation of the vacuum cleaner will be restored automatically.
If during operation the vacuum cleaner vibrates or you hear squealing or grinding noises, this means that there is a problem with the bearings. They need to be lubricated, and it is best to replace them immediately. The presence of sharp sounds in the bearing assembly indicates that its service life has expired.
And the last trouble is that the power wire is not tightened. Repair in this case is also not very difficult. Here the problem may most likely be in the spring. You need to get to the winding drum and inspect it. The spring may be weakened or, conversely, tightened. If everything is fine here, then you will have to remove the drum and unwind the wire from it (or vice versa, rewind it). This will adjust the tension force of the drum.
During inspection, it is necessary to check the functionality of the pressure roller. Vacuum cleaners of any brand are not immune to such a malfunction when the engine speed is no longer regulated. In this case, the problem must be looked for in the electronic control unit. It is simply not recommended to repair it yourself.
The process of disassembling and repairing a Samsung vacuum cleaner is not very difficult. It can be done independently with minimal knowledge of electrical engineering and the ability to handle plumbing tools.
Further disassembly
Removing the top engine mount cover
It is simply put on top and crimped around the perimeter in four places.
Dents created at the factory can be carefully smoothed out using pliers.
Then the cover is simply pulled back by hand and removed from the engine housing.
Air pump wheel
There is a fan under the cover. It shows slight damage to the plastic part of the case.
Inside the cover, the layers of dust remaining after purging the engine are clearly visible. They can also be seen in the photo of the fan near the inlet blades.
It stuck to the washer and under it.
Unscrew the mounting screws with a screwdriver.
Dismantling the anchor
Fastening is carried out:
- screws through the upper tab with a compartment for the upper bearing race;
- projections with grooves in the cover;
- lower bearing race.
Screws securing the rotor to the motor stator
We gain access to them immediately after removing the plastic fan housing.
Let's unwind them. At the same time, we pay attention to the amount of construction dust inside the housing that remains even after it has been blown out from the outside.
Protrusions of the mounting plate that fit into the grooves of the stator housing
They are located next to the mounting screws and provide additional fastening to the rotor.
Using a flat screwdriver, carefully guide them toward the exit from the grooves.
Then we hold the mounting plate with our fingers through the internal holes or hang it on a support. The rotor is still held in place by attaching the outer race of the lower bearing. By the way, it turned out to be additionally glued.
The protruding end of the threaded shaft axis must be protected from damage with a piece of dry hardwood board and struck with a hammer. The rotor will be knocked out of the stator.
Visual inspection
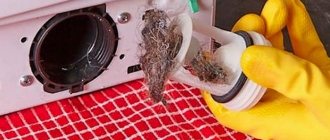
On the rotor, traces of carbon deposits from graphite dust formed as a result of burning brushes and glue on the bearing race are clearly visible.
I tried to remove contamination from the plates in the traditional, careful way: wash with alcohol or its solution using a cotton swab.
The carbon deposits stuck quite strongly to the metal and dissolved very poorly. I had to work with steel bluen. The photo below shows the preliminary result of cleaning, which requires additional polishing of the surfaces.
But, for carrying out electrical measurements this is quite enough. Then comes the cleaning of the grooves between the collector plates from debris, dust and carbon deposits that can bypass the rotor winding chains. At first he worked as a bluer, and then as a scraper made of non-coniferous wood.
Possible difficulties
Difficulties you may encounter when doing your own repairs:
- When removing the brushes, you need to mark which side each of them was on. During engine operation, they wear down in different ways, so they need to be returned to their original place. Otherwise, after a few weeks the vacuum cleaner will have to be disassembled again, but to replace the brushes.
- Lost bolts. It is better to put them in a separate box. In order not to confuse the places of their attachment, the containers are labeled.
- The broken ring gets stuck in the seat. You can get it out with a screwdriver. Then you need to inspect the internal structure of the vacuum cleaner for the presence of spilled balls.
- Damage to the threads on the shaft. To prevent this from happening, it is recommended to remove the bearing using thread pullers.
How often to clean?
To prevent the filter in the vacuum cleaner from becoming a breeding ground for bacteria and fungi, it must be cleaned promptly. The dust collector (bag, container) is cleaned as it fills with debris (the indicator on the body of the vacuum cleaner will tell you when exactly it needs to be cleaned).
Disposable paper bags are disposed of after each cleaning (the maximum period of use of a paper dust bag can be extended to two or three cleanings).
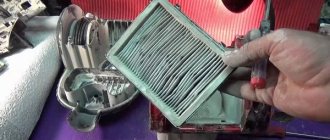
The aqua filter and cyclone type filter are cleaned after each cleaning, regardless of the degree of contamination or filling with debris. The HEPA filter is cleaned as it gets dirty, but at least once every three months.
The foam filter element is cleaned after every tenth cleaning. Wear of the top layer and strong heating of the vacuum cleaner body during cleaning is a signal that the filter needs to be changed urgently.
Dry and wet cleaning of “internals” from dust
Often the cause of a suspicious hum of a vacuum cleaner and an unpleasant odor is the accumulation of dust inside it. It is better to remove dust using “dry” methods so as not to damage the fragile electronic filling and not to disrupt the function of the conductive paths on the board. A small soft brush is suitable for cleaning. You can also use a room fan. If dust and dirt cannot be removed “dry”, after moisture has entered, all parts must be dried as quickly as possible. Plastic elements can be washed under running water. They should be put back together only after they are completely dry.
The drum and cable are easy to dry clean, as is the plastic motor housing. If the casing cannot be cleaned without using water, make sure that it does not touch the electrical circuit. You can use another vacuum cleaner with a suitable attachment as a dry cleaning tool. This is exactly how dust is removed from motor collector plates and windings. Strong air pressure cleans the board and its small parts well – even with heavy dirt.
How to clean the filter element in a Samsung device?
To ensure the highest quality cleaning, modern Samsung vacuum cleaners are equipped with a multi-stage filter system consisting of:
- bag (container) for collecting garbage,
- coarse and fine filters.
In order for a household appliance to operate without interruption, each filter must be cleaned promptly and correctly.
Cyclone (with dust container)
A cylindrical plastic container with a lid and handle, into which dust and debris from the air settles under the influence of centrifugal force, is called a cyclone filter (in Samsung vacuum cleaners, it is fixed on the side of the body).
Cleaning the flask is very simple:
- Disconnect the device from the electrical network.
- Pull the container out of the vacuum cleaner body by the handle.
- Open the container, shake out the debris and dust.
- Using a soft sponge and soap solution, clean the walls of the container from dirt and rinse it under running water.
- After waiting for the container to dry completely, cover it with a lid and place it in its original place.
If water gets into the cyclone filter during cleaning, the household appliance must be turned off immediately, the container removed and cleaned. Otherwise, dust and debris, mixed with water, will be compressed and clog the filter element, which significantly reduces the suction power of the vacuum cleaner.
The process of cleaning the filter is in the video:
Aquafilter
The air filtration system using water (aquafilter) is a container partially (1/3) filled with water inserted into the body of the vacuum cleaner. Passing through the aquafilter, dust from the air is moistened and settles at the bottom of the container.
To clean the aqua filter, you need to:
- remove the container from the body of the household appliance;
- open the container;
- pour out dirty water;
- Rinse the container under running water.
The water filter is cleaned after each cleaning. Otherwise, you will have to make a lot of effort to get rid of the musty smell of stagnant dirty water.
NERA
The HEPA fine air filter traps the smallest (up to 0.6 microns) dust particles. You can find the HEPA filter on the back panel of the vacuum cleaner behind a special grille (it looks like a dense accordion made of fibrous or polymer materials, placed in a plastic frame).
To clean the HEPA filter, you need to carry out a series of sequential steps:
- disconnect the vacuum cleaner from the electrical network;
- open the grille hiding the filter element;
- remove the filter accordion from the plastic housing;
- Gently clean the filter with a soft brush, then rinse under running water.
After cleaning, the filter accordion must be thoroughly dried. Only after drying is it placed back into the plastic case and then into the vacuum cleaner.
Foam rubber
A fine filter made of foam rubber is installed in front of the motor of a Samsung vacuum cleaner. Caring for the foam filter element is very simple:
- Disconnect the household appliance from the electrical network.
- Open the lid of the vacuum cleaner, take out the garbage collection bag (in some models, a plastic container is installed instead of a bag).
- Under the dust collector there is a plastic frame with a handle, into which a foam filter element is inserted.
- Remove the filter, moisten it with water, soap it with laundry soap, and rinse under running water.
- The well-dried part is returned to its original place.
To prevent the foam from tearing and retain its shape, it should not be squeezed, stretched or twisted after washing. The foam must be carefully laid out on a flat surface and allowed to dry naturally.
Carbonic
Samsung premium vacuum cleaners are equipped with a special carbon filter. This plastic form, filled with pressed carbon granules, traps not only dust particles, but also unpleasant odors (interestingly, the filter continues to work even when the vacuum cleaner is turned off).
Even though the carbon filter is quite expensive, it can only be used once. The maximum that can slightly extend its service life is cleaning small dust particles from the outside of the case with a soft brush.
The principle of repairing a household appliance
In order to repair a Samsung vacuum cleaner yourself, you should read the instructions for its operation.
First you need to unplug the power cord from the outlet, pay attention to external signs to determine the location and nature of the breakdown.
In a modern vacuum cleaner, the motor is fully cooled with purified air. On the body, the detachable parts are connected using screw clamps with six self-tapping screws, two of which hold the front part of the fastening cover, and four are located on the opposite side. The handle is secured from the bottom with two self-tapping screws, and the end is held in place by the same number. The electronic motor control board is covered with the top cover of the housing and secured with four plastic locks with latches (grooves with protrusions).
The repair method for a Samsung vacuum cleaner is simple and easy to understand. You should first prepare the necessary tools:
- Several different screwdrivers, pliers.
- Different heads with an awl.
- A small hammer, a soldering iron with a clean rag.
- A supply of WD-40 fluid, EP-2 or Litola-24 lubricant.
- A tester that is necessary to perform continuity testing of electrical circuits.
- Camera.
Required Tools
The set of tools needed will depend on the type and model of Samsung vacuum cleaner. When disassembling and repairing, preventing or cleaning the device, as well as its individual elements, you cannot do without the following devices:
- Phillips and slotted screwdrivers - their sizes are selected in accordance with the type and depth of the screws;
- pliers;
- a stationery knife, or better yet a professional construction knife;
- lubricant;
- electrical insulating tape;
- electrical tester.
The type of work performed will largely influence the choice of tools. For example, to clean the surface of a suction hose before gluing cracks, you will need sandpaper and a degreaser (acetone, solvent). It is convenient to remove dirt on the shaft of the vacuum cleaner brushes with scissors, but to remove blockages you will have to use a long, stiff wire. For gluing cracks or chips on the body, universal super glue is suitable, but for moving parts, such as a hose, a more elastic adhesive material is needed.
Minor faults and their elimination
If the vacuum cleaner begins to act strangely - to perform its functions incorrectly, to make loud noise, to vibrate - it needs help.
Most often, the cause of the malfunction is the cleaning process itself: the dust bag is completely filled or one of the filters is clogged with debris.
In fact, partial disassembly of the vacuum cleaner is a stage of regular maintenance, especially for models with a multi-stage filtration system
Some vacuum cleaners are easy to disassemble, while others require certain knowledge. To avoid mistakes, we recommend that you often look at the instructions, which are equipped with diagrams and tips.
Usually you can solve the problem on your own. But if you are not good at repairing equipment, it is better to take the device to a service center, to specialists.
Problem #1 - suction power has dropped sharply
If you notice that dust is poorly absorbed, and small debris remains completely untouched on the floor, you will have to find out the reason through partial disassembly. First you need to make sure that everything is in order with the pipe, hose and brush.
Procedure:
- disconnect the hose from the vacuum cleaner;
- separate the pipe from the hose;
- remove the nozzle;
- carefully inspect each part;
- try to blow out the pipe and hose.
If a large object (a plastic bag, a sock, a sheet of paper) gets into one of the elements, you need to carefully remove it, then reassemble it in the reverse order and try to start the device.
Often the cause of weak traction is hair wound around the brush or pieces of large debris stuck in the curved outlet of the nozzle. If the cause cannot be eliminated without disassembly, you will have to unscrew the fasteners and separate the external elements
Sometimes the traction weakens simply because you accidentally touched the power regulator and set it to minimum. Be sure to check it before any disassembly.
Problem #2 - the vacuum cleaner filters are clogged
Unusual sound, weak traction, stoppage of operation - the consequences of clogged filters. For devices with a fill indicator, this can also be determined by the red light coming on. Modern devices provide everything to ensure that filters can be accessed quickly and easily.
Usually there are two main elements that need to be cleaned - a plastic cyclone filter (a transparent reservoir with compartments) and a sponge enclosed in a plastic container. But sometimes it is necessary to replace the HEPA filter, and for washing units - additional engine protection.
Photo tips for disassembly, cleaning and replacement:
Image gallery Photo from To shake out dust from the tank and remove hair wrapped around the cyclone filter, you need to press the button, disconnect the hopper from the body and remove the cover
To get to the fine filter, you need to remove the cover located at the back of the device
If the filter is clean, then the reason is not in it - we install it in place. It is better to replace a dirty part with a new one, although some try to wash it
The finest dust remains in the sponge filter. It is usually inserted into the reservoir lid and enclosed in a small plastic container. The sponge washes well with soapy water
Container with cyclone filter
Plastic grille to protect the HEPA filter
New HEPA filter for Samsung
Sponge filter in container
As you can see, disassembling a Samsung vacuum cleaner to clean the filters is simple and quick. The elements are washed in warm water with a non-aggressive detergent. Then they need to be dried and reassembled.
Problem #3 - the device does not turn on
The standard test when the device is not working is to plug it into the network. Make sure the power cord is plugged into the outlet and the power control button is set to the correct setting.
Typically, Samsung brand devices are equipped with LED indicators. When working properly, they light up green, when the dust bin is full, they light up red.
If the indication does not work and the vacuum cleaner does not make noise, most likely the motor will have to be repaired or replaced. But problems with the board are also possible, so disassembling the case is necessary in any case.
Preventive measures
It is better not to treat the problem, but to prevent it. This applies to everything and vacuum cleaners too. How does she look? Basic care: replace or empty the dust bag on time.
Each technique has its own weaknesses.
An important detail is the brush. Cleaning its lint should also not be a waste of time. If the vacuum cleaner is intended for dry cleaning, do not suck in water and other liquids, they will accumulate inside. This leads to breakdown.
Clean your vacuum cleaner more often to increase its shelf life.
Keep the warranty receipt after purchasing the vacuum cleaner, if you have one. Most types of breakdowns can be repaired by specialists. If it is missing or there is another type of breakdown, do not be afraid to use videos from the Internet, where craftsmen will tell you how to repair a broken Samsung vacuum cleaner with your own hands.
Weak "pull"
As we have already found out, if the vacuum cleaner does not suck in dust well, then you will most likely have to repair the vacuum cleaner hose (you have a Samsung or a product of a different brand - it doesn’t matter). First of all, make sure that nothing is stuck in it - foreign objects caught in the hose greatly reduce traction
Simply put, look into the hose and remove the clog.
If you are sure that the hose is not clogged, carefully inspect it and check the integrity of the corrugation. Very often, housewives are too lazy to bend down to move the unit from place to place, and they simply drag it around the room “by the tail.” This causes gaps to appear between the turns of the corrugation, resulting in reduced traction. If you find a gap, take electrical tape and wrap the gap tightly in several layers. Such repairs, of course, will not be enough for a long time, and over time the hose will still have to be replaced, but it will still serve you for some time.
If everything is fine with the hose, check all the filters and the garbage bag - they may be very dirty. Clean the filters thoroughly and replace the bag with a new one. Also, do not forget to check the position of the power regulator - it may be out of order. Return it to the desired position.
Required Tools
The set of tools needed will depend on the type and model of Samsung vacuum cleaner. When disassembling and repairing, preventing or cleaning the device, as well as its individual elements, you cannot do without the following devices:
- Phillips and slotted screwdrivers - their sizes are selected in accordance with the type and depth of the screws;
- pliers;
- a stationery knife, or better yet a professional construction knife;
- lubricant;
- electrical insulating tape;
- electrical tester.
The type of work performed will largely influence the choice of tools. For example, to clean the surface of a suction hose before gluing cracks, you will need sandpaper and a degreaser (acetone, solvent). It is convenient to remove dirt on the shaft of the vacuum cleaner brushes with scissors, but to remove blockages you will have to use a long, stiff wire. For gluing cracks or chips on the body, universal super glue is suitable, but for moving parts, such as a hose, a more elastic adhesive material is needed.