If you have basic knowledge of electrical engineering and confidence in your abilities, you can fix a broken vacuum cleaner yourself. Most units have the same design. Only the technical specifications and design differ. Now we will talk about how to disassemble a Samsung vacuum cleaner, replace a broken motor yourself, or try to restore it.
Frequent malfunctions of Samsung vacuum cleaners
Vacuum cleaners from Korean and Chinese manufacturers have proven themselves to be reliable household electrical appliances. The cause of the malfunction after many years of operation may be hidden in the electrical part of the unit. Most often, with Samsung, the breakdown is hidden in the following nodes:
- jamming or breaking of bearings;
- erasing electric motor brushes;
- failure of the electronic unit;
- engine combustion.
Sometimes the cause of a breakdown may be a simply blown fuse on the electronic board. The part is easy to change, but this already serves as a signal of a possible more serious malfunction.
The reason for frequent shutdown of a running unit is the operation of the engine overheat protection. A simple problem lies in a clogged garbage container. The motor heats up due to overload and the protection turns it off.
The problem with the fuse and a dirty reservoir is easy to solve. In all other cases, the home assistant will have to be disassembled.
Equipment with air-water filter
A vacuum cleaner equipped with an aqua filter operates according to a single-stage filtration scheme, although it is a two-stage one. It has a container and HEPA that can be washed (reinstalled only after drying).
The air entering the dust collector, with its powerful flow, turns the liquid into a foggy cloud that instantly absorbs all the debris. In the area of the dust collector visor in front, a vortex storm allows dust to settle down to the very bottom, and residual microdust particles penetrate through a fog filter, which also works like a HEPA. Clean, dry air cools the motor and is pushed out.
Disassembling the case
The difficulty of disassembling the case lies in the presence of hidden bolts. The manufacturer hides them under buttons, covers and other parts. Repair work begins with preparing the tool. You will definitely need a set of straight and shaped screwdrivers.
Moreover, now we often see screws not for a Phillips screwdriver, but for a triangular or asterisk one. To test the wires, fuse, and switch contacts, you need a multimeter. It is advisable to have tweezers on hand for grasping small screws.
If you plan to disassemble the electric motor, you will need a bearing puller, a hammer, and a set of wrenches of sizes from 8 to 17 mm. Materials needed include Litol lubricant, WD-40 rust-corroding liquid, new bearings and brushes.
Disassembling the case begins by unscrewing all visible screws. Samsung usually doesn't hide them. The approximate location of the screws is shown in red circles in the photo, but each model may vary. If the top cover of the case cannot be removed, it means that there is still a hidden fastener somewhere. Moreover, these may not be screws, but latches on the case.
After disconnecting the top cover from the bottom of the case, do not rush to remove it abruptly. There may be wires coming from the electronic unit. To avoid breaking them, the chips are disconnected on the board. Now you can carefully remove the cover. The review includes an electric motor with wires, as well as other electrical parts located inside the lower half of the housing.
The top cover with screws is set aside so that nothing gets lost.
Required Tools
The set of tools needed will depend on the type and model of Samsung vacuum cleaner. When disassembling and repairing, preventing or cleaning the device, as well as its individual elements, you cannot do without the following devices:
- Phillips and slotted screwdrivers - their sizes are selected in accordance with the type and depth of the screws;
- pliers;
- a stationery knife, or better yet a professional construction knife;
- lubricant;
- electrical insulating tape;
- electrical tester.
The type of work performed will largely influence the choice of tools. For example, to clean the surface of a suction hose before gluing cracks, you will need sandpaper and a degreaser (acetone, solvent). It is convenient to remove dirt on the shaft of the vacuum cleaner brushes with scissors, but to remove blockages you will have to use a long, stiff wire. For gluing cracks or chips on the body, universal super glue is suitable, but for moving parts, such as a hose, a more elastic adhesive material is needed.
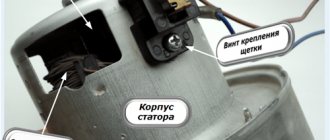
Replacing the electric motor
If the engine is completely out of order or it is impossible to repair it yourself, it is cheaper to buy a new engine. Electric motors from other companies are often suitable for Samsung vacuum cleaners, so there will be no problems with the purchase. The motor is usually easy to remove. If the engine does not immediately yield to being removed by hand, they look for the reason. Perhaps the manufacturer has provided additional fixation, but first things first.
After removing the top cover of some Samsung models, the motor is not immediately visible. An electronic board can be seen, screwed to a plastic box.
There is no need to unscrew the electronic unit. On the board, disconnect the chips with wires going to the engine. On the top cover of the plastic box there are four screws for a Phillips screwdriver. You need to unscrew them and remove the casing along with the board.
Under the box lid there is an electric motor enclosed in another casing. The cover is secured with four screws. After unscrewing them, you can remove the motor itself.
From using the vacuum cleaner for a long time, the impeller and the back of the motor will become clogged with dust. If, during the inspection, lying balls and pieces of the bearing cage are identified, then we can confidently speak about the rotor being jammed and the possibility of its combustion.
Finding a new anchor is difficult. If you also take into account the cost of new bearings and brushes, then it is cheaper to buy a motor that is suitable for mounting and technical parameters.
When choosing a new electric motor, take the old model as a sample. If there is a slight difference in the fastening, new holes can be drilled. The main thing is that the parameters agree and the motor fits into the vacuum cleaner body.
Assembly is carried out in reverse order. Do not forget to install a sensor on the engine to protect against overheating. During assembly, check the tight fit of all covers. If air is sucked in, the performance of the vacuum cleaner will decrease.
Video
We invite you to watch a video on how to disassemble a Samsung washing machine at home.
She graduated from the Institute of Tourism of the Federal Pedagogical University with a degree in Management, loves to travel and communicate with people. She is interested in psychology, enjoys dancing, and studies English. During the five years of maternity leave, I thoroughly mastered housekeeping, not forgetting about my own development. He skillfully uses words and can support a conversation on any topic thanks to his interest in different areas of life.
Found a mistake? Select it and click the buttons:
History knows the fact that a kitten fell into the drum of a washing machine and, after going through a full wash cycle on the “Wool” program, got out of the unit unharmed. The only trouble for the pet was an allergy to washing powder.
For washing small items on the road or in a hotel, it is convenient to use a regular plastic bag. Socks or tights are kneaded inside a tied bag along with water and a small amount of detergent. This method allows you to pre-soak things and wash them without damaging the fabric or wasting a lot of powder and water.
Washing machines have something to do with the origin of the expression “money laundering.” In the 1930s, American gangsters used a network of laundries as a cover for their illegal activities. By passing off the proceeds of crime as proceeds from cleaning clothes, they turned “dirty” money into “clean” money.
Astronauts, while in Earth orbit, solve the problem of dirty things using an original method. Clothes are dropped from the spacecraft and burn up in the upper atmosphere.
The expression “soap opera” (“soap”) did not arise by chance. The very first series and shows that had a female audience were broadcast on television at a time when housewives did cleaning, ironing and laundry. In addition, to attract female viewers to the screens, commercials for detergents: soaps and powders were often played on air.
There are a variety of balls that are used in the washing machine. Antistatic ones will prevent the fabric from sticking to the body after washing, balls with special loops will “comb” the lint and prevent the appearance of pills, and silicone ones with pimples will prevent fluff from matting when washing outerwear.
There is a washing machine “for bachelors”. Linen washed in such a unit does not need to be ironed at all! The thing is that the device does not have a drum: some things can be placed inside the container directly on hangers (for example, jackets and shirts), and smaller things (for example, underwear and socks) can be placed on special shelves.
In the 19th century, washing ladies' toilets took a lot of time. The dresses were first ripped open, and then each part was washed and dried separately so that the fabric did not become deformed. After washing, the clothes were sewn again.
The first officially patented washing machine was made of wood and was a box with a frame, half filled with wooden balls. Laundry for washing and detergent were loaded inside and the frame was moved using a lever, which, in turn, made the balls move and grind the laundry.
Electric motor repair
If you decide to restore the old electric motor, lubricate or change the bearings, perform a complete disassembly.
First, unscrew the screws with a screwdriver and remove the impeller casing. Use a socket wrench to unscrew the nut. In most engines it has a left-hand thread. The impeller is pryed from opposite sides with two screwdrivers, trying to remove it from the anchor.
Unscrew the tightening screws on the body and remove the brushes. The motor will split into two parts: one will contain a stator with a copper winding, and the other half will come out with an armature and bearings.
All parts are carefully wiped off dust with a dry cloth or brush. Use a puller to remove the bearings and install new ones. If necessary, lubricants are pushed into the seat with the balls and separator. Assembly occurs in the reverse order of installing new brushes.
Lastly about electronics
It must be said that the electrical circuits of vacuum cleaners, except for the most expensive ones with microprocessors, are not particularly complex. The electrical circuit diagram of the vacuum cleaner, which can be considered close to typical, is shown in Fig. below. The network voltage in this case is 110 V. For a voltage of 220 V, the resistance of R1 is increased to 150 Ohms and its power to 2 W. R5 takes 330 kOhm, VR1 and VR2 each take 470-510 kOhm, R3 – 24 kOhm 2 W. The operating voltage of all capacitors is 630 V.
Electrical circuit diagram of a vacuum cleaner with power control
R3 sets the maximum power of the vacuum cleaner; it can be changed within 12-47 kOhm. VR1 is the operational power control, and VR2 is set to its minimum value, and here you need to be careful. The fact is that if the motor armature stops, every half-cycle of the mains voltage a starting current equal to 3-5 working currents will flow through it, and an expensive powerful triac (TRIAC according to the circuit) will burn out
Therefore, when setting up the circuit, the VR2 engine is first set to minimum resistance, then a voltage of 175 V is given from the LATR and VR2 very carefully, without overshoot, reduces the motor speed to 700-800 rpm
Thermal protection in such a circuit is also easy: a 1-1.5 MΩ thermistor (for a 220 V mains voltage) with an inverse logarithmic temperature characteristic is connected in parallel to C3. Physically, the thermistor must be in thermal contact with the motor housing, but be electrically isolated from it. A “cold” thermistor (at room temperature) does not affect the operation of the circuit, but when heated to 70-80 degrees, its resistance will drop to 1-0.5 R3, C3 will charge more slowly during the half-cycle, the low-power DIAC triac will open and open the TRIAC later , and the engine power will decrease by half or four. In approximately the same way, it is possible to modify most vacuum cleaners with power control, but without automatic protection.
***
2012-2020 Question-Remont.ru
cope itemtype=”https://schema.org/Article” data-nonce=”a60280afaf”>
cope itemtype=”https://schema.org/Organization”>
Troubleshooting other problems
If the working vacuum cleaner has weakened suction power, the cause of the malfunction is clogged filters. Moreover, cleaning the dust bag or container, as well as the foam plate behind it, will not be enough. You need to remove the filter on the exhaust of the vacuum cleaner. It is usually made of paper or artificial fiber. The filter is carefully cleaned with a dry brush. They are trying to blow it off or shake it off.
When the problem is not solved, disassemble the vacuum cleaner, remove the motor and clean the impeller. If the blades are clogged with dust, then the suction has weakened for this reason.
The vacuum cleaner does not work well due to wear on the brushes and contamination of the armature commutator. After complete disassembly of the electric motor, the conductive copper plates are cleaned with zero-grade sandpaper. New brushes are installed and the screw contacts are retightened.
The reason the vacuum cleaner does not work may be a faulty power cable or power button. The elements can be easily measured with any cheap multimeter. If testing does not give positive results, the problem is in the electronic unit. They just change it.
Problems with the electronic unit result in the inability to use the wheel to adjust the engine speed, which affects the suction force.
When the vacuum cleaner stops winding the power cable, you need to get to the drum. A common cause of failure is spring stretching. Sometimes it bursts. In the first case, the tension force is restored to the spring by unwinding or winding the wire. In the second case, they buy a new drum.
Disassembling a Samsung vacuum cleaner is scary only for the first time. After the first repair, subsequent disassemblies will occur faster.
5 best cordless vacuum cleaners
5 Best Canister Vacuum Cleaners
5 best BORK vacuum cleaners
6 Best Polaris Vacuum Cleaners
How a washing vacuum cleaner works: additional functions
How a vacuum cleaner works: functions of a household appliance
How a robot vacuum cleaner works: device and additional features
How to make a vacuum cleaner from a bottle with your own hands: step-by-step assembly instructions
The vacuum cleaner does not suck up dust well: how to find the problem and repair it
Prevention
Prevention of washing machine malfunctions includes proper use of the device and preventive filter checks. External ones are very important - the air entering the mechanism passes through them, and most of the contaminants accumulate on the filters and protective grille. When the grille and filter system become too dirty, dust and particulate matter can flow directly into the engine, becoming trapped and damaging components. Regular inspection and replacement of dirty filters will significantly extend the life of your device.
How is the problem solved, and is it possible to prevent it?
Why doesn't the vacuum cleaner work? Let's look at some trivial reasons that any user can deal with. Automation failure can occur for the following reasons:
- Filling the dust container. This will be indicated by the presence of a dusty smell.
- Ingress of large debris. Large sizes of dirt stuck in the air duct interfere with the flow of air sucked by the vacuum cleaner.
- Debris stuck in the hose. Evidence of this is a change in sound when the device is turned on.
- Pre-engine filter is dirty. During this process, an unpleasant burnt smell appears.
Let's consider the possibilities of repairing a faulty Samsung vacuum cleaner, and what to do when the vacuum cleaner does not turn on. You can fix the above problems yourself, but it’s still better to avoid them in the first place. To do this, you will need to disconnect the equipment from the power source, then disassemble the device and clean the debris accumulated inside.
To access the dust container, remove the top cover. Some dust containers can be cleaned, or you can replace them with new ones. It is also advisable to wash the dust collector and dry it. In order not to spill dirt and dust, you should close the existing valve for a tight seal. When installing the dust collector back into place, make sure that the neck fits snugly against the bag holder. If this does not happen, then dirt and dust will seep into the structure, which will lead to overheating of the motor and accumulation of dirt on the components.
Filters require additional care. Be sure to read the instructions and find out how many filters are installed in your particular vacuum cleaner model. All filters installed in the structure should be checked. Some types of filters can be washed with running water to clean them. But before installing it in the structure, you should definitely dry it. Starting a vacuum cleaner with a wet filter will cause damage. Periodic replacement is carried out according to the manufacturer's recommendation. When the filter has served its useful life, it is replaced with a new one. The filter life is indicated in the operating book.
All replacement consumables, filters, brushes and other accessories can be purchased at a specialized store.
To remove blockages in the nozzle, unscrew the corrugated accessory from the body, inspect its integrity, remove the accumulated dirt and screw it back. Dirt stuck in the bellows prevents air flow.
But still, if the vacuum cleaner does not turn on, what should you do? If the repair of the breakdown is serious, it is better to contact specialized technicians who can solve this problem.
But it is worth remembering that the main possible breakdowns occur due to engine overheating. You should adhere to the following rules:
- To prevent overheating, use the vacuum cleaner for no more than 30 minutes when cleaning. At maximum mode, use the device for no more than 10-15 minutes. Longer operation may lead to overheating; to do this, allow the device to rest and cool down.
- Make sure the dust bin is full to remove accumulated dirt and dust. An excess of dirt and dust will not allow air flow to pass through, which will lead to overheating of the electric motor. Also, an excess of dust in the dust collector will lead to clogging of the structure inside the device.
- Clean the pre-motor protection filter in a timely manner. Excessive contamination can lead to the formation of an unpleasant burnt odor.
- Avoid sucking large objects that may block the blower. Before using a vacuum cleaner to clean the floor covering, you should collect large debris and accidentally fallen items by hand.
- You need to monitor the level of noise produced. If the sound changes, this may indicate a clogged brush or bellows accessory.
Monitor the performance of your home assistant, and provide timely care for the vacuum cleaner and its replacement consumables. Then it will be easier to avoid breakdowns of equipment to maintain cleanliness in the house.
see also
Comments 88
Yesterday I took one out of my mother-in-law's vacuum cleaner. there is a reverse thread on the impeller. and the protection above the impeller is rolled. but her impeller itself was broken. I couldn't find it separately. I bought the motor for 1100r.
Already ordered it too.
I took a new one, the price tag was around 1000 rubles, there was no point in repairing it.
Look in your city for stores with everything for repairing household appliances, it turns out there are a lot of them in our city, I didn’t know it until I came across it. Ali also has such motors, but they are more expensive due to weight and dimensions ru.aliexpress.com/item/22…-4cab-bab7-bfed53c10b86-4
The engines for this vacuum cleaner are freely available. Also of different power. I just bought a new and more powerful one. There is no point in repairing due to the price of the part.
WHO KNOWS: is the engine variable or constant? :)
This is a commutator AC motor (but the constant motor is also appreciated for its sweet soul).
I have a knob to adjust the speed... only if it is AC, how does the speed change? After all, for alternating voltage, decreasing the voltage will not reduce the speed...
This is a commutator AC motor (but the constant motor is also appreciated for its sweet soul).
Causes of defects
Cracks, tears, and punctures on the body of the vacuum cleaner hose can appear for various reasons. However, the main reason, of course, should be considered improper handling of this part.
What user actions lead to the appearance of defects on the body of the corrugated tube?
Take a closer look:
- Towing a vacuum cleaner from place to place via a hose.
- The tube is bent at unacceptable angles during the cleaning process.
- Inaccurate use when cleaning objects with sharp edges.
- Storage not according to instructions.
The natural cause of the formation of defects should also be considered the expiration of the product’s service life, wear, and poor quality of the material.
Often, violation of operating rules by owners of harvesting equipment leads to the appearance of defects on the body of the corrugated hose. When working with a vacuum cleaner, it is not recommended to use physical force directly on the hose
Towing a vacuum cleaner from place to place by pulling the device by the working hose is a fairly common practice.
At the same time, many owners of vacuum cleaners perform such “tricks” completely unaware of the impending consequences. Meanwhile, the instructions for any vacuum cleaner clearly state that you cannot do this!
Bending of the pipeline at an unacceptable angle can occur when the owner of a vacuum cleaner, in the heat of cleaning, seeks to reach areas that are theoretically inaccessible due to the operational and technical parameters of the cleaning equipment.
This bending of the corrugated sleeve contributes to the rapid appearance of a crack or rupture. Therefore, manipulations with the hose during vacuuming should avoid bending the corrugation at steep angles
Several times such attempts can end quite successfully. However, the strength of the material with respect to unacceptable loads is not unlimited. Therefore, at the most inopportune moment, the pipeline will simply burst in the place where there was an unacceptable bend.
Cleaning work can be carried out under different conditions. For example, when cleaning furniture whose frame has metal parts with sharp edges
If the hose is handled carelessly under such conditions, there are all the prerequisites for cuts to appear on the body of the corrugation.
Finally, the rules for storing cleaning equipment, specifically described in the vacuum cleaner instructions, also cannot be violated, since violation here is one of the reasons for the malfunction of the vacuum cleaner hose.
The storage conditions of household cleaning equipment accessories directly affect the quality of the material from which the same working hose is made. Therefore, violations of storage rules contribute to the appearance of defects
Thus, storing the device together with accessories, or separately accessories, at a temperature below the recommended one leads to a decrease in the strength of the corrugated tube material.
Sudden temperature changes, loaded conditions, and unacceptable bends are also critical for the hose material.
Preventive measures
It is better not to treat the problem, but to prevent it. This applies to everything and vacuum cleaners too. How does she look? Basic care: replace or empty the dust bag on time.
Each technique has its own weaknesses.
An important detail is the brush. Cleaning its lint should also not go unnoticed
If the vacuum cleaner is intended for dry cleaning, do not suck in water and other liquids, they will accumulate inside. This leads to breakdown.
Clean your vacuum cleaner more often to increase its shelf life.
Keep the warranty receipt after purchasing the vacuum cleaner, if you have one. Most types of breakdowns can be repaired by specialists. If it is missing or there is another type of breakdown, do not be afraid to use videos from the Internet, where craftsmen will tell you how to repair a broken Samsung vacuum cleaner with your own hands.
The process of cleaning the insides, the better
An unpleasant smell and hum of a vacuum cleaner while cleaning a room may be due to the accumulation of dust on the inside of this device. For cleaning, soft-bristled brushes, a medium-power vacuum cleaner with a special attachment, and viscose wipes are used.
Is it possible to do wet processing?
Cleaning the inside of the vacuum cleaner is carried out using dry methods that do not disturb the circuit board tracks that conduct current. To do this, use a thin soft brush or a room fan. If dry cleaning does not allow you to cope with contaminants, then wet processing is used, but all parts are dried as quickly as possible.
Plastic parts are washed under running water. Assembly is carried out after all elements are completely dry. Dry cleaning helps remove dirt from the motor housing, drum and cable. If the casing cannot be cleaned with a brush or vacuum cleaner, then you can resort to a damp viscose cloth, but moisture should not get into the circuit.