Soft corners are an excellent solution for a modern kitchen. Everyone wants their kitchen to be not only functional, but also cozy. Manufacturers produce many configurations of comfortable kitchen furniture.
Modular corners, consisting of parts that are not fastened together, are suitable for those who like to experiment with the arrangement of furniture. Kitchen sofas with an extra bed are designed for those who periodically have to leave guests overnight. And for the most practical people, corners with storage space are recommended. Poufs, elegant stools and comfortable chairs complete the set.
Reupholstery and restoration of the kitchen corner
For many people, purchasing a new kitchen corner always takes a backseat, as it is expensive and there are always more important and necessary things to buy.
In one or two days it is quite possible to update a worn-out soft corner and refresh the kitchen interior.
In such a situation, restoration and reupholstery of the kitchen corner becomes a good option. Of course, you can take the furniture to a specialized workshop or call a craftsman directly to your home, but you can also do this work yourself.
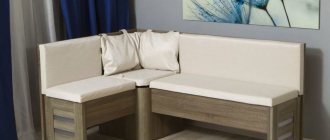
A comfortable soft sofa in the dining area pleases the eye and gives the entire kitchen a feeling of coziness.
Such furniture has a fairly simple design, so restoration can be done even by a person with no experience, who has never wondered how to reupholster a kitchen corner.
Corner made of boards
An easy-to-assemble kitchen corner can be made from ordinary wooden boards.
You will need:
- boards 100*40 mm;
- stapler;
- chipboard;
- foam;
- jigsaw;
- roulette;
- dowels;
- drill, bit with a diameter of 1.5 cm;
- construction glue;
- sandpaper;
- batting;
- upholstery material;
- varnish, paint brush;
- pencil.
Cutting parts and making frames
The corner is made based on the parameters of the kitchen. All details are visible on the diagram, so detailed drawings are not required.
If you still need a diagram, you can watch a video on how to build a template yourself
Having chosen the optimal depth and length, cut the boards into pieces of the required sizes.
You will need:
- 3 racks;
- 2 legs;
- 3 cross elements of the same length for a long sofa;
- 5 identical crossbars for short;
- 4 identical bars for the sides of both sofas (2 on each side);
- 2 cross members for a long sofa.
After the elements that make up the corner are cut, they are carefully sanded using sandpaper. Start with coarse grain, then use medium.
Mark the holes for the dowels. Each frame element must be connected to another using 2 dowels. Drill holes for them using a drill with a crown.
Coat the holes with wood glue, insert dowels, fit the parts tightly together using a hammer
Each internal corner of the structure is strengthened by screwing a metal corner to the boards.
Varnish or stain coating
The wooden base is covered with 2 layers of varnish or stain. If the latter is used, after the frame has dried, it must be sanded again, since the stain raises the pile on the wood, and there is a risk of planting a splinter.
Assembly
On each bottom crossbar, a metal corner is fixed on the inside at the same level - it will hold the bottom of the box.
2 blanks for the bottom are cut out of chipboard. They are laid on the frame.
Cut out 2 front strips for the drawer, 2 side strips. They are secured from the inside of the frame so that the lower end is in contact with the bottom. Fixed with self-tapping screws to the boards.
Cut out 2 seat covers. Their dimensions should be 2 cm larger than the width and length of the boxes, so that when closed they are securely held on the frame.
Selection of materials
The most popular types of material for covering a furniture corner for a kitchen are tapestry, velor, artificial or genuine leather. To increase service life, give preference to the most durable fabrics.
Choose good materials for upholstering the soft corner.
Genuine leather is an expensive material, but at the same time it is a very durable material that will last you a very long time. Foam rubber is usually used as a filler. It is advisable to use a denser and taller one, then the furniture will be more comfortable and voluminous.
In order not to rashly buy too much and update the corner at minimal cost, you need to carefully measure it and draw a pattern.
It is also worth preparing several pieces of plywood, as they may be useful for replacing damaged frame elements. In addition, prepare the glue that you will use to glue the filler.
Use high-quality filler to restore the soft corner.
Manufacturing process: step-by-step instructions
There are no minor parts in the manufacturing process
Every nuance is important, and therefore it is extremely important to follow the instructions and recommendations
If you are planning a long sofa, first cut out the necessary parts:
- bottom, plywood is suitable for making this part;
- bars for the frame part;
- sidewalls made of chipboard, 2 pieces required;
- side parts for the long sides of the box - you also need two parts, which can be made from plywood;
- back;
- sitting
It is very important to take clear measurements so that there are no problems when connecting the structure.
The next stage is assembly. You need to assemble the sofa in a certain order:
- The edges cover the ends of the sidewalls, and the bottom is covered with thrust bearings.
- Using a screwdriver and self-tapping screws, the frame is assembled, and then the box.
- The back is assembled and attached to the sides using dowels. You can strengthen the fastening using metal corners.
If it was planned to make a short sofa, then all actions will be similar. Only the size of the parts changes.
The most economical option is to use particle board or oriented strand board.
After the long and short sofas are ready, they are combined into one structure using a connecting element. Metal corners with the help of dowels attach the seat to the back, and then attach it to the side. The last stage is upholstery, if it is planned, of course.
If upholstery is not planned, then the wood can be treated with primer and varnish. To change the color, you can use tinting or paint.
Required Tools
To carry out the restoration and upholstery of the kitchen corner with your own hands, you will need the following tools:
- Anti-stapler and furniture stapler. They will be needed to remove the old upholstery and attach the new one. If you don’t have an anti-stapler, you can use a regular knife to remove staples;
- Scissors;
- Hammer;
- A set of open-end wrenches for disassembling the frame;
- Ticks;
- Pencil.
Only a professional approach will help you achieve a good result.
Of course, this is just the minimum required set; you may also need other tools, but this will depend on the complexity of the repair work.
Reupholstering sofas for the kitchen is done quite carefully and it is important to take this work with full responsibility.
Desk for two children: choosing the ideal option
But in most kitchens this is an extra element that simply won’t fit due to its size. It is much more logical and practical to make a corner compact design. A sofa bench works great here. This is a bench, often corner, with a convenient design, under which there are additionally hidden niches for various small items and kitchen utensils. They are the ones most often found on sale, and you can assemble them yourself. Finding assembly diagrams is not a problem at all these days. The main thing here is to take into account some nuances.
I’ll say right away that if you have a small kitchen, it’s better to transfer ideas and drawings with a folding design to the bedroom or living room.
In the kitchen you need a small sofa that will provide comfortable seating. It is not focused on constant sleep.
A kitchen sofa is usually angular or straight. A lot here depends on the shape and size of the kitchen itself, and how the furniture will be arranged.
There are a few key features to keep in mind before you start assembling it yourself.
- Height. Kitchen sofas are made higher than ordinary sofas for living rooms and bedrooms. If you've sat at a table on a regular sofa, you'll immediately understand what I'm talking about. Convenience will be questionable;
- Material of manufacture. We will talk about this separately later. But kitchen sofas are made only from practical materials that are easy to clean;
- Dimensions. They should be compact. Kitchens in the vast majority of cases are small and do not have a huge amount of space.
Now we will separately consider some issues related to self-assembly.
Stages of work
When reupholstering furniture, there are several stages that will be necessary in all cases with rare exceptions. Let's take a closer look at how to cover a kitchen corner with your own hands.
Removing the upholstery
To remove the upholstery, we need to gain access to the parts we need. If the back of the kitchen corner is covered with a fiberboard sheet, carefully remove it. Using an anti-stapler, remove the furniture staples that secure the old upholstery and remove it as carefully as possible, since we will need it later.
Use an anti-stapler to remove old upholstery.
The filler in kitchen corners is usually glued to the frame. Therefore, tearing it off the glue will not be difficult. If somewhere after this there are remains of filler on the plywood of the frame, remove them with a knife.
Cutting fabric and filling
First you need to prepare patterns for new upholstery on thick paper. This is where the old upholstery comes in handy. It needs to be straightened with your hands, and in case of a strong jam, ironed. After that, lay it out on paper and trace around the perimeter with a pencil, including all overlaps.
Choose high-quality foam rubber.
After this, cut out templates from paper, according to which you can begin cutting out the prepared material.
The foam rubber for the filler is cut out exactly according to the same principle.
Important! To keep the shape as long as possible, when cutting out the filling, add 1 cm from each edge.
Frame repair
Carefully inspect the frame of your kitchen nook with the upholstery removed. Clean the elements from dirt if necessary. Minor cracks can be filled with glue. If there are severely damaged elements, then you need to carefully unscrew them.
To disassemble the angle frame, open-end wrenches can be useful.
Measure the removed parts and cut new parts from the prepared plywood using the resulting dimensions. Drill holes for mounting in the required places. Assemble the frame with new parts.
Reupholstery and assembly
Glue is applied to the plywood base of the kitchen corner, onto which foam rubber is placed. Next, you need to cover the corner parts with material and use furniture staples and a stapler to secure the fabric.
Be careful when re-tightening the soft corner.
Work with the material slowly and carefully to avoid tears and distortions of the upholstery. If the kitchen corner consists of blocks, then first assemble the corner part, and then the side parts. Complete the kitchen nook assembly by attaching the fiberboard back wall.
How to tighten it with your own hands?
To restore a kitchen corner yourself at home, you need to understand the sequence of actions of this process. It is worth considering the main stages of remodeling old furniture and its complete transformation.
- Removing old upholstery from a kitchen corner using a staple remover or a tool you have at home for removing furniture staples. It is better not to throw away the material; it will be useful for cutting new upholstery.
- Remove the old layer of foam rubber so that there are no residues. If the foam rubber was glued, then it will be possible to remove it completely only with the help of a knife.
- Cut out new upholstery using old samples. The new pattern must exactly match the one that was previously eliminated, otherwise replacing one with another will be problematic. It is best to mark the edges of a new product using chalk or a bar of soap so that the incorrectly made part can be easily erased. When cutting out a pattern, it is important to leave 5 cm on each side to make starts that will tuck during attachment to the furniture frame. It is recommended to buy material with a reserve so that there is enough of it during cutting. If there is anything left after creating the patterns, you can use the fabric for its intended purpose and update chairs or stools, and, if desired, make soft cushions for the future kitchen corner.
- The finished templates are sewn together using a sewing machine. It is worth making several seams to maximize the strength of the structure and prevent it from coming apart in the future.
- Repairing a kitchen corner also involves replacing the soft component, so it is necessary to lay new foam rubber and secure it. For fixation, you can use various glues: construction glue, from a gun or “Moment”. If there is no desire or need to attach the soft component to the frame, you can connect it to the upholstery, securing it with furniture nails or staples.
- The final touch will be putting new covers on the kitchen corner and checking their size. If something needs to be redone, there is still an opportunity for this. As soon as everything is in place, the most important stage begins, in which you should not rush - this is attaching new upholstery to old furniture. You can work using an industrial stapler, which quickly and securely fixes staples to the base of furniture. The staples should be spaced quite often, at least 4 cm between each of them, otherwise the material will begin to turn out, which will spoil the impression of the work performed.
- If you managed to sheathe all the parts of the kitchen corner frame, then you can put all the parts together, put the furniture away and try to use it.
Working step by step, you can achieve the desired result and update old furniture in the kitchen, completely transforming it, and, if desired, radically changing it.
If you carry out the work correctly and follow the advice, you can replace damaged and worn upholstery in the kitchen within one day, enjoying the results for many years.
How to sew a cover yourself
To protect the upholstery, you can use a corner cover. First you need to choose the shape of the cover and fabric. Draw it yourself or find the appropriate pattern on the Internet. Take some old fabric, cut it according to the patterns and sew it.
You can use leather or fabric upholstery on the sofa.
Try the resulting draft on your corner. If any defects are found, correct them. If you are satisfied with how the trial version fits on the corner, then proceed to cutting out the main material. Sew in zippers and clasps if necessary. Decorate the case as you wish.
Choose the color of the fabric based on the interior design of the kitchen.
Place the finished cover on your kitchen corner. But don’t get carried away with decorating too much, because this is a cover designed for a kitchen corner, and an abundance of decorative elements will look inappropriate there.
The leather upholstered corner is easy to use and care for.
How to make a Chester sofa
To do the job you will need the following tools:
- hand circular saw;
- jigsaw;
- stapler (preferably pneumatic, but if there is no compressor, then you will have to work manually);
- drill;
- screwdriver;
- marker and pencil;
- ruler and tape measure.
This standard set of tools will be necessary when making any sofa.
So, you should prepare all the blanks and cut grooves into them in accordance with the presented sketches.
The assembly diagram is presented with a series of photographs, sequentially showing the stages of the work.
Inserting the workpieces into the pre-sawed grooves, we secure them with self-tapping screws.
First, crossbars coated with PVA glue are attached to the racks.
The holders are screwed to the rail with self-tapping screws and fixed with brackets, after which the part is fixed to the frame.
The armrests and the front part of the sofa are upholstered with fiberboard.
We draw a center line and mark 14.5 cm on it - this is how the markings are made for the buttons, which will then be installed. Then, using a feather drill, holes are drilled in the marked places.
Next, we will attach the grosgrain ribbon, which should be located strictly above the hole, going down vertically.
After covering it with fabric, we begin gluing the foam rubber to the frame. In those places where gluing is inconvenient, you can shoot the foam rubber with a stapler.
Now let's draw up two sketches, taking the necessary measurements.
First, measure the distance from the top button to the side bar. We do the same with the back - from the button to the back bar. You also need to measure the distance from the front pillar to the first top button on the armrest. We put all these dimensions into the sketch.
- Size L is the length of the arc from the button to the top bar.
- L+50 is 50 mm to shoot.
- 155 is the distance between the rows.
- These data are not final, as they will still change.
- 195 is the size between the buttons horizontally. On the bar it was 145mm but now has 50mm added for the pleats.
- Each row comes with an offset of 97.5 mm.
- Green shows an edge allowance of 50 mm.
- Bottom distance N is the distance from the bottom button to the allowance block.
Taking into account all these dimensions, we get the dimensions we need.
In the second figure we see that there is also a distance B from the front bar to the top outer button.
After receiving these dimensions, we transfer it all to the fabric.
Now let's make the carriage tie. You can find out how to make it correctly, and how you can do without a press for making buttons, by watching the following video.
Video: correct and incorrect carriage tie
Now we need to make a mattress. To do this, a snake spring is attached to the base, and a dense woven material is placed on top of it. Then a coconut trunk is laid, then 35 (or 42) density foam rubber 10 cm thick. We lay padding polyester on top, and only after that can we start covering the sofa with fabric (or leather).
Such a sofa will be comfortable, beautiful and durable.
By viewing the following slide show, you can watch the assembly process of a similar design.
Advantages and disadvantages of self-upholstery
The advantages of this approach include the following:
- saving money;
- the ability to perform work in your free time;
- compliance of the new type of corner with your tastes and preferences;
- pride in independent work and the repair experience gained.
Synthetic fabric does not deteriorate during use, does not fade, tone and color remain unchanged.
In addition, during restoration it is possible to make some changes to the design of the furniture. You can give free rein to your imagination and come up with a completely new design for your old kitchen corner.
Restored upholstered furniture will breathe new life into kitchen gatherings, pleasing the eye with a harmonious design.
The disadvantages of repairing a kitchen corner with your own hands include the fact that due to the lack of experience in such work, it is not always possible to achieve a good result the first time.
A soft kitchen corner helps create a special atmosphere of coziness and comfort in the kitchen.
Deciding on design and construction
Kitchen corners come in different sizes and configurations. When reconstructing furniture, you can use your own design solutions and even try to make structural changes. The following will help improve the design of your kitchen corner and add an element of freshness and comfort:
- the use of material for backs and seats of different, possibly contrasting colors;
- changing the general shape of kitchen furniture;
- the use of leatherette with decorative buttons on the backs.
It gradually becomes saturated with moisture, falls off, loses softness and elasticity, which means the kitchen corner needs urgent help.
When starting to reupholster a kitchen corner, you need to clearly think through the procedure and follow the plan.
No less effective can be a partial change in the usual design, which can be achieved through:
- changes in the configuration of the dining table;
- the use of wooden panels on the backs of sofas;
- applications for glass, plastic, marble countertops;
- transforming chairs into light, elegant stools;
- abandoning semi-soft seats and backs and using a completely wooden base;
- manufacturing original armrests and semi-soft cushions and others.
But it will bring great joy to the household if a home craftsman reupholsters the kitchen corner with his own hands.
Is it possible to reupholster other furniture?
You can reupholster the old upholstery on other furniture as well. Nowadays, there are many specialized companies offering restoration services for sofas, armchairs, chairs, stools, ottomans and other pieces of furniture.
In addition to the soft corner, you can also upholster other pieces of furniture with this fabric.
Thus, reupholstering a kitchen corner with your own hands will allow you not only to update the appearance of the furniture, repair damaged parts, but also to give a special individual style to your kitchen, while saving a significant amount of money.
Add bright colors to your kitchen to freshen up the interior.
Furniture decorated with your own hands will create a special atmosphere of home comfort, which is so important. After all, it is in the kitchen that the family gathers after a long day of work to eat, chat and share impressions; it is in the kitchen that close relatives and friends are often invited, who will be pleasantly surprised by the new thing.
Take care of your upholstered furniture to extend its life.
How to decorate
The updated kitchen corner can be left unchanged or decorated. Several popular decoration options:
- decoupage;
- pillows with contrasting covers;
- adding bright accents in the form of rollers or blankets;
- decoration with inserts made of genuine leather or suede;
- use of knitted capes;
- hand painted;
- fastening plywood ornaments.
For decoration, stencils are used that will help you apply designs of varying degrees of complexity onto wooden panels. The use of fringe or tassels is no longer relevant. A repeating pattern is applied to the arms, legs and small plain elements.
You should not use more than two ways to decorate a kitchen set. Too much decoration will ruin the appearance of the corner. It is better to opt for a more concise option.
The decoupage technique should be used with caution. For decoration, one color scheme and one type of pattern are used. If the kitchen already has furniture or appliances decorated in the same way, then it is better to abandon this idea. Otherwise, the appearance will be rustic and rustic.
Even a novice craftsman can reupholster a kitchen corner. The main thing is to strictly follow the step-by-step instructions, do the work carefully and without haste. Updated furniture will decorate the kitchen.
Finishing touch
Of course, you can stop here, since you have completely finished the work of updating the upholstery of the corner. But most likely, you will feel like something is missing. This is because an important part of such furniture is the decorative finish.
If desired, you can decorate the backs and seats with embroidery, add small pillows to the corner made of the same fabric as the upholstery, but in a contrasting color, or knit beautiful capes and bedding. You can decorate the wooden base of the sofa itself - paint it and varnish it, glue plywood patterns, make decorative gluing and inserts from beads, rhinestones, or other materials. It all depends on your imagination, ideas about beauty and existing skills. And desires, of course.
Found a violation? Report content
How to properly cut new upholstery ↑
The old adage about the need to measure seven times and only then cut when reupholstering a kitchen corner is truer than ever. Moreover, you need to know some of the nuances of how to correctly measure and cut new upholstery for a kitchen corner. So, you need:
- Dismantle the old upholstery, i.e. remove the old covering from the kitchen corner.
- Then, using a tape measure or measuring tape, measure all the parameters of the cuts - the height and width of the pieces of fabric. All measurements must be taken according to the maximum length of the bends.
- The measurements were taken. We purchased new material. You can proceed directly to cutting. To do this, the fabric needs to be laid out in one layer, and pieces of old upholstery placed on top of it. The contours of the cuts on the new fabric are outlined with special chalk or an ordinary piece of thin dried soap - this strip is easily removed by ironing the fabric or wiping it with a slightly damp cloth. It is also advisable to leave about 5 centimeters on each side for the hem of the fabric.
- If the fabric is not monochromatic, but has a clearly defined pattern, then you need to ensure that the patterns are combined on the sections that will be located next to each other. Also, during cutting, you need to determine the so-called share thread - this is the thread of fabric tension. It is important that in all areas of the fabric such a thread is located in the same direction, for example, everywhere in width or height.
It is convenient to cut parts on a large, flat surface. If you don’t have one, you can sit on the floor at home
Advice: incorrect calculation of fabric can negate all subsequent work and result in additional expenses. Therefore, novice craftsmen are recommended to make the most accurate calculation of the fabric in the following way. It is necessary to take any unnecessary old material on which all the pieces of previously removed upholstery are laid out. If there is no suitable fabric, you can lay out the pieces of fabric on a large table or even on the floor. After this, it is enough to measure what width and length a piece of new fabric is needed.