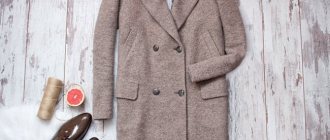
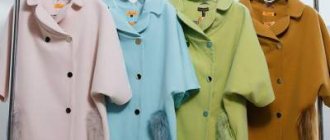
Often a well-preserved coat has been hanging in your wardrobe for years, but you don’t want to put it on because it’s an outdated style and too long. Of course, you won’t be able to remake raglan sleeves yourself, but you can shorten a coat or make a jacket out of it.
Shortening a coat in a studio is quite expensive, so try to learn how to shorten and hem the bottom of a coat yourself. No special tools or sewing machines are required for this; the main thing is to accurately determine the line along which you need to cut off the excess length of the coat.
The first video in the series on the topic “How to sew a women’s coat.” This video shows how to process a coat trim.
The second video in the series on the topic “How to sew a women’s coat.” This video shows how to process a pocket with a flap.
How much does it cost to shorten the sleeves on a coat?
Prices for repairs and tailoring in the studio
| Coat, raincoat, insulated jacket | ||
| 1.1 | Shorten a short coat with a straight silhouette without a vent | from 800 rub. |
| 1.11 | Shorten sleeves without transferring loops or loops | from 700 rub. |
| 1.12 | Shorten sleeves with transfer of stalemate, belt loops | from 1000 rub. |
| 1.13 | Shorten sleeves in coats with vents and buttons | from 1000 rub. |
How to mark the hem line of a coat
Wear your coat with the clothes you will wear in winter or fall and have someone mark the shortening line with chalk. This is done like this: you should stand in front of the mirror without straining in the position in which you usually wear outerwear, and the other person should make the first chalk mark on the front of the coat. Gradually, you should turn to one side, and your assistant with a long ruler or triangle should remain in place and chalk marks on the front part.
The ruler should touch the floor, and the marks should be placed at the same distance from the floor. A continuous line is drawn along the marked marks, a hem allowance of 4-5 cm is added and the excess part of the coat fabric is cut off.
The hem of any coat is usually uneven (H) as the back stretches over time. This is facilitated by moisture (rain, snow), and since the drape coat is heavy, the back gradually stretches out much more than the side seams. In people with a stooped figure, on the contrary, the shelf stretches out. Therefore, you cannot rely on the factory cut of the coat and mark a new line from the old hem. In a long coat this discrepancy may not be noticeable, but in a shortened version it will immediately catch the eye. The new hem line can only be accurately determined using a ruler, taking measurements from the floor, as mentioned above.
How much does it cost to shorten a shirt sleeve?
| Shorten shirt sleeves with trim | from 1000 R |
| Shorten the shirt sleeve at the top (through the collar) | from 1500 R |
| Sew the shirt sleeve along the inside seam | from 800 R |
| Sew a shirt according to darts | from 800 R |
| Sew the shirt along two reliefs, without touching the hem and armhole | from 1200 R |
Interesting materials:
How to sterilize jars of tomatoes in a saucepan? How to sterilize tweezers at home? How to sterilize full jars in the oven? How to wash and dry leather gloves? How to wash a cotton sweater in a machine? How to wash mesh sneakers by hand? How to wash a jacket with Omni hit coating? How to wash kitchen rags? How to shoot with a Cargobob? How to cut an even bob?
2021
Scroll up
How to hem the bottom of a coat
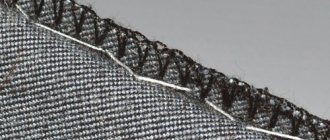
When hemming an item of heavy fabric, such as a coat, it is necessary to distribute the weight of the item evenly and to do this, make several rows of securing stitches so that the fabric does not wrinkle. A particularly high hem (4-5cm) or a hem made from heavy drape fabrics can be made using two or three rows of hand-tacking stitches, for example, herringbone, as shown in this photo. This method of hemming a coat, using several rows of stitches, will not pull back the edge of the finished product, and will evenly strengthen it along the edge.
In our example, we are considering a coat with a loose lining, that is, the hem will be attached separately, and the lining is not connected to the bottom of the coat, so the cut edge of the fabric needs to be serged or otherwise sealed.
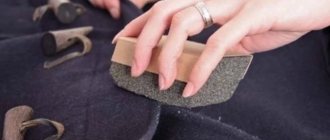
The cut edge of a hem made from heavy drape fabrics can be finished with an edge band or an overlock stitch on an overlocker. If you don’t have an overlocker, you can use a zigzag stitch on a sewing machine. Such processing when shortening a coat is necessarily necessary for loose fabrics, since the edge of thick, heavy fabrics cannot be processed with a double hem, since jeans are hemmed. A double hem will make the seam rough and can ruin the appearance of the coat and even “print” on the front side over time.
It is very important, before hemming the coat, to glue the hem area with adhesive material. It is not necessary to glue the part that is folded, but the front side must be glued to the width of the hem. This will strengthen the fabric and prevent the bottom of the coat from appearing as a “wave”.
Press the hem line lightly. Pin the hem by pinning it halfway between the hem line and the cut edge of the fabric. Fold the edge over the pins and sew the hem from the inside using a herringbone stitch. Then re-pin the pins higher and repeat this operation.
The folded and hemmed edges of the coat must be ironed along the wrong side, being careful not to press down the iron too much. To steam the hem more strongly, you can iron it with a damp iron. It is not advisable to iron the coat from the front side, since the edge of the hem may be imprinted. See How to iron clothes properly.
how to properly and accurately process the corner of the side and sew the lining in a coat and jacket.
I'm talking about option number two.
Our example today is special. This feature happens when we are sorely short of fabric to hem the product. I only had 1.3 m of fabric, but I needed to sew. In this case, we cut out the facing and process it on the bottom of the coat or jacket. This method is no worse or better, it's just different.
So, sew your coat (jacket) as usual. Sew the lining to the collars, leaving the bottom of the coat open.
- The picture should now look like this:
- cut and facing 4 cm wide, length from side to side. Duplicate the facing.
- The lining to the sides of the coat is not sewn all the way, leave about 10 cm free. The lining is shorter than the bottom of the coat by about 0.5 - 1 cm,
- the hem is stitched to the side, swept, and ironed. However, 1-2 cm at the very bottom remained unstitched. You can stitch it to the end, of course. But it’s better not to, I’ll explain why in paragraph 7.
- the lining is aligned along the entire width and length of the coat. There should be no surplus or shortage. The debit and credit will match if the lining was cut correctly.
2. Marks with chalk - for greater accuracy. Did I not say that we do both corners at the same time? I'm talking. We prepare both corners at once, and carefully measure the length of the facing.
3. We pin the facing and sew it first to the lining.
How do you plan to turn your product inside out? Through the sleeve or open side?
I prefer to do this through the unsewn section of the bottom. Why? Yes, because I feel sorry for fraying expensive cashmere, twisting it through a hole in the sleeve. Therefore - gentle techniques, gentle handling of materials that are high in every sense and hidden stitches.
So, turn the facing to the lining, leave a sewn area of 20 cm.
By the way, did you notice that the hem is slightly, 2 mm shorter than the bottom of the coat? I cut it into a corner on purpose so that when finished it would form a beautiful roll of the seam to the wrong side.
5. stitch the lining with a fold and facing side to the hem.
Do both selections like this.
6. This is what our coat bottom looks like now. Let's make another improvement to the final product. To make the joint between the hem and the facing thin, you need to cut out the corners and iron the allowances. Now you can pin the hem and the bottom of the coat along the entire length of the hem. All edges need to be aligned evenly.
7. Using a single line: make a corner, sew the hem and facing to the bottom of the coat.
In point 1, I advised leaving the bottom of the hem unstitched so that the corner would be more accurate and beautiful when finished. In this case, we can control the shape and make the corners absolutely equal. We will cut out allowances in the corners without damaging the fabric.
In point 4, I advised cutting off 2 mm from the hem corner. If you did this, then do not forget to take into account these 2 mm and direct the stitching from the corner slightly downwards, so that when finished the hem is even and the corners are perfectly straight.
Women are prone to change, and sometimes we are tempted to change something. Why not experiment and make a new, even more attractive one out of an old thing? Many girls have a favorite coat hanging in their closet, the style of which is outdated, or it is simply too long. For example, by shortening the bottom and sleeves of your long-forgotten outerwear, you can make a stylish product that even the most advanced fashionistas will envy. You can even construct a jacket from a shortened coat, complementing it with various decorative trims. Shortening a coat with your own hands is as easy as shelling pears. And you don't need complicated tools to do this job.
LiveInternetLiveInternet
Quote from Tolyan's message
Read in full In your quotation book or community!
This article presents a master class on How to shorten a winter coat.
Author: Liliya Slyusareva https://atelie-nadomu.ru/
I really liked the author's site. Many good master classes on sewing clothes
All pictures enlarge by clicking.
To shorten the coat, first determine how much to shorten the coat.
To do this, we bend and pin the bottom with sewing pins. You can pin it longer, then shorter and determine the optimal length of the coat as you like. When you have decided on the length, measure with a centimeter how much you need to shorten. Then we remove the pins and lay out the coat on the table. of shortening of the coat along the entire length of the bottom . We draw a chalk line, put 4 cm down from this line (for the hem of the bottom) and draw a second line. Then we cut along the main fabric, do not cut off the lining yet - photo 1.
how to shorten a coat photo 1
Now you will need to secure the ends of the seams with a stitch so that they do not tear apart photo 2
how to shorten a coat photo 2
In coats, the bottom is duplicated with adhesive material, and since we cut off the duplicated area, it needs to be restored and also glued along the bottom - photo 3.
how to shorten a coat photo 3
how to shorten a coat photo 4
After this, we will overlay the bottom of the coat - that is, we will protect the cuts from falling off. For those who don’t have an overlocker, you can sew the bottom with a zigzag. Then we sweep the bottom, focusing on the chalk line drawn at the very beginning. See photo 4.
Now we make chalk along the bottom of the lining: the top line is the hem line, the second line is marked 4-4.5 cm down from the first and the third line is 1.5-2 cm below. Photo 5. We baste along the top line. Why is this needed - since the coat is winter, the lining is processed on batting, and in order to reduce the thickness at the bottom, the batting will need to be trimmed along the upper intended line. And so that the batting does not move, you need to baste it along with the lining along the top line, and then trim it.
We cover the corners along the bottom of the right and left sides as in photo 6. We notice the lining as in photo 7.
how to shorten a coat photo 5
how to shorten a coat photo 6
how to shorten a coat photo 7
Now that the bottom is swept, it’s time to start ironing. After ironing the bottom, we sew the lining along the bottom, selecting threads to match the color of the lining. We hem the bottom of the coat with blind stitches like in photo 8. We take the thread to match the fabric of the coat, the thickness of the thread is approximately 70L. You can not hem the bottom of the coat by hand, but glue it with adhesive web and reinforce it only at the seams. But I prefer to hem by hand. Now you can remove the basting threads - these are the white threads in the photo. To finally complete the work, you need to steam the bottom so that no traces of basting thread remain. The finished bottom from the inside out is shown in photo 9. To control, hang the coat on a mannequin and fasten the buttons. The length of the sides at the bottom when buttoned up should match photo 10.
how to shorten a coat photo 8
how to shorten a coat photo 9
how to shorten a coat photo 10
So the coat is shortened. And this completes the master class on how to shorten a coat.
Shortening a coat at home
Autumn is coming, it's time to prepare warm clothes. Buy something, give something as a gift, and remake something. My sister drives a car and wanted to shorten her coat. And she’s right, because it’s much more convenient to drive a car in a short coat or jacket. Well, there is a task, let's do it.
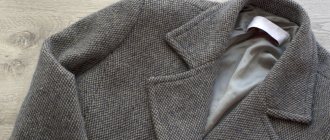
The coat doesn’t look fresh anymore, but it’s still too early to throw it away.
Try it on and find out the new length. Align and pin the lapel, sides and bottom.
From the mark, after trying on, measure the distance to the bottom line and set aside this value along the entire length. Since there are now extra pockets here, I tore them off, but left the flap. If you remove it, a mark will remain, let it live.
Mark the new bottom line. At a distance of 5 cm, mark the allowance line and cut off the excess. Insert pins into the shallow line of the bottom.
And along the pins, on the other side, draw a bottom line.
Undercut the stitching on the sides.
Fold the bottom and steam.
Cut off the seam allowance at the sides so that there is no thickening.
Hang the product on shoulder pads, a mannequin, or wear it on yourself and ask your household to help you. Trim the lining, retreating from the bottom line by 1.5-2 cm. Cut to the edges “no”.
Turn inside out, pin the lining and the product together, matching the side seams and the middle of the back. Give me a line.
Sew the allowance without tightening the thread. So that, as they say, the bottom “walks”. Turn the coat inside out through the hole in the sleeve. Restore the stitching along the edge of the side, sew up the hole in the sleeve, and steam the bottom.
The coat was shortened and became a jacket, very comfortable for the driver.
Enjoy driving in comfortable jackets, dear needlewomen!
I would be grateful if, when copying my articles to your website, blog, personal page or diary, you provide a link to the source.
Style
Next you need to think about where you will wear the chosen coat. You also travel by car or public transport. If you need a universal coat that you will wear “both in feast and in peace,” choose a medium length. A short coat (short coat), which in its front resembles an elongated jacket, will not protect you from the cold. And a floor-length coat is not practical for those who walk a lot. The optimal length is approximately to the knee and slightly above/below.
Long coat
Long coat, street fashion.
Short coat.
Short coat, street fashion.
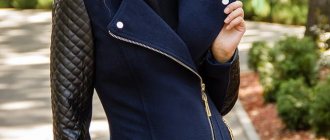
Basic coat models are a wrap coat in the Max Mara style, an oval cocoon coat and a straight/semi-straight coat. It's safe to say that one of these coats will suit you 100%. And if the main criterion for you is versatility, feel free to try on one of these coat models. Such coats are out of fashion and timeless. Fashion houses make them every year. In addition, they can be combined with anything, harmoniously complementing any look.
Basic coat models: wraparound, straight, cocoon.
Basic coat models, street fashion.
Hem the lining
After you have finished with the main fabric of the product, it is the turn of the lining. Put on your coat and straighten out the lining. Ask your assistant to measure the bottom line of the lining; it will be 3cm longer than the bottom edge of the coat, but when finished it will be 2cm shorter than the hem of the garment.
If the lining is sewn to the hem, it is cut taking into account the fold. You cannot sew a lining without a fold on the shoulders, because it will pull on the hem or back.
The coat remains an incredibly popular fall wardrobe item. If you are ready to update your favorite item, and feel that you cannot do without the experienced hand of a craftsman, come to the Mobile Tailor.
We are happy to advise you on remodeling options after listening to all your wishes. You will be pleasantly surprised at the transformation of your coat.
<< Back to Lifehacks Studio
Fabrics/materials
A lot depends on how often you plan to wear your coat. If you intend to wrap yourself in it with the onset of the first cold weather and not get out until spring, then, first of all, you need to take into account wear resistance. The strongest and most durable are wool, tweed, and cashmere. Accordingly, the greater the percentage of these materials in the coat, the more practical it is. Trendy velor and velvet are beautiful, but absolutely impractical, they quickly wear out and lose their original appearance. Leather and suede coats should be chosen from trusted places, since low-quality leather and suede wear out within a short period of time, become thinner, and then tear. It’s hardly worth looking at synthetics, since they don’t heat up.
Warm materials: cashmere, tweed, wool.
Cashmere and wool coat, street fashion.