A suit on a man is always an indicator of respectability.
But only if the item looks neat, without stains, streaks, and smoothly ironed. Statistics show that men practically do not know how to properly iron a shirt and trousers, as this is considered a woman’s job. But in practice it turns out that even the most experienced housewives do not always cope with this task. If a woman struggles with ironing her trousers, problems usually arise with her shirt. No matter how you put it, folds and creases form, arrows appear on the sleeves, and unironed places remain at the collar. Many people wonder how to properly iron shirt sleeves, cuffs and collar, because these places are the most problematic.
Ironing different types of long and short sleeve shirts
How to iron a long and short sleeve shirt? An ironed shirt looks neat, and both the women's and men's versions are ironed the same way.
Several practical life hacks will help when ironing shirts:
- Often there are mistakes such as constantly wrinkled fabric. While you are ironing the last part, the rest are wrinkled. This happens because the material is too wet or hot. It is recommended to process the shirts at the appropriate iron temperature, allow the ironed elements to cool completely and only then move on to the next ones or fold them carefully. To speed up the process, you can open the window.
- Select the heating temperature depending on the type of fabric and the marks on the label. Too high a temperature will leave creases, scorched and wrinkled areas on your clothes. A cold iron will not iron things. If there is no label, then start processing with low heat.
- A fresh, ironed shirt should be hung on hangers, fastened with the top button (snaps, hooks).
- You should never iron dirty shirts. Stains eat into the fabric and will be difficult to remove later when washing or boiling. An unpleasant smell of sweat and staleness remains, which only intensifies.
- Even if you have an iron with a ceramic sole and a steamer, you should never iron over buttons. Carefully process the canvas between them, pushing a narrow spout through.
- If the temperature is incorrectly selected, scorched fabric remains on the sole of the iron. You can clean the surface of a cooled device using a hard rag or soda. To remove scale from the inside, use a solution of vinegar and water in a 1:1 ratio, pour it into the tank and turn it on to warm up. It is recommended to use purified, bottled water for ironing, which does not leave marks or streaks on the fabric.
Adviсe
It is easiest to iron shirts that have just dried after washing. You don’t have to wait for final drying - the process will be easier .
Be sure to study the label sewn to the shirt - it indicates the composition of the fabric and recommendations for caring for it. Please note the recommended iron temperature.
If there is no label on the shirt, and the composition of the fabric cannot be determined, set the iron to minimum heat.
Iron, gradually increasing the temperature. Do this until the fabric begins to smooth out. If the iron suddenly begins to glide worse, the temperature must be reduced so that the sole cools down a little.
Preparing a shirt for ironing, whether it needs to be moistened
A quick way to deal with wrinkled areas on your clothes is to dampen them before ironing. There is no need to over-dry things. If the fabric dries quickly in warm weather, you need to lightly spray it with a spray bottle. Cotton and linen material lends itself well to this processing. Thin chintz or cambric, silk shirts are best ironed dry from the wrong side. You can use damp gauze. Which method to choose is an individual matter.
Note: the straightening effect is better on the hard surface of the ironing board. Clothing should not be pressed too hard to the edges, so as not to leave creases, which will then be difficult to get rid of.
On the reverse side, items with embroidery, voluminous bead decorations, sequins, and lace are also ironed. Items made of artificial fiber, leather, and wool do not require spraying.
Tip: before you start ironing, you should always check the soleplate of the iron for cleanliness and the absence of traces of limescale or rust.
Alternative methods
Ironing is a process that requires not only certain skills and experience, but also time. And therefore, modern technologies have not been left behind - there are devices that make household work easier.
For example, a steam generator or steamer that is suitable for all fabrics and all types of clothing. This technique treats things with a jet of heated steam, and the nozzle itself does not touch them - that is, it simply cannot harm the fabric.
A steam generator or steamer easily smoothes areas of clothing with decorative details and buttons, and the ironing process itself takes no longer than a couple of minutes.
But besides these devices, there are also special presses - devices consisting of two wide plates. When heated, they smooth out the clothes without deforming them in any way.
Temperature selection depending on fabric type
The quality of ironing depends on the temperature sensor and the parameters set on the iron. Compliance with the conditions prescribed by the manufacturer will increase the service life of things and preserve their structure. A certain temperature is suitable for each type of material:
- Product labels may contain various marks. The image of an iron without dots says that there are no restrictions on ironing the item. Three dots inside - the indicators need to be set to high temperatures.
- Before starting work, it is necessary to check the uniformity of heating and the cleanliness of the sole. Ceramic coating has optimal parameters. The difference towards the edges will be 10 degrees.
- Linen is processed at 180–200 o C from the inside out, having previously been moistened.
- It is not necessary to dry the cotton completely; a temperature of 170–180 o C is suitable; a steamer can be used. If the fabric contains synthetics, it is necessary to reduce the heating to 110 degrees.
- Silk products are ironed at a temperature not exceeding 80 o C. You can iron them through thin fabric (not gauze) in one direction to avoid stretching. For complex constructive items, use the steam mode and iron on the weight, hanging the blouse on hangers at a distance of 3–8 cm.
- Woolen products are steamed from the inside out at 100–120 degrees using the point-touch method, instead of continuous movement.
On a note
Useful tips on how to iron men's shirts:
- Without information about the type of fabric, it is better to start the ironing procedure at low temperatures so as not to spoil the product.
- Ironing items in the area of buttons, stripes and labels should be done with extreme caution: when they come into contact with a hot iron, plastic and synthetics melt even when ironing clothes from the inside out.
- To prevent the fabric from deforming and stretching, the iron is moved along the grain thread.
- It is absolutely forbidden to iron dirty things. Any stains under the influence of high temperature become fixed and cannot be washed off.
How to iron a long-sleeve shirt with a regular iron
Start ironing the shirt from the smallest details, collar, cuffs, pockets. Then the shelves and back with sleeves are steamed. Many people are concerned about the formation of arrows and creases during ironing. It is necessary to follow the step-by-step execution of work and move on to the next part only after the previous one has completely cooled.
Ironing cuffs and sleeves, how to avoid the appearance of arrows
To have a neat appearance, the cuffs and sleeves of the shirt must be well steamed. Start ironing the cuffs from the wrong side with the tip of the iron, moving it along the fabric. If there are stripes or convex elements, apply light pressure on both sides.
Sleeves are ironed last to avoid wrinkles and re-ironing. First, one side is processed, then the other (front and back). How to iron shirt sleeves without arrows on an ironing board? To avoid the appearance of arrows in the middle of the sleeve, you can use a special small ironing stand or a towel folded into a tight roll. It is inserted in this form into the product and ironed over it. If you move the sole of the iron all the way to the cuffs, noticeable arrows will form. You need to leave 1-2 cm from the edge. And focus on the middle of the sleeve at the elbow joint.
We recommend:
How to use a handheld clothing steamer
Arrows on a shirt are a personal matter. But business style dictates not to iron them. They also look unpresentable on short sleeves. A woman's wardrobe generally does not accept strict lines and creases in shirts.
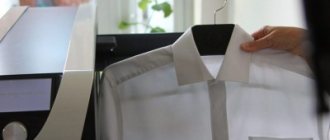
Ironing a shirt collar after washing
A properly steamed collar should lie neatly along the neckline and not wrinkle. The process is not difficult even for beginners. First you need to straighten the collar, lay it out on a board and iron it from the front side from one corner to the middle, evenly passing over the entire surface. You should not delay ironing so as not to end up with a collar that is too stiff and impossible to style. The wrong side is also ironed. It is possible through gauze.
In what order to iron
It is permissible to iron shirt sleeves in a free manner, one that is convenient for you personally. One of the possible ways is to first smooth out the main part of the sleeves, then the cuffs, the shoulder part, and the edges (where the sleeves enter the armholes).
At the final stage, it is necessary to evaluate the result and once again run the iron over the surface of the sleeve, bringing the work done to perfection.
Shirt sleeves
It is permissible to iron them using the entire surface of the iron, having previously tested the heating level on a small piece of fabric. Move the iron freely, without holding it in one area, this can have a detrimental effect on the condition of the product. Use a device for ironing sleeves - a sleeve holder.
Cuffs
The fabric here is quite dense; it would be a good idea to treat the part with additional steam if your iron is equipped with this function. It is better to iron the element with the end of the iron, while carefully ironing small folds at the base of the sleeve.
Shoulder part
After ironing the sleeve, move on to the shoulder part. Place a sleeve underneath or place the fabric on the narrow end of the ironing surface, apply steam and iron with the end of the iron, moving the material carefully.
It is necessary to iron the place where the sleeve enters the armhole. Smoothing out the folds at the sewing site will make it easier to steam them further.
How to iron without an iron and board
Sometimes situations arise when you don’t have an iron or a flat surface at hand. In the old days, large stones heated in the sun were used to straighten things. Nowadays, various steamers are used for these purposes.
You can hang your shirt on hangers over the bathtub and turn on the hot water. Under the influence of steam, the product will straighten out within 20 minutes.
Before the invention of the iron, resourceful housewives used metal mugs filled with hot water, which they ran over the canvas until the creases disappeared.
Immediately after washing, rinse the product well and hang it carefully on a hanger, straightening out all wrinkles. Leave the shirt in the bathroom until the water drains.
A self-smoothing solution made from water, 9% vinegar and fabric softener in equal quantities has an amazing effect. It is necessary to spray the product with the composition and let it dry. You can use a hair dryer to speed up the process.
Important nuances
The steamer is a very convenient feature, but it cannot be used on all fabrics.
When ironing, be sure to take into account such details as the color of the fabric from which the shirt is made. If you need to tidy up a white shirt, you can iron it from the front side and make some effort to smooth out creases. Colored ones usually do not cause difficulties in care. But it’s better to iron them from the inside out so that the design doesn’t start to fade. Black shirts are also ironed, but this is done so that the fabric does not begin to shine from the sole of the iron.
And one more thing: women wear shirts too - that’s a fact. And, of course, there are a couple of points related specifically to lovers of elegant shirts. If the style of the shirt is “male”, then there are no nuances. But for neoclassical ones (with ruffles, folds) - this is a rebus that requires extreme care. And all because of the presence of finishing parts. In this case, you need to start with small elements (trimming, cuffs, collar), gradually moving on to large ones.
How to fold a shirt without wrinkles
To make dried, clean items wrinkle less during a trip, you can roll them up and put them in individual packages. At home, shirts are usually hung on hangers in the closet. To save space, you need to fold them carefully without creating creases. Compact assembly diagram:
- Fasten all the buttons and lay with the back facing up on a flat surface.
- Conditionally divide the shirt into three parts.
- Along the fold line, unscrew the part of the shirt with the sleeve and fold it down. Do the same with the other sleeve.
- Fold the resulting rectangle in three.
- Place on the shelf with the buttons facing up.
Now everyone knows how to iron a shirt correctly without creases on the sleeves and creases and can cope with the task without any problems. A well-groomed appearance and a stylish image are guaranteed.
Rate this post