With a wide variety of clothing, the shirt is still available in both men's and women's wardrobes. According to the rules of etiquette, a shirt is a person’s face. It is unlikely that anyone will want to deal with a person who is wearing a dirty and wrinkled shirt. In order not to make a mistake in front of your future boss or colleague, you need to look neat and beautiful.
First of all, focus on the collar and cuffs, because they catch the eye first. Based on many years of experience, people have stereotypes about how to properly iron a shirt. Even if your shirt is short-sleeved, you will have to iron it.
Ironing rules
Before you start ironing, read some rules. With their help, you will iron the item and avoid many common mistakes.
- After washing your shirt, hang it on hangers and straighten it out. Thanks to this, there will be no unnecessary folds on the fabric.
- Start heat treatment of the fabric while the shirt is still damp. If the shirt has had time to dry, moisten it with a spray bottle.
- How to iron men's shirts correctly? The answer to this question is simple - from the wrong side and you need to start from the collar. Ironing on the right side can be harmful to the fabric and may cause it to fade and become shiny.
If you've ironed the front side of your shirt and there are marks or shine on it, read on to learn how to remove those marks from your clothing.
- Ironing should begin with small parts (collar and cuffs), then sleeves and fronts, and the back should be ironed last.
- Each material requires its own temperature. If you choose it incorrectly, you may burn the shirt or fail to iron the item.
Selecting the temperature mode
A modern iron with a thermostat, as well as a convenient ironing board, will allow you to quickly iron men's shirts made of different materials.
Here's how to properly iron a product, taking into account that each type of fabric requires a certain temperature regime:
- Slightly damp items made of viscose and cotton with the addition of polyester are ironed at a temperature not exceeding 120 °C.
- To iron cotton, select a mode of 150–160 °C; the overdried product will need to be steamed.
- To iron linen fabric, use strong pressure and intense steaming at a temperature of 180–200 °C. The fabric is ironed from the inside out.
- 100% viscose items are ironed slightly damp at 120°C. To avoid stains, it is not advisable to spray the product or apply steam.
- Silk items should only be ironed dry at 60–70 °C.
- Fabric with a compressed effect is ironed at 100 °C without steam.
Caution is exercised when working with synthetic fabrics. As soon as the iron becomes difficult to slide, stop ironing and reduce the temperature.
It is recommended to iron dark-colored shirts from the wrong side. This rule also applies to items made of shiny fabrics and shirts with embroidery.
We advise you to read: A stain on your reputation is indelible, the rest can be dealt with by removing traces of deodorant
It is preferable to use distilled water for steaming. Then dirty spots and streaks will not appear on the ironed clothes, which is possible when using hard tap water.
Algorithm for proper ironing
To prevent the shirt from getting wrinkled, it is necessary to iron a long-sleeved shirt in a certain sequence. It is not necessary to constantly iron in this order, but while you are learning, it is recommended to use this method:
- collar;
- cuffs;
- sleeves;
- shelves;
- back.
This ironing method is based on the principle “from simple to complex.” Once you learn how to iron a shirt correctly, you can come up with your own method and sequence of actions.
Tips and Tricks
The “no crease” function is very helpful when washing clothes. It will help avoid severe creases. If the washing machine is not equipped with such a program, then limit yourself to a gentle spin. You should not set the maximum spin speed when washing shirts.
If the label is cut off
On the inside on the side seam there is a label with recommendations for washing, care and ironing of the product. If there are none or the shortcut is cut off, you will have to select the mode yourself:
- 100% cotton - optimally iron at 150°C, steam;
- polyester - the temperature must be reduced to 110°C;
- crushed cotton - ironed at 110°C without steaming;
- viscose - iron only when wet at an iron sole temperature of 120°C.
- a mixture of linen and cotton - requires ironing at a high temperature of 190-200°C and the use of a steamer;
- linen shirt - iron at high temperature - 210-230°C;
- dense fabric - press on the iron. Military and police shirts are made from this fabric.
A silk shirt is ironed a little differently: it needs to be completely dried and ironed through a thin fabric. Using a spray bottle or steam may leave streaks.
Tags and labels are best left untouched by the iron. They are made of synthetic fabrics that can melt from a hot sole. Or it can become rough and prick the body when worn.
If the iron breaks
Sometimes you urgently need to iron a shirt without an iron at home. For example, when there is no electricity, the iron breaks down. Don't panic, you can use one of the following tips.
- Special wash. Simply wash a shirt made of low-wrinkle fabric and hang it on hangers until dry. After this method there are no folds left. But you shouldn't wring out clothes. Just fasten the buttons, straighten the shirt, turn up the collar and wait for it to dry.
- Hot steam. You can turn on the hot water in the bathroom and hang a shirt on a hanger nearby. The steam will smooth out the wrinkles. A steamer will also cope with this task, if you have one in the house. You can also resort to using a boiling kettle.
- Irrigation. Take a spray bottle and pour one part each of vinegar, water and fabric softener into the flask. The water must be distilled or clean boiled. Instead of conditioner, you can use fabric softener. Hang the shirt on hangers and sprinkle with this miracle composition. After drying, the clothes will look ironed.
If the sleeves are short or the shirt is new
You need to iron a short-sleeved shirt in the same way as a long-sleeved shirt. The process is made easier by the absence of cuffs. A steam generator will help you iron a shirt that is difficult to iron with a regular iron. This item is indispensable in families where shirts are worn frequently.
The step-by-step instructions for ironing a new shirt will not differ significantly from the usual method. But it is more difficult to iron a shirt brought from the store. Proceed in two stages.
- First wash or rinse the shirt in warm water. If this is not possible, then moisten it generously with water and start ironing.
- Press the extra steam button frequently and apply pressure to the iron. If possible, use a steam generator.
It is difficult to iron shirts after boiling. If none of the usual methods help, try ironing the product through a damp cloth. If your shirt constantly wrinkles, for example, from riding in a subway car, or from sitting at your desk at work, then you have chosen clothes made from the wrong fabric.
If there is no board
Not having an ironing board doesn't mean you have to wear wrinkled clothes. Any hard, flat surface can perform its role. You can arrange ironing on a table or sofa. If the floor covering is not afraid of high temperatures, it is permissible to iron clothes on thick fabric on the floor. However, it is better to cover the surfaces with a thick blanket folded several times.
An unusual way to iron clothes without an ironing board is directly on yourself using a hairdryer. Put on a slightly damp shirt and dry it directly on your body with hot air. The method is suitable for women's clothing made from delicate fabrics. Using this technique, clothes are smoothed on a hanger.
Video on the topic
With detailed instructions on how to properly iron a long-sleeved shirt, you'll be able to complete the task with ease. But keep in mind a few more tips: cooled fabric wrinkles more easily. Therefore, if time permits, let the ironed part cool before moving on to the next one. You need to hang the shirt in the closet after it has cooled completely. Be sure to check the steam before ironing, it must be clean. Sometimes scale or rust flies out of the soleplate of the iron with steam. This will come as an unpleasant surprise. Therefore, it is better to iron a white shirt from the wrong side. The same should be done with dark tones to avoid streaks on the front part.
Ironing step by step
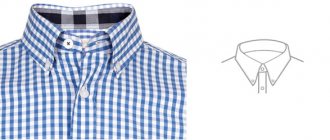
The collar is the first thing people will notice. When you put on a shirt, it is necessary that it stands up and is carefully ironed.
When ironing a long-sleeved shirt, avoid creating creases; they are not needed for shirts.
Collar
- start this process from the inside to avoid smoothing out the folds;
- smooth out the front part of the collar;
- Do not iron along the fold.
The collar is the first thing people will notice. When you put on a shirt, it is necessary that it stands up and is carefully ironed.
Cuffs
- The cuffs must be ironed on the front and back sides;
- give the cuff the required shape;
- iron along the fold.
The cuffs are one of the first places on a shirt that people pay attention to, so they need to look impeccable.
Sleeves
- fold the sleeve along the seam and place it on a flat surface;
- start ironing the item from the shoulder to the cuff;
- turn over to the other side and iron again;
- do not iron the sleeves close to the edge to avoid creases;
- repeat all steps with the second sleeve.
If in an office or other place there is no dress code regarding wearing jackets, then your sleeves will be visible to everyone. It is important that the sleeves are ironed and there are no arrows on them.
Shelves
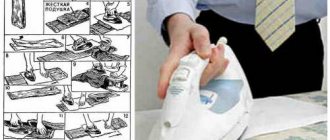
How to do it right: step-by-step instructions with photos
Ironing a man's shirt correctly is more difficult than it seems at first glance. The shirt must be washed and dried properly.
It is best to iron an item that is not completely dry. Ironing begins with processing double small parts, usually from the collar.
It is necessary to inspect the shirt itself and perform the following actions :
- If there are special plastic parts in the corners of the collar that help it keep its shape, they need to be pulled out. But it’s better to do this before washing.
- Unfasten the buttons.
- Make sure that the item does not require repair - all buttons are present and there is no damage.
If the shirt is completely dry, or even dry, you can evenly spray it with water from a spray bottle and leave it in a plastic bag for a quarter of an hour.
Features of collar processing
The collar is laid out with the wrong side up. It is ironed by moving the iron from the edges to the middle.
Handle with care:
- space along the placket and around the top button;
- loop for the top button.
After this, the item is turned over and the collar is ironed from the front side. For materials that are difficult to iron, you can use the steam function.
If the shirt has fasteners in the corners of the collar, they are inserted and carefully smoothed. The fold of the collar should not be smoothed .
Cuffs
After the collar is ironed, move on to the cuffs:
- They are laid out wrong side up on the ironing board.
- Iron in the direction from the corners to the central part.
- Turn the part over to the front side.
- Iron with force from the corners.
- For cuffs designed for cufflinks, combine both loops and iron them together.
There are no folds on the cuffs, regardless of the style of the shirt with sleeves.
Sleeves
After processing the cuffs, iron the rest of the sleeve. To do this, first one sleeve of the shirt is processed, and then the second:
The part is turned with the seam up.
Iron, stretching and straightening the material so that arrows or creases do not form. In this case, the iron should no longer touch the cuffs, not reaching them one or two centimeters. They also leave the seams on the armhole side for later.- Turn the sleeve over and iron the central part. Turn the part over again and put it on the sleeve, starting with the cuff.
- Ironing begins by retreating 20 mm from the cuff.
- Smooth the bar on one side and then on the other side.
- Buttons on the cuffs are fastened.
- Iron the bar with the fastener.
It is convenient to iron the sleeves using a specially designed sleeve part that comes with the ironing board. Without this detail, it will be more difficult to properly iron long sleeves.
An alternative option is towels tightly rolled into a roll shape . In the same way, a duvet cover or other material can be replaced by a neatly folded and then rolled up blanket.
Shoulder part and yoke
After the collar and sleeves are ironed, the shirt is put on the ironing board from the narrower end so that it is convenient to iron the shoulder part.
Next they move on to ironing the junction of the collar with the shirt, and the seams on the armholes. When ironing shoulder seams, the collar should not fall under the iron again.
Shelf
Begin processing the shelves with the one on which the buttons are located . The front of the shirt is laid out lengthwise on the ironing board so that the shoulder part is on the narrowed side of the ironing board.
Shelf processing:
- straighten the fabric;
- near the buttons, the iron should be moved carefully, trying not to touch them;
- the iron is moved from bottom to top;
- after the part of the shelf near the collar is ironed with the tip of the iron, the device is moved to the lower edge of the product;
- repeat the processing on the second shelf.
If the strip is hard and multi-layered, it is recommended to first iron this part first from the inside and then from the face.
Back: “finish straight”
The back and side seams are much easier to iron. To do this, the product is placed on the ironing board so that the shoulder seam is on the narrow end of the ironing board, and the bottom cut is on the wide end. It is recommended to slightly stretch the side seam during the ironing process .
The step-by-step process of ironing a men's shirt is presented in the video:
How to iron a shirt as quickly as possible
You may not learn how to iron a shirt, but what to do if you are short on time and need to iron the shirt. With the help of simple tips, you can easily cope with this problem:
- When washing, do not spin. When you take your shirt out of the machine, you don’t need to wring it out, just hang it up. During natural drying, it is unlikely to wrinkle and you will not need an iron.
- Put the wet shirt on yourself; as it dries, all the folds will straighten out without outside help.
- Exposure of the shirt to steam is a good option in this case. Steam the shirt with an iron and it will quickly smooth out, leaving no wrinkles.
- spread the backrest on one side along the seam;
- iron along it;
- run the iron through the center;
- iron from the second part along the seam.
You bought a new shirt, but it doesn't fit. What to do in this case? The shirt size can be reduced using an iron. This method is suitable for a shirt made of cotton fabric. Use an iron with a steamer to iron the wet shirt for 15–20 minutes. This time is enough to reduce your item by 1-2 sizes.
Solving common problems
Shirts made from compressed fabric are never ironed, but if such a mistake has already occurred, there is a sure way to save your favorite item.
- Place the shirt in a bowl of cool water - when it is completely wet, wring it out and place it on a flat surface.
- Align the parts of the product, and then begin to manually form folds, starting from the center of one of their sides. The depth of the “wrinkles” should be approximately 2.5 centimeters.
- Now you need to involve an assistant in the process. Twist the shirt with a rope in opposite directions - the result is a tight spiral. To prevent it from falling apart, secure the ends with cotton rope.
- Let the shirt dry directly in this state, it is recommended to put some kind of weight on top.
Often, after ironing, shiny spots . You can also successfully fight them:
- Rub dry salt onto the shiny area. If this does not help, mix a spoonful of salt with the same amount of ammonia and two tablespoons of water: treat the affected fabric with a dampened sponge, then rinse with warm water and iron through a damp cloth.
- If we are talking about delicate fabric, you can try onion juice: divide the peeled onion into two halves and rub the shiny areas. The shirt will then need to be washed again.
- Prepare a vinegar solution (1 cup of vinegar per 3 glasses of water). Dampen the shiny prints, and later, while ironing, spray the fabric again from the sprayer (turn the iron to steam mode).
- Baking soda will take care of removing shine from silk and wool fabrics: mix a little water and spread the paste over the stained area. When the composition dries, sweep off the powder with a soft brush and rinse with cool water.
- You can use a regular soap solution to remove excess shine from black fabric: moisten the gauze and lightly, without pressing, iron the shirt. After this, the item should dry naturally.
- Lemon juice is also great for black shirts - just sprinkle a few drops on the marks and rub lightly.
- Old newspaper removes scorch marks very well, but you will need to be extremely careful. When ironing the item through a sheet of newspaper, make sure that the paint does not cling to the fabric.
- In many cases, a strong tea infusion can correct the situation. Brew loose-leaf black tea, wipe the cloth and carefully “walk” with a not hot iron. There will certainly not be a trace left of the flaw!
How to iron a shirt as quickly as possible
You may not learn how to iron a shirt, but what to do if you are short on time and need to iron the shirt. With the help of simple tips, you can easily cope with this problem:
- When washing, do not spin. When you take your shirt out of the machine, you don’t need to wring it out, just hang it up. During natural drying, it is unlikely to wrinkle and you will not need an iron.
- Put the wet shirt on yourself; as it dries, all the folds will straighten out without outside help.
- Exposure of the shirt to steam is a good option in this case. Steam the shirt with an iron and it will quickly smooth out, leaving no wrinkles.
Preparing the Shirt
A few tips to help you prepare your shirt for ironing and achieve a quality result:
- wash the shirt and remove all stains, otherwise the dirt will penetrate even deeper into the structure of the fabric under the influence of temperature. Then it will be almost impossible to remove them.
- It is best to dry your shirt on hangers, this way it will retain its shape and wrinkle less. You need to fasten all the buttons, straighten the cuffs and collar. If you hang the product to dry on a rope or radiator, folds will form on it; ironing it will take more effort and time.
- if the product is completely dry, spray it with distilled water from a spray bottle. But it is best to iron a slightly damp shirt that is not completely dry.
- Silk, especially artificial silk, cannot be ironed with steaming; only dry ironing is allowed from the reverse side.
- Delicate materials should be ironed through chintz or satin fabric; gauze and waffle towels should not be used as lining - they may leave marks.
- trim all protruding threads and remove lint. The most convenient way to do this is with a roller for cleaning clothes. This way, dust will not stick to the iron.
- Turn items with any accessories, embroidery, or convex pattern inside out. The soleplate of the iron can be damaged if you run it over such decor.
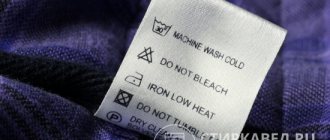
- read the instructions carefully. The label indicates all the necessary information about caring for the item, including the mode in which it should be ironed.
Before turning on the iron
You need to dry a clean, washed shirt flattened, hanging it on a trempel (hanger). There is no need to wait for complete drying; ironing a slightly damp product is much easier and faster. If the fabric is still dry, evenly moisten it with a home spray bottle about an hour before ironing. Or wrap your shirt in a damp towel for a few minutes.
However, this does not apply to silk shirts. They should be ironed exclusively dry through a damp cotton cloth. Spraying with water or ironing through cheesecloth may cause stains.
Do not rush to turn on the iron until you have examined the label on the shirt. The composition of the fabric is indicated there, as well as recommendations from the manufacturer regarding the ironing process. It takes very little time, but it saves you from the possibility of ruining the thing.
A high-quality iron plus a good ironing board will make the process more pleasant and comfortable. You only need to fill the iron with distilled water, but not tap water. Otherwise, salt deposits may form in the tank and stains on things during ironing cannot be avoided. In addition, do not forget to periodically clean the soleplate of the iron.
Ironing short sleeve items
In this case, figuring out how to properly iron clothes is much easier. It needs to be straightened along the shoulder and side seams, the back is straightened and the iron is inserted without touching the collar and seams.
You should start with the shelves, and then move on to the collar. On the sleeves, the central fold and shoulders are ironed on a towel, which is folded in half. This way it is possible to avoid the appearance of creases. If the fabric is dense, it is better not to steam. In this case, it is recommended to use a spray bottle.
New technologies, or Iron - yesterday
Not so long ago, irons that produced steam and sprayed water seemed like a miracle of technology. Today, such a device will not surprise anyone. In addition, ironing a shirt that is difficult to iron is not so easy with a regular iron. New achievements of technological progress are coming to the aid of housewives. Take a closer look at the next three.
- Steam generator. Both in form and in essence the device is quite close to an iron. The main difference is that it continuously delivers a powerful stream of dry steam. The steam generator smooths out even heavily wrinkled items.
- Steamer. The action is based on an intense stream of hot steam, which removes wrinkles, makes the item look fresher, disinfects and removes odors from the fabric. The main advantage is that you can iron clothes in a vertical position, without an ironing board. But a steamer cannot be considered a complete alternative to an iron, because in the instructions for use you can find restrictions on types of fabric.
- Steam manken. An inflatable mannequin shaped like a human torso. It quickly dries and smooths shirts, jackets, and sweaters. The device is intended for professional use and therefore cannot be found in the public domain.
Fabrics and modes
To keep shirts in shape, they need to be hung ironed on hangers.
This is interesting. According to unofficial statistics, about 90% of men do not know how to iron shirts. These are either married individuals whose ironing duties are assigned to their wives, or those who prefer an informal style of clothing that does not involve wearing classic shirts.
If you want your shirt to last longer, select an ironing mode that matches the fabric from which the item is made. (This rule, by the way, applies to all clothing).
Let’s say right away: if the composition of the fabric is unknown, then we start with the lowest temperature, increasing it gradually.
Artificial fabrics
For a polyester shirt, you can safely set it to 110 degrees, but it is better to refuse steam or set it to minimum. Wrinkled shirts, which have been fashionable for several seasons, also look good at 110 degrees, but it is forbidden to turn on the steamer, as the folds will straighten out. For viscose, you can heat the iron to 120 degrees and add steam, but it is not recommended to turn on the spray bottle. Otherwise, you will have to rewash the shirt because of the stains that appear.
Natural
Cotton shirts should be ironed at 150 degrees with the steamer turned on to maximum. If the fabric contains cotton and linen, then the temperature can be increased to 180 degrees and also steamed thoroughly. The maximum temperature - 230 degrees - is required by flax. In this case, be sure to turn on the steam mode and the spray gun. Silk shirts are ironed at low temperatures, without steam, to avoid streaks, and only from the inside out. Otherwise, the fabric will begin to shine.
Preparatory process
Before you start ironing, you need to prepare the available tools that may be needed. Namely, an iron, an ironing board and a spray bottle. It is advisable that the board have a special device for ironing sleeves. It is this that allows you to iron shirt sleeves without arrows. But you can replace this device with other available means, for example, a rolled up towel.
If the iron does not have a steam function, you will need a spray bottle of water. And also two towels, but always light in color so as not to stain your white shirt. One needs to be spread on the surface of the ironing board. Through the second, it will be possible to iron the shirt so that stains do not form on it and it does not lose color.