The need to sew a jacket appears quite often. The reasons may be different. When preparing for the autumn-winter season, you may find that last year’s item was too small or, on the contrary, a size too large.
Sometimes the volume of a jacket no longer corresponds to fashion trends, although the condition of the item allows it to be worn for many more years.
A similar problem often arises when purchasing something new that you like but does not match the required size. The solution may be to contact an outerwear repair shop , but this requires time and material costs. A cheaper way is to remake the item yourself.
At the same time, if you do not have the appropriate skills, then it is better to give the item to the Mobile Tailor studio, whose specialists will do everything to the highest possible quality.
Basic Rules
IMPORTANT ! You can only reduce your jacket by one or two sizes.
Before you start work, you need to take care of the necessary sewing supplies. The house should have everything you might need:
- Sewing machine;
- Scissors;
- Chalk;
- Threads to match the jacket;
- Contrasting color threads;
- Tailor's centimeter or ruler;
- Non-woven fabric.
It is recommended to sew a jacket one size only in the place where it is too big.
Re-shrinkage
Some things are very difficult to shrink. You can wash clothes to make them smaller in the following ways:
- Boil water.
- Soak items in hot water. It should cover them completely.
- Place items in the washing machine using gloves to avoid burning your hands.
- Wash items in hot water using a very small amount of powder.
- Place items in the dryer as soon as the washing process is complete. Dry items at high temperature. Check product size. If the garment still seems large, repeat the process until it has shrunk sufficiently.
How to sew a jacket at the waist?
This is the simplest option for tailoring a jacket to your figure. You just need to add new stitches along the side seams at the waist.
To do this, you need to rip the lining at the bottom of the jacket to open free access to the side seams. The location of new stitches must be determined in advance by trying on the jacket over the corresponding clothing, and mark them with chalk or contrasting threads.
The marked seams must be sewn on a machine with a stitch width the same size as on factory seams.
Similar work must be done with the seams on the lining.
After this, you need to try on the jacket and, after making sure of the result, smooth out the seams and sew on the lining.
Stages of work
Once you have decided how many centimeters you need to sew on your down jacket, you can begin to work directly.
Sew on the sides
- Turn the jacket inside out. Using a sharp object (small scissors or a special seam ripper), open the side seams and carefully remove the old threads. Some modern products are factory-treated with adhesive tape. If this is present, then it is necessary to peel off the hem allowance and, if possible, remove the sticky layer from it. Fabric soaked in glue will be more difficult to stitch.
- Afterwards you will need tracing paper or other thin paper. Some housewives use thicker paper, for example, wallpaper, but for inexperienced seamstresses we recommend tracing paper, on which you can easily stitch . Place it on the side seam and draw a taper line along it, then mark half the distance from the taper line to the edge. Connect the marks. Do not skip this step so that in the future there are no gathers and constrictions on the front side of the product. Now use your sewing machine to make one stitch along the drawn line directly on top of the tracing paper, then remove the paper.
- The next step is to remove the factory threads using scissors using upward movements. The allowance must be cut at a distance of 1 cm from your stitching. If the seam was taped at the factory, then repeat this action using non-woven fabric and an iron. Apply the hot iron for a couple of seconds and remove the hot iron: the material sticks very quickly.
- At the end, open the seam on the lining fabric, sew it along the side seams according to the size of the front fabric. After this, you can connect the lining to the outer material. Next, you just need to sew the cut and turn the down jacket inside out. All that remains is to try it on!
Shortened into a jacket
If you think that the down jacket is too long and you decide to cut it yourself, then follow the instructions:
- open the bottom seam of the product and remove the factory threads;
- open the lining material by 15–20 cm;
- Carefully cut the length you need with scissors. If feathers or fluff get on the cutting line, it is better to carefully remove them so that they do not come out when sewing ;
- form a hem from the outer fabric, turning the top 0.5 cm of the fabric inward, and sew an even seam;
- trim off the excess lining and sew to the inside of the down jacket.
How to sew a sleeve with your own hands?
If you are not satisfied with the length of the sleeves on your down jacket, then shortening them will not be difficult. Here you need to follow the same pattern as when cutting the bottom. By the way, now the current sleeve length is just below the elbow. If you wear this jacket with long gloves, you get a stylish and fresh look. If you are not satisfied with the fit, armhole or width of the sleeve, then it will be much more difficult to recut and sew it yourself. This is possible if you have sewing experience. If you decide to do this, then pay attention to the following tips:
- do not rip off the sleeve immediately. Try using a coat hanger. If the result does not satisfy you, carefully open the side seam of the product, open the sleeve;
- find a pattern (you can find a diagram on the Internet or use a sleeve from an old jacket that suits you), attach it and trace it with chalk along the contour. Draw a new armhole line, first adjusting the side seam line;
- if necessary, decide on the sleeve width
- sew the side seam of the down jacket (see above for how to do this), then sew the side seam on the lining and the sleeve itself;
- fit the sleeve correctly. Using chalk and pins, carefully mark fit reference marks on the sleeve and jacket itself, pin the pieces together and begin basting. It is important to ensure that the head of the sleeve does not begin to wrinkle ;
- turn the sleeve inside out, straighten the lining, carefully sew the rest of the seam;
- Turn the sleeve right side out.
Do not try to re-cut a sleeve without a pattern. Even professional seamstresses always use it so that the sleeve does not twist or wrinkle when worn.
Sewing a down jacket is quite possible if you have at least minimal sewing skills. The main thing is to take your time: once you cut off the excess, you won’t be able to put it back. The quality of your work determines whether you will wear this item in the future.
How to remove pills from a sweater?
How to sew a jacket on the back?
This option for altering a jacket is a little more difficult than the previous one, but it is also quite possible. You should first determine which seams the new stitches will go through and the scale of suturing.
The jacket and one of the sleeves must be turned inside out. At the seam of the lining sleeve, you should rip a section 15-20 cm long. Through the resulting hole, you need to pull out the main material of the jacket. Now you can lay a seam of the optimal width in the center of the back, then smooth it out and tuck the elongated section of the jacket into the hole in the lining.
Next you need to put the lining in order. The sections of the torn area must be aligned and carefully stitched or sewn by hand with small even stitches.
And finally, you can turn the jacket right side out, straighten it out and try it on.
Before performing all this work, keep in mind that they require a certain level of professionalism. Therefore, if you are not confident in your skills, we recommend entrusting this to the professionals from Mobile Tailor.
We adjust the patterns (taking into account the features of the figure)
HELP SPECIALISTS. Where do you need to cut off the sleeves at the head so that they don’t get too narrow and at the same time they are shortened. I've already racked my brains with this problem and can't find the information I need anywhere. To me …
Girls, please help.. I have a very beautiful leather jacket in stock, the color is beautiful, the leather is gorgeous, the cut of a classic jacket. But! The model is outdated, but that’s where they are. large shoulders, that is, the shoulders themselves are enlarged, plus there are also hangers made of syndepon (well, remember, 5 years ago this was fashionable, all jackets had such shoulders). And I really want to wear it again.. Please tell me how to reduce or alter such a shoulder, if so, is there a link to some kind of master class? I'm still new to sewing, but very diligent) needlewomen, please tell me.
girls, tell me at least in a few words, what to pay attention to?
girls, tell me at least in a few words, what to pay attention to?
How to hem the sleeves of a jacket?
If the sleeves of the jacket are a little long, they can be shortened. The bottom of the sleeve must be opened, the cuffs removed and excess material cut off. The size of the part to be cut must be determined in advance, and allowance should be made for allowance. As a rule, reducing the length by one size is minus 1.5-3 centimeters.
The sleeve lining is shortened in the same way.
Next, the cuff is combined with the front side of the sleeve and attached. To complete the work, the lining is sewn on with an exact match along the seam.
How to sew a down jacket with your own hands? Master Class
To sew this type of outerwear you will need the following tools and materials:
- 1.5-2 meters of main fabric for exterior decoration;
- 1.5 meters of lining fabric;
- 500-600 grams of fluff;
Important! You can use both natural down and its various synthetic analogues, such as Isosoft or Thinsulate, for filling.
- 3 meters of fabric for the inside;
- Detachable zipper 80-85 centimeters long;
- Narrow and flexible braid;
- Tailor's needles;
- Tailor's marker or soap;
- Tape measure;
- Threads in color;
- Needles;
- Scissors;
- Sewing machine.
Important! Please note that for external finishing the fabric must be water-repellent with special impregnation.
Once everything is prepared, you can safely begin the process of making a down jacket with your own hands. The procedure is as follows:
- First, create a full-size pattern for the future product. For these purposes, you can use absolutely any model you like.
Important! The pattern should be one size larger. This is due to the fact that the finished product is compacted due to the down lining.
- Cut out the blank elements for the outer and inner parts.
Important! Don't forget to leave 1.5-2 centimeters of fabric for allowances.
- Make side and shoulder seams on the elements intended for the inside of the product. Afterwards, fold them right sides together and stitch the necks and fasteners.
- Fill the finished piece with down and quilt it into squares measuring 6x6 centimeters.
- Fold the sleeve elements right sides together and stitch them, leaving a cut along the armhole.
- Fill the sleeves with down and quilt them in the same way as the main piece.
- Stitch the elbow sections of the sleeves, then sew them into the armholes.
- Connect all the parts of the hood, sew it into the upper part of the down jacket.
Important! For the hood, instead of lining, you can use regular padding polyester.
- Sew all the cuffs. To do this, cut out a rectangle equal to the width of the cuff x2, and a length equal to the circumference of the wrist + 3 centimeters from the main fabric. Fold them in half and sew the side seams.
- Fold the finished part with the wrong side inward and lay parallel lines, leaving an unstitched space of 1 centimeter on each line.
- Using pins, pull the ribbon through the unstitched hole.
- Stick the inner and lining into the blank for the top.
- Align all the cuts and secure them with tailor's pins.
- Sew all three layers of the future product along the side and shoulder seams.
- At the neck of the lining, fold the cut towards the wrong side. Sew it to the hood stitching seam.
- Sew the finished cuffs to the bottom of the sleeves.
- Fold the bottom hem towards the wrong side and stitch it.
How to sew a jacket in several sizes?
If the jacket is several sizes too large, it is better to entrust its alteration to the jacket repair from Mobile Tailor. But if you have enough free time, you can try and cope with the problem yourself.
You need to attach tracing paper with a pattern to the jacket and mark the location of future seams, as well as the suturing lines. Turn the jacket inside out and rip out the lining. Use a sewing machine to make new seams, then use scissors to carefully rip apart the factory stitches, cutting off the excess material so that there is an allowance of about one centimeter wide.
Likewise, the lining must be reduced to fit the new dimensions of the product.
The jacket and lining must be aligned at the seams and the ripped seams on the lining must be sewn.
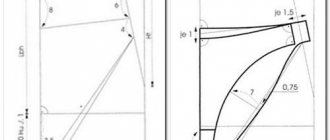
Layouts for armholes
When sewing in sleeves, you may encounter various difficulties - folds along the edges, tightening of the fabric in the armhole. Without control notches, part of the part moves up or down. Therefore, having found your “ideal” basis for the bodice and sleeves (it is usually single-seam), it is worth creating a layout for the armhole according to your measurements. It will allow you to make all the adjustments in advance, and there will be much fewer mistakes during fitting.
The drawing does not take much time and fits on a standard A4 sheet. Having made a basic pattern, you can use it to create various clothes - jackets, dresses with long sleeves, coats. You will simply need to attach the layout in the “working” pattern and determine whether it needs to be expanded, deepened or reduced. It will help solve many problems even at the drawing design stage.
Possible shortcomings
- Inconsistency between armholes and sleeve lines (for example, if the gathering allowance is not made or is too large, or the magazine pattern does not suit you personally). You need to move the top point along the edge to suit the features of your figure.
- The difference between a layout and a ready-made “alien” scheme, which does not take into account individual sizes and body features. If you use a standardized drawing rather than an individual one for cutting, you will have to change its armholes (adjust the depth, the slope of the seam along the shoulder).
- Violation of the length of the side seam. When changing the size of the armhole, place the parts of the drawing side by side and make sure that the designations for the back and front waist are on a single line.
How to sew a leather jacket?
If you still decide to alter a leather jacket yourself , then you should first prepare a pattern. The product must be opened and laid out on the work table. Place the pattern on the skin and trace the contours of each part with chalk.
Attention ! It is necessary to leave allowances 1-2 cm wide at the top and sides, 2-3 cm along the bottom line.
Natural leather must be cut with sharp scissors exactly along the intended contours. Each part must be reinforced with non-woven fabric. When working with leather, keep in mind that needle marks remain on it, so basting cannot be done.
To ensure that the leather does not move during stitching, you need to install a special Teflon foot and a thick needle on the sewing machine. It is better to sew the skin with stitches of three millimeters.
After completing the operations, the jacket must be turned inside out and ironed. The allowances are glued and left to dry.
comments (5) to “Corrections in the area of shoulder cuts”
!Good afternoon! I have a large bust and narrow shoulders. If you are short, in order not to look square, when sewing products you have to adjust the shoulder by 2.8 cm. In this case, the sleeve does not fit well. I ask for your advice on how to adjust the sleeve cap,
Sincerely, Irina
Tell me how to sew a jacket in the shoulders and on the sides so that it is a little narrower, it is very necessary :-)))
Good afternoon. you can read here or
if your reliefs go up to the shoulder seam, then: 1- pin the excess fabric along the waist and chest line, mark how much larger the product is than you want (prick needles along the pinning lines or sew with a needle and thread, chalk if the product is dark in color) 2- spread the reliefs along the front and back 3 - draw new reliefs along the marked lines p 1 4 - hand-sew the reliefs, if the allowances are very large, cut off, leaving an allowance of 2 cm 5 - put on the product and check if you like how it fits on you again. if not, then loosen it or take away the excess even more 6- after checking, you can grind down the reliefs; if the product has a lining, then it needs to be opened in the sleeve and turned out, and reduced in the same way as the top of the product along the reliefs.
if the relief goes into the armhole, then: 1- rip out the sleeve and rip out the side seam, having previously marked the excess along the side 2 - outline how much to reduce the shoulder seam and reduce along the side seam, baste and measure (fit on the chest, hips and waist) 3 - if you like the fit, sew down the side seams 4 - pin the sleeve (as it should be in finished form, seam allowances inside) along the new armhole line. see if you like the position of the sleeve or not... 5 - mark the new armhole line you like. cut off the excess and sew in the sleeve. - sew the shoulders to a new place... that's all =)
Good afternoon! Tell me how to make the shoulder line wider? I bought a sleeveless dress online, and the armhole is like a sundress, the upper part of the arm is very visible, they are full. What can you think of?
Sometimes it happens that people reluctantly buy clothes that do not match their size. Of course, you can exchange the product for another one in the store. But most often this is not possible. In addition, it is common for a person to change body weight, therefore, problems arise with clothes: they become small or one size larger. In any case, you need to get out somehow. And going to a studio is not cheap. Then there remains one more option for the outcome of events, which will be discussed in this article.
Useful tips and tricks
In order for the item to be altered neatly and fit well on the figure, you need to use the recommendations of tailors from the Mobile Tailor studio:
- Follow the correct sequence of actions: first, turn the jacket inside out, and then rip it open.
- Do not attempt to correct the fit of the shoulder or sleeve armhole. This can only be done by re-cutting the sleeve.
- Leave the lining slightly larger than the body size for a loose fit.
- Make sure that the length of the armhole and sleeve cap match perfectly.
- Secure the connection of parts with pins.
- Place the darts on the back closer to the midline.
- For a wide waist, sew on another button.
Blended fabrics
If any synthetic material is added to the composition of a cotton T-shirt, then the procedure for changing its size will change while maintaining the first stages. You can add boiling or steaming to washing in a washing machine, which exceeds 100 °C. A double boiler will increase the maximum possible temperature to 220 °C. The last steps must be carried out with caution and as a last resort, as there is a risk that this will completely damage the product.
You should use a mesh bag to protect your clothes in a top loading machine. For mixed fabrics, you need to choose a delicate wash with a short duration. Most washing machines have a low temperature setting, which is ideal in this case. Increased temperature can compress the tension of the threads, causing them to move closer to each other and the size of the item to decrease.
When washing, use a mild powder and avoid using chlorine bleach as it can damage the material. After washing, the product should be wrapped in a towel for several minutes and do not wring out. This will remove excess water from it and not damage the fabric structure.
Another radical method of washing clothes to make them shrink is suitable for items made of cotton, linen and other fabrics, except synthetics and silk. It consists of alternating hot and cold water, into which the item is alternately immersed. To do this you need:
- Place the product in a container and fill it with boiling water, add fabric softener.
- Wring out the product.
- Prepare a bowl of water mixed with pieces of ice. Immerse the item of clothing in it and leave for 20 minutes.
- Squeeze it lightly and place it on a towel to dry.