Their leatherette outerwear is usually not environmentally friendly and durable. And in our stores you can’t always be sure that a beautiful product is a natural product and not an artificial one. Reasonable people prefer to buy genuine leather in order to order a jacket, raincoat or coat from it and, as a result, be satisfied with outerwear made of high-quality breathable material.
Restoring a jacket is a painstaking, almost jewelry-like process. On the Internet you can find both photos and videos that tell in detail how to repair a leather jacket yourself. But the recommendations are not always feasible - either special equipment or skills in working with specific materials are required. If you decide to take on leather repairs yourself, check out the important tips below. They will help you successfully solve this problem.
How to fix a gap with your own hands
It is believed that leather is a fairly durable material, but it can also tear. Although, of course, holes appear less often on such products than on fabric and canvas ones. If this has already happened, then the instructions for bringing the jacket into proper shape depend mainly on the form of damage that has occurred. There are situations when the material is torn by a “corner”, and there are situations when a piece of skin flies off completely.
In the first case, the sequence of actions is as follows:
- Provide access to the tear from the inside of the leather jacket. It is necessary to rip the jacket lining along one of the seams.
- Carefully, as far as possible, smooth out the torn corner. Now you need to fit it back and secure it with tape on the front side.
- We glue a patch made of leather, thick fabric or suede from the inside. We make sure that the overlay is larger than the tear site and protrudes beyond each of its edges by 10-15 mm.
- Having smoothed the surface from the inside, we install something heavy on the front side. Leave the load until the patch is completely dry.
- We remove the tape. Apply a thin layer of glue along the entire joint of the gap from the outside (it is convenient to use the tip of a toothpick for this).
- We mask the damaged area with a special leather paint to match the product or a regular cream.
- Sew up the inner lining.
Important: Please note that the tape you take is initially very sticky. It may leave marks on the surface of the jacket. It's better to "weaken" it. To do this, glue it to the surface of your leg, peel it off, and then use it for its intended purpose.
In a situation where the hole in the jacket is obvious and a piece of material is completely torn out, repairing the product is somewhat different.
- We rip the lining from the inside in order to get to the place where the skin is torn.
- We level the damaged area as much as possible, glue a patch from the inside, and place a weight on it.
- After the glue has completely dried, we repair the front part of the product. If the “original” torn piece is lost, you need to cut another one from a flap of leather, which is as similar in characteristics as possible to the material of the jacket. We make sure that it is identical to the shape of the hole. We put this piece into the hole.
- Carefully fill the resulting joint with glue along the entire perimeter of the outer patch.
- After everything has dried, paint over the damaged area. Sew up the ripped lining.
If the gap is large and is in plain sight, then repairing it with your own hands will be quite problematic. It is better to contact qualified craftsmen for help in the studio. If an area of skin needs to be replaced, specialists will be able to select the most suitable flap and carefully stitch it in the right place.
Tip: Alternatively, you can seal the jacket yourself and add leather patches. Particular attention should be paid to masking the damage. For example, you can install additional decor in this place. This approach will not only hide traces of the tear, but will also give the jacket originality.
Methods for repairing leather products
Nowadays there is a huge selection of materials for gluing surfaces.
In order to glue the product unnoticed, the glue must have a number of characteristics, these include:
- elasticity;
- good viscosity;
- quick drying;
- heat resistance;
- resistance to water, fats and oils.
The universal adhesive “Moment” best suits these characteristics. In some situations, you can use rubber glue, which is used to repair shoes.
Other materials are used much less frequently: PVA, nairite glue, liquid leather.
What to choose, you need to decide for yourself. But before performing the procedure, you need to read the instructions.
How to sew up holes and cuts
In order to stitch the product, you will need a sewing machine, a special strong needle, a prepared leather patch and threads of a matching color. This largely determines how carefully you can deal with eliminating defects on a jacket at home.
Restoration of leather canvas consists of several steps:
- We get to the place of the tear from the inside of the jacket (to do this we rip the lining).
- We trim the edges of the hole, making them as even and smooth as possible. We prepare a fabric patch, which we apply in this place. We take into account that the flap should protrude beyond the edges of the “wound” by 1.5-2 cm.
- A piece of skin, which is slightly larger in size than the damaged area, is applied externally. Make sure that both patches are positioned evenly in relation to the hole.
- Using a sewing machine, attach the patches.
Important: make sure that the needle is strong enough and suitable for working with leather. Otherwise, you can not only ruin the jacket, but also damage the sewing machine.
Sealing process, preparation for work
Before gluing artificial leather or natural material, it is necessary to carry out preparation.
Step-by-step instruction:
- Cut a patch from the same material as the product. Its size should be at least 1 cm larger at the edges.
- Align the hole with a sharp blade, trim off threads and uneven surfaces.
- Using a damp cloth, wipe the surfaces, remove dirt, dust, and any debris from them.
- Degrease them after cleaning. Wait until completely dry, do not touch with your hands.
- Use fine sandpaper to sand the areas to be glued.
The preparation process directly affects the final result.
How to fix a collar
If this section of the fabric is torn, then the damage can be repaired using any of the previously described methods.
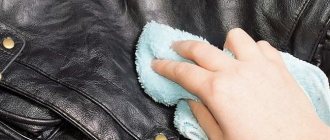
Owners of leather jackets note that one of the most common problems they encounter is the appearance of greasy marks on the collar. This happens if the product is worn for a long time and is not cleaned in a timely manner. There is a way to deal with this problem:
- We treat areas of the skin that have lost their attractive appearance with gasoline. Let the material dry and check the result. If necessary, repeat this manipulation several times.
- After removing all traces of fat, a special paint will allow you to restore the original color of the skin. Using a sponge, carefully paint the collar. Make sure that the product spreads evenly over the entire treated area.
Remember that at home there is always a risk of damaging the product due to careless actions. To prevent this, test the described method in an inconspicuous place. And only then boldly get to work restoring the proper appearance of the collar.
The question remains: if the leather on the jacket is cracked in this area, what should I do? To eliminate such defects, it is advisable to use special dyes that match the color. However, it is better not to use those that come in the form of sprays. Such products are usually sprayed from a distance of 30-40 cm, due to which the dye goes beyond the collar and falls on a larger area.
We eliminate gaps
This is perhaps the most common problem among leather jacket owners. If you get caught on a poorly driven nail, an iron fence or other sharp object, the item will be left with an unsightly cut that spoils its appearance. First you need to figure out what the gaps can be.
On a note! The most common are two cases: either a piece of skin is completely torn out, or the cut will be in the shape of a corner. Please note that recovery procedures in these situations are radically different.
Repair using liquid leather
Today, the market offers a wide range of products that greatly facilitate the repair process. Particular attention should be paid to such a product as liquid skin. It allows you to quickly and easily eliminate various types of damage to the main fabric, pockets, collar and cuffs.
Important: before working with this product, the damaged area must be cleaned of dirt, degreased and thoroughly dried. Otherwise, the actions taken to restore the product may be ineffective.
By choosing liquid leather to match the jacket, you can cope with both deep scratches and through cuts. The only difference in repair is that in the second case, you will need to glue a piece of fabric or leather from the inside that completely covers the cut. The rest is simple:
- Apply the product in 1-2 layers (depending on the depth of the damage) to the edges of the scratch. Make sure that liquid skin does not fall outside the cut. If this happens, remove the excess with a dry sponge.
- Before the mixture begins to dry out, blot the damaged area with a clean cloth. This will somewhat eliminate differences in the surface textures of the jacket and the applied product.
Carefully follow the instructions for use of liquid leather and repair outerwear at home without resorting to the services of professionals.
What is known about natural and artificial leather (leatherette)
Before you learn how to glue leather, you need to consider what kind of material it is and what types there are.
There are several types:
- Artificial leather is granite, vinyl artificial leather, stretch leather and others. Leatherettes at a lower price, which are made from polymers. In appearance it is not much different from the natural one. It loses in terms of performance characteristics, however, it withstands mechanical stress better.
- Genuine leather is the most expensive option, which is used for sewing clothes, various accessories, making furniture, and finishing car interiors. It is comfortable to wear and durable.
- Recycled is an analogue of leather, made from natural scraps and parts.
- Eco-leather stands out as a separate group.
This is a modern material that is quickly gaining popularity.
Leather comes in vegetable and chrome tanning.
In addition to tanning methods, they are divided into:
- clothing;
- haberdashery;
- lining;
- furniture;
- shoe
They are made from bulls, sheep, goats, pigs, calves, and exotic animals.
According to the processing method, they are distinguished:
- suede leather;
- split wood;
- nubuck;
- perforated;
- embossed and some others.
According to the coating processing method:
- Painted with nitro paint, a relief created by a press.
- Uncoated - painted, but not further processed.
Eco leather
This is a combination of a polyurethane base with synthetic fibers. After launching into production, the number of animals killed to obtain natural material decreased.
Several strengths have been noted for which modern manufacturers and buyers value it:
- Various color variations.
- Resistance to mechanical stress.
- Less expensive production process.
- Visually, the pattern is difficult to distinguish from genuine leather.
- Easy to process and stitch.
- Durability, wear resistance.
- Low hygroscopicity.
- Does not cause allergic reactions.
To connect two separate parts made of this material, you can sew them, or use eco-leather glue.
How to repair a leatherette jacket
Faux leather is a rather difficult material to repair. Therefore, if damage is detected, it is better to transfer the item to specialists for restoration. They will be able to eliminate defects, successfully disguise the repair site, and even replace a section of eco-leather if necessary.
Of course, it is not always possible to take the product to a workshop and you have to think about repairs yourself. Find out which repair products are appropriate to use in each specific situation. So, if a leatherette jacket is cracked, what to do is always a pressing question.
When the scratches are shallow and small, a good solution to the problem would be to use an aerosol bottle with a dye. The main thing is to choose a tone identical to the product. And then, following the instructions on the bottle, it will not be at all difficult to give the jacket a fresh look and disguise the damaged area.
Important: spray it from a safe distance (at least 30 cm) and apply it in a thin layer. This will help prevent the formation of drips on the canvas.
For more noticeable scratches, it is better to use dyes that penetrate deeper into the artificial material. Similar substances with pigments are applied to the jacket with a soft sponge or a special brush and distributed evenly over the surface. After 30-40 minutes, the paint layer dries, and the jacket regains its attractive appearance.
If punctures or deep cuts form on the canvas, you can deal with them yourself by using liquid leather. The instructions for its use in this case are similar to those described above for the restoration of leather products.
Restoring a torn leather jacket in specialized studios: ideas
A better repair of a torn jacket will be done in a studio by replacing a separate part or sewing an overlay on top of the flaw. Below in the photo see examples of restored leather jackets.
Restoring a leather jacket using applique
Replacing a damaged part on a leather jacket Replacing a damaged part on a leather jacket Replacing a damaged part on a leather jacket Replacing a damaged part on a leather jacket Replacing a damaged part on a leather jacket Replacing a damaged part on a leather jacket Replacing a damaged part on a leather jacket Replacing a damaged part on a leather jacket
Restoring a damaged part on a leather jacket
Restoring a damaged part on a leather jacket
How to restore a peeling jacket
As a result of excessively long use or after unsuccessful washing using aggressive powders, a leather jacket may begin to peel. If the damaged areas are small and not in the most visible places, special dyes can be used to disguise them. By being able to choose the most suitable color, you can hide the defects that appear and extend the life of the leather product.
The shabby area can be disguised by gluing decorative elements on top that match the style of the jacket. Such modernization not only restores a pleasant appearance, but also improves it, making it unique.
Tip: It's best to avoid washing your jacket at home. Regular dry cleaning carefully removes various contaminants, maintaining the presentable appearance of the leather product.
Using the above tips and recommendations, you can ensure quality care for your outerwear. If your leather jacket is frayed or cracked, you now know what to do. The main thing is to notice the defect in time, react and apply the right remedy.
Did you like the article? Save it to your Pinterest! Hover over the image and click “Save.”
Useful tips
Before starting to repair a leather or faux leather jacket, write down the algorithm of actions on paper and place improvised instructions in front of your eyes. This approach will help you focus on the process and reduce the procedure time. To make the repair successful, you can use a number of recommendations for working with materials and nuances of decorating leather products:
- When using adhesive tape, it is recommended to first check the adhesiveness on the inside of the jacket near the zipper. The tape should adhere firmly to the surface.
- If glue is used, it works quickly. If the composition dries on things prematurely, the process will have to start all over again, with cleaning and degreasing the area being repaired.
- When deciding to install an external patch, you need to pay attention to the design of the clothing. If there is no similar decor, then the patch is made from the lining side or several similar ones are placed.