When purchasing a new item, people expect to wear it for at least one season. The same applies to the jacket. Sometimes an unpleasant situation arises when a hole appears on a recently purchased item. Don't be upset, because everything can be fixed. You just need to understand how to sew up a hole in a jacket. Before you start repairing a thing, you should decide on a method that depends on several factors, namely, the material and type of hole.
Bolognese jackets are in high demand among people of all ages.
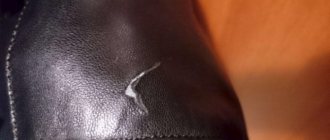
An ordinary coat or any other fabric item can be repaired and get rid of the hole without any problems. As for the Bolognese jacket, things are completely different here. The material from which the item is made is not so easy to sew up. Please note that repair of a hole on a bologna jacket may occur for the following reasons:
- Burn;
- There was a snag on a nail or something similar;
- Blade cut.
If you follow simple instructions, you can sew up your jacket without any problems.
How to seal a torn down jacket
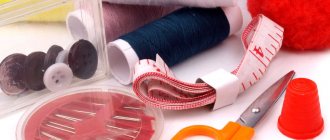
Some people don't know how to seal a hole in their jacket. It's simple: you just need to prepare a little. To work you will need the following things:
- Dry glue tape “Flizelin”;
- A piece of material that matches the color scheme of the jacket;
- Iron;
- Gauze.
Dry glue can be purchased at a store that specializes in selling fabrics and sewing things.
When all the components necessary for the repair are ready, you can begin the repair work.
First, a piece corresponding to the size of the hole is cut from the adhesive tape. After this, you need to put the tape on the pre-prepared fabric. In the next step, a small cut is made on the inside of the jacket. This is necessary in order to get to the damaged area from the inside.
Now all that remains is to place the fabric over the hole, and then, smoothing the edges of the hole, iron the jacket through the gauze. This is the repair
A cigarette is the main cause of burns on a jacket.
finished. It should be remembered that it is necessary to sew up the previously made hole from the inside.
Burnt hole on things
Quite often people are faced with a situation where the sleeve has been burned through. This may have happened due to cigarette ash or after touching a hot object. Regardless of the reason, you must try to eliminate the hole.
The problem can be solved in several ways. It all depends on the parameters of the jacket.
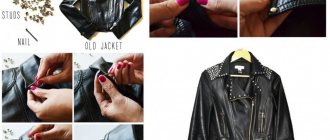
If there are various kinds of rivets or patterns on the clothes, then it is necessary to sew patterns or additional accessories on the burned area.
It should be remembered that it is advisable to make the same patch on the other sleeve.
As for sports jackets, it is better to stick an inscription or picture on them.
How to sew a down jacket near the seam
If the jacket is torn at the seam, there is no need to invent anything. Such a hole can be sewn up with thread. First, it is recommended to visit a haberdashery store that sells suitable threads.
It should be noted that such a gap can be eliminated even without a sewing machine. To make sewing more convenient, the jacket must be placed on the table, first turned inside out. It is important to sew so that the new line is a continuation of the old one. In this case, the seam should be as smooth as possible.
It is most difficult to sew up seams if the jacket has a lining. To make your task easier, you should make a small cut on the inside, which will also need to be stitched up.
How to seal a leatherette jacket?
Replacement jackets can be repaired in the same way as leather ones, but not any glue will work in this case. For example, if you lubricate a leatherette jacket with “Superglue”, it can ruin the product - instead of repairing it, a new hole will appear, since the glue can corrode the material. Therefore, we need to look for safer methods.
It is best to use non-woven tape as it is a very thin material.
The tape is used like this:
- Apply the material to the inside of the leatherette.
- Place a layer of gauze on top.
- Use an iron.
Under the influence of steam, the tape will straighten out and stick well to the surface. The result is an almost invisible patch.
We update the down jacket ourselves
If you carefully repair the damaged area, not a trace will be visible.
If a torn hole appears, you can not only sew everything up or apply a patch. Various types of applications are popular now. You can use this. Thus, you can not only get rid of the hole, but also update your down jacket.
Before mending a tear, you should visit the appropriate store to select a decal or pattern. A similar method can be used if the sleeve or main part of the jacket is torn.
Iron-on adhesives and applications
Appliques and stickers can help out in many cases, but this method has a drawback. You can sew on a pattern or stick on a beautiful picture only where it is appropriate, namely:
- On the sleeves;
- On the chest;
- On the pockets.
In other cases, the stickers will look stupid, which means it’s best to consider another way to fix the holes. If embroidery was chosen, it should be done on a separate fabric, which will subsequently be sewn to the torn area of the jacket.
Braid or tape
You can disguise the hole next to the seam using tape. Many people are interested in the question of how to fix a hole in a jacket so that it is invisible and also beautiful. It's simple, you should use all your imagination. It doesn’t matter what length or color the braid is. Don't be afraid to experiment.
Another way to disguise a hole is with reflective tape.
The advantage of this method is that it will not only hide the defect, but will also make the jacket visible at night. You need to cut a piece of tape and carefully stick it over the gap.
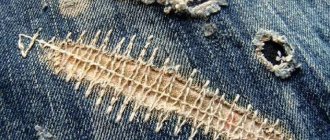
Even very good clothes tend to tear in the most unexpected places. You accidentally ran into a nail, or your favorite four-legged creature decided to let out its claws - and here you are, a hole. I don't want to throw away my beautiful new jacket. And there is no need to rush to the garbage chute. In most cases, clothing can be repaired, and it can even be done without the damage being noticeable.
How to fix a hole in a jacket: video
How to repair pockets or change the lining of pockets in a men's jacket with your own hands
Before you begin the repair, you need to turn the jacket inside out. The easiest way to do this is to rip out a small section of the bottom seam in the lining of one of the sleeves.
Quite often, finished products already have such a hole, stitched on a machine along the front side of the lining. It is technological and served specifically to turn things right side out. You just need to find it. If there is none, you need to rip out the seam of the sleeve yourself.
Through the hole, you need to turn out the section of the jacket with the pocket processed on it and carefully study the technology of its processing. If the latter allows you to easily replace the pads, they need to be marked with chalk (indicate the top and bottom), since they may vary in size. This simple operation will simplify the process of assembling the pocket with new linings.
Then you need to carefully flog the worn pocket linings.
They should be ironed carefully, since new pocket parts will be cut from them.
In general, for the manufacture of pocket linings there is a special fabric, the so-called “pocket”. In essence, it is just high-quality black calico. If there is none, you can use a piece of any other suitable fabric. The main thing is that it is dense and has low fraying and spreading of threads. As for the color of the linings, it is not necessary to opt for a color similar to the color of the jacket, since this part of the pocket, firstly, is practically invisible, and, secondly, made in an interesting color, can even become the “highlight” of the updated products.
Lining fabric should be ironed thoroughly. Then you need to put the details of the whipped lining on it. Use tailor's chalk or soap to outline them. All seam allowances will be taken into account. Then all that remains is to cut out the new linings along the marked lines, indicating whether they are top or bottom.
After this, the new linings should be stitched to the corresponding pocket parts.
Then you need to sew the pocket linings together. This operation must be performed with a small double stitch. Pockets stitched in this way last much longer and are not afraid of any stress.
The restored pocket must be turned back to its original position. The second pocket should be repaired in the same way, after which all that remains is to sew up the hole in the sleeve.
The repair of the pockets is completely completed. Thanks to him, your favorite jacket can serve for more than one season.
Hello, my dear readers)) What a touching and fascinating process is the process of sewing a new product, but since the cold weather has already arrived, I want to sew warm, comfortable things. In my next article I want to tell you how I sewed a men's winter jacket using padding polyester. One of the wishes for this jacket (from my brother, I sewed this jacket for him) was this: to make a pocket with a zipper on the sleeve.
Well, you can’t refuse your brother)), so today I’ll tell you and show you how to make such a pocket with a zipper
. Let's get started...
First of all, we outline the location of the pocket, for me it is on the front of the sleeve near the elbow, we mark the place on both sides by pinning it, usually the length of the pocket can be from 10 to 20 cm, we select the length we need.
Now we cut out from the same fabric as the jacket (in my case, and from the main or contrasting fabric - this is optional) a rectangular strip 5 cm longer than the desired length of the pocket and 7 cm wide.
Now we pin this strip of fabric face to face to the place where we will make the pocket, so that the drawn frame for the zipper is in the center of this strip. Draw a frame, as in the photo below, with a length = the desired length of the pocket and a width of 1 cm.
Now we sew this frame on the machine:
We make sure that the line does not go beyond the frame anywhere, since we will still turn it inside out, this is necessary so that the frame looks neat.
Now we make a cut in the center of the frame and cut along the frame in the center, not reaching the edges by 1 cm. From the 1 cm mark to both corners we make cuts so as not to cut 1 mm. In no case should you accidentally make a mistake and cut more, otherwise the frame will be damaged, since when you turn it right side out, threads will stick out of it in the corners... so be careful.
Since I’m making a pocket on a jacket, I need to cut out the excess insulation from the allowances; of course, in a pocket on trousers or a skirt, this point is skipped)). So let's cut out the padding polyester from the frame:
Now we turn the frame right side out, pin it around the perimeter, or better yet, baste it if you are doing this for the first time or are not sure.
Now we put a zipper underneath and sew it under the frame:
Now, using a special foot for sewing on a zipper, we attach the zipper on the machine along the preliminary basting line, making sure that there are good even angles on the short sides of the frame. To carefully sew a zipper, it is better to first sew the zipper itself on both sides of the frame, and then finish stitching the short parts of the frame, thus fixing the lower and upper parts of the zipper.
On the front side, our zippered pocket is already ready. Now you need to make the burlap pocket.
To do this, cut out burlap from lining or pocket fabric of the required depth and width equal to the length of the pocket + 5 cm.
I would like to note that when the pocket opens, the upper part of one of the burlap will always be visible, so it is recommended to make one burlap from the main fabric, and one from the lining fabric. You can also make burlap from two parts so that the upper part is from the main fabric, and the lower part of the burlap is from the lining (as in my photo below on the right).
This way, when opening the pocket, my brown insert will be visible.
Sew burlap with a brown insert to the top of the frame to the allowances and zipper:
We sew the second burlap to the bottom of the frame to the allowances and zipper, placing the burlap right side to the wrong side of the jacket.
Now we combine the upper burlap with the lower one and sew them together:
In the areas next to the zipper, we sew all the internal parts, placing the stitch in the drawn lines of the frame.
We zig-zag the pocket allowances.
That's it, the zippered pocket is ready!
Watch also the video on how to sew a pocket with a zipper
with facings: And see also another very good detailed master class:
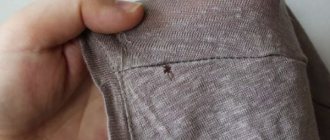
An invisible external seam, made with a thread and a needle on the front side, will save you in an unexpected situation.
Video tutorial: How to quietly sew a hole on the outside of a garment along the seam
If you have a seam torn and it is impossible to quickly sew it up from the inside out, because... there is no access, for example, the lining is in the way.
Photo 1
It is very easy to sew up a torn area. In addition, no lines need to be drawn. The seam line on the fabric will be visible by itself, it has already been created by machine stitching, iron and time (photo 1)
Photo 2 Photo 3
Using a needle, carefully “open” the seam further (photo 2, photo 3). This will release the threads of the remaining seam. Tie them together with 2 knots, thereby securing the remaining seam. Remove the threads from the fabric inside out. Do the same with the opposite side of the opened seam.
Take a thread that matches the color. Thread it through a needle. Make a knot at one end of the thread and leave the other end of the thread hanging freely. For the photo, I deliberately took a thread of a contrasting color to show that the seam would be invisible.
Photo 4
Make a puncture with a thread and a needle on the left half of the seam from the wrong side strictly along the seam line, slightly above the ripped place, pull the thread with the needle to the front side of the fabric to be sewn (photo 4).
Photo 5
Photo 6
On the right side of the product, strictly opposite the thread exit from the left half of the seam, make a puncture with a needle and thread on the wrong side and immediately on the front side, also strictly along the seam line. Stitch length is about 1 mm. Pull the thread to the front side (photo 5, photo 6). Tighten the thread so that the halves of the rupture of the product are connected.
Then, on the left side of the product, strictly opposite the thread exit from the right half, make the same puncture 1 mm long (photo 7). Pull the thread and needle to the front side.
Photo 7
On the right side of the product (photo, make a puncture with a stitch length of 1 mm strictly opposite the thread exit from the left half of the product. As in photos 5 and 6.
Photo 8
On the left side of the product (photo 9), make a puncture with a stitch length of 1 mm strictly opposite the thread exit from the right half of the product, just like in photo 7.
If suddenly your favorite jacket is torn in the most visible place, and you don’t know what to do, check out our article, in which we will tell you how to sew up a hole in a jacket so that it is not visible. There are several ways to make a hole invisible, most of which are universal. Therefore, you should not be upset about a torn item, since the situation is not the worst and can be completely solvable, even without the services of a workshop. Today we will tell you how to repair a torn jacket, depending on the material of the product and the type of hole.
If the jacket is torn at the seam
This is perhaps the easiest option. To solve the problem, just go to a haberdashery store with your jacket to pick out threads that match the color and quality. You can repair such a gap even without a sewing machine. You can simply turn the windbreaker inside out and sew a “back needle” seam in the right place, trying to sew as evenly as possible. Your stitch should be a continuation of the existing machine stitch. To be sure, start sewing a few centimeters before the hole and finish a few centimeters after. If the jacket has a lining, the matter becomes somewhat more complicated. The most correct option is to rip the seam of the lining in the right place, close the hole, and then sew up the lining with a hidden seam.
If you know how to sew very carefully, you can not rip the lining, but close the hole with a hidden seam
Double patch method
Another way of gluing a bologna jacket is the double patch method. It is considered the most durable and reliable. In this case, polyethylene or non-woven fabric is used instead of glue. To do this, a piece of polyethylene is also cut out along with the patch; it should be slightly smaller in size than the patch. Next, the jacket is turned inside out, the edges of the cut are connected to each other, polyethylene is placed on top, and then a patch. Next, they are ironed through natural fabric at an iron temperature of 100-110 degrees.
Sticker or applique?
You can cover the hole with a sticker, embroidery or applique. This method has only one, but very significant drawback. Playful designs, monograms and chevrons are not appropriate in all places. If the hole appears on the sleeve or on the chest, you can say that you are lucky. Find a suitable emblem, close the hole, baste, and then blind stitch or topstitch. If you prefer embroidery, make it on a separate piece of fabric, leaving allowances of about 0.5 cm along the edges. Iron the allowances, and then sew your creation to the sleeve or front in much the same way as is done when decorating Ukrainian embroidered shirts.
If the lining is also torn, you will need to mend it first. Select threads of the same quality as the lining itself
How to sew a lining
Many jackets use inexpensive material as lining - artificial silk, polyester, satin, satin, and less often viscose. When clothes are worn regularly, holes appear in the seam area, which over time turn into large holes.
How to repair a jacket lining:
- turn the jacket inside out;
- select the desired thread color;
- thread the needle;
- cut off the frayed part of the fabric along the edge of the hole;
- Sew the lining by hand using a stucco stitch.
If the fabric delaminates, carefully treat the seam with liquid glue - Moment, Second. If the hole appears in a visible place on the lining, the seam is masked. To do this, use a piece of adhesive non-woven fabric or a patch based on hot-melt adhesive.
In half of the cases, holes in the lining occur in the seam area. If repairs are not done in a timely manner, they increase every day. To repair a broken seam, use a sewing machine:
- set straight line mode;
- adjust the stitch length (optimally 1.5 mm);
- fold the two halves of the lining and clamp it under the machine foot;
- sew, making a 0.5 cm long bartack at the beginning and end.
To ensure that the lining made of artificial silk or satin does not come apart along the seam, sew bias tape.
Hard case
Unfortunately, holes form not only on sleeves and shelves, but also in any other places. And the edges are not always perfectly smooth. If you are unlucky enough to have a “torn wound” on your jacket, you will have to work hard. Buy adhesive interlining at a haberdashery store. The patch should be slightly larger than the hole. Trim the edges of the hole, being careful not to make it bigger. You just need to get rid of the fringe. Then place the interlining under the wrong side with an adhesive layer to the fabric and press it, trying to prevent bulges and wrinkles. Sometimes you can even baste a patch. Cover the hole on top with a piece of gauze and a sheet of thin paper. Iron the entire structure. Remove the gauze and paper. This method is not suitable for any fabric. It’s unlikely that cloth or drape can be sealed, but polyester can be sealed.
You can seal the hole without interlining. Find a piece of the same fabric that the jacket is made from. Cut out a rectangle and glue it on the wrong side with transparent “Moment”. Spread the edges of the hole as far as possible
If a jacket tears in a visible place, it seems that nothing can save it. But what to do if you don’t want to throw away your favorite thing? Don't despair and don't rush to part with her. In many cases, a torn jacket can be repaired, and you can even make sure no one notices the damage. Based on the location and size of the hole, you need to choose a repair method.
Masking a hole
If you do not want to mend the damage to your jacket, you can repair the tear using the following means:
- Decorative patch. There is a wide range of such elements that are used not only for clothing repair, but also for decoration. Patches can be made of fabric, rubber, leather; the latter option is well suited for jackets made of the same or denim fabric and looks organic on them. To secure a piece of material, it must be applied to the tear site and sewn with a hidden seam.
- Reflective tape. This option is suitable for sportswear or children's clothing. The only drawback of this method is its impracticality, since even if there is a small hole in the coating, you will have to sew on a long reflective tape and carry out the same procedure on the other side of the product.
- Fabric thermal sticker. A quick and reliable way to discreetly get rid of a small hole in your clothes. Such stickers are presented in the form of small fabric patches that are attached to any product under the influence of temperature. They should be placed at the site of damage, a layer of fabric should be placed on top and the area should be carefully ironed.
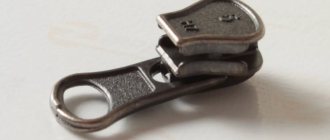
Another option to disguise a hole is to attach a zipper, rivet or button. This method will help not only with covering the hole, but also with decorating a previously unremarkable item.
Decorative patch
If the item is torn at the seam
Perhaps this is the easiest option, which will not be difficult to cope with. To prevent the seam from being visible, be sure to select threads that match the color and quality of your jacket. If there is a lining on it, before starting work you will have to rip the seam of the lining in the place where it will be easiest to get to the damage.
The hole can be sewn up with a sewing machine or by hand, using a backstitch. Try to sew as evenly as possible: the new line should be a continuation of the existing one. To make the seam more durable, start it a couple of centimeters before the hole and finish a few centimeters after. When the job is complete, don't forget to sew the lining back on.
If you already have certain skills, then the jacket can be sewn with a hidden seam. You don't have to rip off the lining to do this. At the beginning of the stitch, insert the needle from the wrong side so that the knot remains inside. Then, on the outside, make parallel stitches so that the distance between them is the same. At the end of the stitch, all that remains is to secure the thread with a loop stitch and hide it with a needle inside the product.
Invisible seam – “Hemming”
It is not difficult to guess from the name what this seam is intended for. It is used if you need to reduce the length of trousers or sleeves manually. In this case, the excess fabric is not trimmed, but tucked under. You can also sew a drawstring using this method and insert an elastic band into it. For example, to narrow a dress at the waist.
An invisible hem stitch looks like this:
The difference with the classic filing method is obvious:
How to hem trouser legs step by step:
- Measure the desired length of the trousers. We celebrate with soap.
- Fold the excess fabric to the wrong side 1-2 times. Secure with pins.
- Take a thread that matches the color of your trousers, insert it into a needle, and tie a knot at the end.
- Place the needle under the folded fabric. Inside it we make a stitch of 0.7 cm and bring it out through the edge of the fold.
- We pick up 1-3 threads on the fabric to which we sew the hem.
- We insert the needle into the fold in the place where the thread came out. Make a stitch of 0.7 cm.
- We pick up 1-3 threads on the fabric under the hem and return the needle to the edge of the fold. Making a stitch.
- We continue to sew in the same way. To prevent the fabric from wrinkling, do not pull the thread too tightly.
Video instruction:
What to do in more complex cases?
Unfortunately, the jacket does not always tear strictly along the seams. In this case, returning it to its proper appearance is much more difficult. If you sew up a hole in the usual way, even very carefully, the seam will still be noticeable.
You will need non-woven fabric with an adhesive thermal backing. It is sold in haberdashery stores in the form of ribbons and scraps. The size of the tape (or shred) should be slightly larger than the hole. If threads come out at the cut site, carefully cut them off so that there is no fringe. Then, under the wrong side, place the interlining with the adhesive side to the fabric and press it well so that there are no wrinkles or blisters. Carefully connect the torn edges without overlap. Cover the hole with gauze on top and iron thoroughly.
This method is not suitable for any fabric. It will be easiest to seal a polyester jacket. But it is unlikely that it will be possible to seal the cloth or drape.
If the jacket came with a repair kit, you can use a patch from it. As a rule, very small pieces of material are placed in such sets. Therefore, this method is suitable for small holes. It is better to use powdered hot melt adhesive for clothing. Lay the jacket out on a flat surface and place the patch directly under the hole. Using a small spoon, spread the glue over the patch. Then iron the jacket through gauze or fabric over the entire area of the patch.
Features of the material
Bologna is a synthetic fabric that consists of a dense weave of polymer threads. It is smooth to the touch, thin and airtight. Often used to produce waterproof clothing.
Bologna jackets are popular because the material has the following properties:
- lasting;
- easy;
- does not wrinkle;
- practical;
- does not get wet;
- resistant to acids, alkalis, mold;
- it's easy to take care of.
Such jackets protect from wind and rain, but are very fragile. Any sharp object can leave cuts on the surface; holes also appear from exposure to high temperature. Therefore, the problem of how to seal a Bologna jacket is familiar to many. There are several simple ways to do this without being noticed.
How to decorate the damaged area?
In sewing stores you can easily find emblems, stickers, ribbons and other decorative elements of a wide variety of themes. But they have a significant drawback: they are not always appropriate. Such elements will look more harmonious on the chest and sleeves.
- Decorative patch. Find a suitable patch and baste it to the jacket so that it covers the hole. Then all you have to do is topstitch it or sew it with a blind seam.
- Leather or denim patches in the shape of geometric shapes will look harmonious and interesting on the jacket.
- Thermal adhesive for fabric. To apply it, attach the sticker to the jacket, cover with cloth and iron. If such a sticker looks too lonely, you can stick another element of the same theme on the other side.
- A cut or small hole in a child's or sports jacket can be sewn up using reflective tape. It is better to sew it not on one section, but around the sleeve or the entire jacket.
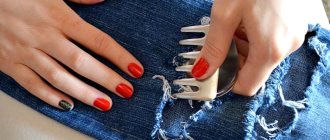
- A straight hole can be decorated using a short zipper sewn along the cut line.
These methods will help not only solve the problem of a torn jacket, but also make the item more interesting and even exclusive.
Sometimes unpleasant situations happen when outerwear is damaged, so that holes form on the surface. It’s good if the defect is formed along the seam, but holes sometimes appear in the most inappropriate places - for example, on the back of a Bologna down jacket or on a sleeve. Such options can be fixed with a patch or mended, but there are other ways to eliminate troubles.
Sealing leather products
Despite the high quality of such outerwear, it is also subject to some damage that can be disguised at home. Most often in this case, universal glue “Moment” is used. If the damaged area is on the sleeve, then you need to turn the jacket inside out and tear off the lining a little. The jacket should be straightened in order to correctly cut a small piece of fabric, the diameter of which will correspond to the existing hole. Fixing glue must be applied both to the patch itself and to the defect site. The adhesive composition should be fixed (this procedure takes no more than 30 minutes).
When the material dries, you can apply another layer of glue. Only now can the patch be glued to the jacket. Place a press on top of the area to be treated and leave it for 3 hours. When the item dries, you need to check whether the edges of the attached patch are coming off. If everything is fine, then you can safely sew up the lining.
Types of holes on a jacket
Winter and demi-season clothing, unlike a shirt or trousers, has a top layer, which is most often damaged, and an insulating lining with filling. The resulting defects on the product can be of the following types:
- A cut. This could be a knife blade, glass or any other sharp object.
- Burnout. It is formed due to thermal or chemical effects on polyester, melting it.
- Hook. Formed when interacting with objects, leaving a torn area.
If the damage is located in a less noticeable place - for example, a pocket, armpit, side seam or bottom of the product, then it is better to sew up or seal such holes. If an unpleasant hole is located in a visible place, it should be disguised using patches or stripes.
Making patches
To eliminate a defect in a product, you can mend the damaged area, glue it, or use a decorative patch. To understand how to repair a hole in a down jacket, you need to know the composition of bolonium for gluing. Before starting the process, you should carefully study the jacket labels
, which describes the effects of temperature and agents when processing fabric.
Darning is not always appropriate for jackets with a feather or down base, since the outer material is very thin, and due to impregnations it has a certain density. Closing a hole in this way can lead to the formation of a sloppy seam.
To make patches, it is advisable to choose a material identical to the composition and color scheme of bologna in order to avoid melting and deformation of the fabric. The patch for the hole is cut out slightly larger than the required size. Its shape can be varied - from the usual squares and stripes to shapes in the form of fruits, smiley faces, etc.
Patches and accessories for decorating defects
Eliminating holes in jackets is possible with the help of stripes, but they must be used in those parts of the product where they are appropriate. Using embroidery as a separate element, for example, a company logo or a thematic image, is better on the sleeves, front of the product or in the pocket area.
In this case, the patch pattern should be selected in accordance with the color and size. In stores you can find such emblems with adhesive coating on the reverse side
, which is attached to the site of damage using a thermal method. The process takes place using an iron; in addition, you can manually sew the part to the defect site, masking it.
If the cut is long and narrow, decorative or reflective tape is used to hide the defect. Having cut off a piece corresponding to the length, attach it to the damaged part using glue or heat-shrinkable web.
You can decorate the area using metal or plastic fittings, then the repair site will be invisible. Depending on the appropriateness of the use of parts, these may be:
- A row of buttons.
- Making eyelets in place of the hole.
- Installation of buttons or rivets.
- Decorative braid.
The fittings can be installed at home, and the necessary parts can be purchased at the nearest fabric store. If the installation is difficult, the product can be taken to a specialist for repair.
Repairing a burnt hole
The hole from the burn must be eliminated. This problem can be solved in different ways, depending on the size and style of the product, as well as the volume of the burn. Let's consider solution options:
- If the product has different rivets, embroideries, patterns, then sew additional fittings in place of the burn.
- A whole burnt hole has appeared on the jacket; it should be masked with patches on both sides (front and back) and add a patch that matches the item. First glue the patch on the wrong side, and cut the second flap a little larger than the hole. Then glue the patch on the front side, disguise the patch with applique or embroidery.
- If the hole is on the front of the garment, cover it with a patch pocket.
- You can hide a hole on a sleeve, chest or pocket with iron-on adhesive or embroidery.
Important! For men's jackets, choose decorative elements in a strict, understated style, such as patches made of leather. For children, patches with their favorite characters or cars and emoticons are suitable.
There are many ways to fix things, choose your favorite and get to work. If you doubt your abilities or the hole is too large, then contact a sewing studio for help.
Repairing damage
Before you seal the down jacket, you need to figure out what is the best way to do it. The properties of warm jackets today are lightness, waterproofness and protection from the cold
. But, despite meeting all these qualities, the product does not have sufficient strength and can be easily damaged. The defect can be eliminated by sealing the cut.
To seal the hole with glue, you should use a rubber or caoutchouc compound; it is suitable for fabric. In this case, heat treatment is not needed; sizing can be done at home, for which you will need:
- Glue.
- Finished patch.
- Scissors.
If the hole on the bologna jacket has uneven cuts, then they need to be edited with scissors, giving it a shape. The step-by-step sizing process is as follows:
- The reverse side of the jacket, as well as the patch itself, is degreased by applying acetone or solvent using a cotton pad.
- Apply a thin layer of glue to the treated surface with a brush or cotton swab.
- Apply a patch from the wrong side, closing the tear, pressing with a press, which can be a switched-off household iron.
- The product should lie under pressure for several hours for better adhesion and penetration of the glue into the fibers of the fabric.
- After drying, you can evaluate the front side; if it looks unaesthetic, you can create decoration using a patch or braid.
If the place is inappropriate for embroidery, then the outer patch should be glued using the same principle, taking into account the tone of the material. In this case, for masking you will need 2 identical patches.
How to seal a hole correctly
Elimination of the defect occurs thermally in several ways, using non-woven material or fabric for a patch on a jacket with an adhesive base. Both options are effective and the results are the same.
To eliminate a malfunction using a thermal method, you need to have in your arsenal:
- Cobweb. This tape is produced using a non-woven method and is completely impregnated with glue. When exposed to iron and temperature, it dissolves, tightly gluing the parts.
- Scissors.
- The patch that needs to be cut is slightly larger than the area where it will be sealed.
The repair process that is effective for cuts or snags is as follows:
If a hole has formed in the burned area, and it is impossible to combine the damaged sections. In this case, when making repairs, it is better to use 2 patches, one of which, together with the adhesive base, is inserted into the hole, and the other is placed on top and secured with an iron.
Sewing a jacket at the seam
If the product has come apart along the seam, how to sew it up correctly - the repair procedure can be done manually or by machine
. To do this, you will need threads to match the color of the fabric, a needle or a sewing machine. If the jacket is unlined, turn it inside out and stitch along the seam. if there is lining fabric, in one of the places on the inside it is necessary to rip the seam and work your way through it to the place of the flaw, forming a hidden seam. After which the inside of the product is put in order.
With the manual method, for a strong connection, a thread is inserted in two folds into a needle. They lay a seam, making a stitch and going back, or quilt the area of the defect with a “goat”. If possible, it is better to check all the seams on the Bolognese jacket and, if there is the slightest visible break in the stitching on the wrong side, sew up the product, reinforcing the seam. Otherwise, in the near future the down jacket may tear in another place and the procedure will have to be repeated.
Sewing a hole with a blind stitch
The hidden seam is placed on the wrong side of the jacket. The method is good for dense fabrics used for the top of the product. There are several options for how to sew with a hidden seam; the jacket is turned inside out and the hole is mended. Or they carry out the procedure by carefully fastening the sections along the face of the product with an invisible seam, simulating a thread surface.
The hidden seam does not always look harmonious; damage can be of different shapes and sizes. For example, if you burn through the fabric, you can repair the down jacket if you have a patch without gluing.
What kind of glue will help?
When choosing glue for repairing a jacket, you must be guided by several principles. The composition should be:
- waterproof;
- elastic;
- colorless;
- resistant to light and temperature changes;
- do not change the structure of the fabric;
- have a thick consistency;
- do not spread;
- Don't freeze instantly so you have time to make changes.
Among the wide variety of adhesive compositions, you can choose an option suitable for a specific fabric and the nature of the tear.
Polyurethane
This type of glue reliably connects surfaces because it is made on a synthetic basis. It is produced in hard and elastic form. The second option is suitable for repairing jackets, down jackets and other fabric products. It has high adhesion and excellent resistance to temperature changes.
Polyurethane glue performs equally well at temperatures from -50 ⁰С to +120 ⁰С.
Rubber
The adhesive composition, which is based on rubber, is highly elastic and can be used to work with leather, fabric, rubber, glass, and wood. Latex rubber adhesive contains casein, which gives it additional elasticity and water resistance. Seams can be glued with styrene rubber-based glue. The composition, which includes natural rubber, is used to glue leather and fabrics together. It has high elasticity.
Polyvinyl acetate
This type of glue is well known to users as PVA. It can be used for fixation “temporarily” and “permanently”. Usually this glue is washed off after washing, since it does not tolerate moisture. But currently they produce polyvinyl acetate glue with high moisture-resistant characteristics. If desired, you can even find two-component adhesive compositions on sale that can withstand direct contact with water. They are best suited for repairing down jackets and down jackets.
Neoprene
Neoprene adhesive makes it easy to make on-site repairs. It dries in less than a minute and forms a strong bond that is flexible and durable. An adhesive composition based on neoprene can easily withstand elevated temperatures and is recommended for gluing elements made of leather, fabric, and rubber. The glue is transparent, waterproof, and can be used to repair jackets and down jackets.
Hot melt adhesive
Safe and non-toxic hot melt adhesive can be used to glue fabrics together. It is applied using a glue gun, which allows the composition to be distributed evenly over the surface. Hot-melt adhesive takes the form of rods that are melted in a gun, or powder for preparing the adhesive composition. The advantage of hot-melt adhesive is its speed of action.
Adhesive aerosol
The difference between aerosol glue and other types is that it can be applied using a spray can. The sprayer allows you to create an even layer of glue and fix materials in places that are difficult to reach for other types of glue. The connection it creates is elastic, the can is sealed, and the consumption is economical. You can apply several layers of adhesive. Complete drying occurs after 20 minutes.
See also
Description and characteristics of Loctite glue, instructions for use
Polyvinyl chloride
This type of glue is produced in the form of an aerosol. It is sprayed in an even layer on one surface, the second is applied on top and pressed with a press for two hours. Complete drying occurs after 6 hours. The adhesion of polyvinyl chloride glue is high and can be used for different fabric textures.
Creative approach to renovation
When eliminating a hole from any damage, you should use your imagination. It all depends on the location of the flaw. For example, if a tear in the material occurs in the chest area, you can use decorative stripes. And if there are pockets with zippers, disguise the cut with a short zipper.
When creating holes at the elbows of things, it is important to maintain symmetry
and put the patch on the other sleeve. If the fabric is damaged on the back of the yoke, you can put a large patch the size of the part; in this case, gluing is not necessary, just carefully cut the fabric to size and sew it manually with a blind seam to the product. Or use a sewing machine and stitch along the face.
For children's products, an option on how to sew up a jacket would be to make patches in the form of cars, hearts, flowers or geometric shapes. Or collect knitted braid in the form of a bow, a flower, and with this voluminous composition cover the area of the flaw.
Attention, TODAY only!
Down jackets have become an indispensable element of insulated clothing for the winter period. During use, the fabric may become damaged from cuts, cigarettes, or snags. The appearance of the product deteriorates instantly, especially if the hole is in a visible place. Find out how to correct the situation in this article.
Damage to the fabric surface of the product can occur in many cases. In this situation, it is not necessary to contact the studio. With a few skills and helpful tips, holes and cuts can be carefully repaired with your own hands.
Key ways:
- glue;
- make a patch;
- sew up.
Before carrying out repairs, it is necessary to prepare tools.
They are prepared depending on the chosen method.
Tools:
- fabric for a patch to match the product;
- threads to match the product;
- needle;
- sewing glue;
- scissors.
Now you can take a closer look at the work process.
Sew up carefully
First of all, you need to pay attention to the damage itself. If the hole is small, with smooth edges, it can be picked up with threads.
In order to sew up a cut or hole, it is necessary to treat the damage itself.
Carefully trim any protruding threads. If the hole is caused by a cigarette, you must carefully cut off the area where the tissue was burned. For greater convenience, you can use small nail scissors.
When the edges are processed, you can proceed directly to work.
To do this, we will need threads to match the product.
If you couldn’t find any, you need to use a shade that best matches the color of the down jacket. The seam can be laid either from the outside or from the inside, depending on personal requirements.
If the stitches will be located on the outside of the product, you must carefully sew the damaged area with a zigzag seam. A few stitches will be enough for this.
In the case of an internal seam
the process is somewhat more complicated. First, we remove the damaged edges. Then, from the wrong side, carefully rip the down jacket and find the place of damage. Slightly bending the edges, sew with a small stitch. When the work is finished, we sew together the previously opened wrong side. The down jacket is repaired.
Reference!
When sewing externally, you can also use a loop stitch (in the shape of the letter P), which is applied with small stitches.
Cover it up discreetly
Bonding damaged tissue has a similar process.
If a hole appears when the fabric is burned, carefully cut off the damaged edge. Lightly grease the material with special fabric glue, carefully fold it inward and glue it together. In most cases, it is recommended to leave the product for several hours to wait until the glue has completely dried.
Many needlewomen go a different route. If damage or scorching appears on the shelves, pockets or sleeves, they are repaired with various applications. Any drawing is suitable for this, depending on personal preferences or hobbies. The application is best used with a special adhesive layer
m. This process is characterized by simple steps and a minimum amount of time.
Making a patch
In most products, manufacturers include an additional piece of fabric with the down jacket. It is intended to test the product before washing or is used as a patch. If there is no spare material, the situation is somewhat more complicated. You can find a scrap that is as close as possible in color and structure to the color of the down jacket. If this was not possible, if both sides of the down jacket match, you can carefully cut off a small piece from the inside of the product (for example, the lining).
Reference!
Additional scraps can be found at specialty craft stores. For greater convenience, you should buy fabric with an adhesive base.
The best option would be to glue a patch.
To do this, carefully process the uneven edges and cut out a small piece from the scrap that is identical to the damage. Lubricate the underside of the patch with glue and carefully press it onto the torn part. For a more reliable fixation, you can place a heavy object on top and leave it for several hours.
With a few simple steps, the patch is ready.
- When gluing a patch, it is better to use tweezers for more comfortable work.
- It is necessary to use only transparent and waterproof glue suitable for working with fabric materials.
- When correcting a patch with uneven edges, it is recommended to first trim the edges to make them smooth.
- When using stickers and appliqués, you must first sew up the scorch mark. This will help prevent the fabric from unraveling in the future.
- You can use a sewing machine to sew a zigzag seam.
- It is recommended to select applications and stickers in accordance with the style of the product. For a classic down jacket - flowers or bright designs, for sports models - badges or symbols of popular youth brands.
Conclusion
Every person regularly experiences damage to their clothing. Particularly disappointing are holes and cuts in winter clothing such as a down jacket. With a few simple skills and our helpful tips, you can fix most holes yourself at home.
Suitable methods for other types of fabric
Methods for masking holes and defects depend on the type of jacket fabric. Duspo, taslan, leather, and taffeta are most often used for sewing outerwear. They have different densities and structures, so repair methods will differ in each specific case.
Features of repairing jackets made of different materials:
- Leather. It is recommended to use thick fabric or pieces of leather to seal the holes. They are sewn on by machine or glued with rubber glue - Moment, Hvat, Special Glue.
- Duspo. Mostly sports jackets are made from thick woven fabric. Therefore, patches with inscriptions that are glued or sewn on are ideal for sealing cuts.
- Taslan. Dense material with grosgrain weave is frayed, as it contains reinforcing nylon threads. Therefore, to mask defects, it is better to use chevrons based on hot-melt adhesive. If the seams diverge, the jacket is ripped open and bias tape is placed on the wrong side.
A patch is one of the simplest ways to reanimate jackets with defects. Depending on the size of the tear, scratch or hole, adhesive-based stripes and chevrons, braid, bias tape, appliqués or zippers are used as patches. If you do not know how to sew, then a suitable piece of fabric can be attached to Moment glue or non-woven fabric.